/Furniture/Bar counter and island/
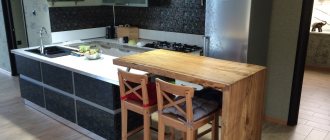
An exclusive and stylish kitchen interior almost always includes a bar counter. It can be located not only in the kitchen, but also serve as a separator between the kitchen and the dining room, the kitchen and the living room, and can become a home minibar. The process of creating such a structure is not too expensive, but requires preliminary preparation and design.
If you can harmoniously fit the bar counter into the interior of the kitchen, then it will become its central element. However, it is worth remembering that a bar stool is not as comfortable as a traditional dining chair, and therefore there should still be a separate table for family dinners. However, modern designs can solve this problem, and our article will help answer your question: how to make a bar counter with your own hands? In “studios” this design will become an excellent zoning element, separating the relaxation area from the place where food is consumed, and will also allow a friendly group of guests to settle down.
Advantages and disadvantages of a bar counter
Pros:
- Firstly, space zoning. The counter visually and not only divides the room into two parts - the work area where food is prepared, and the eating area. Or, if you are the owner of a studio apartment or have a kitchen adjacent to the dining room, the bar will serve as an excellent dividing line between rooms.
- Secondly, the bar counter can be used as a table. Also, having equipped it with all kinds of cabinets, you can hide the necessary kitchen utensils, food, etc. in it, which will significantly save space.
- Thirdly, making a bar counter yourself is not difficult even for a beginner. The main thing is to know how.
- Fourthly, bar counters are unique. It’s unlikely that many of your friends and acquaintances can boast of such a decoration for their kitchen.
It has only one drawback - such a kitchen set takes up a lot of space and is not suitable for apartments with small kitchens.
Features of the loft style in the interior
The loft style began its history in the 20s of the 20th century, when many abandoned warehouses and industrial premises appeared. These objects began to be used as residential apartments, and it was then that the main canons of the loft style were formed.
- There should be maximum free space in the room.
- Walls and floors should contain a minimum of decorative finishing. For flooring, wooden boards or concrete-style pouring are suitable. Brickwork or rough plaster will look good on the walls.
Important! We remove as much as possible from the kitchen all plasterboard panels, suspended ceilings, linoleums, and so on. Window openings should be as large as possible.
- All household appliances and decorative parts should either be ultra-new, sparkling with chrome and steel, or things that are a little shabby with traces of rust or small chips of enamel are suitable.
- No clutter of furniture - everything is only the most necessary.
- The room is divided into zones conditionally using lighting or a color palette.
- The kitchen should be as brutal and urban as possible.
- For countertops of bar tables and work areas, it is better to use materials such as: plastic, glass, stone, wood.
Loft does not tolerate low ceilings, so it is better to choose this style of decoration for your kitchen only if it has sufficient area.
Types of bar counters
Depending on the design, the following types of racks are distinguished:
- Wall Rack: As a rule, it finds wide application in kitchens with medium square footage. It is distinguished by the small width of the tabletop and its location, where one side is tightly placed against the wall, and the other side has a free approach.
- Continuing the kitchen furniture: the counter is placed perpendicular to the work surface. Widely used in studio apartments.
- Partition: The height of this bar counter is much higher than the previous ones and special bar stools are purchased for it. It does not come into contact with any kitchen unit and serves as a separation between rooms.
- Island counter: It is placed in the middle of a large, spacious kitchen. A niche is made in advance for a microwave, oven or drawers for storing cutlery and so on.
Types of structures
Before you start choosing materials, you should think in advance about what kind of design you want to see in your kitchen. The bar counter consists of two elements - the base and the tabletop, the size and shape of which can vary depending on the financial capabilities of the owner and the size of the room itself.
Based on this, the following types of structures are distinguished:
- Monoblock: The shape of the base resembles a square or rectangle, while the tabletop itself can be of any shape and size. Individual cabinets can be built into the base.
- Pipe stand: Very popular in small spaces. On one side, a metal pole runs through the stand from the ceiling to the floor, acting as a support, while on the other side two legs are attached to it.
- Multi-tiered: The tabletop is divided into several levels. This division is very convenient, because depending on how this or that idea is implemented, the levels of such a rack can serve both for storing food and dishes, and as a table for preparing food and the counter itself;
- Support point: This design is a tabletop, which on one side rests against a table or wall, and on the other side one leg is attached to it.
Types of fasteners
In order for the installation of the countertop to be carried out efficiently, the fastenings of the bar counter must be reliable. The following are used as fastening elements:
- pipes with a diameter of 50 mm;
- flanges;
- adapters;
- tabs;
- plugs;
- folding mechanisms.
Separately, it is worth noting the accessories that help make more efficient use of the usable space of the room.
To install the countertop, you definitely need the appropriate fittings. The classification depends on the type of fastening:
- Shelves mounted in the center of the pipe and installed at the desired height. They are usually round in shape, but there are also cone-shaped ones. These are fruit bowls, glass holders, various shelves on which you can store small items, cutlery, and spices.
- Rotating shelves. You can change their position due to the railing, which is attached to the pipe. It is convenient to use such accessories in limited space. Fruit bowls, cutlery hangers and other accessories are equipped with rails.
- Shelves installed on the ceiling. This system is great for storing bottles, glasses, glasses. In addition, with its help you can make your kitchen more modern and stylish.
How to make a bar counter with your own hands
As mentioned earlier, even a beginner can make a bar counter in the kitchen if only he devotes enough time to study this issue.
The work of making a rack is divided into several stages:
- Execution of the drawing taking into account actual dimensions;
- Material selection;
- Purchase of materials and processing;
- Installation of the structure.
The bar counter can be made of wood, plasterboard, stone or brick. Some designers advise choosing the same material for the tabletop and base so as not to disturb the harmony, however, on the Internet you can find a lot of examples and combinations of two different ones.
Depending on what material you will be working with, special tools are selected, however, there is a standard set of tools that you cannot do without:
- Level;
- Screwdriver Set;
- Screws;
- Hammer;
- Screwdriver;
- Paints;
- Brushes and rollers.
To work with wood, you may additionally need screws, baseboards and varnish, and for stone - cement.
Working with different materials has its own characteristics, which significantly affects the work process.
For a plasterboard bar counter, first of all, a metal frame is made.
- The tougher it gets, the better. The walls of the frame are connected by transverse profiles.
- The structure itself is attached to the floor using dowels.
- After testing for strength, drywall is attached directly to it.
- The cracks and gaps are sealed with sealant, after which the stand is painted.
To make a bar counter out of wood, follow the same pattern as when working with drywall.
- The only difference is that the frame is made of wood from individual bars.
- First, markings are made on the floor in those places where the structure will be attached, then they proceed directly to the fastening.
- After this, the frame is sheathed with wood.
- The tabletop must be perfectly sanded, treated with special materials that serve as anti-flammability agents, and then varnished.
Cost of materials
- two oak boards 30 mm thick, area 0.65 m2 = 0.65 x 445 rub. = 290 rub.;
- steel square 4400 x 30 x 30 mm = 4.4 x 60 rub. = 264 rub.;
- steel strip 3200 x 30 × 4 mm = 3.2 x 24 rub. = 77 rub.;
- steel corner 2400 x 40 x 40 mm = 2.4 x 116 rub. = 278 rub.;
- soil jar GF-021 0.9 kg = 70 rub.;
- jar of enamel for metal 0.9 kg = 320 rub.;
- dowels for concrete – 8 pcs. in stock;
- furniture varnish PF 170 - 0.5 l. = 50 rub.;
- screws 30 mm – 16 pcs. in stock.
Total: 1350 rub.
Lighting and accessories
Well-thought-out lighting can also become a kind of accessory, placing the necessary accents and creating a special atmosphere.
- Alternatively, several chandeliers can be installed under the ceiling above the bar counter, which looks very stylish from the outside.
- In addition, you can specially make a suspended ceiling into which to mount several light bulbs.
- You can play with their color and lighting power. A dimer is perfect for this, as it allows you to change the light intensity.
Standard accessories for a bar counter include coasters with dishes, multi-tiered fruit stands, baskets with sweets and cookies, and so on.
Your imagination shouldn’t be limited to this list; don’t be afraid to experiment and come up with something of your own.
