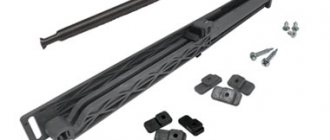
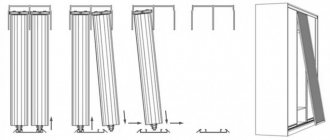
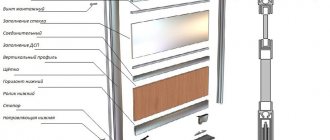
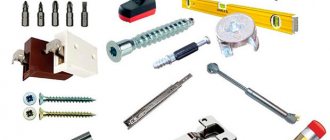
Hello everyone and good day! The topic of our conversation today will be a door closer for a sliding wardrobe. This is an example of modern fittings that are equipped with furniture in order to increase the ease of use and increase its service life.
In addition to handles and hinges with closers, the elements recommended for installation include a door closer under the compartment. This device allows you to close the doors quite smoothly. This eliminates clicks, knocks and unnecessary noise. Schlegel performs similar functions, although the latter has somewhat different tasks. You can read about this at the link.
From this material you will learn which closers you can buy, which one to choose and how to install them on the sliding system of a modern coupe. In fact, installation can be done by yourself. There are visual videos and fairly detailed instructions for this. Please note that additional adjustment of the wardrobe doors may be required.
Ikea door closer
Difficult? Let's do it - assembling Ikea furniture - at your home or office!
The manufacturer makes changes to the technical characteristics of its product over time to improve the quality of the parts.
► How to properly disassemble Pax wardrobe doors?
Additional options include door closers and interior lighting using photo elements. Attention was also paid to filling the cabinet, including auxiliary elements. In our opinion, the instructions for assembling the Pax wardrobe, developed by Ikea, best show the step-by-step sequence of connecting parts and all the nuances of assembly; only the inattentiveness of the assembler and external factors can lead to errors.
► How to assemble a Pax wardrobe with low ceilings?
When installing a wardrobe on their own, the buyer sometimes encounters certain problems.
The Pax wardrobe doors touch each other and do not move well along the guide.
1. The doors are mixed up. On older cabinet models, the vertical frames of the front door are wider than on the inside. The frames of the door closest to the cabinet frame are marked “A”. It is necessary to rearrange the roller system on the doors.
2. Do not tighten the screws when tightening frames or installing rollers. If the screw cannot be fixed - it is torn off or does not “go” along the thread - it is unscrewed using pliers, we “drive” the thread with a tap, and tighten the screw.
3. The roller has come off the guide, the door stop is not closed. We install the roller and bottom bracket into the guide and fix the limiter.
4. A foreign object has fallen between the doors.
5. Changes in cabinet geometry: uneven floors, uneven screeding of cabinet frame sections, fastening to the wall, which caused the cabinet to bend. Level the structure and eliminate all unevenness in the cabinet frame.
The closet door knocks when opening.
1. The wheel in the roller system is deformed. If the wheel is chipped, replace the roller bracket.
2. Visually inspect the roller wheel and remove any adhering particles of debris.
3. Sand in the top guide. We remove dust and other objects from the guide groove.
It is impossible to hang an assembled door.
Move the limiter on the inner door to a horizontal position, then hang the door - then move it to a vertical position - the door is locked.
Updated interior door roller! To open the lock - press on the appendage and pull it down. Secure the pax wardrobe door - pull it up until it clicks.
On the outer door the limiter is towards you, after hanging it - away from you.
Updated roller for the outer door of the Pax wardrobe! To open the lock - lift the element and pull it towards you. Lock the lock away from you until it clicks.
The Pax closet door rattles.
1. The density of the internal elements of the door is lost. Older models were equipped with rubber bands and foam stickers; perhaps over time the rubber bands lost their rigidity or popped out. There are often cases when the client himself removes the seal from the door frame during assembly, citing the reason that it was difficult to insert, which is absolutely not necessary to do, since the door will subsequently rattle when opened. More details - how to remove the door from the Pax wardrobe.
2. The screws are not tightly secured when assembling the doors and installing the roller brackets.
Drawers hit the doors when rolling out
1. Adjust the doors.
2. Move the bumper on the upper guide to the desired position.
3. Install the cabinet frame level, aligning the doors.
The back wall is falling out.
According to the assembly diagram of Ikea furniture, the Pax cabinet is attached to the wall of the room - this is what the Ikea manufacturer provided. This is not only for safety reasons, but also for the smooth movement of doors and the tight fit of the back wall of the cabinet to the wall of the apartment. If for some reason you refuse to drill, replace the nails with self-tapping screws.
There are not enough screws to assemble the doors.
Read the instructions carefully; not all holes are screwed into all the holes when connecting door frames. After installing the device for smooth closing of doors, the screws in the roller mechanism fastening are replaced and three extra screws remain.
► video of the assembly of the Pax wardrobe from Ikea
Correct installation of door closers - a device for smooth closing of doors
Let's do it - assembling an Ikea cabinet - at your home or office! When installing a wardrobe on their own, the buyer sometimes encounters certain problems. 2018-11-27T21:16:20+00:00, Furniture Service Masters
Source
Device for soft closing of IKEA doors
Farid, then only if the hinges are defective.
Why didn’t you buy integral 125 hinges? They definitely don't slam with the stoppers of the Utrusta-125). They are approaching the Bergsbu.
Here is a photo for you, I have a Pax at home with a mirrored Vikedal, a photo of just an integral hinge 125 and a photo of the same hinge but + a soft closing stopper 125
These hinges are not suitable only for the STOROS door, but the smooth pax hinges from the STOROS door DO NOT FITNESS ALSO))))
Mikhail, do you get three sets of hinges that are defective? Since all three doors close like this. We didn’t choose these hinges, we liked the cabinet as it was in the store, the seller added everything to the checklist.
I'm sinning on an uneven floor, an old Stalinist house, old parquet.
Farid, use a level to check the evenness of the installation. I wouldn’t buy the smooth Pax hinges even for 300 rubles for many reasons: 1) they damage the sidewalls of the Pax during installation 2) they are difficult to install, they don’t snap to the wings but are put on in the old-fashioned way through screws And put on all 4 so that they fit even with me It didn't work the first time. But I saw that some of them were standing upside down and changed their clothes until everyone was sitting down properly.
Maybe you didn’t have all the screws in the hook? Then yes, there will be clapping too. Check carefully to see if a couple of loops are standing in a hump. Higher than expected. Then it will clap too. Because Didn't fit into the hook at two points. But only one at a time.
Farid, the wing is the part that is attached to the side of the frame (disconnectable from the hinge!)
Source
How to install and adjust a door closer: a guide for beginners
Many mechanisms are produced to carry out routine processes. For example, you don’t have to try to close the entrance doors tightly. A special device will do this. It will forcefully press the blade against the seal and slam it shut so that the valve operates. Let's figure out how to install a door closer and adjust it correctly.
Features and types of design
The prototype of the closer is an ordinary spring, one edge of which is attached to the box, the other to the canvas. It stretched and forced the door system to close. The modern mechanism has not undergone any significant changes. The principle of operation has not changed. The spring, but more powerful, is filled with oil inside a reliable metal case. In this state, it is capable of not only closing the door panel, but also slowing down in the process.
Given the variety of door designs, mechanisms with different closing forces are produced. According to the EN 1154 standard, they are divided into seven classes: from EN1 to EN7. The first gives the weakest effort, the last - the maximum. When choosing a device, the weight of the canvas and its width are taken into account. These values are specified in the characteristics of each class. If the parameters of a real system belong to different classes, choose a mechanism with a higher class.
The main structural element of the system is the spring. She pushes the lever, which acts on the panel. The supply system in cabinets works in a similar way. Based on the method of force transmission, two types of devices are distinguished.
With articulated rod
They are also called lever rods. The mechanism is easily recognizable by its protruding levers. They somewhat spoil the appearance, but provide reliable and uninterrupted operation. There are several disadvantages: you have to make a significant effort to open the doors. In addition, protruding arms can be broken accidentally or intentionally.
Slide
The lever is located parallel to the canvas, so the appearance of the structure is more attractive. It's much easier to open. After opening the sash by 30°, less force must be applied to continue the process.
Both varieties have two main elements: a lever and a housing with a spring. One is placed on the box, the other on the sash. The place where each element is placed depends on the direction of opening. If it is “pull”, a housing is placed on the box; when opening “pull” - a lever. Depending on the installation location, there are floor, overhead and hidden systems. The latter are mounted on the floor or inside the box.
Device for soft closing of IKEA doors
Children cannot be compared with adults: they have completely different needs that are constantly changing. When developing the SMOSTAD series, we tried to look at the storage system from a child’s point of view, so that with its help it would be easier and more interesting for children to keep their things in order. We took our reliable OPHUS frames as a basis, and then made sure that all elements of the SMOSTAD system were ready for change. This is the only way a storage solution can last for many years - and thus save your budget.
When creating SMOSTAD products, we tried to understand exactly what difficulties people face when organizing the storage of children's things. We visited families in different countries, asked parents and children about their morning routine and asked to show us their wardrobe.
Help from experts - big and small
In addition, we examined the results of studies on child development and paid attention to how storage is organized in schools and kindergartens. This accumulated experience has greatly helped us in our work. One of the discoveries we made during preparation was that in everyday activities and when choosing clothes, conflicts often arise between children and adults. How can you create a storage solution that will help them coexist at home in peace and harmony? Once we had developed the framework and made the first prototypes, we invited our experts back to either praise or criticize our ideas.
Just a little less options
In many families, there is an insoluble problem: the child wants to make decisions himself, and adults believe that they always know better. You may have encountered a situation where a three-year-old child reaches for a holiday outfit on a regular Monday. Being able to see your own clothes and choose for yourself is very important for a child's development, but it is always easier for him when the choice is limited (and appropriate to the occasion). That’s why storage in the SMOSTAD wardrobe can be divided into levels: the upper one will contain clothes that parents control, and the lower one will contain that small set of things from which the child can choose himself. Yes, this, of course, is a little dishonest, but the result is very useful: the child learns to make his own decision based on what is proposed.
From birth to 2 years: a calm and safe start
While waiting for a new addition to the family, you can simply prepare a cozy and safe corner where you can later change your baby’s clothes and change his diapers. And then returning from the maternity hospital will become not only a pleasant event, but also the beginning of an uncontrollable wave of worries: an endlessly growing pile of dirty laundry and the need to manage everything in the world and, above all, of course, take care of the child. And with the SMOSTAD combination, which includes a changing table and storage solution, you will have everything you need at hand on hooks and in drawers, so you can reach the things you need without being distracted from your baby. When he grows up a little and begins to show interest in the world around him, you can hang bright pictures and an attention-developing mobile over the table. And when diaper time has completely passed, the changing table can be easily lowered to a height convenient for the child so that he can play or draw at it.
From 3 to 7 years: development in full swing
During this period, children develop amazingly quickly. Play is, of course, very important, but developing responsibility for one’s belongings and the ability to dress independently is also equally important. These skills help the child mature and become more independent. Motor and sensory skills take time to develop, so it is important to tailor storage to your child's abilities. Many children, for example, find it difficult to hang clothes on and take them off hangers - even if they are children's ones. And in a deep wardrobe, the baby may simply not see the right thing or not reach it. That's why we offer the possibility of dividing the SMOSTAD storage solution into levels - so that the child can reach those things that are stored on hooks, wire shelves or in drawers. And to make it easier for him to get ready in the morning, you can provide each solution with a label with a picture. This way, both you and your sleepy child can easily remember where the socks are.
From 8 to 14 years: formed personality
Module with drawer: easy search
While visiting families around the world, we saw once again that the typical wardrobe with doors is too high and deep for a child. This means that the SMOSTAD system must have some new storage solution. Based on our kitchen range, we have come up with a stable module with a drawer. When our big and small experts tested it, almost all of them had the same reaction: “Wow!” They really liked having such a good overview of all the contents and being able to reach things from both sides. The high edges are designed primarily to make the structure stronger, but they also create a convenient compartment for everything from diapers and toys to sportswear and equipment. Great idea, right?
New needs - new elements
Life with children is a life of constant change. Most parents in different countries agree with this. Suddenly you may find that your jacket is too small, your soft toys are too old for your age, or it’s time to share your wardrobe with your younger sister. To make the SMOSTAD system as flexible as possible, we have developed various accessories such as hooks, handles, label windows and a mirror, all of which can be easily added or removed as needs change.
On hook
Have you paid attention to what the school locker room looks like? There are many hooks in it, and this is not accidental. Children have difficulty handling hangers, and carefully removing a folded item from a stack is an almost impossible task (as impossible as putting it back). Our range of HELPA and LETTHET hooks are ideal for the SMOSTAD system and have been expanded with two new variants. One of them can be installed on a clothes rail, and the second on the door or front panel of a drawer, so that, for example, drawings or photographs can be stored on the back side. Plus, hooks can be used to store backpacks, scarves, hats—and just about any other item your child might need.
Wardrobe navigator
Children learn new skills by repeating the same actions over and over again, they benefit from forming habits, and they sometimes need help with this. Kindergartens often use symbols to create structured storage. At home, such symbols will also help you complete your daily tasks without arguing. With the help of HANGIG windows, you can mark each drawer for socks, T-shirts and sweaters, so that even in a half-asleep state, the child can easily find the things he needs. And he can color the pictures that come with the HENGIG windows himself with the colors he likes. In addition, with such labels you can allow your baby to decorate his wardrobe as he pleases - and you won’t even have to worry about things being damaged by indelible stickers.
Separate room on two square meters
With the start of school life, it becomes very important for a child to have his own cozy corner where he can draw, make crafts, play or read - alone or in the company of friends. However, having personal space can be a challenge if you share a room with a sibling. When creating the SMOSTAD loft bed, we wanted to get a room within a room and make it as flexible and varied as possible. Under the bed there is a desk and a wardrobe, which separates it from the common room, and if you add drawers to the solution, then they will fit all the clothes, toys and school supplies. Add in hooks, cork doors and carefully selected hangers, and you've got a clever separate room within a large nursery.
Handles as an element of style
A rounded wooden handle or a metal handle in a bright color and laconic style? Handles give furniture individuality and allow you to change its style without much expense. For furniture in the SMOSTAD series we offer handles BEGRIPA, PLOKKAR and LAPPMES. They have smooth shapes and are comfortable for a child's hand. Older children will love the arrow-shaped ERNSPARV handles, which can be positioned in different directions for a fun and personal touch.
Safety first
Hitting a sharp corner is painful at any age. That is why all the corners of the doors and drawers of the SMOSTAD system are rounded. To ensure that the entire system is as reliable as possible, we involved security experts from the very beginning stages of its development. They calculated the possible risks for children of different ages. For example, special closers are built into the hinges that prevent the door from slamming, and the last few centimeters close it smoothly and slowly so as not to pinch the child’s fingers. However, you will have to provide the most important safety measure yourself: be sure to secure the storage furniture to the wall so that it does not tip over.
Source
How to install a door closer
Before work, check the equipment and prepare the tools. You will only need a few: a screwdriver and a drill. Most often, a “three” drill is required, but you need to specify the diameter of the fastener. In addition, you will need a ruler and pencil. The manufacturer supplies the product with an installation template. This is a cardboard or paper strip where each structural element is schematically marked. It also marks the mounting holes.
Some difficulties may arise when purchasing closing structures that can create closing forces of varying degrees. There are also templates for them, where the mounting holes of each class are marked with their own color. Letter markings have also been added. The user independently chooses which of them he needs. Important point. The template diagram is located on both sides of the strip. On one there is a marking for opening “from yourself”, on the other - “towards you”. We offer step-by-step instructions on how to properly install a door closer.
Step-by-step instruction
At this point, the installation is complete, all that remains is to adjust the system, which you can do yourself.
Preparation
So, the disassembled wardrobe is already in the apartment. Check the package to see if all parts of the future furniture are in place. In particular, you need to check the number of connecting elements:
- There should be one screw for each hole in the frame or door.
- All double holes must have a corner.
- There must be at least four legs.
- It is necessary to check the presence of metal pins and “hats” on them (they are necessary for attaching the supporting structure).
- Also, to fasten the back wall you need nails; there can be from 15 to 30 of them. If you don’t have nails, you can buy them yourself, choosing short ones of medium thickness.
After all the components have been checked, you need to make sure that you have all the necessary tools at hand: screwdrivers, a hammer and components. Please note that if the assembly is vertical, a stepladder is required.
Assembly instructions
How to adjust the design
Before you adjust the door closer, we’ll tell you about the timing. The first time this is done immediately after the unit is installed. After that, on average twice a year. If the input system is operated under conditions of frequent and sudden temperature changes, it will have to be adjusted more often. The lubricant in which the spring is located is sensitive to temperature, and this affects the entire structure. In any case, the adjustment process consists of three stages.
Adjustment steps
To work, you only need a screwdriver. With its help all settings are made. The easiest way to implement them is after studying the manufacturer's instructions on how to adjust the door closer. We will offer a general description of the procedure, without taking into account a specific model. They start by inspecting the body. There are adjusting screws on it.
Usually there are two. The first adjusts the speed at which the canvas moves. The second one is “responsible” for the finishing time. Some models have another regulator. It adjusts the overall effort.
Let's take a step-by-step look at how to set up a door closer.
Step by step adjustment
Most models are equipped with a Hold-open function. It is used to keep the canvas open indefinitely. To activate it, the sash is opened 90° and the lever lock is tightened. It is impossible to prop up an open panel without allowing it to close. This harms the mechanism.
Sometimes the system needs to not only be configured, but also repaired. It is not difficult. Most often, users encounter a lack of oil. It can be suspected when the closing mechanism behaves like an ordinary spring, slamming the doors with a deafening roar. The cause may be a crack through which lubricant leaks. If a defect is detected, it must be immediately sealed with sealant and shock absorber fluid or any motor synthetic must be added through the mounting holes.
Parts with large cracks that cannot be sealed will have to be replaced. It is very rare that the manufacturer does not add oil for any reason. Its deficiency must be replenished in the manner described above. Another common problem is a warped linkage rod. The iron part may corrode. It is cleaned and coated with anti-corrosion lubricant. Minor deformations are straightened with a hammer, breaks are welded and the resulting seams are thoroughly cleaned. In cases that cannot be corrected, a new element must be installed.
After everything is done, it is advisable to prevent breakdowns. To do this, you need to follow a few simple rules. There is no need to try to close the sash manually without allowing the mechanism to operate. You cannot block the canvas with any object so that it remains open. Children should not be allowed to ride or hang on the canvas. Then a properly installed and adjusted structure will last a long time.
Source
Purpose and functions
A furniture closer is often installed to ensure smooth opening of the units. The device allows you to protect furniture from mechanical deformations during operation. The device is recommended for installation on facades with a mirror or glass surface, because If such a door is abruptly closed, these fragile materials can break and become deformed.
The mechanism consists of the following elements:
- A housing equipped with a spring and a piston-pusher.
- Springs and stoppers for fixing on the upper roller guide.
- Fasteners for installation work.
- Decorative fittings.
The principle of a cabinet closer is based on the mechanism being activated when it comes into contact with the facade of the furniture. After this, the doors smoothly move back to the required position and stop. You can adjust the closing speed of the valves using a special valve.
Self-installation and adjustment of the door closer
To prevent doors from remaining open, they used to use a banal spring, but today they install a door closer. Its design is also based on a spring, but it is more powerful, hidden in a metal case and filled with oil - for “braking” when closing. Installing a door closer is not a difficult task. Self-installation will take 20-30 minutes. Hardly any more. So we take a drill and install it ourselves.
Most popular model
Classification
According to global standards EN 1154, door closers are classified according to the closing force they can generate. They are divided into 7 classes, which are designated EN1-EN7. When choosing a class, pay attention to the inertia of the door, that is, the width of its leaf and weight at the same time. If different door parameters correspond to different classes, install a device of a higher class.
| Door closer class | Door leaf width, mm | Door leaf weight, kg |
| EN1 | up to 750 mm | up to 20 kg |
| EN2 | up to 850 mm | up to 40 kg |
| EN3 | up to 950 mm | up to 60 kg |
| EN4 | up to 1100 mm | up to 80 kg |
| EN5 | up to 1250 mm | up to 100 kg |
| EN6 | up to 1400 mm | up to 120 kg |
| EN7 | up to 1600 mm For example, the width of the door corresponds to class EN2, and the weight is EN4. They put it in 4th class, since a weaker force will not cope with the load. There are door closers that belong to the same class. The characteristics then indicate a class with one digit - EN5. They have a small range of force adjustment - within one class. There are devices whose closing force is regulated within several groups. In this case, the range is marked with a hyphen - EN2-3, for example. The latter are more convenient to use - you can adjust the closing speed depending on the weather. But the cost of such models is higher. |
Structures and traction device
The main design element of a door closer is a spring that pushes the lever. There are two types of devices based on the method of transmitting force from a spring to a lever:
With sliding channel
Both of these types consist of two parts: a housing in which the spring is hidden and a force-transmitting mechanism and lever. They are mounted at the top of the door: one part on the leaf, the second on the frame. Which one goes where depends on the direction of opening. If the doors open “pull”, a housing with a mechanism is installed on the door leaf; when opening “pull,” a lever is attached. The photo shows a lever type closer, but similar installation rules apply to models with a sliding channel.
Installing a door closer depending on the opening direction
As you understand, they are not suitable for all types of doors - it is problematic to install them on glass ones. There is another design for them - floor-mounted. The housing with the mechanism is mounted on the floor, only the holder plate protrudes from above. A similar holder is installed at the top, but the mechanism is not always there, only for heavy door leaves.
By the way, there are floor models for wooden and metal doors. They also have a linkage or sliding channel transmission. They are less conspicuous, but with this arrangement they are more often damaged.
Floor closer for glass doors
Purpose
You can find a wide range of door closers in Ikea, Leroy Merlin, or look through the catalogs of manufacturers such as Blum, GTV or Boyard fittings. In cities like Moscow or St. Petersburg this is not a problem. And the conventional Tyumen is not much inferior to them.
Closers for sliding wardrobes are special mechanisms designed for self-closing doors, which are subsequently fixed in a stationary state. Here I would like to note that stoppers do not always cope with the assigned tasks. Closers are mounted on doors, protecting them from damage in the event of accidental or deliberate sharp slamming. Many companies, including Aristo, offer similar products.
At the same time, door closers are almost never included in the basic package of a coupe. That is, these elements have to be purchased and installed separately.
I can’t say that this fittings are incredibly expensive, but the price depends on many factors.
A characteristic feature of the devices, as well as their advantage, is the ability to install them at any time and as needed, when the cabinet is already assembled.
In most cases, they are universal, that is, the mount fits different models and configurations of the coupe itself. If you have a frame with an aluminum profile, almost every door closer you choose will probably suit your cabinet specifically. As you can imagine, the key feature is soft closing. Plus, the device protects the doors and side pillars of the coupe from mechanical damage. This will be an especially useful addition for those whose facades have glass or mirrors.
If you slam the door hard without calculating the subsequent impact, the glass and mirror can easily break.
Installing a door closer: instructions with photos
To install the closer on the door, you only need a drill, a ruler, a pencil and a screwdriver. A drill is usually required “3” (three), but you need to look at the diameter of the fastener, which usually comes with the kit.
What is needed to install a door closer
Most manufacturers, to facilitate self-installation of the closer on the door, complete the products with installation templates. These templates schematically depict the parts of the closer in full size. They also have mounting holes for each element. In models that can create opening forces of different classes, the holes are drawn in different colors; in addition, they are labeled - the class of the closer is placed next to it.
Example template for installing a door closer
The template is printed on both sides of the sheet. On one side - for opening the doors "towards you" - from the side of the hinges (pictured above), on the other - "from you".
Installing a template
The template has two perpendicular red stripes. We align the horizontal one with the top edge of the door leaf, the vertical one with the axis line of the hinges.
Everything is clear with the upper edge of the door leaf, but to avoid mistakes during installation, you need to draw the axis line of the hinges. If the door closer is installed from the hinge side, there are no problems - use a long ruler and pencil to move the line of the middle of the hinges upward. If installation will be carried out on the other side, measure the distance from the edge of the canvas to the middle of the loop. Mark this distance on the other side and draw a line.
Holes for door closer
On the template we find marks for holes according to the selected class. Using a drill or awl, we transfer them to the door leaf and frame.
Typically, the kit includes two types of fasteners: for metal (metal-plastic) and wood. We select a drill of a suitable size and use a drill to drill holes in the designated places.
Door closers are equipped with two types of fasteners - for metal and wooden doors
Drill holes according to the marks
Next, the actual installation of the door closer begins. Please note that for installation it is necessary that the housing and arms are disconnected. If they are assembled, they are separated (the washer is unscrewed, the screw connecting the levers and the body is removed).
Installation
We attach the parts to the holes made and install the fasteners. In the diagram we find the class of opening force that we need (in this case EN2) and install the parts as shown in the figure.
Door closer installation diagram
To open “towards you,” we place the body on the door leaf and install a rod on the frame.
Installing the case
Now you need to connect the traction lever to the body. There is a special protrusion at the bottom of the case. We put a lever on it and tighten it with a screw.
Installing the traction lever
Now all that remains is to connect the lever to the rod. There are two options.
Connect the lever to the rod
The connection of the lever with the rod itself is very simple: the two parts are combined and slightly pressed with your fingers. They lock into place with a slight click. The trick is how to position them relative to the door. The rate of movement of the door leaf at the final stage of closing depends on this. The position can change due to the fact that the rod consists of two parts and can be adjusted in length - one of the parts of the rod is a long threaded pin. Rotate the pin to shorten or lengthen it.
If you just need a smooth finishing, the rod is placed so that it is perpendicular to the door leaf. To do this, reduce its size slightly (pictured on the left).
Lever and rod placement for setting finishing force
If the door has a latch, a significant force is required to overcome its resistance. For this option, a shoulder is placed perpendicular to the door (the rod is untwisted, making it longer).
Having arranged the parts accordingly, they are combined and connected. That's all, the installation of the door closer is complete. And you can handle it with your own hands, and without much difficulty. The final stage remains - setting the closing speed. To do this, you need to understand the adjustments of door closers.
How to put on a gate
Frost-resistant models that can be used outside are suitable for installation on a gate. But not all gates have a top crossbar. But everyone has side racks. In this case, the rod is attached to the side post by unfolding the mounting plate along the post.
Installing a door closer on a gate without a top crossbar
But hydraulic devices (discussed in this article) do not do well in the cold. The oil that is poured into the body and serves to “brake” the door leaf becomes more viscous, and the gate closes more slowly. From this point of view, it is better to choose a pneumatic model for the gate (read about selection and installation here).
How to install on a metal door
Installation of a closer on metal doors differs only in the type of fasteners used and the size of the drill. Since the canvas is usually heavier, powerful models of at least class 5 are selected (check the table). Accordingly, on the installation template you will need markings for another class.
The door closer is installed on a metal entrance door in the same way.
You may also need a more powerful drill, but these are all details. Otherwise, you need to install a closer on metal doors in the same way as wooden or metal-plastic ones.
Device for soft closing of IKEA doors
Nikita, have you ordered cabinets recently? or do you have your own furniture factory and this comment is just marketing? I don’t want to offend, just anyone can speak out. any facts?
I'll share my story. I found this post because I’m also looking for options with loops. Taking it from the market or from Leroy is definitely not an option. Ikea quality is Ikea quality. and in my opinion it is chic, thought out to the smallest detail. The cabinets are definitely worth all the money considering market prices. Show in full.
I invited several companies in August 21 to design simple cabinet frames. I even thought about contacting and buying a cut. but I didn’t dare. visiting small firms eventually set the price for 1 cabinet with 3 hinged doors 195 cm wide and 245 cm high with 3 white hinged doors to order with facades in film, yes, bloom fittings, at 67-69,000 rubles. if the doors are MDF, the price is immediately 80 thousand rubles. and wait a month or 1.5. Cabinet requirements: 1 rod and 4 simple open shelves inside. Krasnodar city.
I went to Hoff, furniture like stolplithome and other budget companies. I settled on Ikea. The most decent cabinets in appearance and touch. Hoff with their Oscar is even more expensive, and their hinges and doors are very unpresentable, compared to IKEA.
As a result, I ordered 3 pax frames online from IKEA on September 10, 2021 (1 for the corridor is white, 2 for the room are wood-effect frames, all front doors are matte white, not the cheapest), all frames are 100 cm wide and 236 cm high, with 4 drawers, illuminated ulebi, with simple shelves for shoes, with delivery and lifting into the apartment it cost 44 thousand rubles. yes, the problem is: there are no hinges in stock, there are no replacements in ikea and it is not clear when they will be available. ok, 50-52 thousand with loops. but 50 for 3 cabinets, and not for 1 at a price of 65-70 thousand and the quality is normal. better than in companies that have samples of films and I touched factory-made doors in film. definitely better for me. I know what edge is and which facades are “in film” and which are MDF. Yes, MDF is definitely better. but the ikea forsand doors look and feel like they are 100% mdf. My cheap table is small. IKEA since 2015. then it cost 399 rubles. He endured so many moves, rearrangements and spilled liquids that praise be to him. but the cabinets are static. I think they can easily last 10 years if used carefully.
There are no photos of the cabinets yet, I'm waiting for my assembler. and the cabinets arrived last night, i.e. a day after paying for the order online. and there is no terrible smell of glue and sawdust. yes, it smells a little.
So, I had to order a corner cabinet 1 from Hoff for the hallway. I'm getting ready for the terrible smells. I took a sofa from them. 2 months of terrible smell of sawdust and glue
but there is no choice, because Ikea doesn’t have cabinets 95 cm wide, and I only have a 196 cm wide hallway. because 1 ikea pax, 1 hoff corner oscar. I wanted a mirrored door for it at Ikea, but they’ll have to wait too. and in order to save money on delivery and lifting, I ordered a completely corner Oscar with a mirrored door and their own hinges in the hoff. They'll deliver it this week.
something like this. I want to post a photo and description of my experience later. the main thing is not to forget
Source
