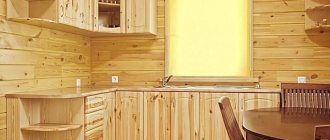
Kitchen design from scratch
Calculating kitchen furniture does not require special mathematical knowledge. It is enough to carefully measure all the indicators, write them down and not confuse them during sketches.
To create a kitchen from scratch, you need to measure all the indicators and plan the placement of the furniture elements.
Preparing a sketch
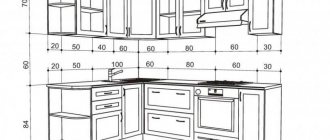
For a preliminary sketch you will need to measure, record readings and draw to scale:
- wall length;
- wall width;
- wall height;
- window locations;
- where are the entrance and balcony doors located?
- sockets and ventilation.
Mark all this in the diagram so that at the first stages you can understand where and what kind of kitchen furniture is placed. Then define what is called the “work triangle area.” This is the constant path that is made in the kitchen between the sink, refrigerator and stove. There should be no obstacles, decor or furniture along this path. Depending on the layout of the kitchen there will be a dining area.
It is necessary to determine where the main furniture and equipment will be located.
When you have placed the main composition on the sketch, allocate the remaining space for cabinets, a dishwasher, other appliances or furniture.
The remaining space is used for decoration and secondary elements.
Determining the minimum configuration of a kitchen set
How to calculate a kitchen set yourself? Before ordering a kitchen set, you need to familiarize yourself with the concept of basic equipment. This is a single set of kitchen furniture blocks 2.4 meters long.
Each headset has a basic configuration.
Placed here:
- 3 wall cabinets 60, 45 and 45 cm wide;
- 4 lower cabinets (under the sink, under the oven, and two cabinets 60 cm wide);
- moisture-resistant tabletop;
- base;
- water trap.
The basic package includes a certain set of elements.
Having such a standard kitchen set, its minimum configuration, makes it more convenient for the seller and buyer to speak the same language. Depending on the area and type of premises, you can easily calculate your equipment and its pricing policy.
Having a sketch will make it easier to explain to the seller what exactly you want.
Instructions on how to take measurements step by step
When you need to measure the kitchen yourself, it is better to follow the same procedure followed by experts.
Measurement steps:
- Drawing up a drawing on a piece of paper. Here a rough plan for the placement of modules and household equipment is drawn in relation to existing utilities (water, sewerage, gas, heating, ventilation).
- Separately, make a sketch of the wall, which is planned to be covered with furniture. Here it is important to show flat details - where, what kind of sockets, switches, kitchen apron, ventilation hatch, window, doorway will be located.
- Find the curvature of the room - the optimal result is the smaller value of the difference between the parameters from the resulting picture.
- The distance between objects that are most important for the kitchen work area. Everything must be measured from one point. They usually take as a basis one corner that is closest to the future headset.
- Separately, the design of furniture details is made. It is necessary to measure facades, buildings, etc.
It is better to draw a plan from several angles: top view, frontal view. It is also necessary to indicate the opening angle of swing doors.
The premises are measured at least at three points to understand how crooked the ceiling is in relation to the walls and floor. For example, if this is the length of the wall, then measurements should be made taking into account some indentations.
| We measure the length of the kitchen in three places | Offset from the floor |
| Bottom wall length | 100 mm. |
| The middle of the kitchen - in the area where there will be (or already is) a wall panel (kitchen apron) | 850-900 mm. |
| The top of the kitchen is in the place of the planned furniture. | 1600 mm. |
In the case where there are differences in length of 3 m by 30 cm, adjustable legs for kitchen modules are used. They allow you to align the headset as required by ideal geometry.
Kitchen unit layout options
The layout of the kitchen determines convenience and comfort during cooking and eating.
There are several options for positioning the headset.
Corner (L-shaped) placement
Classic placement of kitchen units in the shape of the letter “L”. This is an option for square or rectangular rooms. The rule of the “working triangle” is followed here, since there is a lot of free space in the middle. Corner placement of kitchen furniture is not suitable for a narrow or very small room.
Corner placement is considered classic and is suitable for square-shaped rooms.
U-shaped placement
U-shaped placement of the headset occupies three walls at once, usually two long and one short. Many household appliances can be placed here, including a washing machine and dishwasher. A large number of cabinets allows you to arrange all the services and kitchen appliances.
In a U-shaped arrangement, the furniture occupies three walls.
Peninsula accommodation
The peninsular planning method is a combination of the L-plan and the island one. Here one long wall and part of the second, short one are completely occupied. In this case, a small protrusion appears. That is, an “island” that is tightly adjacent to the entire kitchen structure of the unit. This is usually a small work desk with a lower cabinet, dividing the kitchen into a work and dining area. But there are other options.
The peninsula layout has a small overhang that is adjacent to the main structure.
Island location
The island layout combines elements of a linear and separate “island”. This is a combination of dining and work areas. One of the walls is occupied by a kitchen unit, and in the middle of the free space there is either an element of the work area or a dining table. The “island” can be of any size, from a bar counter for one to a huge table for a large family.
With an island arrangement, a working or dining area is located in the middle of the room.
Linear method of arrangement
The linear arrangement method is good for small rooms, studios or narrow kitchens. One of the walls is completely occupied by kitchen furniture and appliances. When cooking, a person moves in a straight line from the refrigerator to the sink to the stove. The remaining free space is allocated for a small dining area, folding table or bar counter.
With a linear placement method, all furniture and appliances are placed along one wall.
Double row arrangement
The double-row or parallel design method involves placing the headset and equipment along the walls “facing” each other. In this case, the sink and refrigerator are on one side, and the stove and cabinets are on the other. This option is suitable for a spacious kitchen with large, bright windows.
The two-row arrangement is also called parallel. It is suitable for a large spacious kitchen.
Lesson 19 — How to calculate the dimensions of facades in cabinet furniture
Calculation of facades is a fairly important procedure, because they are the face of the finished product and in some cases (for example, MDF facades) it will not be possible to change anything if there is an error.
In this article I will try to explain how calculations are made for all the main types of furniture facades (with the exception of sliding doors and radius doors). We will disassemble it on the basis of a box with external dimensions of 600 x 300 mm.
So, let's start with swing facades. In order for the doors to open, it is necessary that they do not rub against each other and against the body; technological gaps are provided for this.
They are 2-4 mm (more - they look ugly, less - they rub).
Personally, I prefer to make gaps of 2 mm.
Separately, I note that the dimensions must be calculated for each module separately, that is, if you are assembling a kitchen in which there are 3 floor drawers and 3 wall drawers, then the dimensions must be calculated for each drawer separately, that is, 6 times - this way you will insure yourself against a number of possible mistakes.
The width of the facade is calculated using the formula:
w = (W/n)-3 mm
where w is the width of the facade, W is the width of the box, n is the number of facades (by width)
Some furniture makers subtract 4 mm, but in my opinion the gaps are too large.
Height of facades. When calculating height, there are no clearly defined formulas - you should be guided by common sense and some simple subtleties.
For example, let's calculate the dimensions of the facades for several kitchen modules.
what is interactive flooring at school
in red , the gaps in blue in orange .
So, the dimensions of the box are 730×450 mm
We calculate the width using the formula (450/1)-3 and get 447 mm. (there are 1.5 mm gaps on the sides, which will allow you not to cling to adjacent cabinets, which will have the same allowances).
In terms of height, we decide to make 3 facades, of which 2 are large, 300 mm each. We take into account that the optimal distance between adjacent drawers is 2-3 mm , and between the tabletop and the upper facade 5 mm (so that the facade does not cling to the drip tray, which is found on kitchen countertops). As a result, subtracting these values from the height of the box, we obtain the height of the small facade 121 mm
730mm - 300mm - 2mm - 300mm - 2mm - 5mm=121 mm
Let's move on to another example: calculation of facades for a hanging cabinet. Its peculiarity is the presence of two hinged facades, as well as an overhang of the upper horizon, which seems to cover the doors, giving the entire cabinet a finished look.
Based on the overall dimensions of the cabinet: 636 x 600 mm, we calculate the width of the facades. (600/2)-3 = 297.
Knowing that the thickness of the upper horizon is 16 mm, and making a 3 mm gap between it and the facade, we get the height of the facade (636-16-3) = 617
Now let's move on to the individual subtleties of the calculation.
1. When calculating the dimensions of facades made of laminated chipboard edged with 2 mm PVC edges, do not forget to subtract another 4 mm from the dimensions, both in height and width (edge thickness on both sides)
2. When calculating the dimensions of hinged facades
for corner cabinets, it is necessary to take into account that there are two types of corner hinges (+45, +30 g).
Visually they do not differ from each other; the difference is noticeable only on the assembled body with a hung facade. Therefore, the installation diagram for the corner hinges that you purchase should be checked with the seller. Let us analyze the calculation for each using the example of a corner cabinet with a distance between the walls (in the façade opening) of 300 mm.
So, option 1, the facade turns out to be inset; its size should be 1 mm less than the width of the niche, that is, equal to 299 mm.
Option 2, on the contrary, provides for the overhead nature of the facade. In this case, the facade is 5 mm wider than the niche (305 mm)
Let us separately dwell on such a topic as the calculation of sliding doors in various variations
Calculation of sliding facades of the "Versailles" straight cabinet system
Calculation of facades-compartments “Versailles” corner wardrobe
Design features of the kitchen set
After you have created a sketch, made accurate calculations, chosen a layout and decided on the material, you transfer the drawings to the workshop. Designs of kitchen sets with dimensions, creation of details, selection of accessories can be left to professionals. In the workshops, wood is cut into the necessary parts.
The sketches are transferred to the workshop for cutting out parts from wood.
Preparatory stage
First, you need to prepare the room so that you can easily measure the kitchen for the kitchen set. Nothing should be lying around underfoot; there should be free access to walls, risers, heating appliances, windows and other parts.
You should start measuring once the space meets the following requirements:
- The renovation of the walls and floors is completely completed. The windows have been replaced (if necessary), the cornice has been suspended. The walls must be level. If required by the project, a wall panel (kitchen apron) is installed, or everything is tiled. The same thing with the floor - all finishing work must be completed.
- The room is clean - the garbage has been completely removed, the floor has been washed.
- All furniture, household appliances, etc. were removed from the area where the set will be located.
Arsenal of available materials and tools:
- Roulette;
- Paper;
- Pen-pencil).
Experts use a laser tape measure to make the measurement results more accurate. She is easy to handle. Therefore, any client of a furniture company can measure their future furniture themselves with such a tape measure.
Edging parts
Having received the necessary parts, it is important to properly process the edges, since they cannot be hidden with paint or varnish. For this purpose, the ends are edged. This involves sealing all visible areas throughout the thickness of the wood with melamine or plastic tape.
- Place the part vertically so that the cut is at the top.
- Melamine or plastic tape has one adhesive side.
- Apply the adhesive side of the tape to the cut.
- For the best adhesion, the cut with the melamine tape is heated with an iron at medium temperatures through a clean sheet of paper.
- To prevent the plastic tape from melting from the iron, use a hair dryer to heat it.
- If you need to remove all excess and protruding fragments, wait until the part has completely cooled.
- Use a knife or other sharp tool to trim off the unnecessary edge.
- Round the corners, remove cut unevenness and roughness with sandpaper.
It is very important to properly process the edges of wood parts.
Corner models
Calculation of the thickness of facades for a corner model kitchen is carried out by professional furniture makers. The dimensions of the structures in question vary, depending on their type. Despite this, corner products must be combined with straight cabinets in thickness and height.
Next, let's take a look at the features of mounted models:
Corner curtain walls are often used to store various kitchen utensils (spoons, forks, spatulas). Such models may have one or more doors, although there are models made on the principle of shelves.
Floor facades for the kitchen differ in the following parameters:
Floor corner facades are installed after fixing the top element. They should be located symmetrically to the upper cabinets.
When choosing corner and regular facades for the kitchen, pay special attention to their overall dimensions. These products must be correctly positioned in the room according to a pre-thought-out plan. All models must correspond to the existing design of the room and be correctly positioned relative to each other.
Source
Features of designing corner cabinets
With a U-shaped or L-shaped layout, you need to design a corner cabinet. If the structural blocks are connected to each other at right angles of 90 degrees, you need to carefully plan drawers and opening doors. In this case, special inserts are made. This allows the doors and roll-out drawers not to intersect with each other.
For some layouts, you will need to design a corner cabinet.
If a corner cabinet is joined at a 45-degree angle, during the assembly phase the bottom and top of the cabinet are installed between the sides rather than on top. Only in this case will you get a smooth façade and be able to attach hinges.
Finding out the dimensions of the floor part
The height of the tabletop and, accordingly, the working area should be such that you do not work in a bent and unnatural state. Typically, this value is set by household appliances, but to increase it, you can purchase a thicker countertop or use a plinth.
The width of the work area is usually dictated by the size of the household appliance. The depth of shelves and drawers is determined by the volume of kitchen equipment. Alternatively, you can measure the shelves of your old furniture (if you still have it) that held everything you need.
What to consider when designing a drawer
Roll-out boxes are functional and spacious. There are two types of such elements:
- the metabox drawer operates on a roller system using metal guides;
- a box made of chipboard, which is made to individual measurements.
Drawers come in two varieties.
It is also worth understanding the differences between ball and roller guides.
- Roller guides are attached to the lower edge of the bottom of the drawer or cabinet. This is a budget-friendly and durable option for fittings that does not need to be lubricated. The drawer doesn't slide out completely, so you don't get a full view of the contents.
- Ball guides are attached to the central part of the roll-out drawer. They allow you to roll out completely and provide a full view of the kitchen utensils.
It is necessary to decide on the type of guides.
What type of guides you plan to use must be known at the sketching stage. Because for roller ones there is a tolerance of approximately 1 mm.
How to calculate the dimensions of facades - several techniques
The main thing in this matter is to provide the correct gaps (indents) from the dimensions of the module on which they are to be installed.
This is necessary for their proper appearance, as well as for normal operation (functionality).
For example, there is an ordinary box (let it be the upper kitchen module), the height of which is H (mm) and width L (mm), and it should have one facade. Let's do the calculation.
To do this, you need to give certain margins in height and width (from the overall dimensions of this box).
Gaps are an individual matter, and each specialist sets them in his own way. But there are numerical limits beyond which the door will look ridiculous.
For example, if you give a gap of 5 millimeters on each side (for example, right and left), then this will immediately “hurt” the eye, since large gaps will be visible.
In this article, I will operate with the indentation values that I use myself.
So, in this case, you can subtract from 1 to 2 millimeters from each size. It turns out that the total gap in width and height will be from 2 to 4 millimeters. Let's settle on a gap of 3 mm (1.5 millimeters on each side).
This means the dimensions will be equal:
This means that in order to determine the dimensions we need, we need to subtract 3 millimeters from the dimensions of the box (covered by this facade).
Answer: 3 mm is better, since externally such gaps look quite normal, but in this case, in terms of width and height, we get an additional 1 mm, which is very useful when adjusting.
Well, this is understandable, but if there should be two identical facades on one box, then how to count them?
Let the box also have dimensions H and L.
Then the calculations can be carried out similarly to the previous ones, with the only amendment that now there will be two fronts (and they will be the same):
L(f)=L/2-3 (mm) width
Then, from the size of each part, we subtract a gap of 3 millimeters.
It should be noted that in this case, the distance between the facades themselves will also be 3 mm.
Such examples, of course, cannot be considered as a general rule.
If, for example, you need to calculate the same box with only one difference - that there should be a tabletop on it, then the calculations will be completely different.
The fact is that the tabletop can make its own adjustments, thanks to the presence of a so-called drip tray (a plastic barrier located on its lower part, and designed to ensure that water, running down its front end, is not “sucked in” into the lower, uncoated plastic part).
It can have a different design, but most often it is a bulge (made of plastic) that is several millimeters high.
And if so, then if the upper gap at the facade is 1-2 ms, then it simply will not work.
Moreover, if the gap at the top is “butt-to-tail”, then problems will arise when adjusting the height.
In terms of width, such fronts are calculated in the same way as in previous examples.
I would like to draw your attention to the fact that all the examples given refer to doors that are “overlaid” on the frame (overlay), that is, attached to them using overhead hinges.
As for the fittings for fastening facades in modules, we will consider them in the following articles, since this is a separate topic.
Source
Placement of equipment and sockets
The electrical network and sockets are thought out during the period when you create the first sketches of kitchen units. Even if you don’t currently have a dishwasher, but are planning to buy one in the future, be sure to make an outlet for it. Otherwise, some time after creating your dream kitchen, you will have to solve new problems of lack of network connection points.
It is recommended to provide an outlet for the dishwasher.
Each built-in appliance must have its own outlet.
- For the hob and oven, make two sockets so as not to connect a double or tee. Don't make the sockets too high or low. 0.6-1 m from the floor level is considered optimal.
- The refrigerator usually has a short cord. The socket must be in the area where it is located and on the side where the wire comes out.
- For a washing machine or dishwasher, the sockets are located quite low, 20-40 cm from the floor level.
- If you plan to install an outlet immediately behind the equipment, add 5-10 cm to the depth so that the equipment fits into the niche.
- Install the microwave oven and coffee machine at shoulder or eye level of an adult. Since this is an appliance that is used daily, sockets must be freely accessible.
- The hood requires a separate outlet, which is designed in the upper area behind the kitchen cabinets.
It is recommended to place sockets and switches according to the diagram.
Furniture calculations, how not to make mistakes
The calculation of any piece of furniture begins with determining the dimensions, but before that you need to measure the room and attach the dimensions to a specific point or corner. The values are transferred to a sheet of paper and they begin to develop a sketch.
It should be remembered that the dimensions of the lower base are tied to the length of the tabletop. The size of the façade of a corner cabinet in a kitchen 600*600 is determined by the required gaps; their size will depend on the geometry of the room. In a standard situation, gaps of width from 1 to 3 centimeters are left. Height discrepancies can be large, especially if the room has high ceilings.
Bottom row
To determine the width of the lower part of the kitchen facade, the number of overlaps on both sides is subtracted from the general parameters. Next, the remaining size is divided into parts for different modules, which are planned in advance. When determining the height, the dimensions of the niches for built-in equipment are taken into account. The standard parameters are 850 millimeters.
my little bird ran into the field
Upper modules
When calculating the upper module, it is necessary to separate the panels so that the hood is above the hob. It is necessary to plan the kitchen unit in such a way that hot air from the stove, when it is heated, escapes through the ventilation hole to the street. The dryer box should be located near the sink. It should be remembered that the upper models have a height of 60-100 centimeters, but the modules sometimes have to be swapped for convenience.
How to Design a Very Small Kitchen
In a small kitchen, use every useful inch. Even small rooms can be made cozy, convenient and comfortable.
- If possible, move the dining area to another room. This way you can create your workspace as comfortably as possible.
- Remove doors with hinges that open into the room. Make an arch or sliding structure.
- Make a kitchen set to order or do it yourself. Only individual measurements will give you maximum functionality of the furniture.
- Take your room design seriously. Make a kitchen in light colors without large patterns with light-reflecting surfaces.
If you follow the recommendations, even from a very small room you can extract the maximum useful space.
Now that you know almost everything about the layout, location of appliances and outlets, it's time to take a critical look at the kitchen. You may want to improve and transform something, replace or create something with your own hands.
Dimensions of kitchen facades: how to calculate them yourself, standards, upper and lower modules
Kitchen furniture should be designed according to the individual preferences of the owners, according to the overall dimensions of the room. Sometimes a property owner or designer looks through a lot of options to choose the best solution. When drawing up a project, you have to take into account the dimensions of cabinets and other furniture elements. From the article we will learn what sizes of kitchen facades there are and how to choose the right doors.
Options for the location of kitchen units - 50 photos
Placement of wall cabinets
The height and depth of wall furniture is also determined by your height. Stand against the wall and imagine that you are opening a wall cabinet and taking something out of it. Mark a spot on the wall where the cabinet handle, corner of the door, or bottom should be.
The optimal distance between the upper and lower cabinets is considered to be 50-55 cm, but it can be greater if it is more comfortable for you.
But will you be comfortable standing on tiptoes? Although this is a very useful exercise, you may become bored with it over time.
You may have been surprised by the specific point where we mentioned habits. If for young people or middle-aged people they are not so significant, then the same cannot be said about older people. If the kitchen will be at their disposal, it may be worth measuring a favorite old table or discussing his preferences with the person in advance.
Headset dimensions
Kitchen furniture is produced in large quantities, of different models, types and shapes. The main purpose of the set is not only to create a comfortable and functional space, but also to ensure simplicity and comfort during cooking, as well as decorating the room.
When choosing furniture, standard dimensions are taken into account, which help determine the minimum dimensions of a particular cabinet or table.
Before purchasing, a kitchen plan is created that demonstrates the correct arrangement of furniture. Typical options for a modular system have a length of 1.8–2.6 m.
The designs are considered the most popular, include different elements and can be combined by any method. This makes it possible to create a beautiful, cozy and functional room. Once assembled there will be all the elements for cleaning and cooking.
Main components of the headset:
- straight or corner floor cabinets;
- wall cabinets that are mounted on the wall with an optimal distance from the floor and countertop;
- drawers for storing small kitchen utensils;
- cabinets with shelves and doors for storing food and utensils.
A tabletop is installed on top of the floor cabinets, which is the main working part for cutting and preparing food. To independently calculate the optimal dimensions, you need to use standard values and features of a specific kitchen. When creating a plan, the following details are taken into account:
- the entire length of the room where the furniture is planned to be placed is measured;
- the shape of the headset is determined;
- the type of equipment that will be used is indicated - its type must be specified (standard placement or built-in products).
For a corner kitchen, the standard dimensions will be 1.5x2 m; they are optimal for a small area. But if the room is large, then the owners try to get more functionality, moving away from the usual dimensions. The photo shows one of the options for corner furniture according to the standards:
Kitchen tables
Equally important is the selection of a kitchen table for a meal. For ease of use of furniture, it is recommended to follow some standards:
- the optimal dimensions are selected based on the number of residents who will be at the table every day. There should be 40x60 cm of area per person;
- there should be about 20–30 cm of usable space in the middle;
- Using a table according to the described parameters, make the tabletop at a height of 80 cm, regardless of the length.
The most popular are rectangular tables, which are suitable for families of 4 people. They are often used in panel houses and other buildings. The height of such furniture is about 75 cm and the width is 80 cm.
If the room is very small, then the dimensions and design will be different. The best option would be a folding type, which will take up minimal space when folded.
