The table itself is an extremely functional invention, in demand in the kitchen, in the workshop, and in the office.
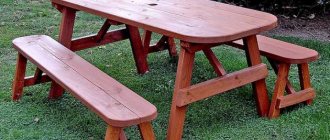
A wooden table combines functionalism, environmental friendliness and aesthetics. You can make such a piece of furniture with your own hands.
Material
If you intend to assemble a table yourself, the first thing you should pay attention to is the material of manufacture. Very rarely, a whole piece of wood is used as a material at hand; much more often, wooden boards are used. The advantages of this material: they can be cut to the required sizes on any construction site; It’s also easy to transport them to the assembly site if you have a personal car.
The only downsides that can be mentioned are possible difficulties that may arise during installation, and also the fact that you should pay attention to the correct processing of the material - otherwise the boards may come apart and will not last long.
Sexual
This material is used for flooring, for cladding buildings and premises and, according to the topic of this article, for the manufacture of interior items. The advantages of this material are as follows:
- Most floorboards have a groove, as this is how they are held together.
This allows you to fasten the boards into a tabletop without any problems, while the joints will be identical and look aesthetically beautiful; - Most of the edged boards have already been processed, so after assembling the table you don’t have to resort to additional painting or varnishing the product;
- even if the floorboard is an ordinary edged one, it still fits together with other boards better than the rest.
But floorboards also have disadvantages .
For example, for a board that has been varnished, a buyer can pay a larger amount than for an ordinary board with subsequent self-coating. The floorboard has a limited size, that is, its size will dictate the size of the countertop, or you will have to adjust the length yourself. Important . It is impossible to make legs from a floorboard, only a tabletop. This means that you will have to select a different material for the legs.
Unedged
This board has jagged edges with bark as it is made by cutting a tree trunk lengthwise. Such boards are cheaper, and with their help you can achieve original design solutions. But at the same time, they require additional processing, and joining them is quite difficult.
Oak
They are distinguished by unique strength, density and resistance to many biological and physical influences. Very expensive , but in terms of service life, this material completely pays for itself.
Solid wood dining table
Such patterns look especially beautiful along the edges of the tabletop. I didn’t do the tabletop itself on top. There are already enough patterns there. But all the elements, in the form of legs and edges, can even be processed:
Step 6.
Now we proceed to coating with decorative impregnation (larger jar). It dries in about 5 hours...
We will cover the entire table completely, and to make it more convenient, I removed several boards
I checked the shade... Oil on the left, decorative impregnation on the right. The impregnation is darker. Initially, I thought of only covering it with oil, but at that time it was light. But I couldn’t find a darker oil, so I took this one. Although it was possible to take a transparent one, because the impregnation is already dark, and after it dries, we cover it with oil 1-2 times. I use impregnation for 1 time and oil for 1 time. After a while, maybe in 3 months I’ll cover it again with oil. That is, subsequent times, during the use of the dining table, I will cover it only with oil.
I cover the entire table with impregnation, and this is what happens:
Photos of the work progress:
This is how the table turned out. Again, it could have been finished... But no! The table will be located outdoors in the yard, so it needs to be protected with special oil. If you cover it only with stain or impregnation, it will fade in the sun, and the wood will not be properly protected. The lifespan will be minimal, and such a table will quickly lose its appearance. Therefore, if you set out to do something, then you need to go to the end...
Step 7
We waited 5 hours (or better yet, a day), after the impregnation had dried, it was time to form those same patterns. Patterns don’t just appear after painting. On the contrary, we first painted the table, then it dried, and after that we use sandpaper and lightly move it along the top of the tabletop, removing the top layer.
And as you remember, when we went through the grinder, the wood already had a slight unevenness. Now, using sandpaper, we simply form a pattern:
In fact, we are simply removing the paint from the hard wood fibers. And this is what we get:
What do you think of this idea for a food table? Like?
Here is a photo in which only one board has been sanded:
Don't be surprised that there are several different papers on the table. I tested which one would show the pattern better. In the end I settled on 80 grit. You can also use P120 grain.
This is the pattern we got all over the table. It’s really antique) If you liked the idea, please write...
Step 8
Well, now, the final stage. Cover it with oil:
Apply with a regular brush, and after 2 hours wipe off the excess with a rag. Let it dry for a day...
The next morning I woke up and wiped it again with a clean rag. But it was already practically dry. The table could be set.
The first dish I cooked with it and posted on the blog was incredibly delicious borscht! This is what happened. What do you think of the photo on the new table?
Please rate my work... And in general, everyday articles are interesting... I just keep a culinary blog, but sometimes it occurs to me to do something with my own hands. For example, on weekends.
I guess that's all for today.
Although no, you also know... I stole several birch firewood from the village. For what? I'll try to make cool boards for food photography, based on the same theme. And if it doesn’t work out, then I’ll light the stove in the bathhouse. Birch burns well)
No, well... Process, paint - and now they are all different. Not for cutting into them. Namely for photographs. In any case, I'll write what happened.
See you again!
Drawing
A drawing is necessary, because thanks to it the table will fit exactly into the room. The drawing will also allow you to calculate the volume of material required. But first things first. What problems will the drawing allow you to solve?
- Dimensions . If this is a kitchen table, and the kitchen is of non-standard sizes, the table, accordingly, will differ from the standards.
- Model . Despite the fact that in general terms a table consists of four legs and a table top, there are a huge number of options for how to make it. There are a lot of table models, types of table tops and legs.
- Calculation of consumables . Having basic mathematical skills, you can calculate the volume of required material from the finished drawing. So that after purchasing the board it does not turn out that there are a lot of scraps left, or that there is not enough material.
Advice . You can download a ready-made drawing from the Internet and modify it to suit your needs.
What will you need to create a table from leftover timber?
If you want to do something simple and useful, then there is nothing easier than putting together a table from blocks that can be sawed from timber. In the end, you can get a truly high-quality item. The table can be used both in the apartment and in the country house. It will turn out easy and simple. Durable and beautiful. And you don’t need to spend money on buying a ready-made table in the store.
To create a table you will need:
- Several bars.
- Hand saw.
- Screws with a screwdriver.
- Primer.
- Wood varnish with brush.
A fairly simple set for those who want to assemble a good-quality table that will cost mere pennies. Many people believe that in order to create a good-quality and colorful thing, you must go to the store to buy something really worthwhile. In fact, only with a hand saw and a screwdriver can you make a very durable table for the garden, and if you also coat it with varnish, then it will not differ at all from the store-bought one.
It is also worth noting that the applied layer of varnish will not only play a decorative role, it will primarily perform a protective role so that the table does not begin to rot under the influence of moisture.
Tools
To complete the work, you may need the following tools, which should be prepared in advance:
- hammer;
- chisel;
- hacksaw;
- drill;
- plane;
- nail puller;
- saw.
Advice . If further work with the tool is not planned, then you don’t have to buy it, but rent it.
Assembling tragus elements: the better to fix them
First you need to collect 2 main elements (for one goat). To do this, squares are made from sawn scraps, and the parts in the corners are superimposed on one another.
The folded scraps are first coated with PVA glue, after which they are slightly pressed with clamps. Next, they are leveled with a square to a perfect 90°, and only then the clamp is pulled out completely. This way the connection will no longer move.
Now self-tapping screws are used. You will need 4 of them. per connection. After all four screws are fully tightened, the clamp can be removed.
Securing each connection in turn, you need to assemble a square with right angles
The second element of the goat is assembled in a similar way. However, it is unlikely that you will be able to stand on one goat, which means you will need to collect 2 more squares.
How to do it?
Once the material has been selected, a drawing and all the necessary tools have been prepared, you can begin assembly . When drawing up the drawing of the table, all its constituent elements, as well as fastenings, were highlighted. First of all, all the necessary elements are cut out and turned in accordance with the dimensions indicated in the drawings. Then, after checking and measuring after production, you can proceed to assembling the parts.
Important . Tools may cause damage. Follow safety precautions.
The assembly procedure is quite simple; general steps can be identified regardless of what model of table you plan to assemble. The assembly steps are as follows:
1. Assembling the legs . The table legs, cut according to the drawing, are fastened with beams using self-tapping screws or nails. For greater reliability, the fastening points should be treated with glue and then tightened with self-tapping screws.
2. The tabletop . To do this, strips are marked on the tabletop that fasten the legs, then using self-tapping screws, nails, screws or fasteners, the tabletop is attached to the structure of the legs.
3. Installation of horizontal screed . Many table models require a tie between the table legs to prevent them from moving apart.
Making a simple wooden table
DIY workbench: simple and practical workbench options. 180 photos of how to make a cool workbench
To make a simple wooden gazebo table with your own hands, you will need timber and boards. The step-by-step process can be described as follows:
- Select the required amount of material. Ideally, for sufficient width you will need six to seven boards 3 cm thick. The boards must be jointed and strictly level. The presence of knots is welcome.
- Treat the material with an antiseptic and dry well.
- Lay out the boards, align them to the required length, and check the joints. You should get an even rectangle.
- Apply the block to the boards on both sides and cut evenly, forming a perimeter.
- Screw the timber to the boards. To do this, on the underside of the tabletop, in the center of the boards on each side, use a small drill to make a recess through the block two-thirds of the way through for a bolt with a lock. Enlarge the hole on the beam slightly to recess the bolt head.
- Cut the corners a little to get a rounded shape.
- From the bottom side, secure another board diagonally with self-tapping screws, coated with glue.
- Using sandpaper, first coarse-grained and then fine-grained, sand the surface of the tabletop, the board and the beam below.
- Cover the table with stain and varnish or paint.
Finishing
After the product is assembled, it must be processed. Treatment is necessary so that the product is resistant to the external environment and lasts many times longer than without treatment.
Processing a product means sanding it and then opening it with varnish . Most often, sanding and varnishing are done several times for greater reliability.
