No matter how difficult assembling kitchen furniture may seem to the average buyer, in reality it is not all that difficult. The main thing is to strictly and scrupulously follow the assembly instructions and take your time.
When preparing to install a kitchen set, you need to plan in detail all the aspects, from the arrangement of furniture and the location of communications, to the finishing of the walls. The procedure for installing and fastening furniture is a serious and labor-intensive job.
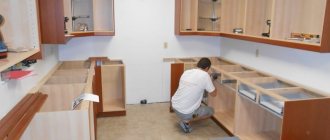
The method of installing a kitchen set directly depends on its model, so the corner version begins to be installed from the corner, and the straight version from the cabinet that will be located at the side wall. It is better not to assemble all the boxes at once, but to install them as they are ready. This will give you more space to work with. It is necessary to move a few centimeters away from the wall for better fastening. Before you start assembling the cabinets, you need to attach the drawer guides, and the upper modules are first hung on the wall, and then the doors are attached to them.
The installation sequence is logical: they start with floor structures, then move on to wall ones. In this article we will look at the procedure for assembling and installing the headset.
The nuances of self-installation of the kitchen
What to pay attention to to avoid installation errors:
- If the set is corner, then it is recommended to start installation work from the corner.
- If the set is linear, assembly begins with the cabinet that will rest against the wall.
- You don't need to assemble all the cabinets at once. Assembly of the next module begins only after the previous one is installed in place.
- In order to correctly install the kitchen set, it is necessary to take into account that the distance between the wall and the countertop should be 0.5 cm.
- It is not recommended to install doors on hanging elements immediately. The module is easier to hang without doors.
- Drawer slides are attached to the interior sidewall surface before the cabinets are assembled.
Correct installation of the kitchen requires prior familiarization with the features of installation work.
Features of the assembly stage
How to assemble a kitchen with your own hands correctly? It is imperative to take into account a number of key points:
- The cabinet is installed under the sink without a back wall. It also needs to seal all the cutouts so that nearby moisture cannot damage the chipboard structure.
- The fastening of the cabinet where the dish dryer is installed does not include the installation of the bottom. If such a design is not possible, then it is worthwhile to provide for fastening a protective rubberized sheet.
- The assembly and installation of the kitchen is carried out with the utmost care. The most vulnerable parts of the headset are the ends of the facades. It is not possible to restore the damaged structure.
Required Tools
In order to install a kitchen set with your own hands, you will need the following tools:
- Hammer. Necessary for drilling deep holes in a concrete wall when installing kitchen wall units.
- A jigsaw or hacksaw for metal, a file, a saw. Needed for cutting wooden kitchen components. They are used to make cuts. They are also used to cut out a hole for a sink.
- Screwdriver. This tool allows you to speed up the build process.
- Hex key.
- Hammer, pliers, cutter knife.
- Level, tape measure, square. Necessary for taking measurements and monitoring the correct step-by-step assembly of kitchen cabinets.
Fasteners you will need to install the kitchen:
- euroscrew;
- furniture nails;
- rail or fastening strip for hanging;
- sealant based on silicone;
- 3.5x30mm self-tapping screws are also used in the work;
- anchor bolts;
- corner;
- furniture ties for fastening;
- dowels.
Where to start
You need to approach each job slowly and carefully think through all your actions.
Table. The procedure for making a headset
| Manufacturing stage | Brief description of actions and practical recommendations |
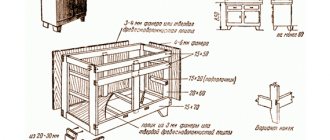
Design selection | You should not do an independent project from scratch; this requires special education and a lot of experience. It is much easier to choose a ready-made one and adapt it to your conditions. Now there is a huge selection of different options for kitchen sets with detailed diagrams, stop at the one you like, adjust its size. You can increase or vice versa, reduce the number of items, supplement them with your own decorative elements, change the material of manufacture. If you have basic knowledge, then use special programs for 3D modeling. Take measurements of the room and, taking them into account, experiment with the elements of the set. It is recommended to take into account existing size recommendations that meet ergonomic requirements - the most convenient dimensions for work are height (≈ 85 cm), width (30–80 cm) and depth (45–50 cm). |
Sketch of cutting map | A rather complex technical stage, the amount of waste depends on the correctness of its implementation. If you doubt your capabilities, we recommend contacting specialized companies. A more detailed justification for this decision will be given below. |
Purchasing materials | Kitchen sets can be made from various materials. But you need to know that even the cheapest ones can be of high quality and last for many years, and vice versa, among the expensive ones there are often defective ones. Before purchasing, you need to have a calculation of the total quantity - standard slabs are purchased taking into account the compiled cutting map. For a kitchen set, additional and decorative elements, fittings, and special fixtures are immediately purchased. You should always make a margin of 5–10%; the specific dimensions depend on the complexity of the headset geometry and your professional skills. |
Preparation of technological holes and assembly | This stage requires a lot of attention; errors will definitely be noticeable and will significantly worsen the appearance. What tools are needed, how all the fittings are assembled step by step can be read in this article a little lower. |
Checking the headset | At this stage, it is necessary to check the functionality of each element; it is not too late to correct errors. It is much easier to do this than to later repair fallen pieces of furniture; in addition, there are materials that cannot be repaired after mechanical damage. As long as the furniture is unloaded and all connections retain their original strength, troubleshooting is relatively easy and without much loss of time. |
If you decide to make a kitchen set yourself, then keep in mind that such work cannot be called easy; you will need maximum effort and patience.
Installing the bottom row of the kitchen
Kitchen installation should begin from the lower tier. At this stage, floor cabinets, countertops, a sink are installed, and a wall panel (apron) is installed. It is important to remember that it is better to install doors on the upper tier after installing the module.
Floor stands
There is a water supply in the floor-mounted corner cabinet, so you need to make cuts for the water supply and other communications. The position of all components and their angle of degrees must be controlled using a building level and a square.
Instructions for assembling floor stands:
- Using self-tapping screws, install cross-shaped fastenings for doors to the side surface of the kitchen walls.
- Screw the roller guides to the inner side surfaces.
- Insert all wooden dowels into blind holes.
- Screw furniture screws into dowels.
- Screw on the adjustable legs.
- After making a mark on the wall, adjust the furniture to the height.
- Place the cabinets in their place against the wall.
- Tie all the cabinets together with self-tapping screws (3 cm).
Installation of countertops and sinks
At this stage it is necessary:
- Place the tabletop on the lower cabinets.
- Leave a gap of 5 cm between the tabletop and the wall.
- Measure the blade and make marks for cutting.
- Place the sink on the underside of the structure and trace the outline of the sink with a pencil.
- Using a drill, make several through holes along the drawn line.
- Using a jigsaw, cut a hole for the sink.
- File the cut area.
- Use fasteners to secure the tabletop to the cabinets.
- Cover the end with covers that are secured with self-tapping screws.
- Install a sink into the hole made.
- Attach the siphon.
Wall panel installation
To protect the kitchen work area from contamination, wall panels are used. To install them, it is necessary to mark the surface, install the frame, and cover the sheathing with panels.
The covering starts from the corner. The panels are installed from top to bottom.
Door fastening
Door fixing guide:
- Screw the screws into the façade.
- Fix the cabinet hinges in special recesses.
- There should be cross-shaped plates on the inside of the case. Doors are hung on these plates. This also applies to glass kitchen cabinet doors.
- Tighten the hinges using a screwdriver.
- Check that the doors operate correctly.
Main types of kitchen layouts
So, today we can distinguish 6 types of layouts for such an important space of the house as the kitchen. Each of them has many features and nuances, which we will discuss next.
Linear layout
This layout is considered universal and the most compact. It is very simple to design, since it has no corners, because it goes along one line. That is why it has another advantageous feature - reduced cost.
Linear kitchen
However, the disadvantages of this type of layout clearly include the fact that the linear arrangement of the headset is very inconvenient, since, as you might have already guessed, it violates our basic rule denoting the working triangle.
This type of furniture placement is suitable for:
- small kitchens (Khrushchev);
- narrow kitchens, the width of which is no more than 2 meters;
- kitchens playing the role of a passage room;
- spaces for cooking in studio apartments.
Exhibition version of a linear kitchen
A linear layout is the best option for students, very busy working people and other categories of citizens who simply do not have time to cook at home.
Interesting advice! The following will help smooth out the inconvenience of linear planning:
- placing the sink in the middle between the stove and the refrigerator;
- increasing the height of the headset elements so that they come as close to the ceiling as possible;
- the location of the linear set at an angle to the wide window sill, which, in fact, will add another work surface to you.
Linear kitchen: drawing
L-shaped layout
This option is very convenient:
- versatility;
- compactness.
So, you can fit it into almost any apartment with any kitchen, because it allows you to use essentially “empty” space - a corner that is usually used as a place to install a flower or a brush with a dustpan. And if you install a cabinet there, you can make it deep enough to install:
- trash can;
- trays for storing root vegetables, etc.
L-shaped kitchen
Unfortunately, the L-shaped arrangement of furniture has a disadvantage - making such a set will not be cheap, since the corner element of the furniture row will need to be equipped with additional fittings, for example:
- carousel;
- basket;
- whatnot
In addition, such kitchens are always made exclusively to order, since the parameters of each apartment will be different in all cases.
L-shaped layout is suitable for:
- rectangular kitchens;
- small kitchens.
It is very convenient in this layout to place a sink or hob on a corner cabinet, especially if the corner is slightly sloping.
Corner element for L-shaped kitchen
Double row system
Using a double-row furniture placement scheme, it is convenient to create a working triangle, while using both walls of a narrow, rectangular room.
Two-row kitchen
The disadvantage of a two-row system is that this layout option will not work in a room that is too wide or too narrow, since in order to bring it to life, you need to have a passage in the kitchen about one and a half meters wide.
In addition, such a kitchen is characterized by the lowest degree of security, especially if it is a walk-through kitchen. But at the same time it is ideal for elongated and narrow rooms.
Variation on the theme of a two-row kitchen
U-shaped kitchen
This layout option allows the kitchen set to literally surround the cook, who at a convenient moment will be able to get the thing he needs out of the closet as quickly as possible. This kitchen is very spacious, however, it is considered the most cumbersome, since it requires a really large amount of space.
This kind of kitchen is perfect for large rooms, and sometimes even for Khrushchev-era apartment buildings, if they have wide and long window sills.
When planning the placement of a U-shaped set, keep in mind that the passage between the cabinets should be at least 100 centimeters and no more than 180, otherwise the room will become terribly uncomfortable.
U-shaped kitchen
Island kitchen
An island is the most functional solution for arranging a kitchen. Its advantages are as follows:
- it adds work space;
- allows you to divide the room into several zones, for example, for cooking or in the dining room.
Unfortunately, such an island can only be installed in a kitchen with an area of at least 18 square meters. This is the best option for a spacious kitchen.
Island kitchen
By the way, the island can also be used as a bar, storing drink containers and flammable liquids there.
One way or another, the island eats up a significant amount of free space, so don’t risk installing it in a small kitchen.
Installation of wall cabinets
The standard dimensions of kitchen cabinets are 90 cm, the height from the base of the countertop to the cabinet is 50-60 cm.
From the base of the tabletop you need to measure upward 50-60 cm and put a mark (this will be the bottom of the cabinet). Then add the height of the cabinet to this point and put another mark. All lines are drawn using a level.
Before starting work, it is necessary to assemble the hanging elements.
Fastening to furniture hinges
To hang cabinets on furniture hinges you must:
- Measure the height of the fasteners.
- Screw furniture hinges to the back of the body.
Rail mounting
This method of hanging upper cabinets on a rail is considered more reliable. The tire is installed horizontally, 3-4 cm below the top mark for installing cabinets. Hooks are attached to the inside of the side walls of the housing. A mounting plate is used to install these elements.
conclusions
As you can see, the height of kitchen cabinets is not so unimportant when buying a kitchen, and even more so when planning a renovation. Of course, it is extremely difficult to take into account all the nuances, especially when the suppliers themselves do not have all the information. But you need to strive, namely:
- When ordering kitchen furniture, check the height of the lower kitchen cabinets, with or without a countertop;
- Do the dimensions of the description take into account the height of the legs (if any);
- Please note that the cabinet sold is complete with legs. Whether they are adjustable or not;
- Is the kitchen plinth included? How it is attached and how it fits together.
That's all, good luck to you in arranging your kitchen. Comments are welcome.
Final work
The final work includes installing a plinth in the kitchen. Then they move on to installing built-in furniture.
In order to install the base, you will need the following tools:
- roulette;
- level;
- file;
- screwdriver, self-tapping screws, small nails and hammer;
- plinth system with connecting elements and fastening clips.
The base part is attached to the outer legs and several intermediate ones every 0.8-1.2 m. Special plugs are used to decorate the corners.
Useful recommendations for the customer
You may have to visit several stores or visit a significant number of Internet sites to compare prices and offers on delivery, guarantees, etc.
However, even if you have taken all these points into account, you may forget about the most important thing! Namely, that any room must be carefully prepared for the installation of new furniture to ensure the safe functioning of your future kitchen.
So, you have found the kitchen of your dreams. You assessed the dimensions of a new set of furniture, chose the necessary modules or a complete set, figured out how the products would look in the kitchen area, you were satisfied with the price, and you decided to order this “ideal” kitchenette. Great! Now you should start preparing the room for installation.
Our recommendations will help you avoid many mistakes.
Firstly, all passages and corridors must be clear so that movers can bring furniture into the house without damaging anything. To avoid damaging the flooring or introducing construction debris into the house, the floor must also be covered with cardboard or film. Naturally, the old kitchen, sink and sink must be dismantled.
Secondly, take care of the power supply of technical devices, lighting elements, correct placement of sockets, ventilation outlets, gas and water supply, and also prepare the walls for the installation of furniture.
Let's talk about this in order.
Problems installing the headset
Problems that arise when installing kitchen units include:
- uneven floor;
- fragile walls;
- gas pipes and meters.
Gas pipes and meter
To prevent gas pipes and meters from spoiling the appearance of the kitchen, you need to insert them into the kitchen wall cabinet. To do this, you need to cut the necessary holes in the back wall of the cabinet.
Uneven floor
To solve this problem, it is recommended to trim the lower decorative plinth using a jigsaw. Cover the cut edge with sealant.
Lighting
Another important point is comprehensive lighting of the kitchen area. This includes lighting the entire room using a lamp or chandelier on the ceiling, as well as the work area.
A very fashionable and stylish solution now is to install kitchen lighting using special lamps.
Let us remind you that lamps can be either fluorescent or halogen (or a combination of both). The former have their own switches, the latter do not. That is, the first need a direct connection to the network, the second - using a switch.
How to hang a cabinet on a plasterboard wall and other complex floors?
The “complex” group of materials includes cinder blocks, foam blocks, and drywall. The last one is considered the most difficult, so we will look at it in detail.
Of course, it will be much easier to install if there is a small plasterboard structure on the main wall. Thus, we can fix the fasteners by drilling through this box. It turns out that the presence of drywall does not play a special role here, because all fastenings will be installed using studs to the main wall.
It is much more difficult to install if it is an empty plasterboard wall with the finishing already completed. In this case, we will have to find the location of the metal frame parts and attach the fastening bar to them.
Fastenings for plasterboard frame
Important point! Any, even the strongest drywall will definitely not be able to withstand the weight of the cabinet, so you shouldn’t even try to install any structures just on the panel itself.
With ceilings made of foam blocks and cinder blocks, everything is much easier - they are very durable and can easily withstand the cabinet. Only in this case will it be necessary to use special screws during the installation process. They are inserted into the wall according to the standard principle, through a prepared hole.
The screws look like this
Despite the fact that cinder blocks themselves are very strong, they are empty inside. Therefore, it is better to use special long screws here.
Screws for multi-chamber units
If there is only empty space inside the block, you will need to make a through fastening with studs. However, it is not recommended to install too massive products on such floors.
