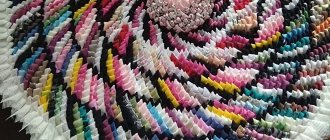
Rug on a hoop: progress of work
The original project used children's knitted T-shirts, but experience has shown that knitwear is not very suitable, as it does not keep its shape flat if it is stretched too much. Therefore, we recommend taking things from fabric with a minimal admixture of elastane, tape or just rope.
The size of the mat depends on the size of the chosen hoop; you can take either your daughter’s gymnastics hoop or a large weight loss hoop. The weaving technology is very simple; even a child can do it by making a round rug on a hoop for their room.
Cut T-shirts or other old outerwear into strips of equal width, from one side seam to the other, to form rings. Place each strip on the hoop: first a vertical line, then a horizontal one, and then divide each sector into equal parts with a strip of a T-shirt.
Important! The strips of fabric should not be very stretched, otherwise the finished rug will wrinkle and will not hold its shape. Ideally, the T-shirt strip should fit almost loosely over the hoop, with minimal stretching of the fabric.
It's likely that if the diameter of your hoop is larger than the t-shirt strip, it's too tight or you're using ropes at all. In this case, simply wrap the hoop in fabric or rope and tie a knot.
Try to have all the base lines intersect at the center point. We start weaving the rug from the center. Take a strip of T-shirt, fasten it with a loop to one of the warp lines and pass it under and over the longitudinal lines.
When the strip ends, tie another T-shirt ring to it, hiding the knot under the previous row. Continue weaving in the same way, alternating between pulling the strip under and over the longitudinal lines. Try to keep each circle pressed tightly against the previous one, avoiding large spaces or holes between them. Once you have finished weaving, cut off the ends of the loops with scissors and tie them with a knot.
Homespun rugs
The well-known weaving principle is also often used in the manufacture of homemade patchwork rugs. The role of the machine will be performed by a wooden frame, slightly larger in size than the intended canvas. Small nails are placed on the top and bottom strips at a distance of about 2 cm from each other, and a base is pulled over them from the same strips that were prepared for creating the canvas or from twine, which must be strong.
Its end is tied to the first upper nail, pulled to the parallel lower one, then to the second upper one, filling the space between the slats. The strips are pulled between the warp threads row by row, from time to time compacting what is collected with your hands or using a special wooden fork.
People often ask: how to weave a rug without a loom? The frame will be successfully replaced by a large sheet of cardboard. The cuts on opposite sides will act as nails, holding the warp threads. Further actions are the same as with the usual method.
You can use a plastic hoop with deep notches for weaving, stretch the warp along the diameter and lay the material in a circle. The difficulty is to lay the threads strictly between opposite points so that they intersect exactly in the middle.
T-shirt rug: weave a hula hoop on a hoop
What does it take to turn some old knitted T-shirts into a cute DIY round rug? Just a hula hoop waistband and weaving technique used to create a rope mat.
Another great idea for using up unwanted old t-shirts. Spending only 2-3 hours, you can weave them with your own hands into a soft, multi-colored and large enough rug for the floor.
This is interesting: How to make flowers from colored paper
Cut the T-shirts into rings of equal width. Stretch each ring onto the hoop: first a vertical line, then a horizontal line, and then divide each sector into equal parts with a stretched strip of T-shirt. Try to have all lines intersect at a central point. We start weaving the rug from the center. Take a strip of T-shirt, fasten it with a loop to one of the warp lines and pass it under and over the longitudinal lines.
When the strip ends, tie another T-shirt ring to it, hiding the knot under the previous row. Continue weaving in the same way, alternating between pulling the strip under and over the longitudinal lines. Try to keep each circle pressed tightly against the previous one, avoiding large spaces or holes between them. Once you have finished weaving, cut off the ends of the loops with scissors and tie them with a knot.
Did you like our site? Join or subscribe (you will receive notifications about new topics by email) to our channel in MirTesen!
We use unnecessary T-shirts in needlework
Wicker rugs are becoming increasingly popular when decorating home interiors. They are interesting to make, do not require material costs, and create comfort in a home environment. A braided braided rug will make a statement piece in any room.
Consider the option of using old T-shirts in weaving carpets.
How to prepare yarn to make a cable rug using material from old T-shirts:
- Cut off the top and bottom trim from the T-shirt;
- We cut the remaining canvas into a continuous strip 1.5 centimeters wide;
- Lightly stretch the resulting ribbon lengthwise;
- Roll the yarn into a ball.
In this way we cut several T-shirts of different colors. We braid the braids according to the length of the future rug.
We fasten the ends with rubber bands and tie them with thread so that the braids do not unravel.
We prepare the material on which the braids will be sewn. To do this, fold the fabric in half, sew along the seams, turn it right side out and stitch the remaining side. We place the braids one by one on the base, attach them or sew them by hand. We fix the ends by stepping back from the edge a few centimeters.
The end result is a beautiful and fun rug.
Rug woven from shreds
Materials needed for making it yourself:
- thick fabric (carpet base);
- pieces of fabric;
- black thread;
- needle;
- scissors;
- fabric glue;
- adhesive tape;
- spray for protective coating (if desired).
1. Select the size of the carpet and prepare a cloth of the appropriate size.
2. Prepare long strips of fabric. Each strip should be approximately 6-7 cm longer than the main part of the carpet.
3. Prepare several bundles of 3 strips and start braiding. You need several blanks so that you can combine them into one carpet.
For convenience, secure the ends of each piece with adhesive tape.
Don't weave all the way through - leave some of the fabric unwoven.
4. Apply glue to a thick canvas. No need to skimp on glue.
5. Carefully place the blanks on the canvas so that they stick.
6. Connect all the pieces together using a needle and thread.
7. Remove the duct tape from the ends. Trim the ends so they are even.
Preparing braids
The main material is braids, which are braided from cut fabric. To create them you need:
- Cut the material into strips 2-4 cm thick, they should be the same in type of material and thickness. Otherwise, the heterogeneity will be noticeable on the rug.
- If the material is knitted, then the edges may fray, so that this does not spoil the appearance of the product, make the strips as thick as possible and roll them into a tube.
- Short elements of ribbons need to be sewn together. To do this, use a sewing machine or hand stitch.
- Next is braiding your hair. It's not that difficult to do. If there is an assistant, then instruct him to hold the beginning of the braid; if not, then secure it with a clothespin at a height of at least 1 meter so that braiding is convenient. As the length increases, wrap the braids into a ball.
Pay special attention to the color palette of braids for the rug. You can use the materials that are available, or you can combine them by color, then the product will be original and bright.
Beautiful rectangular rug
DIY pompom rug: Option No. 1
Required material:
- wool thread;
- scissors;
- bath mat (with holes).
1. Wrap the wool thread around your fingers (the more you wrap, the fluffier the pompom will be).
2. Carefully remove the wound thread from your fingers. Prepare another short thread - about 20 cm long - and tie it around the wound thread (in the middle).
3. Cut off the ends with sharp scissors. Also cut off the excess parts with scissors to get a neat round pompom. But don't cut the thread you used to tie the pompom, you'll need it later.
4. Make enough pom poms to cover the bath mat. After this, begin to thread the thread through the holes and tie it to the rug, thereby attaching the pom poms to the rug.
The pompoms should be close to each other.
5. When you have tied all the pompoms to the carpet, you can cut off the ends of the threads.
Your DIY pompom rug is ready!
Making a braid
Perhaps this method can be called the simplest. To perform the work you do not need special knowledge, tools or skills. All you need is scissors and T-shirts.
To braid, first make the “yarn”.
- To do this, we cut T-shirts into long strips, but in a certain way. Starting from the bottom, we mark the T-shirt into strips up to five centimeters wide. We start cutting in strips, so as not to cut off completely, but as if in a spiral. You need to get as long a strip as possible from the T-shirt. If you stretch it a little, it will look like a thick thread. For convenience, you can roll it into a ball. We do the same with the rest of the T-shirts.
- Next, you need to take three threads of different colors and tie them tightly together and weave a braid. When one of the threads ends, we tie another to it and continue weaving. The result should be a very long braid. At the end you also need to tie a tight knot.
- To get a rug, you need to lay the resulting braid in a circle in a spiral. It is better to do this as tightly as possible so that holes do not appear. And try to lay them in one position, without distortions.
- From the wrong side we sew spiral rows. The mat is ready, you can already use it.
Related article: Applique in the preparatory group: a bowl of fruit and an autumn carpet
Simple pompom rug: Option No. 2
To make this blue and white pompom rug, you will need:
- thick woolen threads for knitting;
- mesh base for the rug;
- scissors.
This is interesting: Sugaring or waxing, which is better?
1. Make pom-poms in different colors to create a smooth gradient color transition. You can make a plain rug or lay out a specific pattern. You can also play with the size of the pompoms, using large, smaller and very small ones. To do this, look here for the best way to make pompoms of different sizes.
2. Now tie each pompom to the net, following the color scheme. Try not to see the outline between the pom-poms.
If desired, the back side of the rug with knots can be covered with fabric or knitting so that the pompom rug is beautiful from all sides, even from the inside out. If you couldn’t find a suitable base - a mesh - it doesn’t matter, pompoms can simply be sewn to any fabric.
Assembly
Putting the braids together is not difficult, and several methods are used for this. Options:
The first option is convenient and quick to implement. But for implementation you need a suitable foundation. This could be an old rug that has lost its attractive appearance or polyethylene foam. The last option is rugs that are used in the bathroom.
Sewing satin braids onto a terry base
The adhesive method consists of the following steps:
- Preparation of the base - cleaning from dirt, degreasing.
- Applying glue to the shape of the rug. You need to apply it in portions and immediately glue the pigtail.
- To ensure that the braids are firmly grasped, press along the entire plane.
- Wait for the product to dry completely.
- Use.
Simple round braid rug
As for stitching, the process is long but reliable. Such products can be washed without fear - they will not fall apart. You can sew by hand or using a sewing machine. In the latter case, it is more convenient to use a zigzag stitch. Stitching can be done without a base or with it; thick fabric can act as it. As for the manual method, it is labor-intensive, especially if a spiral technique is used. The seam should go on the wrong side, and to hide the wrong side, it is worth sewing additional dense material into the base.
Round foot mat made with a hoop
Old knitted T-shirts are actively used by craftswomen for a variety of crafts; in particular, the idea of making rugs out of them is very popular.
Necessary materials:
- 3-4 T-shirts (other things, ribbons or ropes);
- children's gymnastic hoop or hula hoop for adults;
- scissors.
It is recommended to take items made of fabric with a minimal admixture of elastane, tape or just rope.
The size of the mat depends on the size of the chosen hoop; you can take either your daughter’s gymnastics hoop or a large weight loss hoop. The weaving technology is very simple; even a child can do it by making a round rug on a hoop for their room.
Cut T-shirts or other old outerwear into strips of equal width, from one side seam to the other, to form rings. Place each strip on the hoop: first a vertical line, then a horizontal one, and then divide each sector into equal parts with a strip of a T-shirt.
Important! The strips of fabric should not be very stretched, otherwise the finished rug will wrinkle and will not hold its shape. Ideally, the T-shirt strip should fit almost loosely over the hoop, with minimal stretching of the fabric.
It's likely that if the diameter of your hoop is larger than the t-shirt strip, it's too tight or you're using ropes at all. In this case, simply wrap the hoop in fabric or rope and tie a knot.
Try to have all the base lines intersect at the center point. We start weaving the rug from the center. Take a strip of T-shirt, fasten it with a loop to one of the warp lines and pass it under and over the longitudinal lines.
When the strip ends, tie another T-shirt ring to it, hiding the knot under the previous row. Continue weaving in the same way, alternating between pulling the strip under and over the longitudinal lines. Try to keep each circle pressed tightly against the previous one, avoiding large spaces or holes between them. Once you have finished weaving, cut off the ends of the loops with scissors and tie them with a knot.
How to do it?
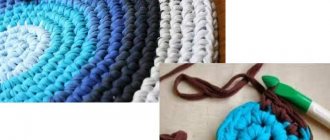
To knit or weave a patchwork carpet with your own hands, it is enough to prepare all the necessary materials for work and find free time. The simplest option will have a round shape.
To successfully complete the job, you should follow the recommendations of the step-by-step master class.
Preparing the ball. The fabric for it must be thoroughly washed and ironed. Cotton sheets and knitted T-shirts are suitable. They are cut into strips of 3-5 cm, the resulting sections are connected to each other with seams and smoothed. An average size rug requires about 200 m of base.
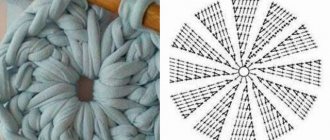
Creating a chain. It is knitted in the traditional way - with air loops (only 5 are enough). They are closed into a ring, which will become the basis for the future product.
Knitting 1 row. First, you need to knit a lifting loop through the center of the circle, then continue moving around the ring, forming double crochets in each loop and a half-crochet at the end.
Knitting 2 rows. Double crochets are also used here. A second loop is made from the first loop to increase the diameter of the ring.
It is important not to skip steps and act carefully.
Knitting 3 rows. At this stage you can change the thread color
It is important to remember that when knitting the 3rd row you need to alternate the first and second loops. In every second step, their number doubles: this way the diameter will gradually increase. After completing each subsequent row, the workpiece is placed on a flat surface and leveled.
From the 4th round, the number of columns from loops increases by 1 with each subsequent cycle. That is, in this row there will be 2 of them, in the 5th circle there will already be 3. You need to continue until the size of the rug reaches the desired values. Usually its diameter does not exceed 0.7-1 m; larger-format products are made oval or rectangular.
When knitting round and oval products, the movement occurs in a spiral. In this regard, it is necessary to carefully control the bending of the edges of the product.
Even a person far from needlework can easily master knitting round rustic rugs. With the help of correctly selected color combinations, you can create original decorative products in a retro style that can decorate the interior of a house or apartment.
If you want to get a rectangular product, at the very beginning the chain of loops is made to be much longer - the width of the future knitted rug. Next, knitting is performed in rows sequentially, without increment. You can use simple chain stitches or double crochets, choosing any desired length. It is not customary to make such rugs plain. The width of the alternating stripes can be different, ranging from 5 to 10 cm.
In the next video you will clearly get acquainted with the process of knitting a round rug from scraps.
Weaving a decorative rug (+photo)
In one of the previous issues of the “HANDWORK” section, you learned how to knit on your fingers, and today I will show you what can be made from knitted fabric. And we will start weaving a decorative rug, which will later become a wonderful decoration for the interior of your home or cottage!
This is interesting: Pavel and Alana Mamaev
For work we will need:
- hula hoop;
- an old, unwanted oversized T-shirt;
- a ball of multi-colored knitted fabric (it should be loose so that it can be compressed during work);
- scissors.

