Varieties
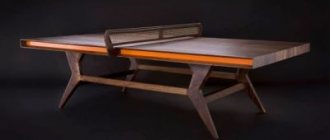
The exciting game of table tennis charges both adults and children with positive emotions, which is why it is very popular. Anyone can play it and have fun. You need to take care of a special table. Its design is simple, which allows you to make the product yourself if you wish.
Before you begin to implement your plan, it is worth deciding on the type of suitable tennis table.
- Stationary. This option is perfect for outdoor installation. It can be moved, but cannot be folded.
- Folding. The model will help save space. Such a table can be folded at any time and placed in a convenient place where it will not disturb anyone.
- Adjustable. This option can be adjusted to the height of the players. The product is easy to use and suitable for children.
- Mini tables. These models are great for transportation. You can take them with you to nature, on vacation. They will not take up much space in the trunk of the car. This table should only be placed on a flat surface.
- With a concrete countertop. This product for outdoor play will serve for a long time. He is not afraid of rain, wind, or the scorching rays of the sun.
- From glass. Durable, shockproof glass is used to make such tables. The model does not deform under the influence of moisture.
It is necessary to decide in advance on the area where you plan to install the tennis table. There should be plenty of space around the table so that players can move around freely.
As for the floor covering, it must be hard and perfectly level.
Brief rules for playing table tennis:
According to modern rules, a table tennis game goes up to 11 points over 2 serves. If the score becomes 10:10, the fight begins until the lead of one player is 2 points. For example, 15:13.
INNINGS
Serving in table tennis is carried out according to the following rules:
- The ball is thrown from an open palm vertically up at least 16 cm. At the moment of its flight, until it hits the racket, the ball must be exclusively above its half of the table: above the surface of the table, and also must not go beyond the edge line of the table .
- The server must hit the ball so that it hits once in his own half and at least once in the opponent's half.
- The serve must be executed in such a way that the receiver (receivers in doubles) and the referee can clearly see all phases of the serve. It is impossible, for example, to hide the moment of serving with the hand in which the racket is located, with the body or clothing.
- A serve is considered served as soon as the ball leaves the server's palm.
- If the ball caught the net during a serve, but all other rules were followed, a “re-serve” is declared - the server must repeat the serve (previously, if the ball touched the net during a serve and flew over to the other half, the game continued).
- After a successful serve, all other shots must be made so that the ball only hits the opponent's half.
ACCOUNTING POINTS
Points are awarded to the opponent when the player makes one of the following mistakes:
- Error when serving (for example, the ball hit the net);
- Incorrect serve (for example, the ball was not thrown 16 cm);
- When serving, the ball was hit twice on its side;
- The ball came to one's side after being hit by the racket;
- The ball was hit twice (since the hand from the wrist is considered part of the racket according to the rules, if the ball hits the fingers and then the racket, it is considered to be hit twice);
- The ball hits anything other than the racket after bouncing off the table (for example, the floor or a player);
- The ball did not hit the opponent's side after the kick;
- The ball was hit before it hit the table;
- The table was moved or the free hand touched the table;
- The ball did not enter the opponent's zone when serving.
What is prohibited in table tennis
- It is forbidden to wear a T-shirt of the same color as the ball.
- It is prohibited to touch the playing surface with either hand before hitting the ball.
- A quick palm strike when serving is prohibited.
- It is forbidden to wet the ball - a wet ball loses its properties, just like the racket.
- It is prohibited to use non-ITTF certified overlays.
To score a point in table tennis
Materials
Making an outdoor tennis table with your own hands is not difficult. It is important to first select the appropriate materials that will be included in the product. The following types of raw materials are used.
Plywood.
The modern market provides a wide selection of plywood sheets. This material is suitable for making a folding tabletop. The advantages include the absence of the need to additionally process the sheet. This will significantly save money and time.
When buying such material, pay attention that the product is of 1 or 2 grades marked “Ш1”. This means that the surface is moisture resistant and polished.
But such a tabletop will also have a number of disadvantages. The main one is sagging. You will need to use a rigid box-shaped main structure equipped with struts. Boards can serve as support, and self-tapping screws can serve as fastening. Disadvantages - the ball bounces sluggishly from such a tabletop.
To correct the situation, it is worth painting the surface with water-based acrylic paint. This is done in two layers. At the same time, the product will improve its moisture-resistant properties.
Chipboard.
Chipboard is often used to make such products. The quality of raw materials is directly affected by the manufacturer. For a stationary structure, a size of 2750x1500 mm is suitable. You can choose a sheet of blue or green shade. Then you won't need to paint the table.
It is worth remembering that the thickness of the chipboard is impressive, 16 mm. This option is suitable for implementing a strong, massive product. If you need to adjust the sheet to individual sizes, you can ask the sellers to trim the material.
The cost of chipboard will be more expensive than the previous option, but its quality and durability are much higher than that of plywood.
Laminated plywood.
When using such a table, the material will not be deformed. The raw materials are made from waterproof birch plywood. Non-flammable material is resistant to damage. Additional advantages of laminated plywood include a wide selection of shades, from which you can choose the color you like best. There is no need to paint such a table.
Thanks to standard sheet sizes, you can make solid and folding tabletops.
Mostly high quality plastic is used for the edges. The ball will bounce perfectly off the surface of the product, and table tennis itself will only bring pleasure. This material is quite expensive. However, the high quality characteristics are worth it.
Fiberglass.
This material is also suitable for making countertops. Sheets of it can be easily purchased at construction stores. It is better to choose a thickness of 10 mm. The shade can be any. Fiberglass, created using modern technologies, is quite durable and light in weight.
This table tennis table will be all-weather.
The material is resistant to various temperatures. You can safely place it in the yard without fear that the scorching sun will damage the coating. The model is highly resistant to deformation, protected from rotting, and has non-flammable properties.
Fiberglass is very expensive. However, the price consists of all the advantages of this material.
Composite aluminum.
Sometimes aluminum is used to create a tennis table. Similar material is used for semi-professional models. The thickness is 22 mm. Visually, the structure may resemble compressed chipboard.
This table can be safely placed outside. The material is durable, does not deform, and is not afraid of mechanical damage.
Many people think that when the ball bounces, it hits the table very loudly. However, this opinion is wrong. The material attracts with its practicality. The cost may be reasonable, but it is not cheaper than a table with a plywood top.
An outdoor tennis table is best made from all-weather materials. They will confidently withstand all the vicissitudes of the elements.
To protect against precipitation, experts recommend using water-repellent awning material or durable rolled polyethylene.
Amateur
These tables are designed for beginner tennis players who love this game, but do not aspire to become professionals. Such models have different dimensions, and the tabletop material is pressed chipboards. One of the subtypes of amateur models are mini-tennis tables, the dimensions of which are sometimes half that of a professional table - 110x61x64 cm. Thanks to their compact dimensions, they can safely be called children's tennis tables. The thickness of the table top for amateur models is 15-19 mm.
Tools
To make a tennis table with your own hands, you should prepare the necessary tools and materials in advance. You will need:
- hacksaw;
- screwdriver;
- drill (diameter 8 mm);
- regular pencil;
- tape measure;
- carpentry corner;
- different screwdrivers;
- chisel;
- open-end wrenches 12x13.
In this case, it is worth stocking up on materials: boards (the required amount), plywood, timber for legs, bolts, sets of nuts, hard sandpaper, moisture-resistant paint for the surface, screws for wood and others. Don't forget about the drawings. They should contain a detailed elaboration of the entire table image.
Other options
We looked at the simplest version of a tennis table. You can modify the drawing and make your own.
To avoid bolting, you can choose a grooved connection. A table made using this method will be easier to assemble and install. But in manufacturing it requires precision and care. If you make a larger cut than required by the drawing, you risk damaging the fastening and you will have to replace the beam.
As you can see, making a tennis table is not at all difficult. This will save you a significant amount of money and bring many pleasant moments.
Attention, TODAY only!
Drawings and dimensions
- The product will depend on the space in which it is located and on the design - whether it is a stationary table or a folding one. It is worth remembering that players must move freely when playing. The width and length can be changed, but the height should remain unchanged.
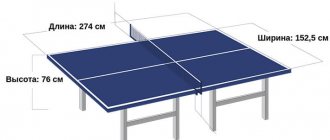
- For a standard table, you can use the following dimensions: 274.3x152.5 cm, height – 76 cm. This option can be made in just a couple of hours at the dacha. The parameters are adjusted according to personal desire.
- Two sheets of plywood (152.5 cm wide) should be placed on top of each other. In the center between the sheets there is a transverse fastener for installing the mesh. Its width is 183 cm. The tabletop is 2 cm thick. There should be a distance of no more than 0.3 cm between the plywood sheets.
- The central fastening will protrude 15-20 cm from the edge of the tabletop. The legs are attached at four corners.
What is the essence of table tennis?
This dynamic sport is played between two people (there are also 2-on-2 doubles matches). The action takes place on a tennis table, painted dark green or dark blue, which should have the following dimensions:
- Length – 2.74 m.
- Width – 1.52 m.
- Height – 76 cm from the floor.
A net is stretched strictly in the middle of the table (widthwise), the top edge of which should not be higher than 15.25 cm from the playing surface. The mesh is attached to vertical posts on each side (post height 15.25 cm). The bottom of the net should be as close to the playing plane as possible, and its ends should also be attached to the support posts.
To play tennis, a ball with a diameter of 40 millimeters and a weight of 2.7 grams is used. The ball must be made of celluloid or similar plastic. Depending on the color, you can use an orange or white ball.
Do you know? The best quality table tennis balls from a Japanese manufacturer cost about $2 apiece.
And now it remains to talk about the racket. It can be any size, shape or weight, but its striking surface must be flat and rigid and made of 85% natural wood. There should be rubber pads on both sides of the racket: one side is painted black, the other is bright red. Before the start of the match, the tennis player must allow his opponent and the umpire to inspect the racket he will be playing with.
We have the equipment and inventory, but how to play? It's quite simple. Tennis players stand opposite each other at the table, lots are drawn (who should serve first), then the game begins. The server must throw the ball vertically and then hit it with the racket so that it first hits his half of the table and then the opponent's half of the table. If the ball touches the net after serving, a re-serve is performed. The essence of the game is to keep the ball in the air for as long as possible, forcing the opponent to make a mistake first, thereby putting a point in your piggy bank.
Table tennis service rules:
- Before serving, the ball should be placed on an open palm.
- The ball is thrown vertically, at least 16 cm in height (serving from the hand is prohibited by the rules).
- It is prohibited to throw the ball above the table area, as well as from under the table.
- After throwing the ball, the server must remove the hand that was holding the round. This rule is established so that the receiver can clearly see the ball.
Players take turns serving two serves.
DIY folding tennis table
If you like to play table tennis, then you probably know how expensive ping ping tables can be. This project shows you how to make a DIY folding tennis table. Although this is a collapsible option, the design is still very durable.
- You will need medium density fiberboard, paint, steel hinges, screws, mesh and pine trestles.
- To make your own tennis table, cut and prepare the wood, paint, let dry, and then screw all the pieces.
The stand is not very heavy, so you can easily organize games in the garage or outdoors.
The actual dimensions of the table are 274 x 152 cm, due to the difficulty of transporting this table will be 200 x 122 cm.
First of all, you need to prepare a wooden board.
- Cut the board to size (remember: 200 x 122 cm)
- We make a horizontal cut up to two meters long, obtaining a board of the required size.
- After this, we again make a horizontal cut up to one meter long, obtaining two boards measuring 100 x 122 cm.
- Place the boards face to face on your workbench.
- We make a mark at a distance of 7 cm from the right edge, a mark up to 7 cm from the left edge and one mark on the last half of the board. These marks will indicate the positions of the three stitches.
Then the sequence is:
- Place three loops on the corresponding marks, aligning half of each loop with the slot between the boards. Mark the outline of the loops.
- Having made the marks, we proceed to cutting the wood, using a hammer and chisel, we make each notch on the hole made and hinges should be installed.
- Then we carefully sand all the wood so that the surface is as smooth as possible.
- Painting. We place the boards on overpasses or at the workplace. Using a roller and beaker, spread the primer evenly over the entire board. We wait 3 hours and come back to apply the second layer.
- Let dry for approximately 8 hours. Use duct tape to mark the margins. With a new roller and beaker, paint both boards green. We wait 6 hours and apply the second layer.
- We wait at least 8 hours until it dries and remove the adhesive tape. Our ping pong table is almost finished! Now install the hinges and screw them on.
- Check how everything works, paint the court lines and tighten the hinge screws. Install the grid. In principle, everything, you can start the tennis tournament.
The third stage - finishing and adjustment operations
The next step is to turn the structure over and place it on supports. Due to the excessive number of supporting legs, the tennis table turned out to be slightly “playy” and unstable. Therefore, the second, most difficult stage in the manufacture of equipment is the correct trimming of the dimensions of the supports.
To do this, you need to place the structure on the floor in the room where it is intended to be used, and measure the dimensions of the trim on specific legs. Trimming should be done using a hand hacksaw or saw. After leveling the position, thin rubber or leather is glued to the supporting surface of the legs to prevent the wood from sliding on the floor.
At the final stage, we prime all parts of the tennis table, paint it with blue paint and white enamel, and apply markings to the playing surface. Usually, in order to get perfectly straight lines, the flange is first sealed with tape, painted white, after drying, the white layer is sealed with tape and painted with blue or green paint.
What does a good tennis table look like?
According to the Olympic regulations, the optimal table dimensions are 2740x1525 mm. It is advisable to install the gaming table permanently and carefully adjust the level. The height of the table is 760 mm from the floor (ground).
Such a table will be quite large and you really need a lot of space for it (taking into account the required 1.5–2 m on each side). When making a table for children, for example, you can deviate from the recommended dimensions downwards; in the end, it is not the final size that is important. Much more important is the proportions of the table - the ratio of length to width should be 9:5. In addition, it is very important to apply the markings correctly.
It should provide a 20 mm wide edge around the perimeter and longitudinally divide the table into two halves with a 3 mm strip for playing in pairs. The marking color is white or light contrasting with the background of the table.
Table tennis ball
Table tennis balls are made from celluloid or plastic.
At the same time, plastic balls differ in manufacturing technology and are:
- Seamless. Produced by XuShaofa, Joola, Kingnik and other companies. The advantages of these balls are good rigidity and rebound, but they also have a disadvantage: when hit hard against an edge, the balls split.
- Suture. Seam balls marked G40+ differ from similar balls in that they spin less and fly more stable. Their disadvantage is their high cost. Balls are also produced from ABS plastic: they have a wide seam, bounce well and practically do not break. They are usually designated by letter markings: S40+, D40+, etc. Many companies are involved in production, including Nittaku, Andro, DHS.
The cost of table tennis balls depends on the quality and technology, as well as the number of stars:
- balls without a star - suitable for beginners and home games;
- 1 star - can also be used by beginners;
- 2 stars - for active training;
- 3 stars - for professional championships.
Requirements for balls
- The ball must have a spherical shape.
- In competitions they play with matte white or orange balls.
- The diameter of the ball is 40 mm, weight is 2.7 g. Such balls are marked “40+”.
- The ball must be made of celluloid or plastic.
Another way to make a tennis table
To assemble the table legs, you will need a 20x40x4 mm profile pipe, 6 m long, and 16 m of steel angle with equal 20 mm shelves, at least 3 mm thick. To give the tabletop exceptional resistance to moisture, its edges must be edged with an aluminum corner profile 20x20x1.2 mm, you will need sections of 280 and 160 cm - two pieces of each.
We dig in and shake up the table legs
A tennis table must be very stable. Its base, a metal frame, must be made conscientiously.
First, cutting the parts:
- Profile pipe: 4 pieces, 1.5 m each.
- Angle steel: 4 pieces of 1 m and 4 pieces of 2 m.
- the rest of the corner into 8 parts of 0.5 meters each.
We place two sections of pipe in parallel and connect them by welding with two two-meter crossbars made of angle steel. The first is installed 20 cm from the upper edge of the leg, the second - 70 cm below the first.
First, we assemble the frame using millimeter tacks, align the diagonals of the rectangle formed inside, and only then weld the seams tightly. The second pair of legs is assembled in the same way.
- In the place where the table is installed, you need to mark a 150x100 cm rectangle with pegs and lacing.
- With an indentation of 10 cm in each direction from the cord, the turf is removed and a small trench with a depth of a bayonet or a little more is dug; the bottom must be thoroughly cleaned. At the corners of the trench you need to dig four pits 75–80 cm deep and 50 cm wide so that the center falls exactly on the marking peg.
- Pour 10–15 cm of dry sand into each pit and insert the legs so that the upper ends are 80 cm above the ground. Align the legs in a horizontal plane using a long rule and a slatted level; the process will be more convenient if you place broken bricks under the lower crossbars.
- Connect the pairs of legs together with 1.5-meter sections of the corner, shift the attachment points by welding 50–60 mm below the longitudinal crossbars. After assembling the base frame, you will need to remove it from the pits, from now on you will not be able to do without the help of a partner.
- At 100 mm from the lower end of the legs, we weld cross-shaped embeds from 50 cm pieces of corner that will hold the table in the ground. Each welding seam on the product must be cleaned from slag with the angle grinder, and if necessary, more metal must be deposited on top. Afterwards, the pipe is degreased with acetone and coated with a phosphating primer, followed by the application of two layers of enamel of any type.
- After drying, the frame is installed in place, but now to level it you need to slightly embed the legs into the sand with gentle blows on their upper ends to a level of 75 cm from the ground.
- After this, the pits are filled with broken bricks mixed with soil and spilled with a bucket of water every 25 cm.
- Once the legs are in place, the top ends should be level. By laying the profile with a bubble level on the legs in pairs, the horizontal plane is checked.
If necessary, adjust the length of the legs by grinding off the excess with an angle grinder.
On top of each leg it is necessary to weld a square or triangular plate made of sheet steel with a thickness of 2 mm. The right-angle plate is aligned with the outer corner of each support so that the main part faces inward of the table.
The second stage - we cut out and fasten the frame elements
We turn the cut halves over with the finishing surface down and fasten the frame elements to the plywood. To do this, mark the installation line and secure the previously cut fragments using steel angles and self-tapping screws. The length of the screws in the corners should be no more than 15 mm, this ensures that there will be no traces of fasteners on the front surface of the plywood.
Next, after installing the boards, we will reinforce them in the corners, where the legs of the tennis table will be installed in the future. To do this, we use previously purchased power steel plates. We select the correct position of the overlays, and using self-tapping screws we attach the overlays to the corner strips of the frame in the places where the supports will be installed.
To make the legs of a tennis table we use timber with a cross section of 50x50 mm. To do this, cut out four pieces of 750 mm in length. This is 5 mm more than necessary, but this allowance was made deliberately; after assembling and leveling the plane, the size of the supports must be cut to the standard height of a tennis table.
In addition to the four corner legs, we will need to make and install two intermediate supports that will be installed in the center of the table. We cut them to length 760-100-15=645 mm. It is better to fasten intermediate supports using steel cheeks - plates 150-200 mm long. The method of attachment to the frame is clear from the photo above. A bolt with a diameter of 12 mm is threaded into the holes, a wide washer and a washer-grower are installed, and the entire fastening is tightened with a nut.
This method allows you to solve two problems at the same time - install intermediate supports and assemble the two halves of the tennis table into one structure.
Assembling and installing the countertop
- To begin with, a frame is assembled from 40x50 mm timber.
- It is better to take the actual dimensions at the outer corners of the already installed supports from the profile pipe.
- If the base is made without deviations, then the dimensions of the frame along the internal perimeter should correspond to 2080x1040 mm.
- You will need two beams with a length of 2160 mm and three with a length of 1120 mm.
- It is advisable to join the beams with a half-timber overlay or a tenon joint.
- The frame is assembled rectangular with a crossbar in the middle.
- Instead of the crossbar, which will be at the junction of the two halves of the tabletop, you can use the remaining strips of plywood in one layer or folded in half. If the halves of the table are joined with strips of plywood, then it is advisable to place them on glue and then additionally screw them in with screws along their entire length, in two rows.
- To combine the tabletop with the frame, strips of plywood are cut into three parts, the central part should fall between the long sides of the frame, and the short ones on the outside, not reaching the edge of the tabletop 7-10 cm, so as not to interfere with the installation of the mesh.
- The frame and tabletop halves are connected together using metal furniture corners and screws. The corners are distributed evenly along the inner and outer perimeter of the frame in increments of approximately 30 cm.
- The most vulnerable place of the tabletop is the ends; they should be reliably protected. Simple painting or end-tape will last 2-3 years, then chips and blisters will appear. Therefore, it is better to edge the table with an aluminum corner: we precisely cut the parts according to the final dimensions of the table: 1525 and 2740 mm, and make a cut inward at 45° for the ends that meet at the corners.
- In the centers of both shelves we make 3 mm staggered holes, the step in each row is 60 cm.
At the bottom ends of the tabletop, you need to chamfer 2.5–3 mm and apply silicone hot glue to the edge; use white plastic rods. An assistant should heat the applied bead of glue with a hairdryer until the end of the plywood is completely covered with it, then the aluminum corner is pressed tightly until excess protruding appears. Pay special attention to filling the corners.
After the glue has dried:
- Drill through the plywood with a 3mm drill bit through the holes in the corner.
- Countersink the metal to 7 mm.
- Reinforce the edging with 12mm countersunk screws.
- From the front side, excess glue is cut off with a sectioning knife. The corner will protrude above the tabletop by 2–3 mm; you need to rest the hacksaw blade against this edge at an angle and pull it with force 5–7 times along the entire length. Along this groove, the edge is broken off with pliers, then the end is finished with an abrasive stone until a 2 mm chamfer is obtained.
Painting a tennis table top
This procedure performs a double function: firstly, it provides protection for moisture-resistant materials (MDF, chipboard, plywood) from external influences, and secondly, it allows you to obtain equipment that is close in its aesthetic characteristics to its factory counterpart. It is best to use acrylic compounds of green or blue color as a dye, while the procedure for painting a tabletop involves the following:
- First, the tabletop is cut to the required size using sawing equipment (when cutting using a jigsaw, chips may form on the edges of the tabletop);
- Next, the sheet is cleaned of dust and chips (using a stiff brush) and coated with deep penetration materials (primer); if there are defects on the material (potholes, bumps), then the problem areas should first be covered with putty and treated with sandpaper.
- Acrylic dye is applied to a dry, prepared surface using a roller. The procedure is repeated 2–3 times after each previous layer has completely dried.
At this point, the tabletop is considered ready, and you can easily proceed to the next stage.
Table layout
Having turned the table over, stick strips of masking tape on the front side, separating the marking lines with exact dimensions, let us remind you: 3 mm central center line and 20 mm along the perimeter of the table. For reinsurance, it is better to cover free areas with paper and tape.
In open areas, remove the gloss with sandpaper, remove dust and grease, and apply white paint.
At the ends, we are especially diligent in painting all the places where the screws are screwed in. After drying, the table needs to be turned over and the entire underside of it exposed with enamel, especially carefully paint the corners and ends of the stiffening ribs. The frame is also painted on all sides.
All-weather table for outdoors and cottages
After assembling the tennis table, all elements must be primed.
If plywood was used for the tabletop, then additional painting of the playing surface will be required.
Before applying paint, the surface must be cleaned . It is recommended to paint in two layers (allow the first to dry before applying the second layer) and use matte paint to prevent glare on the playing surface.
After painting, the surface must dry, which will take at least a day .
At the final stage, markings are applied to the table. To do this, a white stripe, the thickness of which is 20 mm , is used to edge the playing field. The playing field itself is divided in half by a white line, the thickness of which should be no more than 3 mm .
Tip: to apply markings, use masking tape and spray paint.
Help : you can also make a table for a summer house, a gazebo or a folding table for a picnic.
Final table assembly
Now the tabletop can be determined by its legs and the levels can be accurately checked. The tabletop can be attached to the legs in two ways:
- In each of the four plates on the legs, three holes are drilled for the screws that secure the tabletop.
In the beams at the corners, it is enough to drill through holes with a diameter of 10–12 mm as close as possible to the tabletop so that the drill goes close to the profile pipe and under the support plate. In this case, the tabletop will be fixed with reinforcement rods or wooden pins inserted into the holes.
- The second option will allow you to remove the tabletop if necessary without unnecessary problems, for example, for indoor storage in winter.
Features of manufacturing legs
Adjustable furniture legs for use in outdoor sports equipment are not very practical. When installing the table on the ground, they will sink into the ground, and the tabletop will not stand level. In order for such legs to hold well, you need to use metal support structures. Also, such legs are evenly pressed into the soil to create stability.
Support structures for outdoor tables are made in the form of a “goat” from wooden blocks or boards. This prevents the tabletop from sagging in the future. The dimensions of the “goat” can be made to any size, but they must be 30 cm shorter than the width of the tabletop.
Making a tennis table with your own hands will significantly save money and will not take much time. Allows you to choose the desired design and size. It will delight your family and friends and allow you to practice your favorite sport at any time.
Bonus: DIY rackets
As a conclusion, we suggest you make a pair of tennis rackets yourself. , apply markings on a sheet of 4–6 mm plywood
- Draw a rectangle 20x160 mm.
- On the wide sides we add two semicircles with a radius of 80 mm.
- From the center of the figure we set aside one of the circles a rectangle 35x180 mm.
- We make a small joint at the base of the handle and cut out the workpiece with a jigsaw. On the handle we try on two strips of durable wood 6–7 mm thick, 35 mm wide and 100–110 mm long.
- We place them on PVA and squeeze them with clamps, then we process the handle and sawn ends of the racket with emery cloth until the chips are eliminated and an ergonomic shape is given.
Silicone mats (from kitchen utensils) or balsa wood can be used as a shock absorber. In the first case, the same hot-melt adhesive is used for fastening; in the second, concentrated PVA can be used.
First, apply glue to the racket, then place it on the edge of the sheet, press it and cut it along the edge of the plywood after drying.
Now all that remains is to secure the net and you can play.
Equipment weight
The weight of a tennis table depends on the materials from which it is made. Therefore, it is quite logical that the professional-class products you described are heavier than amateur-level models - for example, they even have a much thicker tabletop. The supporting structure of tournament tables is also heavier, which guarantees the equipment the necessary stability.
Even the most massive models can be quite convenient to assemble and transport due to special systems. And we will talk about this in the next paragraph.
What to cover with?
- If the tabletop for an outdoor table is made of plywood or chipboard, then it should be carefully treated with moisture-resistant, oil-based solutions. They are the most effective. Thanks to the oil, all the passages in the boards will be clogged and moisture will not be able to penetrate the material. Paints should also be waterproof.
- For professional sports, blue-green colors are used. Experts believe that these shades calm players and give positive emotions. In any case, it is better to use a tennis table cover. It will help prevent the device from coming into contact with precipitation. This will extend the life of the product.
- The all-weather tabletop is designed specifically for the outdoors. If you are making a table from this material, then paint is optional. This product will be designed for precipitation and various weather conditions.
In this article, we looked at how to make an outdoor tennis table with your own hands. Before implementing an idea, stock up on all the necessary high-quality materials and tools.
It is worth strictly following the pre-made drawing down to the millimeter. Only then will all the details fit together, and the table will be ideal for an active game of ping pong.
Equipment and accessories
When choosing ping pong equipment, pay attention to the selection of accessories: rackets, balls and nets.
Tennis table nets:
- They come in synthetic, cotton and metal. Synthetics and metal are suitable for public places; cotton is appropriate for the home model. Metal mesh is less susceptible to deformation and weather.
- Standard parameters 183x15.25 cm.
- The tension of the mesh is regulated by a cord located in the upper part. If the mesh is removable, then it is equipped with fastenings with clips or screws.
- The rules do not stipulate color, except for a white edge 1.5 cm wide. It is considered mandatory.
- When purchasing a table, a net may be included, with the exception of professional models that are not equipped with a net.
Table tennis rackets are divided into three groups:
- For newbies. The speed and torsion values reach 50, the control is 100 percent.
- Advanced. Torsion and speed increase to 70, control decreases to 90%.
- Professional. Torsion and speed indicators are 100, control - 90%.
When choosing table tennis balls, pay attention to the number of stars on the packaging:
- Cheap and simple ones have one star. They are short-lived due to the poor quality of the material and rough seams.
- High-quality balls are rated two to three stars.
- Balls for professional sports are ITTF certified: their strength is the highest.
