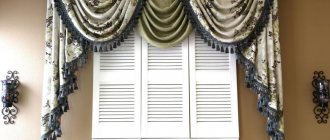
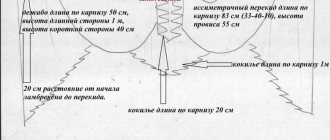
Do you want to make a beautiful lambrequin, but don’t know which shape to choose? Make swags with your own hands. You can take ready-made patterns or make your own according to size. The pleated semicircle is a classic that never goes out of style. Curtain salons offer such products, but it is not always possible to choose the right model, and sometimes custom-made ones are too expensive. If you are interested in how to make swags with your own hands, read on.
Types of products and their main parameters
This lambrequin element is a semicircle with folds. The swag consists of a middle, two shoulders and has depth. The shoulder is located along the cornice, and depth refers to the distance by which the fabric falls from the top line down.
Swags are of the following types:
- symmetrical;
- asymmetrical;
- with a vertical shoulder;
- mechanical;
- with sagging;
- turning into de jabot.
You can try to make a simple symmetrical swag even without a pattern, but a mechanical fold is obtained using curtain (mounting) tape.
Interesting Facts
Cutting curtains is a stage in the manufacture of curtains, which consists of cutting out (cutting) its parts from fabric in accordance with the required dimensions.
For simple-to-cut curtains consisting of rectangular pieces of fabric, this stage is practically invisible, since it consists of only two simple steps: laying the required length/width of the curtain along the edge of the fabric and cutting along the mark perpendicular to the edge of the fabric. For curtains consisting of one piece of fabric (for example, curtains), this is done at the stage of purchasing the material. But for curtains consisting of several parts of an irregular shape other than rectangular, cutting can be a very complex step, requiring certain skills and knowledge, including:
- methods for calculating the required shape and size of curtain elements in accordance with the model;
- features of laying the pattern on the fabric relative to the position of the weft and warp threads (straight or diagonal to obtain the desired effect from assembling the folds);
- options for the optimal arrangement of parts on the fabric for more rational consumption of material.
Since the cut of curtains is unique for each case (related not only to the size and chosen model, but also to the sewing technology, the width of the fabric, the presence and location of the pattern), and there are a huge number of such options, we will consider separately cutting out the most commonly used parts of the “irregular” shape curtains and features of their location on the fabric.
Symmetrical swag
Also called a “shell”, it is a semicircular element filled with folds that repeat its shape (see Fig. 1 - 3).
| Rice. 1. Symmetrical swag | Rice. 2. Two-color symmetrical swag | Rice. 3. Curtains with a lambrequin consisting of three swags and two de jabots |
To cut it out, based on the curtain diagram, determine the required dimensions of the finished swag (see Fig. 4, 5):
- total width - A
; - the width of the middle (central part without folds) – a
; - shoulder width – m
; - height/depth – B
; - the length of the lower edge - L
, which is determined either using a cord by measuring its length, having previously hung it on the width
A
and height
B
of the swag (see Fig. 5), or according to the table (see Fig. 6) in accordance with the width and the height of the swag.
| Rice. 4. Symmetrical swag scheme | Rice. 5. Method of measuring the length of the bottom edge using a cord | Rice. 6. Table of the dependence of the length of the lower edge of the swag on its width and height |
The pattern of a symmetrical swag is an isosceles trapezoid with a rounded lower edge (see Fig. 7), where the top of the trapezoid is the central part of the swag " a
"plus 20 cm (allowances for processing and folding), the sides of the trapezoid are the shoulders of the swag in a straightened form, and the rounded bottom is the lower edge of the swag. In order for the laid folds to be neat and evenly repeat each other without creases or bends, its cutting is done on an oblique, that is, its conditional central vertical line is at an angle of 45 degrees to the edge of the fabric or, which is the same, to the warp and weft threads.
Rice. 7. Swag pattern diagram
Construction
(see Fig. 8):
- Since the swag is symmetrical, the fabric is folded in half (so as not to put aside the required quantities twice) diagonally (for beautiful folds, as mentioned above).
- From the vertex “ o
” a segment “
ok
” equal to
a/2+10 cm
. - From point “ k
” at right angles to the fold of the fabric, a segment “
kc = a/2
” and “
cf = 10 cm
” (allowances for processing and folding) are laid off. - From the point “ k
” along the line of folds, lay the segment “
kt
=
H
”, where
H
= the number of folds multiplied by their depth, laid in the center of the swag (as a rule, the depth is 12 - 20 cm and depends on the drape of the fabric, its rigidity and desired appearance).
It is recommended that H
be no less than
2B and
no more than
3B
; the most optimal is considered to be from
2.6
to
2.8 B. As is clear from the above: the larger the value of H, the deeper the folds will be and, accordingly, vice versa. - From point “ t
” at a right angle to the fold of the fabric, a segment “
tb = L/2
” is laid off. - Connect points “ c
” and “
b
” with a line. - Through point “ f
” draw a line “
fn
” parallel to “
cb
”. - Lay an arc “ bd
” with a radius “
ob
”.
Note: the required amount of fabric to cut a symmetrical swag is a square with side E
(see Fig. 8), which is calculated using the formula
E=(a/2+10+H+L/2)/1.41
. As a rule, curtain fabrics have a width of 2.80 cm.
Rice. 8. Constructing a swag pattern
Then cut out the figure along the points “ fkdn
"(see Fig. 8), after which the cutting of the swag is completed. Next, to complete the swag, there is the stage of laying out folds and fixing them (see Fig. 9 - 12), trimming excess edges (see Fig. 13) and processing the lower edge with bias tape (see Fig. 14).
| Rice. 9 – 11. Formation of swag folds | ||
| Rice. 12 – 14. The final stages of making swag | ||
Asymmetrical swag
It differs from symmetrical in that its folds along the cornice are not symmetrically laid, that is, its left and right shoulders have different widths (see Fig. 15, 16). To cut curtains with an asymmetrical swag, you need to determine its required dimensions (see Fig. 16):
- total width - A
; - the width of the middle (central part without folds) – a
; - left shoulder width – m1
; - right shoulder width – m2
; - the amount of shift of the swag center - c
; - height/depth – B
; - the length of the lower edge is L
, which is determined in the same way as in the previous version of the symmetrical swag.
| Rice. 15. Asymmetrical swag | Rice. 16. Asymmetric swag scheme |
The pattern of an asymmetrical swag is a trapezoid with a beveled and rounded base (see Fig. 17), shown in bold outline. Where, as in a symmetrical swag, the top of the trapezoid corresponds to the central part, the sides correspond to the shoulders, and the bottom corresponds to the lower edge of the swag. It is the beveled bottom edge and laying the pattern on the bias that allows you to make beautiful asymmetrical folds, evenly and without creases, repeating each other.
Construction
(see Fig. 17):
- From the corner of the fabric at an angle of 45 degrees to its sides, lay a segment “ ok
” equal to
a/2 + 10
cm. - Through point “ k
”, at right angles to the drawn segment, a segment “
f1f2
” is laid out, which is equal to
a+20
cm, on which o and “
s2
”, respectively located at a distance of 10 cm from “
f1
” and “
f2
” (allowances necessary for processing and folding). - On the continuation of the “ ok
kt1
”
is laid H
”, the number of folds multiplied by their approximate depth in the center of the swag (as a rule, this is about 12 - 20 cm).
When determining the value of “ H
”, the same recommendations are taken into account as for “
H
” of a symmetrical swag (see above). - From point “ t1
”, parallel to line “
f1f2
”, lay a segment “
t1t2
” towards the wider shoulder (in this case to the left), equal to “
c
” - the distance between the centers of sagging of the upper and lower folds (see Fig. 16) or, what the same
(m2 – m1)/2
. - On the continuation of the drawn line, the segment “ t2t3 = a + 2·m2
” is laid out. - Perpendicular to the drawn line down from the point “ t3
”, lay the segment “
t3t4 = m1 – m2
”. - Draw a line through points “ t2
” and “
t4
”, at which o and “
b2
”, “
b1t2 = t2b2 = L/2
”, “
b1b2 = L
”. - Connect the points “ s1
” and “
b1
”, and “
s2
” and “
b2
” with a line. - Through points “ f1
” and “
f2
” draw lines “
f1n1
” and “
f2n2
” parallel to “
s1b1
” and “
s2b2
”, respectively. - From the point “ t2
”, perpendicular to the line “
b1b2
”, draw down a segment “
t2d
” equal to 1 to 1.5 times the fold value included in the calculation of the swag height. - The points “ n1b1db2n2
” are connected by a smooth arc.
Rice. 17. Construction of an asymmetrical swag pattern
The final stage of cutting a swag is cutting it along the lines connecting the points “ f1f2n2dn1
».
Note: to determine the amount of fabric required to make an asymmetrical swag, make a reduced drawing of its pattern (in proportion), on which the sides of the rectangle E1
and
E2
containing this element (see Fig. 17).
Swag with sag/cutout
Also called a crossover, it is a semicircular element with folded folds that repeat its shape and with a sagging upper edge. It can be symmetrical or asymmetrical (see Fig. 18 - 20). Its cut is similar to the symmetrical/asymmetrical cut, except that the upper edge of the pattern (trapezoid) is not equal to the distance between the vertices of the upper fold, but to its length - L1
, which is found, as well as the length of the lower one -
L2
, namely, either according to the table “dependence of the length of the sag of the swag fold on its width and height” (see Fig. 6), or by measuring the length of the cord suspended by the width and height of the sagging of the upper folds (see Fig. 21 – 23).
Determining the required amount of fabric for sewing a swag with sagging is done by analogy as for a standard swag.
| Rice. 18. Asymmetrical swag with sagging | Rice. 19. Symmetrical swag with sagging/cutout | Rice. 20. Curtain with a lambrequin consisting of a crossover and a dejabot |
| Rice. 21. Method for measuring the length of the sag of the folds of the fold | Rice. 22. Scheme of a symmetrical swag with sagging | Rice. 23. Scheme of an asymmetrical swag with sagging |
De jabot
It is a curtain detail with vertical folds and a beveled bottom edge (see Fig. 24). For the cut, it is necessary to determine its following values (see Fig. 25):
- length along the cornice – l
; - height of the long edge – h
; - short edge height – h1
Its pattern is a rectangle with a lower edge cut at an angle (see Fig. 26), whose upper edge is L
is equal to the sum of the width of the dejabot
l
and the depth of the fold multiplied by their number, and the vertical edges correspond to the side edges of this element and are equal to their length plus 4 - 6 cm for processing the upper edge.
| Rice. 24 – 26. (from left to right) De jabot (photo, diagram, pattern) | ||
Swag turning into de jabot
It is a one-piece piece that combines swag and de jabot (see Fig. 27). To cut it, it is necessary to determine the following values (see Fig. 28):
- size of the middle part of the proposed swag – 1;
- shoulder width – 2 (each separately for models with asymmetrically laid swag folds);
- height/depth of the proposed swag – 3;
- the length of the lower edge of the proposed swag is 4 (measurement method, see above);
- height de jabot – 5;
- the width of the frill along the eaves is 6.
| Rice. 27. Swag turning into de jabot | Rice. 28. Scheme of a swag turning into de jabot |
Construction (see Fig. 29):
- Construction of the pattern of the proposed swag “A1A2G1VG” according to the descriptions given above.
- From point “G1”, parallel to line “A1A2”, a segment “G1D” is laid equal to the sum of the width of the frill along the cornice and the depth of the fold multiplied by their number.
- Perpendicular to the “G1D” line, draw a segment “DD1” equal to the height of the de jabot plus the amount for processing the upper edge.
- Connect points “G” and “D1” according to the model of this part. Note:
as a rule, it is carried out with a reserve and is finally trimmed after assembling the part.
Note: if a symmetrical swag model is used in this curtain element, then the segment “G1D” will be a continuation of the line “GG1”; if it is asymmetrical, then it will not.
Rice. 29. Constructing a pattern of swag, turning into de jabot
The next stage of cutting a swag that turns into de jabot is applying the pattern to the fabric and cutting out the part along its contour, with preliminary transfer of the necessary marks to the fabric.
Note: to determine the amount of fabric required to make a swag turning into a de jabot, make a reduced drawing of its pattern (in proportion), on which the sides of the rectangle containing this element are measured (see Fig. 29).
Stages of cutting curtains
Note: Cutting curtains is carried out after creating a diagram of the curtain model and determining/indicating its main dimensions, therefore, for an example of cutting curtains, we will take a ready-made sketch of a curtain with dimensions, shown in Fig. 30, consisting of:
- two curtains with a gathering factor of 1.5;
- curtains with a gathering factor of 2.5;
- lambrequin, which in turn consists of three symmetrical swags, two asymmetrical crossovers and two de jabots (dimensions and location are indicated in Fig. 30).
Rice. 30. Scheme of a curtain with a lambrequin
1. Breaking the curtain into its component parts and determining the dimensions in finished form, according to the given model.
For our example:
- Curtains (height – 270 cm, width along the cornice – 350 cm) – 1 pc.;
- Curtains (height – 270 cm, width – 175 cm) – 2 pcs. (dark colored curtain fabric);
- Tiebacks (height – 5 cm, length – 50 cm) – 2 pcs. (light colored curtain fabric);
- Symmetrical swag (total width – 133 cm, shoulder width – 54 cm, middle part width – 25 cm, height – 50 cm, bottom edge length – 180 cm, number of folds – 7) – 3 pcs. (dark colored curtain fabric);
- Asymmetrical crossover (total width - 125 cm, width of the smaller shoulder - 17 cm, width of the larger shoulder - 54 cm, width of the middle part - 54 cm, total height - 50 cm, height of the upper sag - 14 cm, length of the lower edge - 173 cm, length of the upper sag – 67 cm, number of folds – 6) – 2 pcs. (light colored curtain fabric);
- De jabot (width along the cornice - 45 cm, height of the long edge 120 cm, height of the short edge 57, number of folds - 5) - 2 pcs. (light colored curtain fabric).
2. Determining the dimensions of curtain parts and drawing their patterns for complex shapes.
For our example:
- Curtain – 1 pc. A rectangular piece of fabric 280 cm high (270 cm + 6 cm, for processing the bottom edge, + 4 cm, for processing the top edge) and 883 cm wide (350 cm 2.5 + 8 cm, for processing the edges).
- Curtains – 2 pcs. A rectangular piece of fabric 280 cm high and 270 cm wide, calculated according to the same principle. For a description of sewing curtains and drapes, see here.
- Tiebacks – 2 pcs. A rectangular piece of fabric 14 cm high and 54 cm wide.
- Symmetrical swag – 3 pcs. Pattern in the form of an isosceles trapezoid with a rounded base, see fig. for drawing with dimensions. 31.
- Asymmetrical throw – 2 pcs. Pattern in the form of a trapezoid with a rounded base, see drawing with dimensions in fig. 32.
| Rice. 31. Drawing of a symmetrical swag pattern | Rice. 32. Drawing of an asymmetrical crossover pattern |
- De jabot – 2 pcs. Pattern in the form of a rectangle with a beveled bottom edge, width 135 cm (45 cm + 5 18 cm, fold depth), larger side side 124 cm (120 cm + 4 cm, for processing the top edge) and smaller side side 61 cm, calculation on the same principle. Note: along the width and bottom edge, do not add fabric to the edges, since the edge of the part in this case is treated with bias tape.
3. Determining the required amount of fabric. Layout of curtain parts on fabric in order to find the least amount of fabric consumption.
For our example we need fabrics:
- Thin translucent for curtains 8.83 m (with a fabric width of 2.80 m or more).
- Light curtain 3.25 m (with a fabric width of 2.80 m), see fig. 33.
Rice. 33. Scheme of consumption of light curtain fabric
- Dark curtain fabric 9 m (with a fabric width of 2.80 m), see fig. 34.
Rice. 34. Consumption diagram for dark curtain fabric
4. Drawing the contours of the patterns on the fabric and transferring the necessary marks.
5. Cutting out curtain parts along the contours of the fabric.
Sequencing
Whatever version of the product you choose, usually sewing a swag with your own hands consists of the following steps:
- Selecting a suitable model and drawing up a diagram.
- Taking measurements and calculating the size of the swag and the amount of material.
- Constructing a pattern or scaling a finished template.
- Positioning the part on the fabric (this is always done diagonally) and cutting.
- Creating folds.
- Sewing seams, finishing edges, hemming curtain tape or Velcro for attaching to the cornice.
The work at each stage may differ slightly, but in general the scheme always remains approximately the same.
What is a lambrequin?
The beautiful word “lambrequin” came to us from France. This is the name for a beautifully draped piece of fabric, which is attached to the window opening in its upper part and is a decoration of the entire curtain composition.
There are several types of lambrequins.
Simple
This is a piece of fabric that is placed into a gather on a curtain tape. It has a simple or figured bottom edge. The first option on the curtain tape is simple, the second is swag (a hanging gathering of fabric). In order to sew the first option, you need to fold and sew the bottom and side seams, and attach a textile tape to the top edge. The bottom of the product can be decorated with an arch. It is pulled together with tape and attached to the cornice. The swag option is draped in a certain way; to do this, you need to create the correct line of folds so that the fabric is even.
Soft
For this look, light flowing fabrics are used. They drape beautifully and look soft and airy. Soft lambrequins can be combined in various ways, such as frills, bells, crossovers or swags. Ruffles, ribbons or fringes are used for decoration.
Hard
For this option you need to choose a very dense fabric. It is stretched onto a frame made of wood or glued to a non-woven base. The so-called bandeau lambrequin does not have any bends or folds; it perfectly holds its shape, which can also be of different types - round, straight, curly. For decoration you can use gold embroidery, tassels, cords or flowers.
Figured
This is a beautiful decorative element reminiscent of lace. The openwork pattern can be made using a stencil and burned using laser equipment.
Combined
The combination of hard and soft types of lambrequin allows you to create original models. As a rule, they use 3 or more drapery elements. The main condition is not to overload the design with unnecessary details.
Size calculation
To make swags with your own hands (patterns using a ready-made template or making them yourself), you need to correctly determine all the parameters of the product. Calculations can be made using equations or a scale drawing.
If you are planning to have a lambrequin (swag), you need to know:
- cornice length;
- half the length of the lower sag (the arc of the hanging edge);
- depth, that is, the distance by which it “hangs” from the top line.
All this just needs to be measured using a window or a scale diagram.
If the lambrequin consists of several swags, you will have to make some calculations. Suppose the length of the cornice is 3.6 m, and you want to place 4 swags that overlap the adjacent one by 1/3. This is the minimum intersection value. If done without them, you need to divide 3.6 m by 4. In the case of overlapping parts, three overlaps of 1/3 each arise, that is, in fact, this is the size of one swag, so the length of the cornice is divided by 3. The size of the element is equal to 1 .2 m.
For symmetrical swags, a pattern is drawn for half the product, which is applied to the fabric folded in half.
For asymmetrical, a single blank is made, but the dimensions of each part, if there are several of them, must be calculated in advance.
Step-by-step master classes
Let's look in detail at how to make lambrequins with your own hands with patterns for beginners.
Simple lambrequin
Even a beginner can handle this model.
To do this, just follow a few steps:
- Measure the length of the window opening (for example, 220 cm) and calculate the length and width of the cut.
- Cut out a strip of fabric of the required size, from 30 to 60 cm long and 3 m wide. Add 3 cm to the width of the finished fabric to finish the edge.
- Finish the panels along the edges and bottom of the product using a hem foot or do it by hand.
- Sew the fabric to the curtain tape: bend the top of the fabric to a width equal to the width of the tape plus 1 cm, and press the hem with an iron. We sew the tape on one side of the central strip of the tie, first bending it 1 cm along the edges of the lambrequin. Then we sew the tape on the other side of the tie.
At the last stage, we tighten the canvas with a cord and decorate the home interior with new clothes.
Soft
Choose an airy fabric: silk, organza or voile. The model consists of the following elements: a sagging loop (swag) and side elements (tie).
- We make a drawing. We divide the length of the product into 3 parts: tie (¼ of the cut width) + swag (½ of the cut width) + tie (¼ of the cut width). The height of the lambrequin on the side is 2 times longer than the central part. Smoothly draw the bottom line of the canvas.
- We cut the fabric and form folds.
- We process the bottom with bias tape, and attach curtain tape on top. Don't forget to leave 3 cm at the edges of the fabric for processing.
Scheme
It’s worth making it a rule to make sketches of future lambrequins. This helps to choose the best arrangement of elements and their proportions in accordance with the size of the window, cornice, curtains. It is better to carry out the diagram on a scale, for example, 1:10. In this case, a three-meter lambrequin on paper will be equal to 30 cm.
If you adhere to this rule, it will not be difficult for you to find out any size of the lambrequin component. To do this, you just need to measure it with a ruler or count the number of cells of graph paper and multiply by the scale value.
You can carry out all constructions on a computer in a graphic editor or a specialized program NanoCad, which allows you to obtain drawings, patterns of curtains and their components with sizing.
Constructing a pattern for a multi-level crossover.
Craftswomen who want to learn how to sew lambrequins often ask the following query in a search engine: “Download a ready-made swag pattern for free.” However, this is the same as typing the following request: “Download a ready-made dress pattern for free.” Here you need to understand that swags, like the styles of dresses, are different, and they have different sizes, just like all the same dresses.
Therefore, there is no such thing as a universal free swag pattern.
To obtain a pattern for a given element, it must be constructed and constructed to the given dimensions.
people7
Then you will get a pattern for a swag or a crossover.
Perekid is the same swag, only with an open middle part.
In this photo you see a multi-level crossover, the shoulders of which are at different horizontal levels.
free swag patterns for lambrequinsDrawing for creating a pattern for this switch (svaga): free download swag pattern
Explanations for constructing a swag (crossover) pattern.
1.Draw the desired crossover (swag) on a scale of 1:1.
2. Label the small circuit acb and the large circuit adb.
3. Draw a horizontal line of arbitrary length through point c.
4. Measure the length of the small contour with a measuring tape and apply it to one and the other side of the swag pattern drawing from the c axis to determine points a and b.
5. Draw a line on side a parallel to the horizontal straight line a-b at a distance equal to height h.
6. Taking point b as the center, move point a to point a' by an arc of a circle to the line of height h.
7. Draw the upper part of the swag (crossover), connecting points a' and b, transfer the point to this line, taking point b as the center.
8. From point c', draw a vertical axis of arbitrary length. (This axis will coincide with the grain of the fabric when cutting the swag).
9. Add an increase (about 70%) to the height c-d of the swag pattern and transfer this total height to the swag pattern drawing from point c' to determine point d'.
10. Set aside 40% of the total height from point d' to determine point m.
11. From point m, draw a straight line parallel to line a' -b, and a horizontal line on the other side.
12. On a horizontal line from point d', mark the length of the large contour in the same way as the small contour (see point 4).
13. Taking point d' as the center, move points a' ' to a' ' ' and b' to c' ' along arcs to straight lines coming from point m.
14 A large contour can be drawn with a compass, taking as the center the junction of the axes c'-d' and d'-b' ' for the larger side and the axes d'-a' ' ' for the smaller side.
15. Curves a'-a' ' ' and b-c' ' can be drawn approximately.
That's it, the free pattern of a multi-level swag (crossover) is ready.
If you want to learn how to build “CORRECT PATTERNS” of various types of swags and folds with “teeth” folds, then my author’s video course will help you with this:
"COMPUTER CUT PLAMBREQUINS"
video course on computer cutting of lambrequins
You will find even more free swag patterns for lambrequins, various types of curtains and their constructions on the page:
Pattern making theory
If you want to download a ready-made “correct” swag pattern for free, then go to the page:
Ready-made patterns for lambrequin parts"
And you will receive this swag pattern, with jagged folds, ABSOLUTELY FREE:
scissors
lambrecen.ru
How to make a swag without a pattern
Do you want to make a round lambrequin? It’s easy to make swags with your own hands. For beginners, we can offer this option:
- Fold a square of light fabric (organza, veil) diagonally and mark the fold in the middle.
- Take a strip on which you mark the width of the swag, the middle and the shoulders. Hang the fabric at a forty-five degree angle. To see the center, hang a weight.
- Carefully form and pin the first fold. Make a “roller” approximately 10-15 cm in size.
- Make all other folds, maintaining symmetry and the same distance between them.
- Trim away any excess fabric and pin the top edge frequently along the pleat pinning line.
- Finish the bottom with bias tape or another method.
- Sew Velcro or curtain tape on top.
Getting even folds the first time may not be so easy, but it's worth practicing.
Stages of sewing an original curtain for the kitchen
See how to make a window decoration. Having mastered one type of sewing, you will be able to make all types of window decorations.
You will need:
- Main fabric;
- Fabric that acts as a lining;
- Curtain;
- One meter of cord.
Sewing instructions:
- Attach the curtain 10 cm above the window.
- Sew a cornice. Cut the main and lining fabric that will hold the folds.
- Fold the material right sides together, pin with needles, baste, stitch, leaving 35 cm at the top unstitched to turn inside out.
- Turn out, iron. Make folds.
- Fit the cornice to the curtain: center to center.
The second layer of the curtain is a cascade.
Cascade pattern.
A lambrequin made from a veil looks beautiful. Voile is a light transparent fabric that will decorate any window.
Take material of different shades and create a chic curtain.
- First, form the swag, placing it in the center.
- Then make a de jabot in a light shade (cut on the bias, complementing the swag).
- The detail for decoration is a mold, which is cut diagonally. The mold occupies the center of the structure.
How to make a pattern
If you don’t want to cut off a lot of excess fabric, you should use another method to sew swags with your own hands. Patterns will help you cut out the finished part and form folds from it.
The following constructions are performed:
- Mark a point and draw a right angle from it.
- Set aside a distance to the right equal to half the middle of the swag, adding 3 cm for processing.
- Measure down the depth of the product, multiplied by a factor that is 2 for hard, difficult to drape fabrics and 2.5 for soft, easy to drape.
- From the starting point, draw a circular arc with the radius of the vertical segment obtained in the previous step.
- From the bottom point, set aside a distance along an arc equal to half the bottom sag with an addition of 3 cm for processing. Close the contour with the resulting mark.
This is how a blank is made, for example, for a mechanical symmetrical swag.
Arched curtain
- An arched curtain is easy to sew and looks fresh and original.
- Take a piece of fabric, the height of which is equal to the length of the curtain + allowances, and the width is equal to the length of the cornice + allowance for gathering: (can be 2 or 3 lengths of the cornice).
- Next, fold the canvas in half lengthwise, cut out an arch whose width is equal to a third of the width of the window.
- You can sew ruffles and braid to the sections, and sew curtain tape on top.
- Then you need to tighten the canvas to the desired size.
- The top of the curtain can be decorated with an organza chill mold.
Dear friends, knowing how to sew curtains with a lambrequin will help you make your interior something that no one else will have. Creative success!
Use a ready-made template
If you are new to this business, in order to properly sew a swag with your own hands, it is better to take ready-made patterns. Now computer technology has greatly simplified search and work.
You can print the version you like in the desired scale on a printer. There are two ways:
- Make a pattern in parts on landscape sheets of home printing equipment.
- Order from a company that provides large-format image production services.
In the first case, you will do everything without leaving home, but you will have to glue the sheets with tape. In the second option, you won’t have to connect anything, but you will have to spend extra money.
Making swags
Sewing a swag is not an easy task and you will have to try hard. If you add a curtain lambrequin to it, then the design will look good and complete. However, it is worth knowing that the proportions between the swag and the lambrequin must be respected in order for the picture to look harmonious. To make it work well, you need to cut the swags into the curtains in advance and count the required number of festoons.
The festoons should look harmonious in the end, as if creating an overall favorable picture. The pattern, every detail and folds in this case require skill and accuracy so that the final result is good. Patterning an asymmetrical swag for beginners will reveal the intricacies of the manufacturing process and finishing it to the desired look. You will have to try hard, but once you have mastered the complex process, you will no longer be able to refuse such elegant curtains.
How to cut swag with your own hands
So, you have chosen a template or built it yourself, cut it out of paper. Now the most important thing is to correctly position the parts on the fabric.
This is done diagonally. As a rule, the pattern should indicate the direction of the grain thread with an arrow. So do this:
- Fold the fabric diagonally into a scarf shape.
- Attach the pattern to the fold line.
- Pin it in place with pins.
- Trace the edges with chalk or soap, do not forget about allowances in the right places.
- Cut out the workpiece.
Work is done. Now you know how to cut a swag with your own hands. You can begin forming folds and sewing.
How to decorate a window in the living room
Guests are most often invited to the living room. Where do guests' eyes go first? Of course on the window! Therefore, they try to decorate the windows in this room with beautiful curtains made of expensive fabric. Velvet is considered the most solemn and luxurious fabric.
Velvet curtains are complemented with tassels, fringe, and elegant braid.
It is best to hang velvet products in a living room, the interior of which is made in a classic style. The splendor of luxurious material will look good in a Rococo, Empire, Baroque interior, as well as next to a forged or carved wooden cornice.
How to work with velvet:
- Before cutting, carry out a wet-heat treatment to straighten the material.
- It should be cut in the direction of the pile from bottom to top so that the finished shade is deep and luxurious.
- When sewing, it is better to use silk threads.
- Make seams along the pile.
Velvet products love space, so they are hung only in a large living room. They will make a small room even smaller.
How to properly hang a lambrequin on a cornice?
If we are talking about a rigid lambrequin, then for this you will need adhesive tape (Velcro) and Moment glue - it should be noted that a rigid lambrequin is attached only to a flat surface. The tape with its sticky side is glued to the outside of the cornice, and the soft part of the tape is carefully sewn to the lambrequin from the inside out. Sometimes you can use thin fishing line instead of thread. The lambrequin is hung on the cornice, connecting both parts of the ribbon.
Some cornices are so beautiful that you don’t even want to hide them from anyone. Then everything is done in reverse: the sticky half of the tape is glued to the wrong side of the luxurious baguette, and the soft half of the tape is sewn on the good side of the lambrequin.
The soft lambrequin is attached with braid. On the front side, special hooks are attached to the cornice. A curtain tape is sewn to the softest lambrequin, after which the lambrequin is placed on hooks. To avoid sagging of the lambrequin, the hooks should be secured closer to each other.
