Types of roller blinds
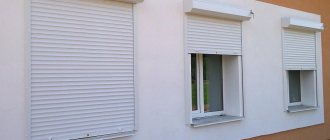
Fabric roller shutters are a straightened fabric sheet that is wound onto a shaft placed above the window. The bottom of the canvas is lowered and raised depending on the need for shading. There are several types of fabric roller shutters on sale, differing in size, mounting location and installation principle.
Classic open
The system of classic open curtains is best suited for wide openings, panoramic windows and bay windows.
They are mounted on the wall, ceiling, or in the opening. They move using a chain or spring mechanism.
Advantages:
- cheap, the cost depends on the area of the canvas;
- cover a large glass area at once;
- take up minimal space from the room.
Flaws:
- when lowered, they interfere with opening the window;
- get dirty faster with dust;
- require drilling into walls or ceilings.
The classic open curtain system is best suited for wide openings, panoramic windows and bay windows.
UNI cassette blinds closed
A shaft with a fabric roller shutter in a plastic box matching the color of the window frame.
The shaft with the wound fabric is hidden in a plastic box the color of the window frame on which it is attached. The blade adjustment is controlled by a spring or chain mechanism.
Advantages:
- the frame and guides merge with the contour of the window frame; when folded, the curtains are invisible;
- the guides are installed on the glazing bead, the canvas is almost adjacent to the glass;
- does not interfere with window opening;
- do not take away the window sill area;
- can be used on roof windows;
- You can install two boxes at the same time in the upper and lower positions.
Flaws:
- the most expensive design of fabric roller shutters
MINI roller blinds open
MINI open roller blinds are mounted on a window frame or sash.
They are mounted on a window frame or sash. Adjustable by chain mechanism.
Advantages:
- fastened without drilling the window profile;
- the guides are a stretched invisible fishing line;
- do not interfere with window opening;
- do not take up window sill space.
Flaws:
- require careful handling;
- glue can “float” in hot weather
An interesting variety of mini roller blinds is double day-night roller blinds. This is a canvas made of alternating dense and transparent strips of the same width, unwinding in two layers. Shading is done by combining stripes in layers. The main advantage of the model is the smooth regulation of natural light.
Day-night roller blinds smoothly regulate the level of natural light
When deciding which type of roller blinds to choose for a particular room, you should take into account the interior design, size and position of the windows.
- The space of deep window openings and window sills is usually used for decorative and functional purposes. It is recommended to install cassette roller blinds in them, which occupy a minimum of space and do not distract attention.
- It is better to decorate shallow openings without a window sill and narrow windows with curtains over the opening. A long cornice and a wide canvas matching the color of the walls will visually increase the size of the window.
For all types of roller blinds, it is possible to integrate an electric drive for automatic adjustment of the position of the curtain.
Taking measurements for cassette curtains
This type requires careful measurements, since the canvas will be installed in the opening. Pay attention to the shape of the beads securing the glass unit:
- Glazing beads with right angles indicate that you will need to measure the height and width of the glass between them;
- The beveled version involves measuring a larger distance between the beads.
Taking measurements for mini-cassette curtains
For class UNI 1, the glass size is calculated without taking into account beads.
When taking measurements from type UNI 2, data is taken on the sum of measurements from the glass and the width of the beads.
Fastening methods, choice of fixation type
Classic roller blinds are mounted on plastic brackets using dowels driven into the base. Depending on the design, roller blinds can be attached to plastic windows, or the base can be the horizontal surface of the ceiling or opening, the vertical surface of the wall or opening.
Classic roller blinds are mounted in the opening, behind the opening to the wall or ceiling
Cassette and mini-rollo are fixed to the window profile with self-tapping screws. But more often, models with fastening without drilling are used. The shaft, guides and clamps are glued to the profile with double-sided foam tape, and on the opening doors the shaft is additionally secured with a clamp.
The position of curtains with a spring mechanism is fixed by the spring itself. When the canvas is pulled down, the spring does not hold it. As soon as the tension has stopped, the mechanism clamps the shaft in the specified position. To raise the curtain, it is pulled slightly, releasing the clamp, and then released, allowing it to rise to the desired level.
The position of the blade in the chain mechanism is held by a pair of clamps placed on the chain. To prevent the chain on the opening window from drooping, a clamp is attached at the bottom of the profile into which it is tucked.
Nuances of fastening
To install curtains on wooden windows, only screws or self-tapping screws are used, and on aluminum windows it is preferable to use metal screws and blind rivets.
On wooden windows you can install curtains with plastic or aluminum guides on double-sided tape. Before installation, the adhesive tape must be completely removed, and the guides must be secured with screws. On aluminum windows it is advisable to use curtains without guides.
Preparation for installation
Before installing roller blinds on a plastic window, it is necessary to determine the dimensions of the product for each double-glazed window. The fabric should cover the glass well, but not extend beyond the frame.
- The mini-rollo canvas should be 3 cm wider than the glass. On the sash, the overlap on the handle side is 1 cm, and on the hinge side - 2 cm.
- The size of the blade in a system with U-guides mounted on a glazing bead exactly matches the size of the glass. If the glazing bead is oblique or rounded, the guides are glued to the frame. In this case, the size of the fabric is equal to the outer perimeter of the glazing beads.
- The canvas mounted in the opening should be 4 cm narrower than it. Measurements are taken at the window frame.
- The size of the curtain mounted on the wall or ceiling is determined depending on the design solution. It should be 10 or more centimeters wider than the opening, and its edge can go down to the window sill or to the floor.
All roller blinds are produced in the form of a designer kit with all the necessary components. There is no need to buy additional materials.
1 — Control mechanism for raising and lowering the curtains. 2 - Brackets. 3 - Guide line. 4 — Chain stops in the extreme positions of the blade. 5 - Bracket area with adhesive tape. 6 — Magnetic latches of the bottom bar
Taking measurements for “mini” curtains
In order to attach roller blinds to a plastic window you must:
- Measure the width of the glass and glazing beads, and then the length of the window sash;
- Decide on the mechanism. It is usually located on the side of the window hinges;
- Select the option to attach the curtain. Differences may arise and can be changed if the sash opens or is closed tightly.
How to attach roller blinds to plastic windows
Tools
- Drill or hammer drill (depending on the base material).
- A set of drills or drills for concrete, bits (depending on the base material).
- Screwdriver.
- Screwdriver Set.
- Dowels.
- Level.
- Pencil.
Operating procedure
- Remove the curtain and accessories from the packaging.
- Assemble the roll: insert the chain mechanism into the shaft with fabric at one end and the plug at the other; Attach the brackets to the shaft according to the diagram included in the package.
- Attach the roller blind to the mounting location, center it relative to the opening, and adjust the horizontal position according to the level.
- Using a pencil, mark the drilling points through the mounting holes in the brackets.
- Remove the brackets from the shaft.
Stages of installing roller blinds on a window frame - Drill mounting holes, drive in dowels, screw in brackets.
- If the curtain model has cable guides, thread the ends of the cable into the grooves of the brackets, tie with a double knot, and cut exactly in the middle.
- Insert the roll into the brackets with the canvas facing the window.
- Pull the free ends of the cable into the loops at the ends of the fabric plumb line.
- Screw the cable clamps to the wall below. Pass its free ends into the grooves and tighten with the adjusting screw.
- Insert the shaft clamps.
In a house with small children and animals, it is recommended to install fabric roller shutters with a spring mechanism. They don't have long plastic chain loops that kids and pets can get caught in or break.
Video: installing curtains outside the window
Velcro blinds
Velcro curtains are considered universal. In the case of a mini mechanism, one of the important elements is the double-sided tape that is attached to the back cover of the box with the drum during installation. For installation, you only need to carefully mark the location of the drum attachment on the blind or opening sash.
Remove the protective tape from the tape. The product should be attached to the marked place very carefully. The secured tape creates a strong connection. If you make a mistake, the adhesive layer will have to be completely removed from both the frame and the sash, and then repeat the procedure again: attach the adhesive tape with one side to the product, remove the protective tape and try to install the drum again.
The second stage is the installation of fabric guides. Aluminum runners are also equipped with double-sided tape. They are attached in the same way, only directly to the glazing bead in such a way that the fabric tucked into them moves along them without interference.
Save
Save
Installation in a window opening
Tools
- Drill or hammer drill (depending on the base material).
- A set of drills or drills for concrete, bits (depending on the base material).
- Screwdriver.
- Screwdriver Set.
- Dowels.
- Level.
- Pencil.
When installing a roller blind into an opening, using a spirit level is mandatory! Seemingly straight walls may turn out to be crooked, causing the curtains to become skewed, causing problems and looking unsightly.
Roller blinds installed inside the opening look aesthetically pleasing
Operating procedure
- Remove the curtain and accessories from the packaging.
- Assemble the roll: insert the chain mechanism into the shaft with fabric at one end and the plug at the other; Attach the brackets to the shaft.
- Attach the roller blind to the mounting location and level it horizontally.
- Using a pencil, mark the drilling points through the mounting holes in the brackets.
- Remove the brackets from the shaft.
- Drill holes, drive in dowels, screw the brackets.
- If the model has a guide line, thread the ends of the line into the special holes in the brackets, tie with a double knot, and cut in the middle.
- Insert the roll into the brackets with the canvas facing the window.
- Pull the free ends of the fishing line through the loops at the ends of the plumb line.
- Screw the fasteners for the guide line to the side walls of the opening, insert the free ends of the line into the special holes, and tighten them with the adjusting screw.
- Insert the shaft clamps.
- Attach the stops to the chain at the extreme positions of the blade.
Possible installation errors
However, not everyone can hang roller blinds. There are several reasons for this:
- Geometric irregularities. Often people are in a hurry and try to finish their work faster. Because of this, the parallels are broken and the shaft cannot be installed straight. Be sure to check the slope with a level.
- Twisting the self-tapping screws of the brackets. Because of this, the platform cracks and can break completely.
- Violation during assembly of the shaft and blade. Because of this, the curtain may not lower at all.
Before assembling the roller blinds, make sure the markings and design are correct. This video describes the easiest installation method, with which you will not make common mistakes.
How to hang a MINI open roller blind on a window frame
Tools
Installation tools will only be needed for roller blinds attached to the frame with self-tapping screws:
- Drill with a thin drill bit.
- Screwdriver.
- Screwdriver Set.
- Pencil.
The procedure is the same as when attaching a roller blind to a wall, with the difference that a hammer drill, bumpers and dowels are not needed. Most MINI models are fixed without drilling the window profile.
Operating procedure
- Remove the curtain and accessories from the packaging.
- Assemble the roll: insert the chain mechanism into the shaft at one end and the plug at the other, attach the brackets to the shaft.
- Attach the shaft to the frame, center it relative to the glass.
- Use a pencil to mark the outer sides of the brackets.
- Remove the brackets from the shaft.
- Degrease the mounting points. Attach pieces of double-sided foam adhesive tape to the profile according to the marks.
- For rolls mounted on sashes, connect the brackets to the clamp.
Installation of MINI roller blinds - Glue the brackets to the tapes, pressing the parts firmly against the profile.
- Insert the roll into the brackets.
- If the model has a guide line, thread the ends of the line into the holes in the brackets, tie with a double knot, and cut exactly in the middle.
- Insert the roll into the brackets with the canvas facing the window.
- Insert the shaft clamps
- Pull the free ends of the fishing line through the loops at the ends of the fabric plumb line.
Roller blinds for installation on the window sash without drilling are additionally fixed with a clamp - Stretch the fabric to the bottom. Attach the fasteners for the guide line to the bottom profile with double-sided tape. Insert the free ends of the fishing line, tighten them with the adjusting screw
- Attach the stops to the chain in the extreme open and extreme closed positions of the blade.
- For curtains on a sash with a chain mechanism, glue the chain retainer to the profile at a height of 10 cm from the window sill.
On windows of small height, you can do without a guide line. To ensure that the closed curtain does not move away from the window in the ventilation position, magnetic latches should be used. They are mounted on the lower profile of the frame and on the plumb line of the canvas.
To open such a curtain, do not forget to first disconnect the magnets and then pull the chain.
If you want to remove roller blinds from a PVC profile, you will face the problem of cleaning the plastic from glue. Take a household hair dryer and a cloth soaked in solvent. Heat small areas of glue with a hairdryer at maximum temperature and immediately wipe them off with a rag.
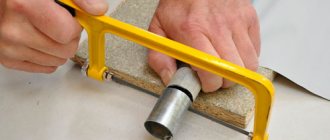
How to cut a curtain to width
This is not difficult to do. Required tools and materials:
- roulette;
- a simple pencil;
- flat bar 2 meters long;
- scissors;
- a strip of double-sided tape equal to the length of the curtain tube;
- a hacksaw or grinder with a cutting disc;
- drill with a 1.5 mm drill bit if necessary.
Operating procedure:
- Measure the length of the edges of the weighting material protruding from the canvas. Remove the weight.
- Unwind the fabric to the tube and remove it from the tube, removing the old tape.
- Measure the required width of the canvas from above and below with a simple pencil.
- Place a level bar along the marked marks and draw a solid line with a simple pencil.
- Trim off excess fabric with scissors.
- Mark on the tube a size equal to the width of the fabric plus 10 mm.
- Cut the tube.
- Cut the tape to a length equal to the width of the canvas.
- Remove one protective strip and stick the tape to the tube so that 5 mm of tape remains free at the edges.
- Remove the second protective strip and glue the sheet to the tube.
- Cut the weighting material wider than the canvas by the amount of the previously measured outlets.
- Drill the missing hole in the weighting material to allow the guide line to pass through.
- Insert the weighting material into the canvas.
Installation of cassette structures
Cassette roller blinds with U-shaped guides merge with the window profile
Operating procedure
- Remove the curtain and accessories from the packaging.
- Degrease the glazing bead and profile using the alcohol wipes included in the kit or a rag soaked in alcohol.
- Remove the protective film from the U-shaped profile and, pressing firmly, glue it onto the vertical beads.
- Remove the back of the box from the protective film.
- Release 10–15 cm of fabric from the box.
- Bring the box to the upper profile of the frame, thread the ends of the plumb line into the guides.
- Glue the box to the frame.
- Remove the box from the glued fastening corners. Press the corners firmly against the profile for security.
- Place the box in place.
- Attach limiters to the chain to allow the curtain to fully open and close.
- Hang a decorative weight on the bottom loop of the chain.
Installing roller blinds yourself at home or in the office is not that difficult. It will be much more difficult to choose from a huge variety of fabrics suitable for the interior.
Larisa Chaika
Problem four - inability to swap control units
Customers who buy fully assembled roller blinds leave the store satisfied. Their logic is clear: there is no need to screw or screw in anything, just attach the holders and hang the curtains on them. But my friendly recommendation to those who have chosen roller blinds to install on a frame is to buy models in which you can easily remove and put on the main parts.
There are cases when, in ready-to-use products, the control units are tightly attached to the pipe on which the curtain roll is wound. The drum-type block, through which the control circuit moves the blade, is located on the right side. It is unlikely to be possible to move this control gear to the left without rendering the shaft useless.
This means that two roller-type curtains with chains located on the right will appear on your window. One of them will inevitably be in the center of the frame. Firstly, it spoils the external impression. Secondly, the chain mechanism will become an obstacle when opening and closing the flap. The chain will constantly get stuck in the closed transom and one day it will become unusable. Save yourself from this “pleasure” - choose products with removable control units.
What kind of curtains are these?
Essential elements
A roller blind is a fairly simple design, which is most often mounted either on the window itself (in the upper part of the frame/sash), or on the wall or ceiling above the window opening. The mechanism used in such products allows you to quickly raise and lower the canvas, controlling the lighting in the room.
Open and closed options
- The basis of the product is a horizontal axis (shaft), which is made of either metal or plastic pipe. The axis is designed for winding the fabric, and therefore makes it perfectly round and smooth.
- Brackets are installed on the sides of the axis for fixing the product to the wall. The brackets are usually combined with a control mechanism - a special device that sets the curtain in motion.
- The mechanism that raises and lowers the curtain can be either open or closed. In the second case, the brackets, the axle and the assembled part of the canvas are located in a special box. The boxes are made of light and durable plastic: white, painted or laminated with a polymer film to imitate natural wood.
Typical product diagram
- A chain of metal or (usually) plastic links is attached to the mechanism, which sets the control unit in motion. This element is usually made closed: so we just need to pull either one or the other hanging edge, and the curtain will move.
- The main detail of this entire system is, of course, the canvas itself. It is mounted on an axis and rolled up. A vertical bar is fixed at the bottom of the canvas, which plays the role of a load. When the trigger is turned, the roll unwinds and, under the influence of a plumb line, the fabric is unwinded from the axis or pulled out of the box.
It is worth keeping in mind that there are a variety of modifications of such curtains on the market, which require different methods of fastening and different types of drive mechanisms. However, the general scheme of the device remains unchanged, so I can say with confidence: if you understand one model, then the likelihood of difficulties arising with others will be reduced to almost zero.
Advantages
Before hanging a curtain on a window, it’s a good idea to understand its pros and cons. Rolled structures have objectively more advantages:
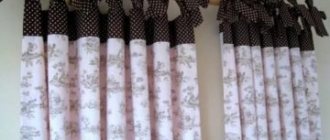
- First, and most importantly, there is almost limitless design potential. The canvas can be made of cotton, linen, silk, polyester, as well as synthetic materials - vinyl, fiberglass, non-woven fabric, etc. Naturally, the list of shades, textures and patterns will also be the most extensive.
Designer version with fluorescent printing
- Along with the attractiveness, it is worth noting the ability to choose the degree of shading: if you don’t want to lose light, choose translucent curtains; if you want to completely block the flow of sunlight, buy a dense canvas and ensure not even twilight, but almost absolute darkness.
These products have a lot of shades and varying degrees of shading.
- Some manufacturers have multilayer models in their product lines with the ability to adjust shading intensity, anti-glare properties, and increased thermal insulation characteristics. There are also curtains for rooms with computers: a layer of fabric on the inside, a reflective screen on the outside.
- Practicality is another plus. Most manufacturers treat curtain fabric with special compounds, so dust does not settle on the curtains, and dirt can be removed by simply wiping the surface with a damp sponge.
Caring for roller blinds is quite easy and simple!
This does not apply to old stains, so try not to let the situation get worse: complete wet cleaning of the fabric is possible, but in order to iron it without wrinkles or marks, you will have to tinker. And it’s not a fact that it will work out.
- I would also say the compact size is a key advantage - the curtains do not take up much space and do not interfere with the installation of flower pots and other large objects on the windowsill. Mini-curtains can be hung directly on the window sash - they will not interfere with its opening either in the rotary or tilt mode.
Curtain installation options
- Finally, I would include durability as an advantage: with proper care, the curtains will last you until you want to change something in the design of the room. And then they can be taken to the dacha!
Installation directly on the sash facilitates ventilation
Flaws
Such products also have disadvantages. I wouldn't call them any significant, but they need to be mentioned. So:
Installation and use instructions need to be understood
- If you have not encountered such designs before, then you will have to spend time figuring out how to assemble the product, how to secure it and how to use it. It takes a little time, but you still have to get used to it.
- The brackets and lifting mechanism of most models are made of plastic, which is quite fragile. That is why you need to use the curtain very carefully, otherwise there is a risk of damaging the gears, and you will have to lift the curtain manually.
- Before fixing such a product in the kitchen, carefully consider what material you need to use for the canvas. Fabric options tend to accumulate unpleasant odors, so they will have to be changed regularly.
- Washing curtains in water is strictly not recommended. Yes, dirt is removed quite effectively this way, but along with dust and grease deposits, the protective impregnation also goes away. In addition, after washing, ironing the fabric so that it acquires its original appearance is unrealistic!
In general, there are disadvantages, but it’s difficult to call them significant. Yes, some aspects need to be kept in mind, but I don’t think it’s worth refusing to buy a really cool thing because of them.
It turns out more expensive than installing blinds, but much more beautiful
Well, one last thing. Speaking about the advantages and disadvantages, we cannot ignore such a parameter as price . Here I am inclined to attribute curtains to the budget segment: the cost of one curtain 80 cm wide and up to 170 cm long is about 1000 rubles.
The simplest horizontal blinds for the same window opening will cost approximately 650 - 750 rubles, so the savings are insignificant.
If you want more, there is more, and much more!
Regular curtains can be found cheaper, but do not forget that for curtains and tulle you will also need a ceiling/wall mount, which will “eat up” all the savings.
User manual
- Movements are made without jerking, smoothly.
- Do not touch the fabric with wet hands.
- Do not hang products near radiators or stoves.
- If the mechanism jams, experts advise lubricating it thoroughly.
You need to use roller blinds carefully, as they have plastic fasteners
A variety of colors will help you choose a product for almost any room. The window will look unusual. It's economical and practical! With their help, it is quite possible to create a unique apartment design.
Components of roller blinds
In order to prepare the box, light wood species are used. The fabric must be environmentally friendly and non-toxic. The components of the cornice include:
- canvas;
- plugs on the sides;
- inside – control mechanism;
- on the side is the control chain.
Main parts of roller blinds
An example of an open type roller blind configuration
Where to begin
Choosing curtains is not a tricky matter. It is only important to decide on the installation principle. The canvas completely covers the window opening. In this case, the fastening is made to the ceiling or wall above the window frame. The latter is possible provided there is sufficient width of free space above the frame. Keep in mind that with this option, ventilation with the curtain closed is impossible. If there is an urgent need for ventilation when the curtains are closed, purchase designs that can be mounted directly on the sash.
Having chosen the desired model, start taking measurements using a tape measure. Why is it convenient to buy roller blinds - if the width you need is not on sale, you can buy a product with wider parameters. During installation, excess fabric is simply cut off.
When cutting a shaft, it is important to correctly calculate the required length. To do this, subtract 8mm from the required width (this is the width of the 2 mounting brackets). Trim the strip according to the required width of the curtain. Be sure to trim the canvas unfolded on a flat, hard surface.
Keep in mind that the width of the canvas (with guides) must exceed the width of the glass unit by exactly 3 cm. The curtain should not cling to the handle on the sash - this point is also important to take into account.