Drywall is a favorite finishing material among designers and builders due to its versatility and uniqueness. This relatively inexpensive material allows you not only to quickly and efficiently level surfaces, but also to implement the most daring and non-standard design solutions.
An excellent design idea is a niche in the bedroom.
It is made from environmentally friendly materials, which allows it to be used not only in residential buildings, but also in finishing rooms intended for children. The construction of drywall consists of sheets of cardboard and gypsum dough. The uniqueness of this material lies in the formation of all kinds of geometric designs. Using special technologies, it can be given convex or concave roundness, wavy surfaces, and rounded arches. It is indispensable when creating suspended ceilings, walls, partitions, shelves, racks, arches, niches.
Thus, you will not only add a touch of novelty to the interior, but also acquire a practical decorative element.
How to make a plasterboard ceiling with your own hands
To finish the ceiling with plasterboard, you will need a stable stepladder, a meter ruler, a building level, a screwdriver, a hammer drill (if the slabs will be attached to a concrete floor), a hammer, a hacksaw or metal scissors. To process plasterboard you need a drill with special round attachments, a jigsaw, a hacksaw, a knife, and fine-grained sandpaper.
The materials used are a metal profile, plasterboard sheets, screws, hangers and dowels, as well as paint, a roller and a brush for making the finishing coat. At the same time, it is worth purchasing wiring and lighting fixtures.
Installation of plasterboard ceilings consists of the following steps:
1) design and marking; 2) surface preparation (attaching a wall profile to floor slabs or wooden beams with dowels at intervals of 50 cm); 3) assembly of a metal frame (for complex structures, the profile must form the appropriate angles and be suitable in size); 4) placement of electrical wiring; 5) cutting sheets and preparing decorative elements from plasterboard; 6) alternately attaching gypsum boards to the frame; 7) cutting holes for light bulbs; 8) finishing work: plastering, painting, painting, installation of lighting fixtures.
Before making a plasterboard ceiling with your own hands, it is worth watching several videos with master classes in which experienced specialists describe in detail the nuances of the work. It is better to entrust the implementation of complex design solutions to professionals - this will help save time and make it easier to achieve the desired result.
Non-standard application
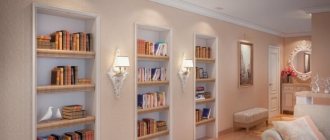
You can refuse to purchase cabinet furniture for the living room, replacing it with a very interesting and functional design. Decorate one of the walls in the room with decorative niches and shelves where you can place a TV, home library, flower pots, favorite family photos, children's toys, and many household items. A variety of niche shelves will fit perfectly into any room of your home - be it a bedroom, a children's room, a kitchen or a hallway. Such designs help organize space and often become the main accents in rooms.
Very interesting solutions can be implemented with conventional wall cladding. Drywall allows you to make almost any imitation. You can, for example, lay out an entire brickwork in a room, replacing heavy sand-lime brick with light plasterboard. In a large and spacious bedroom, you can build real columns: this way you can turn an ordinary room into palace chambers. You can remove all the doors in the apartment: leave the arched openings and decorate them with curtains with a lambrequin.
In large rooms, two-level plasterboard ceilings with hidden lighting will look great. If you build an additional niche in such a ceiling to install a curtain rod, which will be invisible, you will create an amazing feeling that the fabric is flowing directly from the ceiling. If the room is also provided with interesting lighting, it can create a mysterious and enchanting atmosphere. You can install a box with original lighting on the wall.
Preparatory work
Designing a niche in the bedroom wall involves the following preparation algorithm:
- choose the location of the structure;
- draw a drawing. It is best to draw a diagram of the entire room indicating the design parameters: depth, height, width and height from the floor. Here you should think through all the nuances of the design, as well as its functional load;
- calculate the amount of material required for work;
- prepare the work surface - remove all uneven surfaces from the walls and prime it;
- draw a drawing on the wall. First we apply markings to the floor and then to the walls. For accuracy and evenness of the drawn lines, use a level.
After this, you can begin the installation itself.
Optimal material for installation
Among all the variety of materials offered on the construction market, the most convenient and easy to use are plasterboard sheets. Fragility and fear of water are their main disadvantages. They have a smooth surface that is easy to process - putty, paint, wallpaper.
Before you go buying drywall, let's get acquainted with its variety:
- Arched;
- Wall;
- Moisture resistant;
- Fire resistant;
- Ceiling.
The thickness of the plasterboard is 12 and 9.6 mm. For the strength of the structure being built, we choose thicker sheets. Moisture resistant or wall, depending on the humidity level.
Ceiling - the thinnest. It is cheap. It will also work for cladding.
During the installation process, you will need profiles to ensure structural rigidity and self-tapping screws for attaching drywall to the posts and guides of the assembled frame. We study various photos of options for placing the bed in a niche, draw a working drawing, and make an estimate.
In this regard, the layout of the bed in a niche made of plasterboard is the best economical option. You can do without expenses, and spend the saved money on purchasing finishing materials.
Spot layouts
The main lighting areas must be equipped with a sufficient number of lamps.
- Spots at the head of the bed will not provide enough light for reading. For this purpose, it is better to install sconces or floor lamps. At the same time, soft lighting will help create a romantic atmosphere.
- The wardrobe should also have high-quality lighting. Harsh daylight will mercilessly reveal all the mistakes: small folds, pills, stains, etc. It is better if you can notice these shortcomings before you leave the house.
- For women, the area where makeup is applied is also important. This could be a dressing table, trellis, etc. The light should fall evenly, softly, without shadows.
With chandelier
The chandelier is usually located in the center of the ceiling. However, in some projects it is permissible to have two chandeliers on long holders, which replace sconces and floor lamps. If the room is elongated or has a curved shape, then it makes sense to make two zones, the center of which will again be the chandelier.
In the classic version, spots are placed symmetrically around the central element.
The most common schemes:
- Square. The spots are located along the perimeter of the ceiling at an equidistant distance from each other.
- Oval. The lamps form an oval around the chandelier.
- Two arcs. Two symmetrical lines in the form of an arc are formed around the central element.
- Parallel. Two parallel lines. It is often used when it is necessary to emphasize the decorative insert above the bed, which smoothly flows onto the ceiling.
- Corners. Corners are formed in two or four corners. Each of 3-5 spots.
- Snake or wave. It combines two chandeliers well in a large room and interestingly plays off one central lamp in an elongated bedroom.
Without chandelier
You can leave the option with spotlights without a chandelier. To do this, you need to calculate the required amount of light so that the room is fully illuminated.
Layout diagrams of lamps on a suspended ceiling without a chandelier.
- Matrix. The ceiling is drawn into cells, like in a school notebook. Spots are located at the intersections of lines.
- Spiral. The line twists into a spiral. In this case, a round, oval shape or the golden ratio formula can be used.
- Two arcs in the corner. One of the corners is formed by two parallel rounded lines.
- Diamonds. The spots form diamonds located along the center along the entire length of the ceiling.
- Starry sky. The matrix is located behind the film and is combined with the image printed on the canvas. LEDs and optical fiber are used.
With all this, it is not forbidden to combine lamps with LED strips.
Stretch ceilings allow you to create coziness and provide different lighting scenarios. Hidden from view LED lighting will make the ceiling “float”, a bright chandelier will help you see the smallest details on clothes, and the soft diffused light of the spots will help you relax and fall asleep.
Placement methods depending on the design style
Currently, it is encouraged to place several recesses in one room at once - of course, if its dimensions allow this.
They can be placed:
- symmetrical to each other;
- asymmetrical;
- combined.
The latter option is still rarely used in design projects, although it accumulates the strongest decorative potential. Symmetrical
located niches are a sign of an interior that has been carefully designed to the smallest detail, in which there should be no surprises.
The dictates of strict geometry are more suitable for modern design styles: loft, contemporary, Scandinavian minimalism
. Calibrated lines, absence of any curves, brevity and effectiveness in one bottle.
The reasons for such popularity of such architectural solutions lie in their applied nature: in the design styles mentioned above there is no room for anything superfluous - every detail of the interior must be justified, every square meter must be organized.
Space optimization as one of the trends of not only this year, but also next year in action. Sequentially placed recesses in the wall and in the classic format feel quite comfortable, but this is rather an exception that directly confirms the rule. As for asymmetry
, it usually characterizes interiors in
Provence, shabby chic, and vintage styles
.
There is a predominance of forms rounded at the top and framing. An interesting detail: most often, paintings, family photos, archaic vases and other objects
, which directly hint at the taste preferences of the owner.
Wall finishing options
How to decorate the corridor is an important point, which primarily concerns materials. You need to choose durable products so that the floor is easy to clean, the wallpaper repels dirt and does not absorb moisture, and the lighting allows you to “quickly clean up the mess” before going out.
The decoration of the corridor differs for private houses and apartments. For the first, you need to choose the most durable and easy-to-clean materials, since a person immediately brings all the dirt into the home, and does not leave some of it in the vestibule or on the staircase.
If you want to make the walls light, then it is better to divide them into two parts - the bottom is dark (about 50 cm), and the rest is light. This way, dirt from shoes and the hems of raincoats will not be so noticeable.
Wallpaper finishing
Covering the hallway walls with wallpaper is a cheap, simple and good option for a hallway of any size and purpose. In your Khrushchev or country cottage, a corridor with wallpaper will be elegant and neat if you choose the right design. There are no strict requirements in the color scheme, although most prefer light (beige, cream, coffee, white) or dark tones (burgundy, brown, dark green, black, dark purple). It is difficult to find beautiful wallpaper for the corridor in bright colors.
Installation of lamps in a plasterboard ceiling
To quickly and accurately make a round hole in a sheet of plaster for a lamp, you can use crowns of different diameters for gypsum boards. If such equipment is not at hand, then there is an easy way to cut such a hole with a jigsaw. To do this, you need to draw a circle, then, using a drill of about 10 mm, drill a hole in its center and, inserting an electric jigsaw blade into it, constantly expanding the circles in a spiral, cut a hole of the required diameter.
After puttying, sanding and painting the ceiling, lamps are installed in the finished sockets, which are connected to a block with terminals and secured in the drywall holes using spring clips. The LED strip is glued to the outlets of a galvanized mounting profile or directly to the painted surface of drywall.
What are niches?
It is quite difficult to list the variety of designs and shapes of plasterboard niches. They can be of various shapes: rectangular, square, round, or include many combinations. Niches also differ in size and depth. Based on this, they are divided into two types.
- Deep niche.
- Shallow niche.
By adding appropriate lighting, you can get a real fairy tale atmosphere.
Deep niche
This design can reach a depth of 40 cm or more. Most often it is mounted next to the sleeping area or above the bed. The advantages of such a plasterboard model lie in its multifaceted use. It will not only effectively highlight the head of the bed, but also convenient shelves, bedside tables, and cabinets.
Niches can come in a wide variety of shapes and differ not only in depth, area and design, but also in functionality.
How to decorate a niche in the wall in the bedroom:
- For ease of use, be sure to think through the lighting of this area. Spot lighting is often used, but wall sconces or table lamps on bedside tables can become a convenient addition and decoration.
- Spacious bedrooms allow you to use deep niches as room zoning. A small library with a comfortable chair and an original lamp, a wonderful and cozy relaxation area with a fireplace or a huge sea aquarium will be quite impressively placed here. You can completely hide a recess in the wall from prying eyes by placing a spacious, comfortable closet or dressing room there.
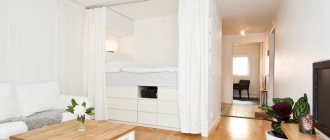
- For small apartments, a deep niche can be used as a wardrobe or a transformable bed. During the day it looks like a closet, and at night it turns into a comfortable sleeping place.
- An endless fountain of interior design ideas with a deep plasterboard design on the wall in a children's bedroom. Here you can create a play area or a sports corner, or equip a work area with a comfortable desk and plenty of shelves. And, of course, to create a cozy and fabulous sleeping place, in addition to the bed, you can place your favorite toys on comfortable shelves.
The niche will make you want to spend days in bed.
shallow niche
A shallow version of plasterboard niches serves more of a decorative function in the interior of a bedroom. As a rule, they are used as bright accents complemented by spectacular lighting.
This design will effectively highlight the headboard.
Here you can place chic panels made of textured plaster or mosaic, original stained glass windows and spectacular photo wallpapers, as well as mirrors. This design solution can become a decoration for the head of the bed.
In addition to beauty, it is also very practical.
The shallow design can also accommodate shelves with designer items, figurines or photographs in original frames.
If you cut out small shelves in it, the issue of storing remote controls, mobile phones and a night light will be resolved once and for all.
As a rule, the niche is decorated in the same style as the entire bedroom. The location of the niche is selected based on the layout, size, shape of the room, ceiling height and lighting. The choice of shape and size of the structure also depends on the shape and size of the room.
Convenience is the main rule that should be followed when arranging a cozy alcove for relaxation from daytime worries and night sleep.
A small bedroom will look more attractive with a vertically elongated niche or a square-shaped design. If the bedroom has high ceilings, it is better to use horizontally elongated niches.
A suitable option for spacious bedrooms and small rooms that lack volume.
Arch over the bed in the bedroom
The classic style involves the use of arched compositions in bedrooms above the bed with stucco molding and the use of light colors.
In order not to burden the bedroom design with a complex plasterboard structure, it must be decorated with lighting.
The arched design of the bedside area is typical of the oriental style. It allows you to recreate a princess’s bed with the characteristic mystery, originality and brilliance of decorations, as well as the variety and richness of fabrics.
The most striking and widespread solution is Moorish arches. The installation of such arches provides for various height parameters. The internal filling of these niches is distinguished by expensive lamps, decorative vases and other elegant little things.
The bedroom is designed for privacy, love, and relaxation. Therefore, its interior is thought out to the smallest detail and created with soul!
The arch above the bed will be perfectly emphasized by a canopy made of transparent colored organza with a large pattern made in oriental style gold or silver tones.
If the arch above the bed is deep enough, it can be decorated with plaster stucco or using textured plaster to create sophisticated romantic pictures, using soft pastel colors and original spot lighting with an emphasis on important details. You can complete such delicate and romantic beauty with a light transparent veil.
This area should evoke peace and harmony, so warm light is optimal.
