Options for implementing mirror lighting
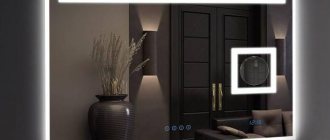
The easiest way is to purchase a ready-made illuminated mirror. However, it is not always possible to find an option that is suitable in size and style, so you have to use your own imagination and skills, creating an original version of the design with your own hands.
There are many options for mirror illumination, but the most successful of them is the use of an LED strip. It allows you to create a soft halo of light around the reflective plane, decorating and complementing the interior of the room.
LEDs are optimal in the bathroom - they are unpretentious, do not consume a lot of electricity, and have a long service life. Other types of lamps are significantly inferior to them in all respects.
A mirror with an LED strip should not have a complex shape. The best option is a rectangle with LED lighting around the perimeter or along the top and bottom edges (you can also use the sides). There are no fundamental requirements for the shape or size of the mirror, but practice has shown that the most advantageous results are demonstrated by the simplest solutions.
Important! The tape is installed from the inside, on the back side of the mirror sheet. This creates a soft and unobtrusive stream of light, does not irritate the eyes and does not dazzle when looking at your reflection in the mirror. You can use a special box, but it is easier and more effective to install the backlight directly on the glass surface.
My plans
After watching this video, I made a rough plan of what exactly I would do at home - in an ordinary 1-room apartment with an area of 46 square meters.
Kitchen:
- lighting the cooking area using this strip with 5 x 6 mm LEDs;
- the main lighting is a super-bright strip (luminous flux 9600 lm).
Hallway, room:
- main lighting – super-bright strip with a luminous flux of 9600 lm;
- additional spots in the hallway;
- wall dimmers with remote control - used to control the brightness of lighting;
- LED lamps in the bedside area - I chose them based on my experience of using a table lamp; they are perfect for reading.
Bath:
- main lighting – special protected tape for rooms with high humidity
- the lamp above the mirror – I haven’t decided on it yet.
Problem and solution
Having made plans for what I want, a new problem arose - choosing a store. It's no secret that the market is simply flooded with low-quality products. There are tens of thousands of offers on the well-known eastern Internet site, and choosing really good LED strips becomes simply unrealistic.
But I found a solution for myself, in Moscow, and at an adequate price. It was these guys who did the complex project mentioned in the video. Who are they? The LedRus company - its specialists have extensive experience in the field of lighting systems and will help solve the most complex problems. I hope that they will help me realize my ideas.
p.s. I will be glad to hear suggestions and comments on my “project”!
iPhones.ru
But just recently one could only dream of such solutions. We talked about smart homes. Let's talk about light ones
Yes, not about iPhones - just about what is important to every adult. To make your home bright, stylish and beautiful
How it all started While browsing the Internet to prepare the next article, I came across an interesting headline that...
QIWI: 9161768807
Tools
To create the backlight you need to prepare:
- mirror;
- brackets for hanging;
- glue for fixing the box to the glass (or tape to the glass, if necessary);
- LED strip with power supply and connecting elements.
In addition, you will need:
- ruler, square and marker for marking;
- electric drill with special drills for making holes in tiles;
- a hammer drill with a drill, the diameter of which corresponds to the size of the holes in the tile;
- dowels and screws;
- soldering iron with solder for connecting contacts;
- screwdriver, pliers, etc.
The listed tools represent a minimum set; additional devices may be needed during work.
Drilling holes
You need to drill holes in the places where the light bulbs will be.
First, you can make holes with a regular drill. Next you will need a round bit for drilling large holes. Their size should be equal to the diameter of the light bulb sockets.
After drilling is completed, each hole must be treated with sandpaper and wiped with a damp cloth to remove dust.
Selecting LED strip
Choosing a ribbon is an important and responsible procedure, on which the success of the entire event largely depends. There are a large number of LED backlights on sale, with different power, type and number of LEDs, glow color, etc. There are a lot of options, so you need to firmly decide in advance what to choose so as not to waste time choosing in the store.
Attention! It is necessary to take into account the operating conditions of the backlight. The bathroom is a wet room, so you should buy tape with a high humidity protection class (IP67). In addition, you should decide on the brightness and power of the tape. In this matter, you need to be prudent and abandon powerful models, since the backlight will be right in front of your face.
Excessive brightness will be unpleasant and will not allow you to look normally in the mirror. The best option is a summer with a power of 4-8 W/m, with SMD 3528 LEDs, the number of elements is 60 pcs/m.
Incandescent lamps
Regular light bulbs. Light can be provided using several ordinary light bulbs of the required light and incandescent type. They are connected in one chain and turned on through a socket and switch.
In this case, it is necessary to provide a convenient placement of the outlet. It should not be noticeable; this is a stage of planning the entire room and the electricity in it.
If the tiles are already laid, it will most likely be quite difficult to make an additional outlet without damaging part of the tiles.
power unit
LED strips require a separate power supply. They are connected to their own power supply, which converts alternating mains voltage 220 V 50 Hz into direct current 12 V. The choice of power supply is made according to the power indicator of the tape.
Here you will have to make some calculation - the power per linear meter (indicated in the technical specifications) should be multiplied by the total length. The power supply is selected with a margin of 15-25%, but not more than 50%, so as not to overload the LEDs. This is dangerous for them and can put them out of action ahead of time.
Touch button and light strips
The first thing you need is, of course, the mirror itself. Each one will have individual sizes and shapes.
If possible, order a mirror with a facet.
In addition to beauty and the play of light on the sides, this beveled edge will add safety.
At the bottom of the mirror you will need to visualize a button.
To do this, you will need to remove the amalgam or reflective layer from the back side.
Mistake #1
Without removing it, the touch button will not work.
Even if you know exactly where it is located and will point your finger at this area.
Choose the appropriate button shape yourself - a square or a circle.
How to make it on an initially solid mirror base? There are three ways.
Mistake #2
The simplest and cheapest is to carefully drill out the protective coating from the back side with a diamond core bit or grind it off with a diamond cutter for a Dremel.
Although the method is working, the result is a “collective farm”.
The most difficult method is sandblasting. This service is usually provided by those who professionally deal with mirrors (cutting, processing, drilling holes).
How to remove amalgam at home without resorting to outside help? Chemistry will help in this matter.
Mounting method
The best option is to hang the mirror with your own hands on self-tapping screws installed in the wall, through the holes in the tape box. This is the most convenient option, since the box will still have to be made. 2 holes are made in the top bar of the box, the distance between which corresponds to the distance between the screws (or hooks) fixed to the wall. It is necessary to accurately measure the height so that the mirror is located in the correct and comfortable position for all family members.
There are various types of ready-made mirror mounts available for sale. If necessary, you can use them, but it is advisable to choose a design that best matches the size and other features. It is important to remember that the box located on the back side will create a gap between the glass and the wall.
Important! The mount must be selected taking into account this distance, otherwise it will be impossible to use it and you will have to make the brackets yourself.
Reflector installation: which material is more convenient to use?
Initially, it was planned to use sheet aluminum as a reflector. But this plan was not destined to come true. The reason for this was the high cost of the material and the complexity of its processing. The solution came during the installation of the frames - to use a regular glossy PVC panel. This turned out to be correct. The material is easy to process and does not require large financial costs.
First, all parts of the reflector were cut out and tried on. To fix the plastic panel on the inner frame, holes were drilled in the aluminum profile.
Fitting the panels took a minimum of time - processing the material did not cause any problems
Network connection
Under normal conditions, you connect the tape yourself to the network via a power supply - the device is plugged into the network, and the tape is connected to the 12 V output. In this case, there may be different connection options. For example, if you need to automatically turn on the mirror lighting when you turn on the general lighting in the bathroom, the power supply is simply connected to the switch.
However, some users find it necessary to start the mirror illumination themselves and not use it constantly. To do this, you need to install a button (microswitch) on the frame (box), which will turn the lamp on and off at the request of the owner.
Frame preparation
If the existing frame matches your color, you can immediately begin marking it. You can also pre-paint the frame to your liking.
Count how many lamps are in your garland. Calculate at what distance from each other they will be. Mark the mounting locations for the lamps on the frame.
Step-by-step instruction
Let's look at how to make LED lighting for a mirror with your own hands. Procedure:
- Develop a project or at least a working drawing. This point should not be treated as a waste of time, since careful consideration of details and advance calculation of all necessary materials and tools will help to quickly and efficiently complete the work and obtain the expected result.
- Assemble a box for the LED strip according to the size of the mirror. As a rule, it is a frame glued to the surface on the reverse side. Its size is 8-10 cm smaller on each side than the length and width of the mirror - this ensures hidden installation of the lamp. The easiest way to do this is to use duralumin corners or a rectangular pipe. Some difficulty will arise when cutting corners at 45°, which is best done on a pendulum machine or, which is somewhat worse, manually using a miter box.
- Drill holes in the top bar of the box (frame) for hanging on the wall. (This item is necessary if special fasteners or brackets are not used).
- Place the mirror on the front side. Glue the frame on the back side, ensuring an even distance from the edge on all sides.
- Glue LED lighting to the outer sides of the frame. You can use your own adhesive layer provided on the tape. Double-sided tape or waterproof glue will also work.
- Connect the parts of the tape with connectors, attach the wires and hang it on the wall.
- Connect the wires to the power supply, and connect the unit itself to the network. Use one of the options for turning on the backlight - either from a general light switch or from your own button.
- Perform a test run, and if any problems are detected, correct them using the appropriate method.
The specified procedure is given as an example; in each specific case, deviations or additional points are possible.
For the corridor
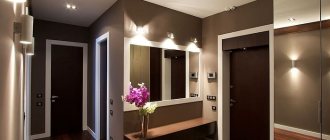
If you need to illuminate a mirror that is placed in the corridor, you don’t need to invent anything special: the best solution is wall sconces. Installation of these lighting devices is carried out according to the standard scheme.
This number of sconces is quite enough to illuminate the mirror in the hallway
As for their location, a completely acceptable option is on the sides or on top. Depends on how much space there is on each side.
Procedure:
- Turn off the machines on the dashboard.
- Stretch the wires if there are none. Before starting work, check where the phase is and where the zero is.
- Draw conclusions for mounting each lighting fixture.
- Mark their location on the wall.
- Hang the sconce and connect it to de-energized wires.
- Screw in the light bulbs.
- Turn on the machines on the dashboard.
- Check functionality.
- Enjoy using it.
Play of light in mirror surfaces and sconce elements
This is interesting: Popular types of milkweed (video)
Main conclusions
Do-it-yourself illumination of a bathroom mirror using an LED strip allows you to decorate the room and complement its interior with a stylish and effective element. Installation and installation of lighting is not fundamentally difficult; all that is required is care and thoroughness in performing all operations.
The result will not only decorate the room, but will also make using the mirror more convenient, improve visibility, and improve the quality of all hygiene procedures. If you have your own options for making the backlight, you can outline them in your comments. Both experienced and novice craftsmen need new ideas.
Previous
LEDsTechnical characteristics and features of choosing two-pin LED lamps for cars
Next
LEDsHow to measure and improve LED efficiency
What's next
Having studied the main advantages and characteristics of LEDs, as well as strips using them, I began to think about what options to implement in my apartment. And there really are many examples. Here are just a few of them.
New feature! Photos are grouped into a gallery - to view the next/previous one, click on the arrow.
However, I was interested in complex projects that span the entire space. And I found this option, although YouTube rather helped me here. How? Yes, it’s very simple - after watching one of the videos, the service suggested that I familiarize myself with similar ones and this is what I saw:
The guys who filmed the video implemented a whole project in which practically only LEDs, lamps based on them, as well as LED strips are used to illuminate the apartment.
From the description it became clear that each room has 3 lighting modes: behind the cornice, lighting of ceiling niches, as well as main lighting of 400 lux.
