Models from scrap materials
If you need a DIY smartphone stand urgently, items lying on the table may come in handy:
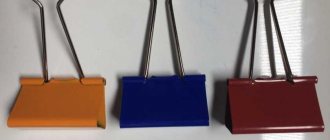
A simple design is made from stationery clips and a plastic (or paper) card. It is enough to secure the binders on opposite sides of the base by placing the device on them.
An alternative to clamps are paper clips, bent into miniature stands. No cardboard base is required for this holder. Two large paper clips are usually enough to hold a smartphone.
An unusual DIY phone stand is made using a toilet paper roll, which is a hollow cardboard tube. You can make a device in it where the device will be located. And plastic cups around the edges will give the design the appearance of a portable speaker.
A compact stand can be made from a plastic card. Considering that after such an upgrade the bank card will become unusable for its intended purpose, it is better to use an unnecessary discount card or gift certificate.
The plastic is cut off from one corner to create a support, and on the other side a connector is cut out that matches the width of the phone.
The base for the stand can be wire 2-3 mm thick. You just need to bend it into the shape of two letters “L”.
If you wish, you can assemble the holder from Lego. Various combinations are allowed here. Moreover, the homemade structure is just as easy to disassemble.
If you have any tape cassettes left in your home audio library, you can borrow a case from one of them for a while. To conveniently place the phone, just turn the design back side out.
If you have 6 pencils in stock, you can make a stand out of them, fastening them with elastic bands. In order for the structure to stand firmly, it needs to be made like a pyramid. The phone is placed on the base of a triangle made from two pencils.
Another version of the stand is made from wine corks connected to each other.
The simplest support for the gadget will be a roll of tape. If the diameter is sufficient, the smartphone can be placed inside.
Types of phone holders for the car
The following varieties are currently on the market:
- Plastic clamp with silicone beads for fixing to the steering wheel. It is easy to use, but blocks the view of the dashboard.
- Clamp for installation in the air duct. Devices of this type benefit from functionality. There are models that allow you to quickly secure your mobile phone with one hand. They produce holders with a flexible cord, which allows you to rotate the gadget in any direction. But the fastening to the air duct grille is not reliable in itself. If the holder swings too much during movement, the phone or tablet will fall.
- Suction cup – attaches to the dashboard or windshield. The holder does not limit your view and allows you to quickly access the gadget’s buttons. But while moving, the mobile device will sway.
- Magnetic holder. It consists of 2 parts: a magnet, veiled in a frame placed on the panel, and a metal plate with a rubber gasket, which must be secured to the gadget. As long as you use a strong enough magnet, your devices will be safe. You can also make such a complex tablet holder for a car dashboard with your own hands.
- Silicone mat is a modern multifunctional mechanism. The clamps are angled for easy viewing of the screen. The mat is equipped with a USB connector to charge your phone if necessary. Additionally, magnetic outputs for Lightning and micro-USB can be built-in. The mat is installed on the panel without additional fasteners on its own sole, treated with a special compound.
Car tablet holder-mat
There are many offers from manufacturers. All products are in different price ranges, and every car owner can find something for themselves. But there are affordable ways to create your own model.
Paper or cardboard option
If you have origami skills, you can turn a sheet of paper into a phone holder with your own hands. To do this, 4 folds are left on the A4 sheet, dividing the space into 4 even transverse stripes. Then the sheet unfolds and is visually divided in half. Make 2 new quarter folds on each edge.
The workpiece is turned over to the other side, where the edge is folded, making up 1/8 of the length of the sheet. All that remains is to turn the sheet over, bend it first along the longitudinal folds, and then along the transverse ones. The result is a triangle with a pocket for your phone.
To make a tablet stand with your own hands, you should use cardboard. 3 rectangular parts are cut from this material. In two of them there are holes for the holder. Then the elements are bent and glued in the shape of a triangle. The seams are additionally fixed with binders.
Paper creations
You can make a stand out of paper not only for stationery. Once you set a goal and get involved in the process, you will see how easy it is to create a beautiful and useful paper craft.
Here are some examples to help a creative person create:
- coasters for Easter eggs. In this case, they make do with minimal materials: leave a fragment of a paper egg tray with 4-6 cells, decorate it with tulle, ribbons, artificial flowers;
- stands for newspapers and papers. They create from old cardboard boxes, pasting them with felt flowers, yellowed newspapers (vintage version), trimming them with buttons and fabric;
- organizers for kitchen utensils, household items, buttons, and so on;
- Baskets are woven from twisted strips of waste paper and coasters are made. If desired, they can be painted.
Be bold in your creativity! Take your example from children, because they are not bound by conventions and cliches. For them, the orange sun and grass doll hair are the norm, “but I like it that way!” Be artists, their motto is “That’s how I see it!” Let your imagination go free and you will be surprised how much space and material there is around you to realize your creative ideas.
Holders that attach to the wall
If you want to turn your smartphone into something like a television panel, you can use an old disc box as the base of the holder. The work is performed according to the following scheme:
- After measuring the device parameters, the case is disassembled into two parts.
- The smartphone diagram is printed on a flat plastic part. The design will require a rectangular back panel with four sides along the edges.
- The parts are cut according to the markings. To prevent the screen from scratching on sharp edges, they are dulled with sandpaper.
- Now we need to connect the structural parts with a glue gun.
- An element with openings for self-tapping screws is attached to the upper part of the holder on the wall side. The bottom edges are supplemented with corners and a soft film to prevent the device from accidentally falling.
All that remains is to screw a couple of screws into the wall and hang the finished structure on them.
A hanging holder can be easily made from a bottle. To do this, the neck and part of the front wall are cut off. All that remains is to make a hole for the hook in the upper back part. Using a similar scheme, holders are made from containers left over from shampoos or shower gels.
Rubbish - put to work!
Let's consider a small fraction of handicrafts, from which you can make stands for stationery, flower pots, telephones and other household items.
First of all, needlewomen use unnecessary paper, cardboard, newspapers, postcards, glossy magazines.
Glass jars with small chips and chips are carefully sanded and coated with acrylic paint. Use tin and cans. They are wrapped in multi-colored yarn, thick rope, covered with beads, felt, sequins, and trimmed with buttons.
Those who are familiar with woodworking tools will love the two-in-one stand. Two parts in the shape of an elephant are cut out of wood, and a box or glass is glued between them. The curved trunk will serve as a stand for the gadget, and the container will serve as a stand for pencils and pens.An interesting option is to glue colored pencils or popsicle sticks in a circle onto a glass or Pepsi-Cola jar. Such a wooden composition will fit the theme on the desk of a creative person.
Young ladies do not like to tinker with a jigsaw and a soldering iron; they like to embroider, knit, sculpt and glue. Therefore, they know how to make coasters in the form of little cases, crocheted and knitted, in the shape of animals and flowers. Original stands are made from baked clay or plastic, which can be painted with acrylic paints.
We recommend reading:
- Do-it-yourself antiseptic: instructions on how to make disinfectant at home
DIY medical mask: instructions on how to easily make a mask against coronavirus. Photo, video, step-by-step guide, made of gauze, with valve, made of paper
How to make a mirror with your own hands: tools, materials, new designs, step-by-step instructions, reviews + secrets from the master (105 photos)
Wooden structures
It is worth considering that the stand for the tablet is made taking into account the weight of the device. Therefore, it makes sense to use harder and more durable materials for it. So, to make a structure from wood beams, you need:
- align the edges of the workpiece;
- outline the dimensions of the smartphone;
- cut along the markings with rounding and surface treatment to remove roughness;
- mark the locations for the grooves at the back;
- cut holes, clearing them of debris;
- sand the product, then treat it with stain;
- assemble elements into a single structure.
As an alternative, you can use a board in which you will have to cut a gap in the middle with a table saw.
The excess material is cut off. The groove must be made at an angle to ensure the desired tilt of the device. The hole made needs to be sanded and coated with oil.
And there is room for flowers!
There are a lot of flowers in your house, the window sills are occupied and there is no room on the floor for green residents. In order to compactly place the flora and not go out of budget, the flower garden is planted on homemade shelves.
Usually, inexperienced craftsmen do not know how to start and what to make a flower stand from. The imagination pictures a structure made of wood or iron. This is a good option if you have extra money, because metal products, especially forged ones, are not cheap.
But from improvised materials they make flowerpots, flowerpots and stands not only for apartments, but also for summer cottages.
For an apartment, men are able to make a modular structure from a metal pipe and plywood. They cut out pieces of wood of any shape, drill holes along the diameter of the tube, string it on it and secure it with special fasteners.
An airy shelf is made from wooden rectangles with drilled holes in the corners. A rope is pulled through the holes, tying knots on both sides so that the shelf does not move along the rope. And, having hung it, they set up flowerpots with flowers.
If you are confused by possible difficulties, you should watch the video, and they will tell you in detail and show you how to make a stand out of pieces of wood.
But for the balcony and summer cottage, non-traditional materials are used. From plastic bottles, plastic sewer pipes, old buckets, shoes, bicycles, chairs, car tires they create such works that you can only marvel.
At dachas there is a lot of material, for example, logs, which can be laid, hollowed out, earth filled into the hole and flowers planted.
What to consider when choosing a stand type
When planning to assemble a phone holder, you need to understand:
- whether the structure is planned for temporary or permanent use;
- does its external aesthetics matter?
- will the material support the weight of the device;
- How safe is the option for the phone and its owner;
- If we are talking about a complex and intricate stand, it is important to understand whether there is enough time and skill to implement the plan.
Having decided on these parameters, you can begin to select the optimal model.
To summarize: there are several ways to make a phone holder for your home or office. The choice of material and type of construction is determined by the parameters of the phone, as well as the preferences of its owner.
Support the phone
Now let's take a look at the phone stand, which can be created in a few minutes. Let the novice master not be intimidated by the question of how to make it.
You won’t need a saw, jigsaw, drill or other “scary” devices. Holders for modern gadgets are made from straightened paper clips and cardboard folded in a simple way.
There are original individuals who do not see a problem in creating a stand at all. It is enough to take two office clips so that the phone stands upright.
We recommend reading:
- Special rescue equipment
- How to insulate a veranda for winter living: a review of the most effective methods, instructions, materials, installation diagrams
Tile work: description of all stages + step-by-step instructions for beginners
Old cassette boxes, wire bent in two or three steps, or fragments of Lego constructors are also perfect for this purpose.
For those who are not looking for easy ways, it is advised to build a stand from a wooden block, cutting out a groove for the phone in it. Those who like to collect origami will create an intricate craft that will comfortably fit a communication device. For such a stand you do not need thick cardboard.
It happens that you need to charge your phone, but there is no table or chair near the outlet. Shouldn't a faithful friend hang on a cord? A plastic bottle will be used.
It is necessary to wash it and outline the contours of the stand with a marker. The front part should be slightly shorter than the phone itself so that it does not fall out of the “case”.
A hook is marked on the back wall, which the cup clings to the charger. We cut out the craft along the contour and use it for our health!
Photos of DIY phone stands
Master class Craft product Origami Chinese modular MK phone stand Paper
Phone stand.
For my stand I used blue and pink paper...
It is based on 28 modules.
We assemble 4 rows of 28 modules each, then starting from the 5th row we reduce the number of modules first by 1, then by 2,3,4. There should be gaps left. We place 1 pink module in the middle on the 7th row.
After this, we assemble a row of this type 6-0-10-0-6 (we put 6 modules, then a skip, then 10 skip modules, and then 6 modules). We place 2 pink modules on 1 pink module.
Then we put 3 pink modules and we can start making the bed of our stand.
Then we put on 4 pink modules.
After this, we insert 1 blue module in the middle of the 4 pink modules and 2 pink modules on each side.
We make a row of blue modules above the heart pattern.
then reduce it up.
Here! Our stand is ready!
This is the first MK, don’t judge strictly... If suddenly something is not clear, ask...
As Easter approached, I had to return to the once-forgotten modular origami - as always, for any holiday, my daughter was asked to make a craft with her own hands. Our school is like this, with an emphasis on craftswomen
Since I myself have problems with imagination, I always use ready-made schemes, of which there are plenty on the internet. For the Easter egg, a detailed diagram is here.
Then we simply assemble according to the scheme:
The finished craft lasts for a week or two, then I get bored and I take it apart, putting the modules in the aforementioned cake box. The next time I want to assemble something again, I already have ready-made modules - in a box. This Easter egg and stand were assembled from a former sailboat, so the colors are not the same as in the original diagram
In this case, I still had to use glue - the photo shows that the stand consists of 3 parts, they must be glued together. But I didn’t stick the egg itself anymore.
What is needed for production (materials and tools)
Before you begin, you need to prepare the following:
- paper and cardboard material – colored and white;
- glue;
- pencils - simple and colored;
- ruler;
- glue brushes;
- scissors;
- scotch;
- stapler;
- stationery knife.
For decoration, you may also need different decor. elements.
Results
- When choosing mounts for a photo backdrop, you need to first focus on the room in which you will be shooting, and then on the background material.
- If you're very limited on space, a T-stand with a plastic backdrop or a spring backdrop is your best bet.
- In larger home or professional studios, gates can be installed. They are good for fabric backdrops, but for use with a paper backdrop in a tube, it is better to install an additional end mount (check that the gate can support the total weight of the system).
- If you want to use several backgrounds at once, then a logical option would be a ceiling or wall mounting system on which you can hang several paper tubes at once.
- For outdoor sessions, backdrops with a spring (complete with a holder for a reflector on a tripod) and lightweight collapsible gates are suitable.
A beautiful and at the same time functional background, as well as a reliable mount for it, is an important investment in your photographic future!
What else might be useful?
In addition to the stand itself and the background, you may need additional accessories that will make your life much easier. Special clips are convenient for temporarily securing a background, stretching the surface of a fabric background across the width, and for paper backgrounds, they can be used as a weight to prevent the roll from curling.
Another useful accessory is tape (adhesive tape). It can be used to quickly repair a torn backdrop, glue the folded edge of a paper backdrop to the floor, or attach a gel filter to a light fixture to illuminate the backdrop. The advantage of tape over regular tape is that it leaves virtually no marks on the surface and does not spoil the background material.
Step-by-step description of different stands
Making a cardboard stand yourself is not difficult. If the material is not very dense, several sheets are glued together. Micro-corrugated cardboard is most suitable for such an accessory.
Corrugated cardboard is a packaging material consisting of glued layers of paper.
A special stationery knife is most convenient for cutting from cardboard. With such a tool, the workpiece is cut more accurately and much easier. Let's look at how this is done in each specific case.
For pencils
Such a stand is a useful and necessary item for a desk so that office supplies do not get lost or scattered around the table.
You can create an individual pencil holder to suit your taste in an exclusive version with your own hands.
"Penguin"
A small cardboard box is required (volumes and sizes are determined at will): you can take a suitable one for juice (it is washed and dried). Cardboard cylinders will also work.
Next, the package is covered with paper of the appropriate size (black color - this will be the penguin’s body).
Pencil holders are a necessary and useful item for a writing interior.
Then templates are cut out of paper:
- breast - white;
- wings - black;
- paws - yellow.
The eyes are also made from black paper and the beak from yellow paper.
All elements are sequentially glued to the appropriate places. The penguin pencil is ready.
Such beautiful products will decorate any surface and will keep your writing instruments in order.
From paper tubes
First they need to be prepared. For this purpose, newspaper or magazine sheets are taken. Using a regular knitting needle, twist the tubes. There should be a lot of them. Then the ends are secured with glue.
Next, the tubes are painted in the intended color and left to dry. The juice packaging is cut to the required height. The tubes are cut to the height of the future stand and glued along the perimeter of the blank box.
The stand for pens and pencils, which is shown in the photo, can be made in just a couple of hours.
Important! It is necessary to glue tightly, without gaps.
Allow the product to dry and then it is ready for use.
Pencil with flowers
A pencil stand can be made with flower decoration. To do this, you can take napkins (color - optional).
The napkin is folded in half twice. It is fastened in the center with a stapler. Using scissors, make the edges of the napkin wavy. Each layer must be lifted upward, while at the base you need to press a little.
A pencil stand will allow you to always keep writing objects at hand, rather than looking for them in the corners of bottomless desk drawers.
You can make several multi-colored flowers and decorate a ready-made paper pencil holder with them. Flowers are “planted” on glue, or secured on the bottom with tape.
For phone
It is not difficult to build such a stand. Such work will not take much time. This is a practical and easy option to make the device yourself. And, besides, do it - at any time.
The following is a step-by-step guide to the most interesting ideas.
Shell
No special instructions are needed in this case. The main thing is to get a suitable, large enough shell.
To work, you need glue, which, when hardened, turns into a plastic tight mass - the so-called. rubber or liquid nails. There's no such thing? Then acrylic plasticine is used, which does not stain anything.
A layer of glue is applied to the area where the phone will come into contact with the shell surface. If the “workpiece” is not stable, glue is also applied to the lower part for a stronger fixation.
The main thing is to find a suitable shell from which you will make a phone stand.
Additional Information! This hand-made gadget stand looks great and fits into any interior.
Wine corks
This is an excellent material for creativity. Therefore, you should not throw them away.
A smartphone stand made from this material will be environmentally friendly, comfortable, durable and very original: thanks to the unusual design itself and the decor.
If you have a few wine corks, a little glue, a knife and some free time, you can make a smartphone stand.
To work you need:
- twenty traffic jams;
- leg-split;
- lace;
- Super glue.
The corks are lined up and glued together.
First, the back wall of the gadget stand is made (the corks are glued together in a row, and the “second floor” is assembled in the same way). One “floor” is pasted onto the other. The back wall is ready.
Next, glue the front one. The bottom part of the stand is glued gradually. The plugs are placed one at a time against each other. Then the back wall is attached.
As a decoration, you can add thin twine or lace to the stand. Floss threads and other cute little things will also work.
You will get a unique stand for your mobile phone.
Bamboo chaise lounge
To make such a stand you need:
- bamboo sticks and mat;
- dye;
- six coffee sticks;
- wire cutters
How to make such a stand step by step can be found here:
Upon completion of the work, you get a stylish and unusual accessory that no one will have. The stand can be presented as a present or to decorate your desktop.
The stand is made of bamboo - a beautiful and pleasant to the touch material.
Easy way
You will need a thick sheet of paper. Squares of 15x15 or 10x10 (cm) will fit a standard smartphone.
You must proceed as follows:
- The sheet is folded in half twice.
- Unfold and fold first the lower, then the upper halves in half.
- Now they make creases.
- Unfold the workpiece and make a bend on the other side.
- It is necessary to repeat all previously performed steps on the opposite half.
- The workpiece is unrolled. All folds must be clear.
- The paper is turned ninety degrees, one corner is lifted and placed inside. It looks like a pocket.
- The two corners are pressed against each other - the paper should curl naturally.
- The central part is tucked under the prepared pocket.
- All steps are duplicated on the opposite side. You need to start by forming a pocket.
- At the final stage, the central fold must be made clear: this will be the part of the stand that holds the main weight of the gadget.
A very simple phone stand made of paper using the origami technique.
Now the stand is ready.
For the Easter egg
Step by step work:
- Take colored paper. It should be a 15x15 cm square.
- Fold in half twice.
- Then you need to open the sheet and fold the lower and upper parts to the middle.
- Next, open the workpiece and position it so that the fold line is on top.
- A triangle is formed on both edges.
- Fold it back on both sides so that it turns out the same.
- Now on one side the bottom corner is turned up, on the other side they do the same. Unfold the workpiece and duplicate the previous steps.
- The upper triangle is folded down - everything is done on both sides.
- Now all that remains is to open the resulting “wallet”.
- Next, it is straightened so that the stand takes the desired shape.
Paper Easter egg coasters can be very original and interesting.
Now you can insert the Easter egg.

