/Household appliances/Hood and geyser/
One of the criteria for choosing a hood for the kitchen is its size. They come in different shapes, but since they are standardized, choosing the right model will not be difficult, especially if a competent sales consultant helps you. And yet, it is better to know some rules and nuances before making a purchase.
Dimensions of hoods built into the cabinet
The width and depth of the hood built into the cabinet depend on the size of the stove. They should be at least equal to the width and depth of the hob or slightly exceed them. If the hood is purchased before the stove, then you can focus on the distance between the hanging cabinets on both sides of the hob.
The width can be divided into narrow, standard and wide.
Narrow hoods for closets
- up to 60 cm. Models with a width of 50 and 60 cm are often found, which corresponds to the width of a standard kitchen module. Thus, Faber INCA LUX 2.0 EG8 X A52, 52 cm wide with two types of filters, has a maximum power of 1050 m3/hour, effective even for a large kitchen.
Standard hoods for cabinets
- from 60 to 90 cm. They operate in both air exhaust and recirculation modes. In the catalog of the Hausdorf online store you can find models with widths of 73, 80, 85 and 90 cm with three or more suction speeds and electronic control.
Wide
- over 90 cm. Less common. We present them in models with a width of 110 and 118 cm. As a rule, these are high-tech products with low noise levels. For example, the Miele DA 2628 with efficient perimeter suction can be controlled from a smartphone.
Norms and requirements
The correct size of a kitchen hood will ensure maximum performance of the device. That is why you should approach this issue responsibly.
The main criterion when calculating sizes is width. Why is that? Manufacturers indicate in the technical documentation that the width should be larger or correspond to the dimensions of the hob. Therefore, the device is installed strictly above the stove. The type of stove (induction, electric or gas) does not matter.
No specific standards are specified. The main thing that must be observed is the optimal distance to the stove to ensure fire safety.
The most common kitchen hoods on the market are 60 cm wide. If the figure is 990 cm or more, this will increase productivity and allow you to cover a larger volume in a certain time. Under no circumstances should the device be narrower than the hob. This can lead to a third of the emissions bypassing the hood and settling on the ceiling.
Depth
For ease of use, models built into a cabinet or ceiling are made smaller in depth (usually 25-30 cm) and equipped with a telescopic panel. The total depth including the panel is from 40 to 60 cm.
When not in use or during normal operation, the panel does not extend and does not interfere with anyone standing at the stove. In intensive mode, the panel moves forward to more effectively remove contaminated air. For example, Elica CIAK GR/A/86 without a retractable panel is 27 cm deep, and with it - 42 cm.
Hood height
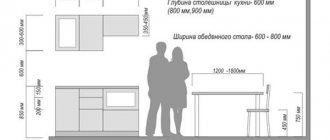
Height is also important: it should be chosen taking into account the type of device and the dimensions of the room. It is recommended to leave a distance of at least 75 cm for a gas stove and at least 65 cm for an electric stove between the surface of the hob and the hood.
By height, all models are divided into:
- low,
- standard,
- tall.
Low models with a minimum height of 10 cm and a maximum of up to 40 cm are usually island or wall-mounted, as well as built-in. For example, the small wall-mounted Kaiser A 501 NB, the most affordable, has a height of 32 cm, and the built-in narrow Elica CIAK GR/A/56 with a retractable panel is 20 cm.
Standard models with heights from 40 to 90 cm - all possible types. Among the most popular is the island model Korting KHA 7950 X Cube, cubic in shape with a height of 72.7 cm.
Tall models up to 140 cm are designed for very large rooms and are considered as a decorative element. Among them there are many fireplace and inclined models, for example, the classic Falmec Melissa Tulip 90 (600) S stained oak 102 cm high with natural wood trim.
Dimensions of kitchen hoods built into the ceiling
Hoods built into the ceiling
, are usually placed in kitchens with an “island” stove. Unlike conventional island designs, these flat designs do not clutter up the space. They are installed in ceiling modules made of plasterboard or under a suspended ceiling, and controlled from a remote control.
The width and depth also correspond to the dimensions of the hob and do not differ from the characteristics of hoods built into the cabinet. The Faber HIGH-LIGHT WH MATT A91 model, with a width of 91 cm and a depth of 50 cm, is suitable for the largest hob.
What other parameters should you be interested in when selecting
In addition to the dimensions of the product, the following parameters are extremely important when choosing:
- Noise level;
- Number of operating modes and type of control;
- Maximum performance;
- Filters used.
The most important characteristics are performance and noise level. Experts know a lot about how to choose a product based only on these two parameters. For home use, the product requires high efficiency and quiet operation. Knowing what sizes hoods come in, you can quickly select suitable options for yourself.
Noise level
This parameter is indicated for minimum and maximum performance. 45 dB in maximum performance mode is considered quite good. If the value is above 65 dB, then the product is classified as noisy.
The noise level of the installation is acceptable if you plan to use it in industrial workshops and kitchens. In an ordinary apartment or private house, it is recommended to choose products that can demonstrate high efficiency with low noise levels. Thanks to the use of suspended hoods, it is possible to achieve minimal noise when pulling.
Number of operating modes and type of control
Control can be electromechanical and touch. Modern built-in hoods are equipped with many sensors. Products can be controlled remotely using a remote control or connection via a smartphone.
The most important is the number of operating modes. An advanced installation can operate in removal or recirculation mode. By changing the performance indicator, you can adjust the suction power.
Maximum performance
Thanks to this value, it is possible to understand how productive the hood is. It is worth noting that the selection of a product should not be carried out according to the principle: the more powerful, the better. The kitchen hood is selected based on the area of the room and the level of load on the stove. If there should be a hood in the room, then its selection should be done correctly.
There is a special formula for deducting productivity, which looks like this: S (kitchen area) x H (room height) x 12 (air renewal coefficient, enshrined in building codes). For example, 8 m2 x 2.6 m x 12 = 249 m3 (minimum required hood capacity in m3 for a room of 8 m2 with a ceiling height of 2.6 m).
If you plan to prepare dishes and use products that have a strong smell, the device should be chosen with a reserve. Once the dimensions of the kitchen hood have been determined, you can proceed to calculating the performance.
Filters used
Regardless of what mode the device operates in (exhaust or recirculate air), at least a carbon filter must be installed. The more filters are installed, the better the installation works. Moreover, the quality of filtration affects the service life of the hood intended for recessing.
It is advisable that the product be equipped with a carbon and grease filter at the same time. The carbon element allows you to get rid of odors. In turn, the grease filter traps fats and prevents them from getting into important compartments of the device. After installing the hood over the stove, fat will somehow begin to get into it. It is worth noting that the filtration elements should be replaced regularly to maintain the performance of the hood and prevent breakdowns.
Models built into the table
Hoods built into the table
, are retractable structures that are installed behind the hob or on the side of it. Less common are non-retractable models built into the countertop - for example, BORA CKASE. To install them, you need a cabinet under the hob. When not in use, these devices are almost invisible.
BORA built-in desk hoods
De Dietrich built-in table hoods
BORA built-in desk hoods
Miele built-in desk hoods
Their sizes vary widely depending on the design and installation location. Thus, the Miele CSDA 7000 FL model, installed flush on the side of the hob, is 12 cm wide and 52 cm deep. The De Dietrich DHD7261B pull-out model, installed behind the hob, is 118 cm wide, the height of the hidden part is 74 cm and the retractable part is 30 cm.
Recirculating hood or direct flow?
If it is possible to install a direct flow hood, you should give preference to it. After all, cleaning the air from foreign impurities using air intake is better than cleaning it through filtration. Installation of a direct flow hood can be done where it is convenient for you, this requires access to the nearest open access ventilation system.
Installing a long air duct will not be a very practical solution, as this leads to a violation of aesthetics and a decrease in the efficiency of air intake, because performance decreases with each bend.
The direct flow hood has a metal filter that prevents fat accumulations from settling inside the hood. Its absence will lead to rapid breakdown and the hood will emit an unpleasant odor over time. It is washable, but cleaning it can be quite difficult, so users often think about replacing the filter.
The recirculating hood consists of two filters: the first, which removes oil particles and the second, which eliminates unpleasant odors. The first one looks like a plastic cassette and requires replacement after its service life has expired. In the second case, there is a carbon filter to eliminate odors. It is disposable and requires constant replacement; its maintenance will cost a pretty penny in large families.
Most hoods themselves signal that the carbon filter needs to be replaced, and it’s time to wash the grease filter. Such signals are given by light indication or symbols that disappear over time of operation.
A recirculating hood is suitable where it is not possible to install a direct flow hood, for example, if there is no access to the shaft and in an island kitchen option. Recirculating models do not cool the room, this is important in kitchen design.
The direct flow hood can also work with recirculation; this requires an additional filter; it is not included in the kit and is sold separately.
A budget direct flow hood that does not have filters would not be a good idea, its service life is relatively short and it is quite difficult to clean.
Operating mode
All hoods use either one of the operating mode principles or are designed for both.
Work principles:
- Branch. In this case, it is necessary to remove the exhaust duct to the ventilation system of the building. The exhaust air enters the pipe and is discharged outside. The diameter of the air duct for equipment with exhaust purification is usually 12 and 15 cm.
- Circulating. The hood cleans the air entering its structure using filters. The purified air moves back into the room.
Each mode has pros and cons. When air is removed from the room, the quality of cleaning is better, especially if the family cooks a lot. But the appearance of the corrugation located on the top of the kitchen cabinets spoils the overall appearance of the kitchen. Therefore, modern models use a double type of cleansing mode.
There is also a combined principle. In modern models it has become popular to use two modes. Just not at the same time, but by changing the purification system, switching from layering to circulation.
Circulation is associated with the change of carbon filters, which must be changed every six months or a year. Or monitor the condition of grease filters by cleaning them. But aesthetically, the kitchen set looks beautiful and complete.
The air purification mode through carbon filters is more often used for built-in hoods. By the way, some manufacturers sell hoods with an additional set of such filters.
Design advantages
Typically, an inclined hood is distinguished by greater power and productivity. This is due to the peculiarities of its functioning: air is drawn in during the process of natural rise, without excessive energy consumption. More powerful motors, efficient cleaning filters, together with the angular location of the air intake, make kitchen hoods an excellent choice with many other advantages:
- they are more convenient to install, do not limit the use of wall cabinets installed nearby, and allow their doors to be opened freely;
- increased efficiency of air exchange allows you to quickly remove unpleasant fumes and odors from the room, even in comparison with the most powerful analogues of other types;
- the advantage of air exchange results in savings on electricity, which becomes noticeable with frequent use of the device;
- the use of more advanced electric motors reduces noise and ensures their quietest operation in comparison with other types of models;
- design features ensure ease of installation, which does not require special skills and a complex set of tools;
- such devices are more ergonomic, they are comfortable when working near the stove, and create conditions for convenient access to the entire space of the hob;
- Thanks to its modern design and wide range of models, it looks great in the interior of any kitchen.
What to look for when choosing a hood
- Power . Manufacturers produce models in a wide power range from 190 to 1350 m³ per hour.
- Method of operation . These household appliances are divided into two categories: exhaust and filter. Basically, consumers prefer devices of the first category.
- Installation features . There are three types of units: wall-mounted, ceiling-mounted and built-in.
- They also differ in size, configuration and design .
Performance and Power
These are two important characteristics of a kitchen hood that are worth considering. Productivity indicates the amount of air processed by the hood per unit of time.
There is motor performance - it should be measured in free mode. And the drainage performance, when you need to connect a pipe to the hood and only then measure its performance. It will always be lower than that of the motor.
If you plan to connect to the home ventilation system, we recommend a hood with an exhaust capacity of 200-250 cubic m/h. If your house and the air duct goes outside, you can take it higher - from 350 cubic m/h. Also, small rooms require high productivity, because... there the air becomes polluted faster.
Power affects how quickly the device can purify the air. If you rarely cook at home, then there is no point in overpaying; you can choose a kitchen hood over a gas or electric stove up to 150 W.
Optimal ratio between the dimensions of the exhaust device and the plate
For optimal performance of a kitchen hood, it is essential that the size of the dome matches the area of the hob.
- If the dome is smaller than the width of the hob, the exhaust device will not be able to suck in all the vapors from the food being prepared, which means the smell will spread throughout the apartment.
- If the hood is the same size as the hob or larger, this significantly increases productivity.
- The large area of the kitchen hood will allow you to suck in all the odors and vapors from the food being prepared, as well as carbon dioxide.
Step-by-step installation instructions
We will consider a simple installation option; it can be considered universal and can be used in any kitchen furniture sets. The wall cabinet will have two multi-colored front doors. The hood's plastic rectangular smooth pipes make the process of periodic cleaning much easier. It is very difficult to remove dust from corrugated ones; dirt remains in deep folds.
Step 1 . Using a ruler or tape measure, accurately measure the distance from the bottom of the unit body to its top cover. This measurement is needed to determine the location of the fixation loops. Work very carefully, otherwise gaps will appear between the side walls of the cabinet and the hood, which are not easy to eliminate. The fact is that the furniture is made of laminated chipboard, and such material does not allow drilling holes very close to each other. You will not be able to raise the hood a few millimeters by drilling new holes; you will have to take other complex measures.
Measure the height of the device
Step 2 . Drill holes in the sidewalls, do not forget to add half the thickness of the sheet to the obtained measurement data. In our case, chipboard with a thickness of 18 mm, accordingly, we need to add 9 mm. The jumper will be fixed in this place; the hardware should fit exactly in the middle of the bar.
Two holes are drilled in the sidewalls for confirmations
Practical advice. It is recommended to fix the shelf for fastening the hood with confirmats (euro screws). They provide maximum fastening strength, and this is very important for this element. The fact is that vibration inevitably occurs during operation of the hood. Even small multidirectional efforts can weaken the fastening, the cabinet will begin to shake, and the intensity of unpleasant sounds will increase.
Step 3 . On the installed shelf, mark the exit point of the hood pipe, then put a plastic adapter on it. To do this, place the facade on the hood shelf, measure the distance to the hole and, taking into account its diameter, draw a circle. You can attach an adapter and draw a circle from it, it’s much faster.
Mark a hole for the pipe on the shelf
Step 4 . Mark the hole for the power cable. There is nothing complicated, the wire bends and in any case it is possible to install it in place.
Next to the large hole, mark a smaller one for the cable.
Step 5 . Use a hole saw to drill a hole. To ensure an even cut on the back side of the slab, do it in two stages. First you need to select a depth of approximately 1/3 of the thickness of the material, then turn the shelf over and drill from the back side. With the help of this technology, the occurrence of chips is completely prevented.
Drill a hole with a crown
Important. The diameter of the hole should allow the hood switch to fit in without any problems. This makes it possible to turn on the unit after attaching the cabinet to the wall.
Step 6 . Use an electric jigsaw to cut a hole for the exhaust pipe. Uneven edges can then be corrected with a hand router.
The edges of the holes are processed with a milling cutter
Step 7 . Check the dimensions, install the cabinet on the hood. Place the facade, figure out how you will attach it. The door opens upwards, this must be taken into account when purchasing fittings.
Trying the hood on the cabinet
Step 8 . Secure the shelf to install the lower facade, drill a hole in it for the air duct. The algorithm of actions is no different from those described above.
Marking for the air duct
Step 9 . Mark and cut a hole on the top cover of the cabinet to display the angle of rotation of the hood.
A hole is marked in the top lid of the cabinet for the pipe to exit.
Practical advice. It is better not to seal open sections of chipboard with an edge, but to carefully coat them with an antiseptic sealant. It protects the material much more reliably from moisture. In addition, it takes less time and mold does not appear in areas where it meets the wall.
The cabinet with the hood is assembled, you can fix it to the wall and connect the device to the network.
Cabinet with hood ready for installation
Installation rules
You need to start installation with the furniture into which the hood will be built. If the cabinet fits in size, then you can continue installation as usual, simply by making the necessary holes in the furniture, but this is not always possible. A small device with parameters of 50-60 cm usually fits in a standard kitchen cabinet.
Before installing the hood, you should carefully study all the dimensions and parameters in order to correctly select the necessary elements and make suitable connectors
If this is not the case, then the kitchen owner has two options: order new furniture or dismantle the cabinet to use a special hood box. The latter option has certain advantages, since the box is assembled separately at the bottom, then the hood is fixed in it, and only after that the entire structure is installed on the wall.
This is what the box in which the hood is installed looks like. The structure is assembled separately, then attached to the wall or furniture, which is more convenient than placing the device directly in the closet
A façade is installed on top of the hood, so the hood looks neat and stylish from the outside. The problem of insufficient space can be solved by using a device of minimal dimensions - 45 cm.
This model can be placed even in a very small closet. But it should be remembered that compact dimensions in this case come at the expense of performance.
It is necessary to take this point into account so that it does not turn out that a suitable-sized hood cannot cope with the required amount of work. If the cabinet fits the dimensions, you need to make a hole in its bottom for the hood, taking into account its size. Sometimes it is more convenient to completely remove the bottom. You will also need to make an opening for the air duct at the top of the cabinet.
In the upper part of the cabinet intended for installing a built-in hood, you need to make a round or square hole for the air duct
It can be round or rectangular, it all depends on the type of duct. Flexible corrugated structures with a round cross-section are often used, but there are also plastic ventilation ducts with a rectangular or square cross-section.
The air duct connects the hood to a hole in the wall leading to a common ventilation duct in an apartment building or directly to the street in the case of a private building. Another cutout will need to be made on the back of the cabinet to secure the device and install the socket.
Once all the necessary openings in the cabinet are ready, you can proceed directly to installing the device. First, the hood is secured in a cabinet or box. In this case, you should make sure that the moving part of the device freely extends to the required width.
Part of the built-in hood extends so that it covers the entire surface of the stove. Only this position will effectively purify the air in the room.
After this, the air duct is attached to the connector at the top of the device using a clamp. Experts recommend making this mount detachable so that it remains possible for simple dismantling. Some craftsmen immediately use sealant, but professionals do not always approve of this decision.
In order for the built-in hood to be positioned correctly in the cabinet, it may be necessary to install an internal vertical partition, which is recommended to be removable
Periodically, the structure will have to be disassembled to clean it from accumulated fat and other contaminants. However, it should be remembered that the connection must be sufficiently tight to ensure effective removal of contaminated kitchen air.
Most often, the hood duct is removed vertically from the cabinet, but sometimes a side outlet through the rear wall is used for this purpose. In this case, the hole is made at the back. You should not make holes “not a peephole”, you should first apply markings.
Some models of hoods are equipped with a convenient template, which greatly facilitates the process of marking the mounting floor for the device. If such a template is missing, you will have to perform the markup in the usual way, i.e. using a tape measure and a building level. The hood must be installed strictly horizontally.
The installation of a built-in hood is usually carried out after the entire kitchen unit has been assembled, so that the entire structure is comfortable and looks neat. Self-tapping screws with dowels are usually used as fasteners for hoods. After installing the hood in the box, a special adapter is installed in the corresponding hole to connect the air duct.
After this, all that remains is to take it out into the ventilation duct. The exhaust duct should be as short as possible in length, since this indicator affects the overall performance of the device. The maximum allowed number of knees is three.
These points should be taken into account at the stage of general kitchen design; it is recommended to install the stove as close as possible to the general ventilation duct of the house. The diameter of the air duct must be the same as the dimensions of the pipe intended for it. Typically this figure is 120 mm or more.
The power cable should be routed upward so that it does not overheat near the hob. There is usually a socket on the back wall of the cabinet
An important point is choosing the correct position for the power cord. It should not pass directly over the hob.
The cable must be secured inside the cabinet, and the socket for connecting it must be installed in the area of the rear wall in which the hood is installed. You can choose another location for the outlet, the main thing is that this part of the device does not overheat when the stove is on.
After all installation work is completed, you should connect the device to the power supply, pull out part of the hood and test its operation. Ventilation of the kitchen space can also be done using an exhaust fan, but if a hood is already installed in the room, the use of additional devices is considered unnecessary.
Additional amenities
Hoods may also differ in their control features. The standard option is a hood with a button panel: more modern models include slider speed switches. Touch-sensitive exhaust technology with an electronic display is more convenient to use and has the additional advantage of cleaning the housing from dirt.
The hood control type can also be remote. Turning the device on and off, as well as changing modes during operation, is carried out either using the remote control or through voice commands.
Both manual and automatic control processes are convenient if you have chosen a retractable kitchen hood with a slider panel or a model with the ability to adjust the tilt angle.
Both horizontal and vertical hoods are distinguished by their diversity in design. In addition to the main material, chrome steel, glass or wood can be used.
In addition to the decorative properties, pay attention to the size of the equipment itself: some stylized interiors will look more harmonious when using a large hood, while others require greater conciseness and the installation of compact hoods
Remember! Hoods of different sizes differ in maximum power and noise level during operation. Study the technical documentation before choosing the appropriate model.
The next difference between hoods is their functionality. Modern devices are equipped with an auxiliary timer, an automatic shutdown mode, a sensor that signals when filters are dirty, the ability to adjust the brightness of the backlight, and also have many other additional functions.
After studying photos of types of hoods and understanding what kind of kitchen hoods there are in terms of work characteristics and appearance, you can choose the best model for your kitchen.
We recommend that you familiarize yourself with our materials using the links and watch a video about the classification of modern exhaust devices.
The most popular manufacturers
Very often people want to choose the best quality product, but not overpay. Today this is difficult to do due to the fact that there are a large number of companies on the household appliances market and a huge number of models with additional functions, without and with an air duct, various configurations and color schemes.
The best manufacturers are selected based on customer reviews and, of course, the assessment of professionals. So, the best hoods produce:
- Bosch.
- Siemens.
- Coopersburg.
- Best.
- Zanussi.
- Elika.
- Gorenje.
- Samsung.
- Hansa.
- Cronasteel.
It should be remembered that even a time-tested company may produce models that are not of very good quality. Therefore, before purchasing, you should always consult with more experienced people and read reviews.
Calculation of the minimum permissible performance
In order not to make a mistake in choosing and buy the model that is optimal for your kitchen, you should familiarize yourself with the formula for calculating the performance of exhaust equipment.
The calculations take place in several stages.
- First you need to multiply the area of the entire kitchen by the height of its walls.
- The result obtained is multiplied by the air exchange rate per hour, which is equal to 12.
- This value is multiplied by an additional factor of 2. For electric hobs it is equal to 1.7.
- To the calculated minimum performance threshold, an additional 10% of its value is added for each meter of length of the air duct pipe and each of its bends. Another 10% is added up in case of an emergency. The result obtained is final.
There is a simpler calculation formula, according to which the volume of the kitchen (the product of the area and the height of the walls) must be increased 10 times.
The diagram shows the principle of calculating the minimum performance of the hood, where a is the length of the kitchen, b is the width of the kitchen, h is the height of the room
The simplified formula for calculating the minimum hood performance does not take into account the most important nuances: the type of hob, the length of the air duct pipe and its bends. We recommend that you familiarize yourself with the hood calculation, which takes into account all the nuances.
Based on such calculations, you can find out whether the installed hood meets your needs. Perhaps the device should be changed to a more powerful one.
Duct pipe size
The cross-section of the duct directly affects performance. To ensure efficient operation of the device, the path from the equipment to the channel should be as short as possible without bends.
It would be easy to install the equipment directly under the vent, but this option becomes impossible in most cases. If the opening of the ventilation duct is located further than the equipment, they are connected using special pipes so that the route is short and has a minimum of bends and differences.
Dimensions of plastic pipes for exhaust hood
There are two types of pipes:
- Plastic or corrugated with a cross-section from 80 to 120 mm;
- Plastic round pipes with a cross section from 125 to 150 mm.
The cross-section of the ventilation pipe must match or be one size larger than the exhaust pipe. This is the main rule that should be followed when choosing ventilation pipes.
It is recommended to seal the ventilation ducts as much as possible at the time of pipe installation, so that the pressure is constant and the device spends less energy transporting air.
Conclusions and useful video on the topic
Power, brand, design and principle of placement of the hood hood – sellers of kitchen appliances showrooms colorfully talk about all this.
From the video below, you will learn about the nuances of choice that are not mentioned by the sales staff. Hood models are distinguished not by their design, but by the quality of assembly and configuration:
In the following video, craftsmen drill a wall in a high-rise building for an exhaust hood air duct. The work is carried out with professional tools quickly and accurately.
A ventilation duct is mounted to the prepared opening, which will be connected to the hood after finishing the kitchen:
Most videos about range hoods for household use contain either promotional or simplified information of their choice. Moreover, the procedure for calculating power is not given anywhere - it’s all about “kitchen volumes” and “10-fold updates of the atmosphere.”
We are confident that the only way to balance the home atmosphere is by correctly calculating air purification equipment.
Does your kitchen hood do a great job of removing exhaust air? Share your experience in calculating power. Or maybe you used a simpler method instead of formulas and complex calculations? Tell us about it - leave your comments in the block below.
Design and components of kitchen hoods
The appearance of hoods depends on two factors: attractiveness and method of maintenance. At the moment, manufacturers offer a wide selection of options, and even the most demanding housewife will be able to choose the model she likes in appearance. The best options would be enameled, metal type hoods, because the plastic type is very difficult to clean daily. The glass model will be a very beautiful, but expensive option, not suitable for everyday care.
Noise level
Some noise during air purification is normal for an extractor hood. But previously the equipment worked too noisily, and this could create considerable discomfort for the owner. Now manufacturers offer a lot of optimal solutions - effective sound absorption and noise reduction technologies. Therefore, standard built-in models will in any case be quite quiet, even at high suction speeds. At minimum power, the average noise level for built-in hoods is up to 35 dB.
Review of the model range from different manufacturers
To choose the right hood, you first need to make a substantive examination of its technical parameters in comparison with other options from different manufacturers. And only after that make an informed choice based on a detailed analysis, and not on the external attractiveness of the household appliance.
GORENJEDU 5345 W
The most popular among classic and affordable recirculation devices, with a standard wall mounting width of 50 cm, a capacity of 330 m³ per hour and a noise level of 55 dB. Installed directly under the wall cabinet or secured with dowels to the wall surface. The model is controlled using buttons; there are three operating modes. It is suitable for working in a kitchen up to 9 square meters. m.
GORENJEDU 5345 W
KAISER A 9416 WBE
The 90 cm wide model is covered with specialized enamel and equipped with decorative elements. With a fairly large power of 790 m³ per hour, it has a fairly acceptable noise level of 56 dB. The universal hood works perfectly not only in the recirculation mode, but also in the air exhaust mode, provided that the device is connected to the ventilation duct.
The included telescopic pipe allows for easy height adjustment. The dome itself is made 65 cm high.
Possessing higher quality characteristics, it also has a higher cost.
KAISER A 9416 WBE
KRONA STEEL KAMILLA 2M 600
The model has a special retractable part, the unit is equipped with two motors and is controlled using buttons. The width is 60 cm, and its capacity is 560 m³ per hour with a noise level of 50 dB. The original finish using unpainted wood provides it with a unique design.
The hood is ideal for a kitchen of 11 m2.
Krona Kamilla 2M 3P 600 inox
FALMEC TWISTER 45
One of the representatives of island models with a built-in air ionization system. With a width of 45 cm and a capacity of only 460 m³ per hour, it is equipped with a system that ensures ionization of air masses and neutralizes unpleasant odors, which not only provides high-quality indoor air purification, but also makes it healthier. The cylindrical design of the aluminum body makes the device stylish and original. All the above advantages, naturally, influenced the price of the household appliance in the direction of its increase.
Hood FALMEC TWISTER 45
In order to immediately protect yourself from unpleasant emotions associated with an unsuccessful purchase, the choice should be made among models from well-known manufacturers of household appliances. This will allow you not only to purchase a sample of high-quality European cleaning equipment with numerous functions, but also to receive a warranty from the manufacturer and thereby save money.
The most famous and deservedly popular companies in the domestic market are KAISER, KRONASTEEL, SIEMENS and GORENJE.
