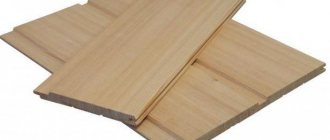
What is lining? Wikipedia says it is “a thin cladding board, a product of wood processing. Has a tongue-and-groove connection. Used for interior and exterior decoration of premises: country houses, baths, saunas, loggias, balconies, attics, technical and utility rooms.”
Initially, lining was used for interior decoration of passenger railroad cars. Actually, that's where the name comes from. Later, builders became interested in the convenient and affordable finishing material, but for some reason they turned it into a material for finishing the interiors of utility rooms, sheds, temporary cabins or rooms in country houses.
We don't agree with this. Cladding board (as lining is also called) is an amazing material: lightweight, environmentally friendly, plastic. And it fits perfectly into modern interiors. Now we will demonstrate this.
Lining in the interior of the apartment
Just 10 years ago, in an ordinary apartment, lining could only be found on the balcony. It was used both as a finishing material and as insulation.
Today, lining is already leaving the space of technical rooms and is winning the right to the title of a fashionable finishing material.
Ceramic tile
What could be more reliable than tiling the balcony? Beautiful, easy to install and durable material is not afraid of mechanical damage, water, bright sunlight, is easy to clean and does not absorb dust. For all its positive qualities, tiles are unacceptable for balconies; an exception can only be made for loggias. When completed, laying ceramic tiles on a balcony has too much weight, and the remote slab may simply not be able to support it.
Interior decoration with clapboard
Both walls and ceilings can be finished with lining. In country houses, the walls on the first floor are most often painted or covered with wallpaper, and the upper floors are often completely finished with clapboard.
Lining is a textured, living material that perfectly retains heat indoors, provides excellent sound insulation, and excellent air permeability. The walls “breathe”, which means that moisture does not accumulate behind the lining of the lining, and bacteria and mold do not multiply.
Clapboard finishing has another advantage: even if the building is built of stone, it is very easy to create the feeling of a wooden house in one or all rooms.
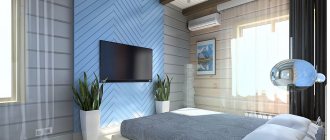
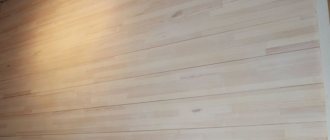
Look at the photo and tell me: are these walls made of timber or an interior decorated with clapboard? It’s difficult to tell the difference at first glance, but take my word for it: it’s the lining in the photo.
What to cover
The choice of coating for the lining is determined by the brand and type:
- Acrylate paint has a long service life. Ideal for exterior finishing, as well as for interior use. This paint leaves behind a vapor-proof layer;
- Acrylate aqualac. This coating is rightfully considered the most optimal and popular option when choosing indoor paints and varnishes;
- Oil paint. This type of panel treatment is remarkably absorbed into the wood and effectively protects against moisture. Oil paint is often used specifically for the exterior walls of a building. The light colors of this paint are much more resistant to sunlight. Bright colors, in turn, will quickly lose their color and become more faded;
- Oils and waxes perfectly preserve the individual texture of wood, and this coating allows the wood to breathe. The main disadvantages are the regularity and required frequency of application.
There are a lot of means for application, there are both ready-made solutions and folk remedies. Wonderful bleaching solutions are: “Iney Prof”, “Neomid 500”, as well as the well-known “Snowball”. “Iney Prof” is available for both gentle whitening and for deeper treatment, it’s up to you to choose. However, nowadays there are no problems with wood bleaches.
Folk remedies include: oxalic acid, hydrogen peroxide and bleach. If you have chosen bleach, it should be diluted in a ratio of one to ten (ten parts of water). But it is better, of course, to purchase a ready-made solution so as not to bother with folk remedies.
Instructions for using the solution are usually written directly on the container, but often the usage scheme looks like this: apply the solution with a brush or sponge to the wood, then it all depends on the coating you choose - some need to be washed off after 10 minutes, there are those that after 15. Always wash off with lukewarm water. The surface will lighten almost immediately, and after 20 minutes you will not recognize your panels.
It is important to remember that bleaching is only the first step, followed by priming, painting or varnishing. It is best to perform bleaching in a ventilated area with rubber gloves on your hands.
Any tree, no matter what it was covered with before, loses its external and color qualities over time. Especially when there is a factor such as increased evaporation. There are a couple of options on how to “revive” your lining.
Sanding and subsequent painting is considered the most reliable.
Most people use oil paint for freshening up. But its use is strongly not recommended for updating your coverage. The paint takes a long time to dry, and the color often does not justify the expected result, and such repairs have a very limited shelf life and soon you will have to repeat the procedure again. Acrylic paints in this case are much more practical, and the profile with this coating will look like new.
Another method is to coat the panels with a special bleaching solution. Construction stores offer a wide range of products, which will allow you to make the right choice that will meet your requirements. Chlorine-based products are most often used, but in addition to this, there are many other active substances, a lot depends on the manufacturer and quality. The main thing is to understand that after bleaching you will have to varnish your profile.
There are also owners who apply a light-colored varnish to the panels (this is the easiest way). Using this method, the color of the wood will indeed become lighter, but you will not return the original shade. As they say, it will be an easy repair for lazy people.
Lining in different interior styles
Country, Provence - these are the styles in which the lining feels absolutely in its place. Wooden accents in the interior add warmth and comfort and blend harmoniously with aged wooden furniture. But the lining easily fits into more formal interiors. Here are some examples of how you can neatly fit lining into the space of a modern home.
The outer wall in the photo above, covered with clapboard, also serves as a wooden accent and has a purely utilitarian function of additional thermal insulation for the bedroom.
The clapboard ceiling looks organically in the space of a modern loft. This technique visually lowers the ceiling a little, which is what the designer of this project actually wanted to achieve.
A wall panel assembled from artificially aged cladding boards looks great.
Cabinet
In this case, the lining in the interior, the photo of which we offer you, is used for a study.
The eco-friendly minimalism of the room creates a calm working mood and helps with concentration. Three board section sizes hide the monotony of the stripes. Wide vertical boards not only increase the height of the ceiling. They level out the sharp lines of the ceiling beams, drawing the direction of view towards the floor, which is assembled from the same wide boards, but they lie as a continuous sheet.
Painted lining
An interesting way to use wainscoting in your interior is to paint it.
Paint the clapboard walls white and soft blue for a great nursery in a Mediterranean or Provençal style...
...paint it a soft yellow for a great backdrop for a country style room.
A white wall made of painted and artificially aged lining fits well into the interior of a Scandinavian-style bathroom (although, in our opinion, it is not entirely comfortable in the bathroom)…
... and into the space of the large kitchen-dining room, echoing the same textured furniture facades and wooden ceiling.
Bathroom
A toilet or bathroom can also be finished with clapboard, but only on the condition that it is impregnated with a water-repellent composition. Otherwise, such an interior will very quickly lose its original appearance. The use of lining in toilet rooms is also encouraged only if the area is large enough. Do not forget that installing boards greatly reduces the area of the room. Ideal if the bathroom is combined. In other cases, it is better to limit yourself to plastic panels that imitate natural clapboard boards.
Lining in the kitchen interior
In the kitchen interior, you can clapboard all the walls or focus only on the dining area. The lining also looks beautiful on a kitchen apron. Don't want problems with cleaning? Treat it with an antiseptic and cover it with moisture-resistant paint.
In a country-style kitchen, unpainted lining looks harmonious; in other cases, it is better to paint it. White, gray and beige colors are suitable for the Scandinavian direction, and delicate pastel colors for Provence. For an eco-friendly style, choose brighter shades, such as green or brown.
Doors
Doors are a very important part of the overall living space: the choice of color and door design should be taken very seriously. A light door does not overload the space and creates a nice neutral background. Also, the texture of bleached oak will be wonderfully combined with glass. Additional lighting can be provided through the glazing in the door, which is very important for dark rooms. You can achieve an interesting effect by choosing different shades and degrees of glass transparency. In general, the atmosphere of a home with light interiors and an entrance door will be lighter and airier. They are great for narrow hallways and cramped spaces.
Lining in the living room interior
The lining goes well with wallpaper. If you make panels out of it at the bottom of the wall, the room will turn out to be especially homely and cozy.
Everyone is already a little tired of boring monochrome living rooms. Let's use lining to add a little color to the interior and play with contrasts? For example, you can trim the walls with clapboard and paint them in an unusual color (complex dusty shades look most interesting, as in the photo above), and leave the floor or ceiling white. Fresh and unconventional. The reverse scheme also works: bright wallpaper - snow-white wooden paneling.
6 main groups of wood protection compounds
If impregnation is necessary for the panels on the balcony, and it faces the south or east, then you will need a solution for exterior work.
It is important to note that some compositions may give the surface a greenish or pink tint due to chemical reactions.
For this reason, carefully read the description, since it will be possible to disguise this color only with opaque paints or a very dark tint.
Stain and other tinting compounds do not hide the texture of the wood, and also do not apply any film, for this reason the wood retains its properties and the vapor permeability remains the same. If you want to express the wood pattern more clearly, it is better to choose a slightly pigmented solution. In this case, several layers may be required, but then you can achieve the required level of “painting”.
Varnishes nowadays are used both water-based and scuba-based. The latter, in turn, are divided into glossy, semi-matte and matte. It is easy to add various colors to varnish coatings, as well as UV filters and bactericidal solutions.
all your dentistry October field phone
Wood oils. There are pigmented ones, and there are also transparent ones. They are perfectly absorbed deep into the fibers without leaving a dense film on the surface. The best solutions are as good as varnish, protecting the surface from dirt and abrasion. But oils do not have a glossy shine; the surface is slightly shiny or, rather, matte. This is a great way to protect your panels. It is possible to highlight the grain of wood using the correct coating technique.
Wax compounds. There are three types of wax: water, liquid, solid. Aqueous and liquid compositions are initially ready for use, while solid ones, before use, will have to be melted to a liquid state. Waxing panels is very effective and traditional, but with new technologies the processing process has become much easier. And although applying wax still remains a difficult task, it will lie much more evenly on a primed surface.
Pros and cons of lining
Like any other finishing material, lining has its pros and cons. A sign will help you understand whether or not it should be in your interior.
With the help of lining you can create a truly stylish and at the same time unique design. We have already talked in the blog about how you can use wood in the interior. Why not try to do the same with clapboard and be surprised at the result?
Combination with other colors
The color of bleached oak peacefully “coexists” with rich, contrasting colors. They emphasize the naturalness and natural beauty of the light coating.
- Floor. If you decide to use a light floor covering to decorate the room and the room has a large area, it is better to choose, as mentioned above, a contrasting baseboard. This can be a completely painted baseboard, without wood grain. Shades of gray are good - it is basic and classic, it will go with everything. If you prefer a baseboard with a wood texture, then it is better to choose a darker shade, but with the same degree of color warmth as the floor.
The plinth must be the same color as the door, then the interior will look complete and harmonious.
The bleached oak floor provides a fairly wide choice of wall colors, although to create a comfortable environment from the point of view of visual perception, it is better to focus on natural shades: white, shades of beige, mustard, brown, pistachio, green, gray, blue and light blue. If the room is large, you can try fairly dark shades of the walls in combination with a light floor.
- Wall and ceiling panels in bleached oak color will look great together with brickwork, plaster, and plain painted walls in neutral shades.
- In furniture pieces, a combination of bleached oak with black or fresh, rich colors will look trendy and interesting. Bright kitchen facades or living room sets in combination with a frame in a neutral light shade will be a good color scheme and will refresh a boring interior. Turquoise, yellow, orange and even pink, if desired, will fit perfectly into the decor. For those who are not yet ready for bright furniture, a variety of textiles in interesting colors will help create interesting accents. These can be curtains, bedspreads, pillows, even such complex shades as purple, emerald, bright red will only emphasize the restraint and freshness of bleached oak, and create a fashionable contrast in the decor of the room.
Popular self-processing options
Painted boards, of course, have a number of undeniable advantages, but the main drawback for many is its high price. This is often off-putting.
If you have at least some skills in this matter, then you can paint the lining yourself, thus saving part of the budget.
Popular formulations for treatment are:
- Varnish;
- Impregnation;
- Dye;
- Stain;
- Wax.
Varnishes create a translucent layer on the surface, with its help you can give the wood a noble shade. Impregnation and stain are invisible on the wall.
They are absorbed inside, protecting her. Often, another layer of varnish is applied to such a coating.
Paints create a color film on the surface, which often has good water-repellent properties.
The choice of composition depends on your goals and desires. To create a traditional interior, varnishes are used. Depending on the base element, they are divided into:
- Alkyd;
- Acrylic;
- Polyurethane;
- Scuba diving.
The most popular option is aqualak. It is versatile and non-toxic.
It can be used with equal success for both floors and ceilings.
Remember that it is better to apply several thin layers than one thick one. This will affect the quality of your work.
Alkyd varnishes are highly durable, but it is better to use them for facade work. They are very fragrant and take a long time to dry.
Polyurethane can be either urethane or acrylic based, or contain solvents. It is very abrasion resistant. But, alas, it releases many harmful substances.
Painting process
The lining is painted using a special technology. It lies in the fact that you need to move the brush or roller continuously from top to bottom, so you will get an evenly painted surface without drips or streaks.
It is also worth noting that the pressure on the brush or roller should be the same throughout its entire length.
Applying a second layer of white paint to the paneling
You cannot apply a brush with paint several times in one place because this will lead to uneven coloring of the surface of the lining. The brush should only be half full of paint, maximum, and no more. You need to paint in a thin layer and several times.
Important! Applying the second layer is possible only after the first layer has completely dried.
In order to paint the entire surface of the lining evenly and accurately, you need to purchase several types of brushes in order to paint hard-to-reach places well. The door trim is the most difficult to paint, so this area needs to be given special attention. To properly paint hard-to-reach places, it is better to watch the entire process on a training video.
If the lining is adjacent to glass or panels, it is necessary to cover the surface near them with masking tape. After painting, we simply remove it from the surface. The entire painting process requires care and precision. If this does not apply to you, then turn for help to the craftsmen who will quickly and efficiently paint the lining.
Careful and thorough painting of the panels leads to the desired result.
