Where to start assembling
The most important thing is to study the instructions. To make it easier to understand the fittings, they should be sorted into separate groups. For small components, an organizer or several plastic containers are suitable. It is better to count all the small parts in advance and check their quantities with those indicated in the manual. Structural elements need to be checked for chips and uniform color.
With a competent approach to assembling the cabinet, it will last at least 10 years.
It is difficult to assemble a wardrobe alone, so it is better to call 1-2 partners.
If everything is in order, there are no missing parts or damage, you can begin assembly.
Instructions for assembling the wardrobe must be included with the purchased piece of furniture.
Required Tools
Often complete with confirmations there is a hexagon with which furniture is assembled. But this key is not all that you may need. After all, control measurements need to be carried out with something, and the structural elements need to be tapped so that they fit tightly to each other at the points of connection with dowels. In order not to waste time searching for the necessary tools later, you need to prepare:
- roulette;
- level;
- drill;
- rubber and regular hammers;
- flat and Phillips screwdrivers;
- L-shaped hexagon.
The drill will be useful at least when installing the rod. Using a rubber hammer, you can adjust structural elements without fear of damaging their outer coating. If you don’t have such a tool, you can use a regular one. But in this case, you will need a shock-absorbing lining to prevent metal contact with the laminate.
It’s better to forget about a screwdriver while assembling large-sized furniture: it’s easy to “miss” with it by screwing in a screw deeper than necessary. And this can lead to a decrease in the strength of the entire structure due to weakening of the attachment points.
Preparing all materials for assembly
You need to prepare in advance the tools that may be needed. Usually the minimum required is: keys, screwdriver or screwdriver, hammer (rubber and regular), pencil, ruler, tape measure. It is also advisable to use a building level to check how level the cabinet is assembled relative to the floor.
You need to assemble the cabinet on the floor. It is optimal to do this in such a position that lifting a heavy body after assembly requires a minimum of effort and energy.
Advice. Parts should not be immediately removed from their packaging. After inspection, it is better to put them in boxes so as not to accidentally damage them.
Wardrobe assembly procedure
The first step is to install the base. Usually the stove is attached to stands that are located along the long side. It is mounted using Euro screws - fastenings with a recess in the head for a hex key.
It is important to know that a number of cabinet filling elements will also require preliminary marking and installation of fasteners, since this work will then be complicated.
The next step in the order of assembling the wardrobe is mounting the body. These are load-bearing parts.
Next, the back wall is attached. Shelves, hanging rods, that is, all the internal contents, are installed in the finished housing.
Assembling a sliding wardrobe with your own hands requires the master to have a clear understanding of the functions of all structural parts and fittings. Some shelves can be put back in place only after the furniture has been installed in a vertical position.
Lastly, the doors are mounted to the cabinet.
Advice. If the model has mirrors, it is attached to a fully assembled cabinet.
Before installing the side outer wall, we recommend pre-fixing the corner shelves that will be on the outside.
Cutting the cabinet body parts and rolling the ends.
If you are planning to make a cabinet, then you have probably already thought about how to cut laminated chipboard into parts of the required sizes. Buying expensive tools to make one cabinet is unprofitable. You can, of course, try to cut it with a jigsaw, but the cut will be uneven and chips of the laminated surface of the slab are inevitable. The remaining option is to find a company that will make high-quality cuts of laminated chipboard on a sawing machine with a scoring disk and carriage. As a rule, such companies also provide services for processing the ends of parts and, at the same time, sell chipboards of various thicknesses and textures.
Such a company needs to provide a list of parts with dimensions, indicating on which sides the edge should be. They can also tell you where you can buy furniture fittings and profiles.
First of all, look for furniture production; if there is a Leroy Merlin store in your city, then they also provide such services, but the price of their services is quite high.
Those who have difficulty calculating the dimensions of cabinet parts can use Pro100, a free, simple furniture design program. There is a lot of information and lessons for this program on the Internet.
Pro100 program interface
Purpose of materials and panels
During operation, the main load falls on the base or stand. Therefore, it is important to check the strength of the part and install it on the most flat surface possible.
If the perimeter of the built-in structure will be walls, floor and ceiling, it is important that they are as smooth as possible. A level is useful for measuring the angle of inclination and leveling surfaces before installing shelves, walls and doors.
Body parts are necessary to protect things from the external environment, and they also serve as load-bearing elements to which all shelves are attached.
To correctly measure the locations for drilling holes, you need to fold all the shelves.
The back plate is usually made of thin sheet material; the part does not bear body load.
Important! So that smooth movement mechanisms are installed on the drawers.
It is recommended to immediately screw the base of the telescopic guides.
When assembling the plinth, it is necessary to mark the location for attaching the slats or adjustable legs. Long cabinets will require at least 6 supports. The cross strips are attached to the bottom of the cabinet with corners and self-tapping screws.
As for the through holes for confirmation, which are made from the outside, difficulties may arise with this, since the markings are made inside.
Before installing the housing, it is advisable to check the evenness of the floor with a level. If it is uneven, it is better to choose a model with adjustable legs that can be adjusted in height.
Sometimes it happens that in order to eliminate defects of poor quality assembly, you have to disassemble the wardrobe and then reinstall it.
Important! After assembling the main parts of the structure, it is necessary to level it. First, measure one diagonal with a tape measure, then the other. This method is used to check how even the corners are. By calculating the difference in values, you can determine in which direction the top of the furniture needs to be moved.
The distance between opposite corners should be the same. Otherwise, the cabinet will stand crookedly and the doors will not close tightly.
It is necessary to align the geometry of the cabinet so that there are no problems with installing the doors.
How to choose an Ikea bed
Since the Ikea extendable bed is now at the peak of popularity, more and more companies are appearing that are engaged in counterfeiting it.
More often, manufacturers create only a visible resemblance to the original, without caring at all about the functionality of the design.
Therefore, when choosing Ikea for a children's room, you should pay attention to the following aspects.
- It is advisable to purchase a design with a slatted base. Under no circumstances should you purchase a piece of furniture that has plywood instead of slats.
In the latter case, the mattress will not be sufficiently ventilated.
It quickly begins to move apart and fall apart under increased mechanical loads.
After a short time, the sliding part begins to jam and the mechanism breaks.
Installation of hardware
Responsible furniture manufacturers prepare all holes for hardware during production.
On the bottom bar, you need to pre-drill several holes and insert anchors on which the rack bars will be attached.
The specific set depends on the model and manufacturer, but for most cabinets you need to have hex keys and a set of screwdrivers, including ones for Eurobolts.
The first step is to install the side planks; if there is a middle post, it is installed after.
The top bar is fastened with corners and self-tapping screws or confirmations.
Advice. It is better to assemble the cabinet in a standing position, since fitting the parts while lying down is problematic. To install the roof, a minimum of 10 cm must be left.
Each hardware has its own technical parameters and requires special fixation technology.
Stage 1: determine the dimensions
The dimensions of the swing closet are determined based on the installation location:
- Height. If you want to take up the entire available height, make a built-in wardrobe. For cabinet furniture, it is necessary to provide a space of at least 150-200 mm.
- Depth. There is usually little space in the hallway, so narrow cabinets are installed. The width of hangers for adult clothes in IKEA is 42-43 centimeters. If you want to place a standard rod in a closet, make the cabinet at least 450-500 mm in depth. If it is less, you will have to install a transverse rod; it is less convenient and roomy. In our case, the cabinet depth will be 450 mm.
- Width. The parameter is limited only by the length of the wall.
Nailing the back wall
If you choose suitable fastenings for a panel made of fiberboard (the back wall is most often made from this material), then over time it will move away from the structure. It is best to screw it on with self-tapping screws.
The elements should fit into the holes prepared by the manufacturer easily, but at the same time not wobble.
The panel is placed behind the cabinet and then screwed, holding the bulk of the wall. Self-tapping screws are inserted in increments of 10-20 cm.
As soon as the actual loads exceed the maximum values, the thin part of the chipboard is destroyed. The holes will have to be redone, which means additional costs and loss of time.
Advice. If there are several back slats, they are first fastened end-to-end with ties.
Installation of additional materials
Usually shelves are fastened with corners and self-tapping screws. Manufacturers pre-drill holes for hardware on these parts. All that remains is to measure and determine the optimal distance between the shelves and screw them to the side and central strips.
During assembly, never tighten fasteners until all parts are in the correct position.
The hanger bar is mounted on the flanges that come with it. If necessary, the pipe can be shortened using a hacksaw.
Work very carefully and hold the elements constantly.
To install drawers, you first need to attach the mechanisms to the rack strips. It is very important to install them parallel to each other at the same height. Then there will be no problems with retractable mechanisms.
The fiberboard boards are fixed with wood screws. Screw them in carefully; the screws should land exactly in the middle of the furniture boards.
Installation of internal partitions
There are small holes along the edges of the furniture partitions; you need to place choppers in them, strengthening the wooden joints. Then you need to align the dowels with the holes in the base. This way the vertical partitions are put in place.
The frame is assembled, now we need to install the internal partitions.
It is important that the attached partitions do not tilt until the cabinet is completely assembled. To add rigidity to the system, you need to secure the parts with screws or self-tapping screws. Insertion into grooves is also allowed.
If the holes for the dowels are not prepared, they will have to be drilled
It is recommended to install parts during assembly of the structure strictly according to the drawing, horizontally or vertically. At each stage, it is important to prevent distortions of the connecting parts. In a room with low ceilings, it is better to work vertically. Since the finished cabinet will not need to be lifted.
Door installation
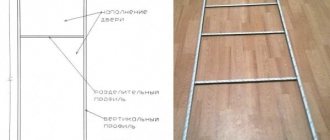
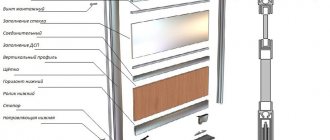
Before installing the doors, it is necessary to install the guides, strictly observing a straight line. First of all, screw on the upper rails, and then the lower ones.
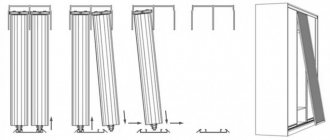
When installing sliding doors, you should always install the inner one first, and then the outer one.
The upper guides are attached flush with the side edge, and the lower ones with an indentation of 8-15 mm. Holes for mounting are drilled in a staggered pattern on both lines.
Once the doors are adjusted, the stoppers should be adjusted correctly. They are needed to ensure that the doors remain stationary in the closed position.
2 doors
Before installing the doors, you need to check and clear the bottom track of any debris. If foreign particles get into the roller mechanism, the door will jam.
The door that will run on the far rail is installed first. The door is first inserted into the top track, and then the end rollers are placed in the bottom channel.
If there is more than one door, the outer latches are adjusted first, and the rest are centered on them.
3 doors
To install 3 doors on a wardrobe, first install two doors that will run on the rear rail. They are also mounted: first in the upper guide, then in the lower. After installing the doors, stoppers are installed to prevent the doors from colliding.
Please note that a mirror door is expensive and will be unpleasant if it falls out due to improper installation.
Lastly, the door is mounted, which will run on the front rail. A mirror is usually attached to it. It is very important that the doors are installed level, otherwise they may fly out of the grooves, which is not safe to use.
PAX planner: set dimensions and choose design
PAX can be planned independently in the planner program, or with a specialist when visiting a store. The good thing about the second method is that a specialist can give you some advice or warn you against mistakes in planning. The first one will please those who do not have the opportunity to visit the store, because... IKEA is not available in all cities of Russia and CIS countries.
This is what the scheduler interface looks like on the website. On the right is the main menu where you can set different sizes and configurations.
The price will depend on the content and dimensions. The most expensive will be tall cabinets with glass doors or veneer fronts. Panels on sliding doors made of fiberboard are the most budget-friendly.
In general, a cabinet assembled using the PAX system costs from 5 thousand rubles.
Internal filling
The project above is exactly my closet. And this is what it looks like in reality.
Dimensions of my closet: 236x58x150 cm. The price in this configuration, as can be seen in the screenshot from the program, is almost 27 thousand. In my opinion it is very cheap.
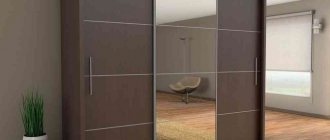
Facades: one sliding door - “Mehamn” under stained ash; the other is mirrored.
Frame sizes
Although IKEA claims that this wardrobe system allows you to assemble a wardrobe for almost any room, the size and capabilities of PAX are still limited.
In the catalog you can choose only 2 types of height and 2 depths:
- Height: 201 or 236 cm;
- Depth: 35 or 58 cm.
Narrow cabinet with a depth of 35 cm
Full-size, with a frame depth of 68 cm.
The width is also not so simple. There are only three standards:
- 50 cm;
- 75 cm;
- 100 cm.
I wanted to install PAX not only in the room, but also in the hallway for outerwear. But precisely because of the width, we had to look for other options for arranging the hallway.
Corner
The PAX system allows you to assemble a corner or U-shaped wardrobe option. To do this, you need to purchase a special module.
Unfortunately, IKEA does not currently have options for frames with a beveled corner. And, in my opinion, it looks more beautiful with a right angle. Although, perhaps, a corner wardrobe in the shape of a trapezoid is more convenient to use.
Doors: hinged and sliding
Sliding ones save space, but from personal experience I will say that it is inconvenient to dress alone with such a wardrobe: while one half is open, access to the other is closed.
But in a small apartment or in a narrow corridor, there aren’t really any other options besides sliding doors.
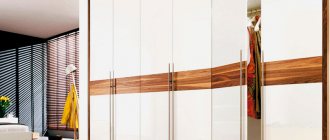
But there are more design options among swing designs.
Internal filling
The interior arrangement and organization of storage is a separate delight. For this I am ready to endlessly praise IKEA.
Everything is thought out to the smallest detail:
- shelves can be installed at any height convenient for you;
- built-in lighting (to get dressed normally, you don’t need to turn on the lights in the entire room and wake up your household, this is super humane in relation to the husband sleeping in the room, who gets up for work an hour or two later);
- clothes rails (stationary and retractable);
- retractable trouser hangers,
- pull-out shelves for shoes;
- retractable baskets;
- boxes, hanging bags;
- drawers and drawers;
- and much, much more.
This is simply paradise for those who love order and functionality!
Open wardrobes PAX
A large dressing room is every woman's dream. And with IKEA’s open storage system, you can get closer to your dream by organizing a mini version of it in the pantry, for example. Or under the stairs.
And if the size of the bedroom allows, then you can build a partition from plasterboard, organizing storage behind it.
Design options
For sliding doors, the catalog offers the following facade options:
- white: matte or glossy;
- frosted glass;
- beige gloss;
- light gray gloss;
- white with a white strip design;
- bleached oak;
- dark frosted glass;
- dark bamboo;
- white textured;
- mirrored
The sliding door frame can be composed of different facades, because... its parts are sold separately.
Frame
The frames are available in only three colors: white, bleached oak and black-brown.
There is a larger range of swing doors. There are blue, green, gray, black, black-brown, light or dark wood, white and even with a floral pattern. There are smooth facades, with panels or with a mirror.
