Every year people around the world celebrate birthdays. Many people, especially children, are looking forward to this amazing date. They want to celebrate their birthday brightly, unusually, cheerfully, with a lot of memories.
A heavy burden on the shoulders of parents is to organize a unique holiday: call friends, choose gifts, set the table, decorate the location. Many people decide to outsource this task to specialists who will do everything quickly and efficiently.
But when creating a holiday, the atmosphere and love of family are important. It’s so wonderful for everyone to choose decorations together, make them themselves, decorate the house, cook food.
Now the most popular birthday attribute is numbers that reflect age. They can serve as a cake decoration or a great decoration for photographs. This article will show you how to make decor for every taste and color with your own hands, and not run out shopping every time.
Creating a wireframe
Creating a holiday figure begins with the frame. It is made from thick cardboard. Corrugated packaging cardboard from boxes for large household appliances is perfect for this purpose.
The figure consists of two large parts and several small ones. On a large sheet of cardboard you need to draw a silhouette of a number. If you are good at drawing, do it by hand. You can do it even simpler, download a photo of a birthday number template from the Internet, print a large picture on several A4 sheets and cut it out. All you have to do is attach the finished template to the cardboard and trace it.
Having cut out two parts of the number, you need to cut out a long ribbon from cardboard; it will be located between the front and back of the number and form the volume. If there is not enough material for a long strip, you can cut out several pieces of the same width and connect them with tape. All that remains is to glue all the parts together with wide tape.
Making a number with your own hands can be even easier. You can cut the frame of the decoration from foam or foam rubber. Simply attach the printed template to the material, trace and cut out. Foam rubber can be cut with large scissors; foam plastic can be cut with a stationery knife.
The finished frame can be decorated in several ways.
Suitable types of materials
A common component of the craft is small plastic or inflatable balls that need to be attached to a frame.
Unfortunately, balls belong to the classic method of making numbers, and most people have long been bored with them. Let's look at 3 well-known and interesting methods of creating decorations: paper, fabric and edible figures.
You can also watch an interesting lesson on a specialized website on creating crafts or jewelry with your own hands, for example, the handicraft portal https://tytpodelki.ru/ offers a huge selection of original and exclusive works.
Each of them differs in creativity and way of presentation. For example, butterflies, flowers, and bows come out beautifully from fabric, and craftsmen can create any type of origami from paper. A completely new type of holiday numbers is a cake made from cookies, cakes or sponge cake.
An independent and hand-made creation is always valued more than a factory one, so you will not regret the money and time spent. Especially if you find out that the figurine can be sold at an attractive price. The cost depends on the shape, size and material.
Fluffy figure for a boy
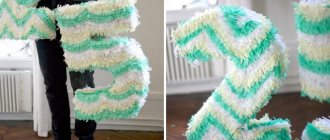
You can get original numbers from corrugated paper if you make it according to the following instructions:
- Cut long strips of small width from corrugated paper of the main color and glue them to all the joints of the cardboard frame. This is necessary so that there are no gaps on the number;
- Cut out many squares of corrugated paper, measuring 5 by 5 cm or slightly larger;
- Each square needs to be wrapped around a pencil or pen; corrugated paper will hold its shape well;
- Immediately glue each piece onto the frame.
At the bottom of the figure, you can glue several pieces of cardboard, stacked on top of each other, to make it heavier and more stable.
Foam base
How to make a three-dimensional figure from napkins and foam? If you choose foam plastic as the base material, then it will be much more convenient to work. Cut the number out of paper or draw it directly onto the foam and then cut it out. If the sheet of material is too thin, glue several sheets together with ceiling tile adhesive. It is most convenient to work with this capricious material with a special tool.
If it is possible to use a professional cutting tool with a heated nichrome thread, be sure to take advantage of it. A similar cutter can be made from a soldering iron with fixed copper wire, but this is only for creating volumetric figures in large quantities. Foam can be cut well with a regular knife using a metal ruler.
Fabric bows
You can use more than just paper to create numbers. Excellent decorations also come from fabric. For a girl’s birthday, you can cover the number with fabric bows.
For this purpose, it is better to buy several meters of ready-made smooth braid. The ribbon is cut into pieces 10-15 cm long, each one is tied into a bow and glued to the frame. If the fabric frays at the cut site, gently burn it over the fire to seal the edge.
Ribbon fringe
If you buy thin multi-colored ribbons, you can use them to make fringe. We offer you instructions on how to correctly make a number with fringe:
- Cut the tape into pieces 10 cm long;
- Fold each piece in half and tie a knot at the fold;
- Glue the knot to the cardboard frame;
- Repeat for each ribbon. The knots need to be glued close to each other; for this it is better to use hot melt glue.
Note!
Macrame: diagrams, interesting projects and detailed descriptions of making crafts
- Crochet amigurumi - examples of how to make a beautiful toy with your own hands (75 photos)
Coffee topiary: step-by-step master class on how to make a small decorative tree from coffee beans
Satin flowers
You can make beautiful and very realistic flowers from a wide satin ribbon. For each flower you need to do the following:
- Cut out three circles, different sizes;
- Fire heat all edges;
- Add the circles together from largest to smallest;
- Pierce the center of the piece with a tailor's pin and pin it to the base.
Jewelry options
Any thin paper can be used for decoration. You can decorate the number with large pompoms, voluminous or flat flowers, fringe, and so on. For a large figurine you will need about 100-200 paper roses. We inform you of this to understand the scale of the work. It is advisable to choose lush flowers, such as roses or asters. To save time, the sides can be covered with corrugated paper. You can decorate the number with the same or different flowers, for example, combine two or three colors and make gradient transitions. The same goes for fringe.
Making numbers with yarn
Another simple way is to wrap the number with thread. Select the yarn of the desired color or colors, firmly glue the end of the thread to the cardboard figure and begin simply wrapping the thread around the frame. The thread must be placed very tightly so that the cardboard is not visible. The direction of the thread can be changed, so the number will look more interesting.
A melange thread or thread with smooth color transitions will look beautiful on a festive number.
How to make voluminous asters for decoration
To create a lush aster you need to take six napkins and a stapler. Fold the napkins in a stack, cut out the petals (round the edges), fasten them in the center and unfold them, moving the petals a little. Fluff the flower. You can try making the edges wavy. A flower with jagged edges will look interesting. For one flower, try using napkins of different colors to make the decor look brighter and more varied.
Other ideas
In addition to the listed ways to decorate a holiday number, there are many more ways. Here are just some ideas on what you can use to cover a number:
A large piece of fabric. The fabric is glued to hot glue, forming beautiful folds;
- Colored paper or gift wrapping paper. On top of the frame you can make a thematic applique in the theme of the holiday;
- Small photographs;
- Multi-colored buttons;
- Felt;
- Artificial flowers made of plastic;
- Sparkles. The frame should be generously greased with PVA glue and sprinkled with multi-colored glitter;
- Wrap a decorative rope around the number, periodically gluing the rope;
- Small balloons. They need to be attached to a foam plastic frame, piercing the tail of each inflated ball with a tailor's pin. If the frame of your figure is made of cardboard, glue the balls with tape; hot glue will melt the rubber.
A festive number will decorate your home during your child’s birthday celebration, and can also be an excellent gift for an adult birthday boy. It can serve as a decorative item or combine several functions.
You can put a small gift inside the volumetric figure; for convenience, make a “door” in advance through which the birthday person can get the gift. For kids, you can make a festive piñata from a hollow cardboard figure. To do this, just fill the figure with candies and hang it in the yard.
Paper view
This type of decor requires certain materials: a ready-made frame, PVA glue, colored paper and active imagination.
