Every year people around the world celebrate birthdays. Many people, especially children, are looking forward to this amazing date. They want to celebrate their birthday brightly, unusually, cheerfully, with a lot of memories.
A heavy burden on the shoulders of parents is to organize a unique holiday: call friends, choose gifts, set the table, decorate the location. Many people decide to outsource this task to specialists who will do everything quickly and efficiently.
But when creating a holiday, the atmosphere and love of family are important. It’s so wonderful for everyone to choose decorations together, make them themselves, decorate the house, cook food.
Now the most popular birthday attribute is numbers that reflect age. They can serve as a cake decoration or a great decoration for photographs. This article will show you how to make decor for every taste and color with your own hands, and not run out shopping every time.
Methods and schemes for making different numbers
Below we describe the work scheme according to which we will carry out almost every product, and tips for implementing high-quality figures.
First of all, we pay special attention to the frame of the figure. For a faster craft option, you can choose polystyrene or foam rubber as the base, rather than cardboard. The materials must initially be the desired size. We follow the same principle - trace the stencil and cut it out.
Stencils for numbers and decorations can be easily found on the Internet and printed; this task will take no more than ten minutes of your time.
At the end, the most interesting part remains - decorating the numbers. We will dwell on this in more detail, considering many decoration options.
Flowers
The simplest and, at the same time, beautiful paper figures are roses or other buds. We prepare colored durable napkins in advance, put 2-4 pieces together and form an accordion, which we wrap with a thin thread in the middle.
All that remains is to fluff both sides of the napkins, giving them a rounded appearance, and glue them onto a stable frame. It is difficult to say how many buds will be needed.
Use your imagination or watch video tutorials on creating other types of flower arrangements. The best option is lush roses of any color.
DIY polymer clay jewelry: master classes with photosDIY decorative candles: master classes with photos
Decorating a vase: ideas and master classes on how to make a vase with your own hands (80+ photos)
Materials and tools for work
It all depends on your choice of desired numbers. Their size, color, heaviness, stability, beauty. The required items you will need are: a simple pencil, A4 sheets, scissors/stationery knife, glue/adhesive tape/hot gun. The following two choices depend entirely on your taste:
- Frame: foam rubber, polystyrene foam, cardboard, paper, foil;
- Decorations: napkins, candies, flowers, beads, rhinestones, rain, fabric, sparkles, threads, buttons, ribbons, paints and other things.
Personalized craft design
Today, any decor can be ordered or bought in a store, but only you know the tastes and desires of your birthday person and, based on the instructions on how to make a number correctly, you can create something individual that reflects the personality of the recipient.
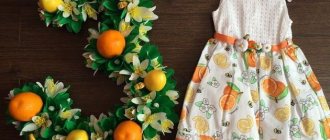
So, for a little girl, a delicate pink and blue color scheme, a fluffy texture of flowers, and elements of jewelry are suitable.
Decorations for a more strict number of a birthday boy can be, for example, pictures with cars, animals - depending on interests. We take into account the child’s temperament, his favorite color, and hobbies.
Options for flat numbers with your own hands
This choice will look great on wallpaper or windows. It is suitable for a photo shoot on the eve of the holiday and will look amazing in the photographs taken.
From paper
First, we need to carefully create the desired number using a stencil; be guided by your desires in size. You can work directly on a colored sheet or use a landscape sheet as a basis. We can cut out patterns, beautiful shapes or our own decorations from colored sheets of paper and decorate the craft.
An interesting and not complicated design: take two colored sheets, cut out thin strips (you can glue some to the required length), intertwine them. The result will please you with its checkered design. We glue the numbers onto the canvas using PVA glue and cut off unnecessary protrusions.
From cardboard
We use the same tactics when working with cardboard. This material is stronger than paper and is more difficult to tear or damage in any other way. Such numbers themselves will look a little more voluminous due to the density of the base.
You can decorate with many materials, from rhinestones to homemade flowers. Decorations on cardboard should be attached with glue; it will be less noticeable compared to other fastenings.
The best way to cut cardboard is with a stationery knife, this way there are no hanging edges left. Use a little imagination and create a unique craft.
From photographs
This unusual option is especially suitable for an anniversary (5, 10, 15 years and so on). Photos can be attached to either paper or cardboard.
Choose the most meaningful pictures, because they are the ones that will reflect your love for the person.
You should first cover the pictures printed on paper with tape so that they last longer. In addition to photographs, you can use small decorations in this craft, just don’t overdo it.
How to make paper roses
How to make a volumetric figure with your own hands? Step by step, the entire process of creating a decorative element with a cardboard base is as follows:
- On a large sheet of cardboard, draw a blank - a number of the required shape and size.
- Cut out two number blanks and a strip of cardboard. Make notches every 2-3 cm on the strip with a stationery knife.
- Fasten all the elements together using tape.
- Make the required number of paper roses for decoration. This can be done in different ways, which we describe below.
- Glue the decor to the workpiece in a certain order or randomly if several colors are used. It is better to use delicate shades for the front side, and darker ones on the edges. This will make the figure look even more voluminous. You cannot use skewers for fixation, because the composition must not only be beautiful and durable, but also safe for the child.
To make the simplest rose, you will need to draw a spiral on a square of colored paper and cut a strip along the marked contour. Then roll the strip tightly, starting from the center. For strength, you can add a little glue to the base of the structure.
To make more natural roses, you need crepe paper. Cut out 15 petals in the shape of hearts and 5 in the shape of drops. Lightly stretch each petal from the center to the edges to give it a more natural shape. Fold the edges in using a pen or pencil. Now attach the droplet petals to the wire base, then the heart petals. If necessary, secure the structure with adhesive tape.
To make roses that look like real ones, you need to cut the paper into strips 1-5 cm wide. From one A4 sheet you can get up to 20 roses.
Basis for volumetric birthday numbers
As we said earlier, the base of numbers is half the success of the entire work. Each material has its positive and negative sides. For numbers, stability and an even structure are important; it is desirable to have a slight heaviness so that the product does not fly away during gusts of air.
Frame
Most often they use a cardboard base, which can withstand great mechanical stress. You need to decide how big you want the number to be. If it is within the limits of a landscape sheet, then you can immediately print it on a printer. But with large sizes you will have to work hard:
- We print in the highest resolution on several sheets;
- We cut out each element and connect it with glue/adhesive tape;
- We trace the blank on cardboard and cut it out;
- This procedure can be done several times if the age contains two digits.
Next, we cut out another frame blank of the same number, which will be located behind, as well as a ribbon for the volume of the number, located between these two elements. At the end of working with the base, we fasten all the elements together with tape, not sparing it, otherwise the craft will quickly break.
Styrofoam
Most often, this material is in demand for insulation purposes, but is gradually being used for crafts. It is better to make crafts from fine-grained polystyrene foam, it crumbles less. Let's consider the advantages for making numbers:
- Low cost, very easy to find in the public domain;
- Small weight category;
- Foam plastic is not affected by humidity and cold;
- To prevent the foam craft from flying away, you can attach any weighting material;
- Crafts made from foam plastic are unpretentious; many tools that are available are suitable for them.
The disadvantages of this material are: intolerance to fire and solvents (materials for working with polystyrene foam should not contain acetone).
Foam rubber
A frequent guest in the home of handicrafts. This material has an extensive list of advantages, let's look at it:
- It wears out for a very long time under the influence of external forces (durable);
- Does not harm humans – environmental safety is at the highest level;
- Sealed and not exposed to moisture;
- The structure is stable from -40 to +100 degrees;
- Elastic, which is very important for crafts.
Paper flowers for covering
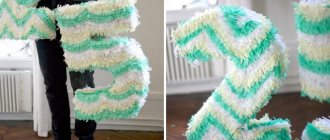
The original numbers made from corrugated paper look very nice. They are made like this: a cardboard base is covered with paper roses.
We cut strips of the same size, approximately 5 cm wide, up to 50 cm long. The shorter the length of the strip, the smaller each flower will be, therefore, more of them will be needed.
We bend the edge of the strip half a centimeter, roll it into a roll, tie it with thread at the bottom, the rose is ready. You need to make enough of them to completely cover the entire craft.
Decor of volumetric figures
Volumetric crafts make an even greater impression with their scale. They look incredible and beckon you to take a couple of pictures side by side.
Birthday celebrants will be able to fully enjoy the interior of the festive room, and guests will appreciate the cozy atmosphere.
There are many options for creating three-dimensional figures, so let’s look at them now.
Paper products
For a simple three-dimensional figure with paper elements, we will need: a ready-made base for the figure, colored paper, a glue gun and PVA.
The process is very easy:
- We prepare the frame for the figure (we previously discussed its production);
- Separately, we roll up many roses from colored sheets. Here you will need unlimited patience and nerves. Choose delicate shades for the product;
- Attach the finished roses with glue to the number frame.
Napkins
Using napkins you can make amazing flowers; this is a budget option. Choose shades of napkins that are pleasing to the eye, shape them like an accordion, tie them with a thread in the center, open the opposite ends, and round them.
Gradually, one by one, we separate the layers of the napkin and make a bud. Once all the flowers are ready, you need to attach them to the frame with PVA glue. Try not to leave gaps or pre-paint the frame in an identical color.
Fresh flowers
Everything is repeated here. Attach flower buds to the frame. The only thing is that such a product can be very heavy and unstable, choose a stand and attach the numbers. Try not to leave gaps or decorate them in advance.
Fabric
The numbers can be covered with beautiful fabric and additional decor can be sewn on. It will be great if you cover it with a canopy of bright shreds, it looks much more interesting. Or, attach flowers sewn from fabric to the finished product. If time permits, you can sew the numbers according to the pattern, filling them with cotton wool.
Ribbons
You can use one or more ribbons of different colors to cover the voluminous figure around the entire perimeter. This method works well with beads, which are then sewn onto the craft.
Ribbons make excellent knitted patterns, but you should choose a larger material. This is one of the most budget options.
Buttons
Buttons are a universal option that goes with everything. Be it cardboard, fabric, ribbons, colored paper or foam. Using this decorative element, you can fill the entire area of the craft or just a part, creating a pattern. It will be more beautiful if you choose buttons of different sizes, but almost the same color.
mi
It looks very aesthetically pleasing if you carefully wrap the voluminous numbers with knitting threads.
The effect of overflow and tenderness is created, and if you choose several similar colors and create a light edge, it will be delightful.
Real needlewomen will appreciate this option for birthday decorations for both adults and children.
Rain
Rain is a capricious material that is not so easy to use in crafts. But if you work hard and pay attention to it, you can create a bright figure.
All you have to do is wrap the frame with rain, sometimes using PVA glue to secure the material. At the end, leave a few lines hanging to create a festive effect.
Sequins
Glitter makes little princesses happy; we need more of it, everywhere.
Apply glue to the entire surface of the product and carefully distribute the glitter evenly.
Let them dry and cover them again with clear glue.
Try to work in a specially designated area. Otherwise, your home will shine for several more days in a variety of places, we promise.
Acrylic paints
This material is not suitable for all frames, but with its help you can realize many fantasies. Draw the number as you please or create unique patterns and drawings on the canvas. For greater effect, go over the paints several times.
We have shared with you the most interesting ideas for bringing unique numbers to life. All you have to do is select materials and use a little imagination. Good luck!
Original ideas
Before starting work, we carefully consider how the number should look, what size and thickness it will be, determine the color scheme, and surface texture. A lot of ideas can be gleaned from photographs of finished products.
The color of the craft can be uniform, two-color, or variegated. Colors can be arranged in spots, stripes or as a frame.
An excellent combination for the holiday - red and white. By gluing images, you can reflect a certain theme in the product - Africa, the underwater world...
Humor is appropriate: we put a hat on it, glue on ears, and tie bows. The number can be golden and solemn, or bright green with cheerful daisies, whatever you like, the choice is yours.
