In the modern furniture market you can find many types and designs of drawers. But what we are interested in now is not their appearance. No matter how high-quality the guides are and no matter how high-quality the assembly is, there are many cases when problems begin to arise over time. Most often this happens
- when the load is exceeded
- incorrect installation of guides
- exceeding the effective service life
- deformation of individual parts during operation
The problems cited relate to the mechanics used in modern furniture to pull out drawers. There are fewer problems with the box itself and its design. Let's look at them first.
Disassembling the roll-out box mechanism
If such a need arises, rest assured, you can do everything yourself - remove the box and install it in place! This has been done several times at our house. The first time I removed furniture drawers was when the cabinet was completely new. The furniture company's specialists incorrectly set the position of the roll-out drawer guides in the children's room set. Because of this, it (the box) constantly moved out and opened spontaneously. First I’ll tell you, and then I’ll show you in video instructions how to fix everything...
Disassembling the roll-out box mechanism
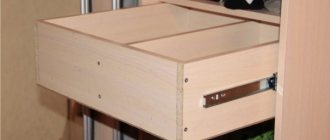
So: at first we called the furniture company, but we couldn’t persuade them to have a master come and adjust everything. Therefore, we said goodbye once and for all to this organization and decided to do everything on our own. I didn’t immediately understand how to remove the box from the “guides”. It turned out to be simple! It is necessary to pull the drawer out as far as it will go, then the plastic “tongues” will come out.
Roll-out box repair
Drawer mechanism repair
The tongue “sits” on a bolt, much like a clock hand, only of a very interesting shape. The protrusions of this “arrow” block the movement of the guides and prevent the box from falling out when assembled. To disassemble the mechanism, you need to pull the “tab” counterclockwise and pull out the drawer.
Left side of drawer with roll-out mechanism
On the left, pull the “tongue” up...
Roll-out drawer mechanism - right view
And on the right we pull the tongue down... The roll-out drawer (also known as a drawer) easily comes off the holding guides.
Using a “level,” I measured the position of these same guides. As expected, they were installed crookedly. First, I unscrewed a couple of screws, those in the depths of the frame. Again, using a “level,” I set it in the correct position, made sure that nothing would interfere with the movement of the box, screwed it on and assembled the furniture.
If you repeat this, make sure that the “guides” fall into place in the receiving glands. If it closes tightly, then perhaps something is crooked. Better check it again! If everything is in its place, it works fine! This same disassembly and reassembly method will come in handy if something falls from an overloaded box behind the back wall and you need to quickly get it out. This principle applies to shelves of computer tables, etc., etc.
Video instructions on how to remove the box from the runners. I filmed it with my phone, it’s better, of course, to use a normal video camera>>>.
Causes of PMM malfunction
Before troubleshooting, unplug the equipment.
To find out why the door broke, you need to open it and carefully inspect it. Here are the most common reasons:
- A sealing rubber band located around the perimeter prevents a tight closure. Perhaps it was deformed or jumped out of place.
- The dish container is not installed correctly, or a large object is preventing it from closing. Check and install items correctly.
- The dishwasher is installed on an uneven surface, which is why the door is skewed and does not fit into the fastenings. Check the correct installation according to the instructions.
- The mechanical lock is faulty, the wiring from the lock to the module is broken.
If the dishwasher does not lock the door open, the reason may be in the operating mechanism: spring, cable, lock.
Kitchen cabinet renovation
Modern furniture fittings can be used for many years without problems. Of course, this applies to quality products. When they fail, these parts are not repaired, but simply replaced with new ones. A different attitude may be towards old kitchen furniture. Warped doors, creaking drawers, dented bottoms can be repaired quite easily with your own hands. To do this, you don’t need to be a major specialist in this field, an ordinary everyday “consideration” is enough.
Some common kitchen furniture problems that you can fix yourself.
Drawer bottom repair
In ancient furniture, the bottom of the drawers was made of thin boards, glued or solid. Over time, thin boards become deformed and crack. It’s even worse if the bottom was made of old low-quality plywood or fiberboard. Poorly glued plywood delaminates over the years, and the fiberboard is pressed through.
In order not to order new boxes, you can simply strengthen the bottom part by additionally gluing a piece of plywood 4-6 mm thick to the bottom. . Measure the bottom from below, between the sides, calculate the gap on each side of 2 mm. , saw off along the markings, apply any wood glue, install in place and lightly press on top with a weight until the glue dries completely.
Hinge repair
In old furniture, hinges can become loose over time. This is due to the fact that the screws no longer hold in the wood, and it is impossible to tighten them. To fix this problem, unscrew all the screws and remove the hinges. Drive a pointed piece of wood into the screw holes, always lubricated with glue.
Dresser repair
Restoring the appearance of a chest of drawers, repairing drawers, restoring locks, handles, eliminating cracks, restoring varnish, wood color, decor.
These are necessary restoration measures carried out in our workshop when repairing, restoring and updating a good old chest of drawers. Professional varnish finishing can turn even a simple retro chest of drawers made of birch plywood into a luxurious antique object of a modern interior, filling it with the pomp of natural materials.
The secret is simple. In finishing the old chest of drawers with varnish, the technology of polishing Karelian birch was used. Furniture restorers skillfully use the secrets of old masters: correctly restore (raise) the color of wood, regenerate or recreate, imitate designer varnish, repair old-style locks, make keys, install guides, choose the right fittings, and a simple chest of drawers turns into an exquisite work of carpentry and furniture art . This will happen under one mandatory condition. Repairing a chest of drawers should be done by a real restorer. You can find out the price of repair and restoration, as well as evaluate antique furniture in our workshop, by sending photos to our email
Drawer bottom problem
The most common problem with kitchen drawers that many of us unfortunately face is the bottoms falling out. As noted above, this occurs due to too much load on the bottom. The most common use for kitchen cabinets is a cut-in bottom, where plywood is glued into slots on the sides of the drawer. You can correct such a defect yourself by coating the grooves with special glue a couple of times and inserting the bottom into place in the grooves.
But it’s best not to be lazy and still replace the bottom:
- Disassemble the box into individual parts
- Carefully clean the grooves with sandpaper without disturbing their shape.
- Cut the bottom part to the required size
- Reassemble the box by gluing in a new bottom.
- Leave for a while for the glue to dry. At first, try not to load the bottom.
Such actions can be done independently if self-tapping screws are used in the design of the box. But if tenon joints were used, then it is best to seek help from specialists - they will repair kitchen furniture drawers quickly and efficiently. Do not use nails to join pieces together as the wood will dry out over time and the nail heads will stick out and damage the roller guides.
Installing telescopic guides is not an easy task, but Gods don’t burn pots
July 28, 2020
Conventionally, the installation of telescopic guides for a furniture box (shelf) is divided into three stages. Clarification of overall dimensions and allowances, selection of suitable fittings, direct installation. After that, all that remains is to adjust the travel of the guides, and the installed mechanism will serve faithfully for many years.
Dimensions in the installation of telescopic guides are of particular importance
We discussed the features, types and types of guides for furniture drawers and shelves separately. We recommend reading them before you start upgrading your chest of drawers. But in any case, after making a decision, first of all we begin to work with the overall dimensions of the box and the niche in which it will be placed:
- The maximum depth, width and height of the niche will set restrictions on the size of the box;
- Take into account the load-carrying capacity of the guides and the maximum length;
- Consider the frequency of use, the possibility of minimal adjustment (depending on the weight of the stored items);
- Take into account installation tolerances and allowances necessary for comfortable use.
How does this look in practical application to the problem being solved?
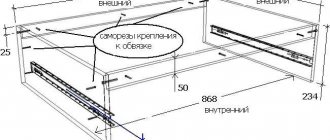
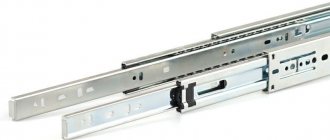
- The length of the telescopic guides is standardized in increments of 50 mm, from 250 to 800 mm. For a drawer with a depth of 495 mm, you will have to choose 450 mm “telescopes”, sacrificing full extension.
- Technological clearances are needed to avoid jamming and ensure smooth running. 10 mm should be left between the rear walls.
- The thickness of the guides is 13 mm; such gaps must be left between the side walls of the drawer and the niche.
- The installation location is marked with an allowance of no more than 1 mm on each sidewall. The more accurately both guide rails are placed, the smoother and quieter the move will be. An error of 3 mm cannot be corrected by adjustment!
- The installation line for the guides is drawn exactly in the middle of the side of the drawer, marked from top to bottom, this is necessary for the correct distribution of loads;
- The distance from the bottom of the niche to the bottom of the box is not regulated; it depends on the design and size (shape) of the facade strip. In practice, there is usually a gap left, but you need to make sure that it exists.
If everything is clear with the dimensions, you can continue working.
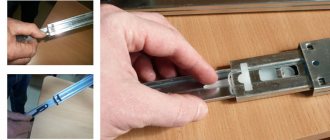
Installation of telescopic guides begins with disassembling the “telescopes”
It is easy to disassemble - disconnect the fastener and remove the inner rail.
Lifehack. First, disassemble one structure, practice assembling it to gain skill. Otherwise, assembly after installation may cause difficulties.
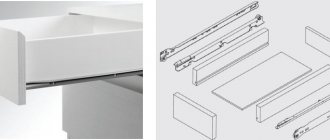
Remember that three elements are called:
- Mate (on the box);
- Middle rail. Ensures uniform load distribution;
- Main part. Fixed on the walls of the niche.
Next we need a pencil, an awl, a screwdriver or screwdriver and a building level.
We mark the side of the box with a horizontal line exactly in the middle of the height of the wall. We fasten the mating part with one screw (any extreme one). We place the box on the bottom, use a level to level the rail, and use an awl to tap the point for the second outermost screw in the center of the mounting hole.
We tighten all the screws (depending on the length, 3-5 pieces), while simultaneously controlling the accuracy of the horizontal level. We similarly attach the counter part to the other sidewall.
Lifehack. Fixation holes allow vertical correction of the counter and main parts. But the more accurately the screws are secured to the centers on the box, the easier it will be to adjust the main part inside the niche.
Before attaching the slats inside, we assemble the telescopes directly on the walls, check the smoothness of movement and, after trying them on in place, the correctness of the marked line inside the niche. If the line runs along the centers of the rail mounting holes, you can continue working. If not, we correct the marking to achieve the required accuracy.
Roller guides
Another common problem resulting from the use of drawers is that the drawers do not fit into the opening straight, but at an angle, and also jam when pulled out.
You can also cope with this on your own. To do this, you need to completely pull out the drawers and inspect all the parts of the guides. If all the rollers are in place and spin well, then there is no need to change the accessories. And you need to clean the dirt from the rails that are attached to the walls of the cabinet. If they are loose and loose, attach the mounting screws better. The guides can also be adjusted in height. There are special oval holes for this procedure.
Preparing to assemble the chest of drawers
The parts need to be pasted over. To do this, attach the edge to the end of the part with the base down and iron it with a hot iron. Rub the top with a dry cloth several times to ensure reliable adhesion. Remove the protruding edges of the edge with a dull knife and sand the edges with sandpaper. Be careful with the laminate - try not to scratch it.
Holes for confirmations are drilled:
- Into the plane - with an 8 mm drill through,
- at the end - with a 5 mm drill to a depth of 60 mm.
Holes for confirmations
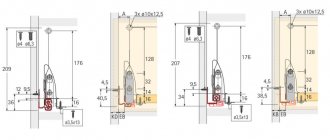
Before assembling the cabinet, the “body” of the chest of drawers, you need to mark and attach the guides under the drawers. The picture shows the dimensions, but if you decide to change the height of your chest of drawers or the number of drawers in it, it is useful to know a simple formula for calculating their layout. It is not difficult:
(Front height) + (approximately 3 mm allowance for each drawer) – 25 mm = center line of the runner fasteners, counting from the top.
Marking for guides
Some tips for repairing drawers
In order to efficiently and quickly repair drawers, it is advisable to adopt a few tips.
- If you can’t remove rusted nails, just run a hacksaw blade over the metal and cut off the nail head.
- If the parts of the drawer are connected to each other using a tongue and groove method, it is best to glue them with wood glue or fish glue. If there is paint on the surfaces to be glued, it must first be removed by heating it with a hot hairdryer.
- If there is too much old glue when disassembling the box, it can be removed with a brush and hot water. And then scrape it off with a knife.
Repair of drawers: causes of breakdowns
Before you start repairing drawers with your own hands in a closet or chest of drawers, you should understand the cause of the breakdown. Understanding what caused the problem is the key to successful repairs. The main thing is not to confuse causes and effects. For example, warping the cabinet or cabinet body itself can cause incorrect movement of the guides and their failure. And if you do not “return” the body to the original correct geometry, replacing the guides simply will not solve the problem.
The box frame has fallen apart or the bottom is falling out
This kind of breakdown is especially common in wooden chests of drawers assembled on spikes. Over time, the boxes dry out and become unstuck. All that is required is to take them out, disassemble them into parts, level them, sand them and reassemble them with glue. For reliable tightening, use additional fasteners in the form of furniture corners and self-tapping screws.
The bottom of the fiberboard box may not be nailed securely at first. Fasteners on small nails are especially unreliable. If the drawer is made of chipboard, then it is better to attach the fiberboard bottom to it using 3x16 self-tapping screws. Use washers to expand the clutch area.
The drawer falls out or warps in the guides
Most likely the reason is the insufficient rigidity of the cabinet or chest of drawers itself. Due to the uneven load of the shelves, the body inevitably deforms: the sides bend, the distance between them increases, and the drawers begin to fall out. The cabinet may warp if the floors are uneven and the cabinet or chest of drawers itself is not level.
Correct, smooth movement of the guides is possible only with the correct geometry of all elements. That is, both the body and the boxes of the drawers must be aligned diagonally. Perhaps the assembly was incorrect from the beginning - if you screw the guides unevenly relative to each other by at least a millimeter, and over time, as the boxes are loaded and they sag, this inaccuracy will become critical.
Also, the cause of the box warping and falling out of the guides may be grinding and deformation of the rollers (ball bearings) of the rails themselves. It happens that the metal of the guides itself bends. The reason is simple - the fittings have exhausted their service life and require replacement.
The drawer doesn't slide out well, the guides stick
The reason may be either in the deformations described above or in the fittings themselves. Even if I installed Chinese analogues with thin metal on the guides, it is unlikely that the fittings were originally designed to fully load the box. Therefore, it cannot ensure the expected smoothness of closing and opening the drawer.
Preparation. How to replace guides
What are the causes of the malfunction?
No matter how good the assembly of a chest of drawers, there are a huge number of reasons why problems with the structures may appear. As a rule, it is those guides that are on the inner drawers that most often deteriorate.
There can be several reasons for breakdowns:
- Deformation of certain structural elements due to improper use or even transportation.
- The service life has been exceeded.
- Incorrect installation of guides.
- The permissible load level has been exceeded.
In addition, even the frame of the drawers can break, although this happens much less often. The most vulnerable spot is the bottom of the box. Most furniture manufacturing companies often save money on this particular area of the structure, and then secure the bottom to the sides of the drawers.
This will significantly simplify the production technology, and the bottom will become a load-bearing element that will take on the role of a part that forms the frame geometry. In this case, the cause of failure will be insufficiently strong fixation of the bottom to the structure. The bottom is secured with small nails at the back and front of the box, and guides will hold it on the sides. So, the design will work properly for some time, but after a while the nails will begin to come loose. The bottom will peel off, and repairing such damage is not so difficult.
Set of repair tools
To replace drawer guides, e.g. To repair a chest of drawers, it is better not to use nails, although this is the cheapest material. In order to repair wooden boxes yourself, you should use specialized furniture staples. To use them, you will need to buy a furniture stapler, and the tool itself, along with a set of staples, costs a little more than a hammer and nails.
If the box is not subject to heavy loads, then 8 mm brackets will be enough to securely fasten it. They are quite easy to work with, and they hardly deform and go in quite deeply. For a stronger and more reliable fixation, staples are used, the length of which is 1 cm. To make the bottom as strong as possible, it is worth buying nickel-plated hardened staples. They have a high level of strength and are not yet susceptible to corrosion. In order to replace the guides, you will need screws with a diameter of 0.35 cm. There are 2 variations in the length of furniture screws with a diameter of 1.5 and 3 cm. To install the guides, in most cases, 1.5 cm of screws will be enough, but if the chest of drawers is made of chipboards poor quality, then you should use 3 cm screws.
DIY drawer frame repair and replacement
Summarizing all of the above, we can identify several repair methods to return the drawer to its former strength and smooth operation:
- Strengthening the structure itself . It is necessary to add rigidity by installing strips along the back wall. You can also level furniture that is standing unevenly so that its geometry becomes correct. After checking all the corners, you can repair the drawers and replace the fittings (if required).
- Strengthening the drawer frame and strengthening the bottom . If during operation it becomes clear that the fiberboard bottom is not able to withstand the load and is expected to fall out even after replacement, there is a reason to strengthen it. To do this, install a stiffener horizontally or vertically along the bottom - a partition. You can additionally attach the bottom to this part. This method will also help make a large box more rigid without warping.
Repair and replacement of guides in drawers
It happens that the guides quickly fail because the box is large and heavily loaded. Telescopic (ball) guides allow installation in two rows. In this case, the drawer will be endowed with greater load-bearing capacity and will last longer.
With such an “upgrade,” it is quite possible to replace the bottom made of flexible fiberboard with chipboard or plywood in order to store, say, tools in such a box.
It is better, of course, to replace the metal guides. They don't cost that much. However, if upon visual inspection the rollers are intact, have an even shape, and only the metal of the runners is bent, you can try to return it to its original shape. To do this, use a vice, pliers and other hand tools.
Incompatibility of coolant and lubricant
Incompatibility of coolant and lubricant In some cases, coolant, consisting of 93 - 95% water, can decompose the grease, washing out the oil component. It loses its properties. In this case, a solid white soap emulsion with particles of waste material is formed. As a result, there is a lack of lubrication. To eliminate the harmful effects of coolant on grease lubrication, it is necessary to switch to oil lubrication. If it is impossible to implement this constructively, then it is necessary to use enhanced means of protecting linear guides.
vote
Article rating
