A room covered with wallpaper butt-to-edge takes on a more sophisticated look than when using the overlap method. This creates the feeling of a complete wall covering without visible joints of wallpaper strips. But novice masters do not always manage to achieve the desired effect. Noticeable gaps form. There may be several reasons for this. As a result, time and money spent on materials are wasted.
Wallpaper
What equipment will you need for your work?
If you hire experienced workers to complete the work, you will have to spend about the same amount on services as on material. You can save money by gluing yourself, but you will have to familiarize yourself with the process of performing the work and everything necessary.
Seamless wallpapering
Joining plain wallpaper
Inventory:
- wallpaper;
- wallpaper cutting knife;
- glue;
- glue bucket;
- brushes of different widths for applying glue to wallpaper;
- wallpaper spatula;
- plumb line
You can start working on wall coverings only if you have all of the above.
Joining wallpaper with window casing
Rules for quality gluing
There are rules to get the desired result:
- Work can start from a corner, window or doorway.
The order of stripes when gluing from the window - The glue is applied according to the selected type of material. If processing of canvases is required, it starts from the middle.
- If the alignment is done in a crooked corner, then the strips are laid with an overlap of 10 to 20 mm. If possible, it is better to avoid any joining in the corners.
- To avoid peeling the edges, they are coated with a more durable glue.
- Seams may stand out because too much time has been spent smoothing them out.
If the work is done correctly, the surface will acquire the desired decorative effect.
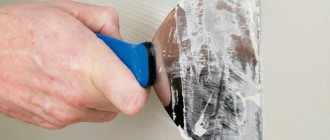
You can smooth the canvas thoroughly using a plastic wallpaper spatula.
Possible problems when joining wallpaper
When gluing walls, most people encounter the problem of uneven corners. This will be especially scary for those who do not know how to join wallpaper when gluing. In fact, there are no perfectly straight corners, so during the work, distortions or unevenness of the pattern may form. It is possible to avoid such errors, but effort must be made.
The complexity of the work of joined wallpaper also depends on the type chosen. When working with paper, apply glue and glue the wallpaper to the wall as quickly as possible, otherwise they may fall apart. It will be especially difficult if there is a drawing. You must be prepared for the fact that more than one canvas will be damaged in the process.
It is permissible to overlap, but it depends on the density of the fabric. You must adhere to the following rules: higher density wallpaper requires less overlap. If glass wallpaper is used, even the slightest overlay will be visible.
Adjusting the wallpaper pattern
Vinyl wallpaper is glued in a different way. The glue is applied only to the wall. A rubber roller is used for fixation, since the use of other types threatens to remove the coating from the vinyl wallpaper and deteriorate its excellent appearance.
Non-woven wallpaper has its own characteristics. Next, let's get acquainted with the nuances of working with them.
Trimming wallpaper
Non-woven wallpaper, features of working with them
The reason for the popularity of non-woven wallpaper is that it has qualities not inherent in other types. These include:
- tensile strength;
- fire safety;
- excellent heat and sound insulation;
- do not change color when exposed to sunlight;
- There are both cheap and quite expensive versions.
Glue for non-woven wallpaper is a powder that must be diluted in water. In this case, you must strictly follow the instructions on the packaging. Otherwise, the wallpaper may not adhere well to the wall or develop blisters. After applying the glue, you need to let it soak into the canvas.
Wallpapering
Types of combination
Before considering the various ways to combine wallpaper, let's consider two main types of combination.
How to combine wallpaper by color
When combining wallpaper of different colors, you should remember the well-known color wheel. Remember that wallpaper of the same color gives the room a feeling of calm, and a combination of contrasting colors gives dynamism and brightness. The table below will help you decide which shades of wallpaper to choose.
| Main color | Harmonizing colors | Inharmonious colors |
| Red | Green, blue, blue-green, golden yellow, gray | Purple, brick, brown, chestnut, reddish yellow |
| Pink | Bordeaux, brown, gray | Blue, red, lilac, chestnut |
| Orange | Sky blue, green, purple, lilac, brown, white | Red |
| Brown | Beige, blue with a greenish tint, gray, golden | Bordeaux, chestnut, lilac, pink |
| Yellow | Green, brown, golden | Bordeaux, pink |
| Blue | Red, brown, blue, orange, light purple | Bordeaux, dark purple, lilac |
| Blue | Red, gray, golden, burgundy | Green, lilac, pink, brown |
| Violet | Gold, yellow, orange, light green, green, grass green, sea green | Red, brick |
| Bordeaux | Green, blue-green, gray, pink, blue | Lilac, chestnut, red, golden |
| Grey | Black, green, red, blue, pink, yellow, cyan | Brown, beige |
How to combine wallpaper according to texture
In addition to combining different colors, you can also combine wallpaper according to texture, for example, paper and vinyl, textile and photo wallpaper, embossed and silk.
Work algorithm
The following algorithm will help you learn how to do the job correctly.
- Pasting the wall should begin with a vertical line drawn using a plumb line. It should be at a distance of 15 cm from the corner.
- Stripes can be cut immediately, but only if the wallpaper does not have a pattern.
- Prepare the glue required for the day of work. Excess glue may deteriorate the next day.
- Cut the fabric, leaving a little margin.
- Place the wallpaper with its front side facing the table and apply glue. After this, the fabric must be folded with the edges toward the center and allowed to soak.
- Start gluing from the ceiling, moving towards the bottom of the canvas. Use a spatula to expel the air from the center to the edges. Remove excess glue with a damp cloth.
- The new fabric must be glued joint-to-joint in relation to the previous one. This technique will help to avoid curvature and discrepancies in patterns.
- After the wallpaper has been joined, it must be carefully passed with a spatula.
After pasting is completed, it is necessary to maintain air humidity and a stable temperature in the room. Otherwise, the joints may begin to peel off.
Joining wallpaper on the ceiling
How to remove errors at connection points?
Quite often you have to glue wallpaper joints. The reasons may be different. To know how to fix this, the first step is to evaluate how much the sheets have diverged at the joint. And only then look for solutions.
- If the gap is large, then it will be most effective to cut strips of the same wallpaper and glue them into the joint. This is not the easiest way, but it is the one that will help best fix the problem.
- The easiest way to remove joints on wallpaper is to decorate it with a decorative element. These can be either various borders or special stickers for joints. This will not only solve the problem of how to hide the joints, but also improve the appearance of the interior.
- If only the edges of the wallpaper have come off, but the putty remains in place, then you need to grease the piece of wallpaper that has come off with regular PVA glue. Then press it with a cloth and dry it with a hairdryer. This is a very fast and effective way to solve the problem.
- If the wallpaper comes off along with the putty, then you must first trim and prime the area. And only then apply the wallpaper.
How to combine the diverging edges?
If you encounter such a problem, don't panic. It's easy enough to fix. If the wallpaper sheets have come apart, then ways to glue them at the joints are described below :
- The sheets that have come apart need to be unfolded. This must be done extremely carefully.
- If there are pieces of putty left on the back side of the canvas, they should be removed. But try not to overdo it; this should be done with caution so as not to damage the sheet.
- Vacuum the wall and wallpaper. This step will help prevent debris from getting underneath the cover.
- We prime the wall and give it time to dry.
- Coat the wall and wallpaper with glue. If the area is small, then you can use glue with a convenient spout, which is convenient for coating small areas.
- Roll out the fabric with a roller.
- Go over the seams with a rag to remove any remaining glue.
Masking seams
There are several ways to close wallpaper joints:
- Paint the wallpaper or hide the joint using a special tinting paste.
- Paint the joint with tile grout. There are a huge number of them, it will be easy to choose the right shade.
- You can use a regular marker or pencil.
Decoration methods
Advice There are a huge number of ways to decorate joints with all kinds of materials. In order to do this, you will need to turn on your imagination and allow yourself to create.
An interesting way to decorate joints is the so-called borders. This is a very interesting decorative element; in the right hands it can become a stylish interior decoration.
There are a number of nuances when gluing such borders:
- Using a pencil and ruler, mark out where the borders will be located.
- The main surface should be cleaned of cracks and bulges.
- We cut the border sheets.
- Wet the main surface with water. Coat the border with glue and leave for 5 minutes. Then glue it to the marked place.
- Go over the curbs with a roller.
The problem of how to decorate joints on wallpaper can be solved with the help of decorative rope (jute). It helps to focus attention on individual details. To do this, you must:
- Cut the required piece of rope.
- Impregnate the ends of the piece with varnish. This can be parquet varnish or hot glue.
- Apply a small amount of hot melt glue to the joints.
- Place the rope on the joint and press firmly.
- Finishing nails can be used at the end. They are driven in at a distance of 5-10 cm from each other.
Thanks to modern technologies, almost any repair defect can be corrected. However, it is still better to hang wallpaper according to the rules, in which case you will not have to correct mistakes later and waste additional time.
How to join wallpaper at corners?
The following algorithm will help you correctly paste wallpaper in the corners.
- Preparing the corner. Such work is carried out when plastering walls. Special plastic corners are installed in the corner of the wall. They are attached to putty. Next, alignment is carried out.
- Wallpapering corners. If the wall is uneven, trimming it in the corner will help preserve the pattern on the canvas. The corner area is smeared with glue. They start gluing from top to bottom from left to right.
- Leveling the canvas. Responsible leveling of the canvas on the wall will help get rid of defects and achieve good adhesion to the surface. The joint should not be more than 5 mm. After the wallpaper is glued, the remainder, if any, is cut off with a stationery knife.
Smoothing wallpaper
Wallpapering with a pattern
Aligning wallpaper on the wall
Wallpaper with a pattern
The presence of a pattern on the wallpaper complicates the process of pasting both corners and walls. In the presence of vertical lines, distortions in the corners of the room immediately catch the eye; with horizontal patterns, there is an overlap of the canvases or a skew in the ratio of the ceiling to the floor.
Matching the wallpaper pattern
Wallpaper flattening
The following tips will help you avoid such troubles:
- it is necessary to make a slight overlap on the previous canvas;
- if a curvature has formed, you need to move it to the upper part, then hide it behind the panels;
- The smooth edge must be glued plumb, the excess part must be cut off using a stationery knife.
Following these tips will help minimize distortion and make the wallpaper fit together more successfully.
Joining wallpaper in the corner
Useful tips
Joining wallpaper has its own subtleties, familiarity with which will provide you with a high-quality result after pasting. Let's look at some tips on this issue:
- Peeling and curling of the edges of the canvas can be avoided using wallpaper joint tape. It increases the degree of adhesion and strengthens the joint area. The tape is simply glued to the joint and waited for it to dry.
- Carefully coat the edges of the strips with glue to prevent the joints from opening in the future.
- When joining with an overlap, you can only glue thin paper wallpaper - then the seam will not be noticeable. Butt jointing is done with thick wallpaper, which includes vinyl and fiberglass.
- After joining, do not forget to go over the seams with a rubber roller - this way the edges of the strips will lie on the wall more tightly, and the likelihood of the joints coming apart will be significantly reduced.
- Do not stretch the wallpaper across the wall, as this may cause the precisely fitted joints to come apart after the glue dries (how to repair loose joints?).
- If you are joining strips with uneven edges, it is better to overlap them. While the glue is still wet, use a utility knife to cut through the joint. After this you will get a perfectly fitted connection.
- Maintain the optimal temperature in the room where you are wallpapering. It is better to turn off heating devices, fans, central heating and air conditioners. Also, do not allow drafts, because any deviations from the normal temperature will cause the seams between the strips to diverge.
- When wallpapering in the area of doors and windows, it is better to make the joint above the openings.
Joining is one of the most important stages when wallpapering. This step must be approached carefully and competently in order to avoid serious mistakes, and the joints do not separate in the future and the edges do not peel off. The level of your responsibility in joining the wallpaper will be reflected in the result after the work done.
How to make a joint when using different types and types of wallpaper?
There are several universal joint options that will suit different types of wallpaper:
- we make a classic joint. Wallpaper is glued to the wall with ungreased edges. Next, you should draw a line and trim the joint. After which the ungreased part is treated with glue and glued.
- horizontal stripes. In this case, draw a straight line along the level, glue the upper part, then the lower part.
Of course, for a beginner in wallpapering, difficulties may arise, but the desire to learn, to make it enjoyable for yourself, will help you overcome all difficulties and next time it will be much easier.
Wallpapering the bathroom

