Required tools and materials
Before starting any work, you need to prepare everything you need - buy material, tools. The list consists of the following:
- Furniture fittings;
- Putty material for wood;
- Facades, if necessary;
- Paint or stain (preferably spray);
- Construction knife;
- Construction hair dryer;
- Screwdriver;
- Sharp scissors;
- Iron;
- Self-adhesive furniture film;
- Wax for furniture of different consistency;
- Candle;
- Spatulas;
- Rags, clamp;
- PVA glue;
- Wood varnish;
- Felt pen;
- Edge for processing ends.
This is not the entire list of materials and tools, since you can update old furniture in several ways, each option has its own specific set of necessary tools.
How to update an old wall with your own hands
Many people wonder how to update an old wall with their own hands if it has already lost its relevance, but is still durable. There are several ways to make furniture more comfortable and suitable for a modern interior.
Similar articles:
How to remake a Soviet wall Decoupage furniture DIY furniture restoration DIY leather furniture repair
Types of update
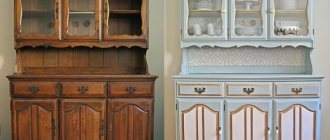
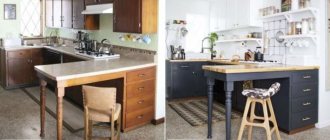
If you don’t know how to update an old furniture wall with your own hands, before and after photos can be found on the Internet. In addition, we present several methods that can be used to give a second life to any furniture.
Restoration of an old wall
If old furniture is dear to you as a memory, but its appearance has been severely damaged by time - chips, creases, deep cracks have formed on the surface - it can be restored. After spending a minimum of time, you will receive an updated piece of furniture. For repair work, a standard set of materials and tools is used. For quality repairs, it is enough to perform the following steps:
- The working surface must be cleaned and washed with a solution of water and soap, and dried well - this will help increase the adhesion of the material to the wall facade;
- To rid the surface of deep scratches, they are filled with melted wax. After the fill has hardened, you need to take a felt-tip pen to match the wood, apply strokes to the wax that will imitate the structure of the wall material. This is not difficult to do; just continue an existing drawing. After this, take a clean rag and carefully rub it over the frozen wax, slightly smearing the lines. As soon as the desired result is achieved, the plane is coated with furniture varnish;
- If severe abrasions are visible on the facade, they are painted over with varnish of the desired shade from a spray can;
- If there are cracks and delaminated areas on the facade, you can update the old wall using basic means - PVA glue, a medical syringe and a fixative. You need to fill the syringe with glue and inject the required amount of the composition into the crack. Then press the split and remove excess glue. Using a clamp, press the area and leave to dry for 24 hours;
- Are there many chips on the façade? The same melted wax will help you deal with them. First, you need to use a spatula to trim the edges of the chip and fill it with wax. Once the wax has dried, buff the area well with a clean, dry rag. Then perform the same steps as when filling scratches and apply varnish.
After this treatment, the wall will not change its design, but its appearance will become much more attractive.
We remove dirt and dust from coatings
Treating cracks with wax
Repairing chips with glue
Painting over abrasions
Transforming a wall with furniture varnish
If the interior of your apartment has changed, and simple restoration does not suit you, then you can radically change the old furniture with your own hands. There are several ways to update furniture, the choice of which will depend on artistic skills, preferences and the amount of free time.
The easiest way is to varnish. The process is not complicated, provided that the procedure and restoration technology are followed.
The set of tools is standard, but for a good result you need to follow the following algorithm:
- Take a photo of the wall before starting work. This will help you assemble it later after the update without confusion;
- Disassemble the structure. It is necessary to remove the fittings and doors;
- Wash the wall and all components with soapy water;
- Remove dust and soot deposits in the corners using a toothbrush or toothpicks. This stage should not be ignored, since the quality of the final result depends on preparation;
- Inspect the condition of the facades. If the surface is not badly damaged, then it will be enough to simply coat it with varnish;
- If the facades are in poor condition, there are a lot of chips and deep scratches on them - the old coating is removed without leaving a trace. To make the work go faster, you can use special compounds that help remove varnish, or use a regular spatula;
- As soon as all the exfoliated areas are removed, the old varnish is removed, you can begin restoration with wax - how to do it is described above;
- Using fine-grain sandpaper, sand the surface and remove dust;
- Cover the wall façade and all components with 3-4 thin layers of furniture varnish. It is worth remembering that when applying a thick layer, drips may form that will spoil the appearance of the wall;
- As soon as the varnish coating has dried, the wall should be assembled and the fittings replaced with new elements.
By updating old furniture in this way, you can add a few more years of life to the wall in your interior.
Removing dust and dirt
We remove cracks
Removing old varnish
Varnish in several layers
Installing new handles
Application of self-adhesive wallpaper
Today there are a lot of materials that can be used for restoration. Updating old furniture with self-adhesive wallpaper is one of the easiest options. This material is easy to work with and inexpensive. In addition, the range is so wide that you can choose material to suit every taste. The film is waterproof, so it can protect the wall from environmental influences. The algorithm for performing the work is as follows:
- Make preparations as in the previous method - remove the fittings and disassemble the structure;
- Clean the facades, wash them, and after drying, treat the surface with white spirit to degrease;
- While the facades are drying, we cut out the material. Sheets of film should be 10 mm larger than the original size on each side. This is necessary in order to eliminate gaps in the finishing;
- The surface on which you plan to stick the material must be moistened. Apply the film to the top edge and carefully peel off a small strip of the protective layer. The film is pasted gradually, slowly moving down;
- After gluing, you need to level the material with a soft rag, moving from the center to the edges;
- As soon as the entire wall is covered, you need to heat the iron and iron the plane through the fabric - this will help the film adhere tightly to the surface;
- Replace the doors and fittings and apply edge tape.
It is not necessary to use wood-look film; you can choose any color. A competent design combination of different shades will help turn an old wall into a real masterpiece.
We disassemble furniture
Cleaning the surface
We moisturize the coatings
We glue the film
Putting it back together
Restoration using staining
Repainting an old wall will change its appearance beyond recognition, while the main outlines will remain unchanged. You don't need any artistic skills or special tools. The work is not difficult to complete, just follow the basic rules:
- The wall is completely disassembled and the fittings are removed - this makes the restoration process much easier;
- The old coating must be completely removed, obvious flaws must be repaired with wax;
- Sand the surface after it has dried with sandpaper or a soft rag;
- Painting is carried out in several layers, and care must be taken to ensure that no sagging or smudges appear. As soon as the painting is completed, we leave the structure to dry, after which the wall should be assembled.
If a sagging has formed during the work, which was discovered after drying, it should be cleaned with sandpaper and additionally coated with paint. For a complete understanding of the painting system, watch a master class for beginners on updating furniture with your own hands.
Interesting interior solutions
Before you update an old furniture wall from the times of the USSR, you need to make sure that its fasteners are intact and, if necessary, replace them. The set can acquire a more modern look if you do not display all its modules in one row, but distribute them in different corners of the room or apartment.
If the cabinets will stand as a solid wall, then you should do the following:
- remove mezzanines, glass and other doors, leaving only the lower shelves and drawers closed;
- attach cornices to the top of the wall;
- Decorate the side parts with columns.
You can beat the Soviet wall in a modern interior if you leave the bottom row of cabinets, above which you hang shelves and racks at different levels.
If the set is topped with mezzanines, you can update the old Soviet wall by making a fashionable hanging wall out of them. To do this, remove the doors and the back. The resulting sections are hung vertically or L-shaped. The shelves in such a module will have to be redone and, when filling them, the strength of the wall will have to be taken into account.
Work technology
Carrying out work for any type of restoration has one general technological sequence - preparation and actual updating.
Preparatory work
Before you decide to remake old Soviet-era furniture, you need to understand that such a process is only justified if it is made of wood. It is not advisable to renew old furniture made of chipboard, since the service life of these structures is not long, and perhaps the wall is no longer suitable for restoration. So, there are preparatory activities that must be carried out before any restoration:
- Clean the surface from dust and dirt, while dismantling all decor and fittings;
- The old layer of paintwork must be removed. This can be done with coarse sandpaper or a sanding machine. A solvent solution can also be applied;
- Grout deep cracks with a special material;
- Fill chips and dents with wax and sand;
- Prime the surface with a wood compound. It is advisable to use acrylic compounds that fill all microscopic cracks.
The preparation stage is very important, since the final result depends on the quality of surface cleaning.
Removing dust and dirt
Remove old paint or varnish
We erase the deformations
Prime the surface
Update instructions
Before you restore old furniture, you need to decide on the design you want to get. Let's consider the most popular updating method at the moment - decoupage. The preparatory work has been carried out successfully, and restoration can begin. The algorithm for performing the work is simple and will not cause difficulties even for a beginner:
- Cut out the desired design, or take special napkins for decoupage. If you are doing the work for the first time, take pictures of medium size relative to the surface on which they will be applied;
- Apply PVA glue to the surface, you can use a blending composition. Do not coat the entire wall at once, as the glue may dry out while you are covering one area, so you need to work in stages;
- When gluing a pattern, you must strictly ensure that the edges adhere to the surface. Drawings can be pasted overlapping each other, so the decor will be voluminous and original;
- If you need to paste over a corner, the material just neatly bends around the corner, there is no need to cut anything. Smooth the picture with your fingers or a rubber spatula to remove air bubbles and leave to dry;
- The next stage is varnishing. Apply a thin layer of clear furniture varnish with a brush or lint-free roller and let it dry. We repeat the process 3-5 times;
- After the last layer of varnish has dried, you need to rub the surface until it shines; this can be done with a soft cloth. Polishing should be done in a circular motion without pressing.
In the before and after photos you can see how to update an old furniture wall with your own hands.
If you follow the instructions and apply designer methods of decorating furniture, you can get a great result that will be the pride of the apartment owners.
We cut out the elements and cover the furniture with glue
Paste stencils
Varnish
Ways to update an old furniture wall with your own hands, examples in before and after photos
The apartment has a Soviet-era wall made of high quality natural wood. But over time, the facades became warped, the fittings failed, and the appearance became unpresentable. It’s a shame to throw away this piece of furniture, so many people have a question about how to update an old furniture wall with their own hands and they study photos before and after restoration.
Photo
How to repaint old chipboard furniture with your own hands
Modern interior items very quickly go out of fashion or lose their attractiveness, but purchasing new ones is not always possible. This raises the question: how to repaint chipboard furniture with your own hands so that the product acquires an attractive appearance? This is not always easy to do, because the result is influenced not only by the correct choice of materials and technology, but also by the accuracy of the process.
How to paint chipboard
Painting chipboard furniture includes two main stages:
- preparatory stage;
- painting work.
On a note! When deciding to paint laminated chipboard, it is worth considering that the end result, even if all the nuances are observed, does not always meet expectations.
Tool selection
Various tools can be used for work:
- Spray gun. Due to the fact that furniture parts made of wood-based material have a flat base, this particular device is the best option. When spraying, the paint can be applied more evenly. The main problem with using such a tool is the correct selection of the distance. In case of erroneous calculations, drips and sagging are formed.
- Roller. This device is most often used at home. Painting with a roller is not always easy, since the applied layer must have a small thickness, otherwise sagging will become noticeable. To paint furniture, use tools with a medium-length fur coat.
- Foam sponge. Suitable for tinting and painting well-primed elements, it allows you to obtain a uniform coating, but subject to extreme care.
When restoring old furniture, you can get by with affordable tools
Brushes are rarely used for this process; their main purpose is decoration. They allow you to create an antique effect, but if a base layer was previously applied to hide the base.
On a note! When repainting an old table or chest of drawers, the joining of parts is taken into account: the new layer should not lead to the appearance of distortions and protruding areas.
Preparing the base
Step-by-step preparation instructions:
- Furniture is disassembled or only parts that need to be repainted are removed. It is problematic to carry out high-quality painting of parts without removing them. If you have no assembly experience, it is better to number the elements on the reverse side and draw up a diagram.
- The fittings are carefully removed, even if they are not located on the side to be painted. Its elements will complicate the process.
- The work site is prepared, everything unnecessary is removed.
If you don’t have a sander at hand, you can get by with sandpaper on a wooden block
- The part is placed on a flat area. The front side is treated with sandpaper; for this you can use a hand block. Power tools are used very carefully. It is necessary to remove a small layer and create roughness on the surface to improve adhesion. Care must be taken, as chipboard is easily damaged.
- Dust and dirt are removed.
All details are processed in this way.
Repainting
Coating of fragments with paint is carried out according to the scheme:
- A primer is applied to the element. It is recommended to perform at least two treatments, each time waiting until the product is completely dry.
- The coloring composition is being prepared. It is stirred well and tinted if necessary.
- The mixture is poured into a convenient roller container. The instrument is soaked in the solution and the excess is squeezed out.
- Painting starts from the middle. The mixture rolls out well over the base, the movements should be parallel, and a thick layer should not be allowed to be created. The first layer is the base; you need to wait until it dries completely.
- Then the main coating is applied according to the previous principle.
- When using a spray gun, you will need to dilute the composition used. To select the optimal distance, training staining is carried out.
Regardless of the type of composition, the surface is painted in 2 – 3 layers
If the part will experience constant impact, then an additional layer of varnish is applied.
The nuances of repainting furniture chipboard
Painting old furniture with your own hands is considered a difficult and risky procedure. The fact is that for the manufacture of interior items (cabinets, chests of drawers, kitchen modules) processed materials with a decorative layer are used. Therefore, it is necessary to correctly determine the type of coating in order to draw up a work plan.
Chipboards used in furniture production can be of the following types:
- Lacquered. Wardrobes, beds and dressing tables made more than 30 years ago are made from this material. Now this furniture is being produced again. The manufacturing technology is that several layers of varnish are applied to the decorative base. Parts processed in this way are used for facades or visible parts of the body. It is very difficult to repaint varnished products; it is much easier to polish if there is damage.
Laminated products are the hardest to repaint. This is a modern option that is used everywhere; furniture made from chipboard is very popular. The principle of obtaining such a surface is that the film is rolled onto a chipboard base and, under the influence of a heat press, creates a reliable and durable layer. It is difficult to repaint such material due to the fact that it is impossible to completely remove the coating, because it has adhesion to the base. This must be taken into account so as not to damage the parts being processed.
Laminated boards are coated with a polymer on top, which complicates the restoration process. Such products are created by gluing decorative paper onto a chipboard, so the coating is unreliable. It is recommended that such elements be allowed to be repainted only after the top layer has been removed and a significant part of the glue has been cleaned off.
The paper coating can be easily peeled off the board, after which the product is ready to apply a new Veneered decor. The basis of the material is chipboard; veneer is glued onto it under pressure. Painting of such interior items is carried out using a limited number of compositions - these are stains and varnish. The veneer surface must be prepared carefully so as not to damage the decorative layer.
Furniture covered with natural wood veneer belongs to the elite class
There are other types of slabs, but they are not as common.
Furniture decoration
Decorating such material is not very easy. There are many recommendations for creating a Provence style, but achieving the effect that is obtained on furniture made of wood, plywood or MDF will not work. This is explained by the fact that chipboard products rarely have the required appearance.
Using simple devices on chipboard furniture you can create true masterpieces
You can diversify the interior in the following ways:
To work using the Decoupage technique (artificial aging), special paints are used
- Aging. To create this effect, after laying the base coat, apply a darker color of paint with a brush. The movements should be sweeping and slightly uneven; a diluted white compound can be applied on top. Everything is fixed with varnish.
Before repainting chipboard furniture, it is recommended to experiment a little. This will allow you to evaluate the result and, possibly, choose a more suitable decoration option.
How to paint old furniture
To paint boring or defective interior items, you need to select a composition suitable for these purposes. The main recommendation when choosing is to refuse cheap options.
Paint for chipboard furniture should be selected taking into account the characteristics of the composition:
- Oily. Preference should be given to well-known brands. A significant disadvantage is the unpleasant and toxic fumes, and the drying period of the solution is quite long. This mixture must be laid in thin layers, which is why the material is used infrequently.
- Acrylic. A modern version of water-dispersed paints. The composition has many positive qualities, which makes it in demand. But when working with laminated chipboard, it is necessary to purchase a solution with increased adhesion and not dilute it with water.
- Alkyd. This option is much preferable to the oil option. The product is suitable for painting furniture, but the work is carried out in well-ventilated areas due to the specific smell of the composition.
Of the three proposed, the best is acrylic paint, oil paint is affordable, and alkyd enamel is considered the golden mean
On a note! To tint or decorate small areas, spray paint is used. For example, a bedside table will require one or two containers.
Chipboard can also be repainted with other types of compositions. Stain is used only for tinting veneered material. The varnish serves to secure the decorative layer; it can act as an independent composition, but this will require complex preparation of the base. For work it is better to use a quick-drying variety.
A mandatory element of the coating is a primer; the composition must have good adhesion.
No decorative coating can be applied to chipboard without primer.
