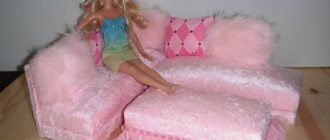
When a child gets a doll, pretty soon every child begins to think about arranging a home for it. With the modern development of toy production, you can buy almost any furniture or a whole house at once for your favorite doll in a store. However, it will be much more fun to decorate everything with handmade items. This does not require any special skills or expensive materials, such as plywood, wood, metal or plastic. You can simply arm yourself with glue, scissors and paper. We will look at how to make paper furniture for dolls in this article.
How to make doll furniture from paper
Today there are many ways to make paper furniture. Each of them has its own advantages and disadvantages. Here are the most famous of them.
- Origami technique.
- Manufacturing of furniture according to drawings.
- Gluing according to color schemes.
- Weaving from paper strips or tubes.
- Using matchboxes as a “building” material.
- Manufacturing furniture from corrugated cardboard.
- Painted furniture.
- Production of paper furniture from combined materials.
- Papier-mâché furniture.
Although all these techniques are different, they use the same material - paper and its derivative cardboard. No matter which of them is chosen, one rule remains the same for all: making doll furniture requires special care and attention, because it is almost jewelry work.
Piano
This model can also be used as a desk. If you take a square for it, measuring at least 21x21 cm and stop at step 6, you will get a decoration-house for a puppet show.
Step-by-step instruction:
- Connect the top and bottom edges of the square sheet.
- We mark the center of the figure.
- We add the right and left sides to it.
- We make folds along the dotted lines. We open both parts from the inside according to the arrows.
- Flatten the resulting folds.
- We get a decorative house. However, we don’t stop at this point and continue assembling the piano. Raise the central part of the workpiece.
- Bend down the top edge.
- We fold the sides at right angles.
- We give the central part a horizontal position. Paste on a pre-printed image of the keys.
Requirements for paper for toy furniture
When considering the question of how to make paper furniture for dolls with your own hands, it is worth remembering that each manufacturing method has certain requirements for paper.
Almost all of the above methods require thick paper from 90 g/m2. It should bend well and not delaminate at the bend. However, for origami, paper is needed that is less dense, capable of withstanding repeated folding and maintaining a beautiful appearance.
The same requirements apply to cardboard. By the way, to make furniture from it, you can use both regular stationery cardboard and corrugated packaging cardboard.
If doll furniture will be made using papier-mâché or weaving, old newspapers or magazines are perfect as consumables.
It's interesting to know
In ancient Rome, the legend about the goddess of love Venus and the hunter Adonis was very popular. The young man, the son of the Cypriot king, was famous for his rare beauty. It is not surprising that Venus showed favor to him and almost never separated from her lover. However, Adonis soon died during a hunt, from the fangs of a wild boar. According to the myth, roses and anemones grew in the place where the blood of the young king was shed. And the tears of the saddened Venus, falling to the ground, turned into drop-shaped red berries, their sweetness reminiscent of love.
In honor of Adonis, whose cult was borrowed first by the ancient Greeks and then by the Romans from the peoples of Western Asia, spring fertility festivals were held. Their participants always ate strawberries - a symbol of the sun, blossoming nature and love pleasures. The Romans especially revered this berry, considering it a strong aphrodisiac, as well as a remedy for mental and heart illness. Strawberries are really rich in folic acid, which stimulates the production of so-called “happiness hormones”. And wealthy Roman women made themselves strawberry “beauty masks.”
In medieval Italy, the cult of Adonis was replaced by the veneration of St. Anthony of Padua. In memory of him, large-scale celebrations were held in many cities on May 13. The people of Rome celebrated the day with a colorful festival known as the Triumph of the Strawberries. A statue of the saint was placed in a huge basket, about 2 m in diameter, and around there were small boxes, pots and other containers filled with aromatic berries. Several people carried this symbol of fertility at the head of the solemn procession, walking around the central streets. At the end of the holiday, baskets of berries were generously distributed to everyone.
Since 1870, due to disagreements between the papal church and the Italian government, the festival was banned. It was revived in 1922, but moved to the province of Rome - the small town of Nemi, where it is still held. Starting from mid-May, tourists flock to the small resort village to taste the sweetest and most aromatic strawberries, which have no equal in Italy. Festivals dedicated to the “queen of berries” are also held in Japan, Russia, Germany, Finland and the UK.
How to make paper furniture with your own hands: origami
The simplest method of making furniture, which does not require special skills, materials, and most importantly time, is origami (the art of folding paper figures).
All you need is a square sheet of paper and a diagram of how to fold it correctly. No glue or scissors are needed for origami (unless, of course, it is a modular subtype).
When making doll furniture in this way, you should first practice on paper from a math notebook (it will be easier to fold because of the squares). And, having mastered this technique, make a table, chair or something else from special paper.
Option for postcards
A simple origami strawberry model can be folded in just five minutes according to the following scheme. You will need a sheet of paper with two contrasting sides - ideally red and green. However, if you couldn’t find such a combination, don’t be upset. At the end of the assembly, the strawberry sepals can be painted or decorated with a stylized berry, matching the rest of the decor to it.
Step-by-step instruction:
We start working from the green side (or its color analogue).
- Fold the square sheet in half diagonally.
- We also bend the triangle in half.
- Open the left “pocket” to the right.
- Let's flatten it.
- Turn the workpiece over.
- Repeat steps 3 and 4 on the back.
- Turn the “Double Square” over with the open edge facing away from you.
- We bend the top of the first layer along the dotted line.
- For the second one, we move the ends apart.
- Fold the side edges along the dotted lines.
- Lower the top of the figure.
- You can draw characteristic points with a marker.
A slightly more complex version from Korean origamists:
Strawberries are often combined on postcards with other origami fruits.
Schemes on how to make a chair, table and sofa using the origami technique
As an example of how to make paper furniture with your own hands (step by step), below are three diagrams for origami. The size of the finished product folded along each of them depends on the size of the sheet. After practicing several times, it will not be difficult to calculate it relative to the doll’s height.
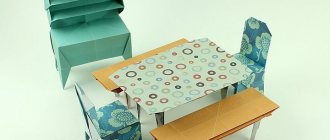
The first diagram shows the method of making a table from paper.
It would be nice to add a chair to the made paper table. How to do this is shown in this diagram.
Instead of a paper chair, in addition to the table, it’s a good idea to use a sofa assembled according to the diagram shown below.
Initial stage of work
The beauty of self-made household items, clothing or furniture is that it is unique.
For these purposes, available materials are used, missing ones are purchased, some parts have to be ordered from the carpentry shop. It will still be much cheaper than buying a ready-made sofa, and creative work will bring pleasure.
The basis is sketches and drawings for making a corner sofa with your own hands. There are options:
- do it yourself;
- order from a specialist;
- borrow from the Internet (take it from our website).
Ready-made drawings are convenient as a starting sample. They have to be adjusted to suit your materials and capabilities. Based on the finished sketches, the dimensions are specified.
For furniture made from plastic bottles, you will need a large number of identical containers to make entire blocks with tape. The number of bottles determines the dimensions of the sofa, which are adjusted in the drawings.
How to make furniture for dolls from paper without glue
Besides origami, there is another way to make paper furniture without glue. However, in this case you cannot do without scissors. You will need them to cut out doll furniture according to the pattern. Then you need to fold it.
A chair or slab made in this way looks more elegant than origami products. But when creating furniture this way, you need to cut and fold it very carefully so as not to spoil it.
To print such diagrams, it is best to use paper with a density of about 100 g/m2.
The finished product can be painted to your liking.
Master class No. 1
Let's start furnishing the doll's home with an armchair . It's easy to make: please note that the dimensions are shown in the photo. All you have to do is transfer them onto cardboard. We specifically do not provide chair templates, since it is made based on the personal considerations of the child or parent who is involved in the process of creating furniture.
Cut out the parts you see in the photo from cardboard and get to work. To create a chair seat, use square blanks. Their number depends on the thickness of the cardboard used. Place a stack of cardboards together and glue them together.
Attach the seat to the back of the chair,
glue it to the bottom. Lubricate the front part of the seat with glue and attach the plug piece. It is a rectangle with rising bed elements. Now between the back and front of the chair there are supports on which cylindrical beds will be placed. Secure the cylinders of the beds and hide the sides under the cardboard. The chair is ready! To avoid leaving the furniture in this condition, cover it with a beautiful fabric or secure it with decorative paper. Please note: if the child is small, the paper will become a short-lived cover for the chair.
Making doll furniture from color schemes
In the old days, paper cutting houses could be purchased at almost any bookstore. Follow the instructions and use scissors and glue to create a charming dollhouse or palace with furniture.
Knowing the basics of working with any graphic editors and the principles of constructing such diagrams, you can easily make similar blanks. If making a whole palace for a doll is not part of your plans, it wouldn’t be a bad idea to create a wardrobe, chair or bed and, after printing them, make vintage furniture for your favorite. Needless to say, only laser printing is suitable for this method, since inkjet printing, although more colorful, can float or simply fade over time when it comes into contact with water.
As for the choice of glue for this furniture, it is best to use double-sided tape or a stationery glue stick. It is also acceptable to use a glue gun, but very carefully.
From small items to office kits
Cardboard, as a material for furniture production, is rapidly becoming fashionable. Entire trends in such furniture art are being created, each of the companies operating in this market works in its own style.
It’s easy to order almost everything, from an original lamp for a desk, to the table itself, and even to bulky furniture for books, documents and clothes.
It should not be surprising that cardboard is able to withstand mechanical loads. Paper, as everyone knows, is made from cellulose, which, in turn, forms the basis of wood.
And everyone knows the strength of wood and the widest possibilities for its use. Therefore, to ensure the strength of cardboard products, it is enough to assemble them properly. Moreover, there is a lot of cardboard on the market specifically designed for these purposes, as well as different types of glue, paint and other finishing materials.
Weaving paper tubes as one of the ways to make doll furniture
Weaving is a fairly ancient and popular type of needlework. Today it is experiencing a new revival. However, modern craftsmen increasingly use paper tubes or ribbons for weaving rather than wicker. The finished product is painted and then varnished and in this form can serve for many years.
When choosing a way to make paper furniture for Barbie with your own hands, it would be nice to take advantage of this: today the tendency to use wicker paper furniture in your homes is becoming more and more fashionable.
Among the advantages of this technique are the elegance and strength of the finished furniture, as well as its realism. In addition, the materials will cost nothing, because these are unnecessary old newspaper or magazine sheets.
But among the disadvantages - in order to make doll furniture using this method, you must first master the weaving technique, and also have a certain pattern.
But, having learned how to create toy tables, cabinets or chairs for Barbie, it would be nice to try your hand at making human-sized furniture.
Simple models
For young children, the ability of an origami paper airplane to fly rapidly and perform intricate pirouettes is much more important than its resemblance to a real fighter plane. Several models have been developed that can cover distances of up to 10 meters and all of them have simple circuits that are accessible from 6 to 7 years of age. Since the shape of such toys resembles a glider, they can be classified as a stylized type of fighter.
Scheme No. 1
Step-by-step instruction:
- Divide the A4 sheet into 3 parts along the short side and cut off 1/3. Fold the resulting rectangle in half. We open it and place the long side towards us.
- We bend the lower and upper corners on the left towards the center.
- Make a fold as shown in the picture.
- We bend the corners again from the left to the middle.
- We tuck the protruding triangle.
- We bend the figure into a “mountain”.
- Fold the wings on the bias.
Scheme No. 2
Step-by-step instruction:
- We divide the A4 sheet in half crosswise.
- We bend the upper corners towards the center.
- We lower the extreme point of the workpiece down to the base.
- Bend it up.
- We fold the workpiece into a “mountain”.
- Rotate it 90° counterclockwise.
- Make a bias fold, forming a wing. We repeat the same action on the back.
- We bend the edges of the wings.
Scheme No. 3
Step-by-step instruction:
- Divide the A4 sheet in half lengthwise.
- Fold the top left corner down.
- We bend the resulting triangle in height.
- Bend the far left corner to the right.
- We close the figure with a “valley”.
- Fold the front layer along the dotted line.
- Repeat step 6 on the back.
- We tuck the bottom edges of the product.
- We raise the wings so that they are parallel to the ground.
Matchbox furniture
Among the most used materials for making doll furniture are matchboxes. In fact, they act as bricks for creating tables, chests of drawers, beds, etc. Moreover, if some craftsmen simply paste over the finished product with colored paper or fabric, others decorate matchbox furniture using decoupage, giving the product realism.
To make sure that you can make very beautiful furniture for a doll from a matchbox, below is a master class on making a toy chest of drawers from two boxes of matches. To complete this you will also need stationery cardboard, black and white paint, double-sided tape, sandpaper and two beads.
This method can also be used to successfully make wardrobes, desks and kitchen furniture. The main thing is to have a lot of matchboxes in stock.
Required tools and materials
Origami.
master class with step-by-step photos. modular origami. Father Frost. step-by-step assembly Origami furniture is an interesting area that requires special attention. Making such figures does not take much time, and the resulting result pleases adults and children with its appearance. The main feature of the products is their maximum similarity to real furniture items: sofas, tables, cabinets, armchairs and chests of drawers.
It is unlikely that you will be able to use such furniture in real life, but the items will be a good option for creating a model of a future room or designing a dollhouse. To achieve similarity with real furniture, textured paper is used during construction to imitate various surfaces: stone, leather, fabric, wood and metal. When creating objects, it is better to use paint that does not completely saturate the material, but only gives it color.
The following materials are used for production:
- Material for the base – matchboxes, some corrugated cardboard, colored thick paper;
- Pieces of fabric, decorative film and textured paper for finishing finished items;
- Scissors;
- Black pencil or pen;
- PVA glue or any other for working with paper.
Furniture for dolls made of cardboard
Quite popular today is a technique that tells how to make furniture for dolls with your own hands from cardboard and paper. This method is used to make not only furniture, but also entire dollhouses.
For this method, it is most rational to use corrugated cardboard, the source of which can be any box from a parcel or some kind of household appliance.
Most often, furniture made from this material is covered with paper or fabric, and sometimes painted. However, in recent years, eco-style has become especially popular. Following it, furniture made of corrugated cardboard is not painted, but is left as is. At the same time, do not forget: if there was something printed or written on the front side of the box, it needs to be re-faced so that the picture remains hidden inside the product.
It is worth noting that making real modular furniture from corrugated cardboard is becoming quite a popular trend in the modern world.
True, it is not very durable, but it is affordable and environmentally friendly, unlike plastic, and can be easily disposed of or transported when moving.
About “women’s” day itself
The date March 8 is closely connected with the names of two German activists who fought for women's equality - Clara Zetkin and Rosa Luxemburg. Although for the first time a feminist holiday was celebrated in New York at the initiative of the US Socialist Party. This happened in February 1909. A year later, American fighters for gender equality arrived in Copenhagen, where they met with Clara Zetkin, who warmly supported their initiative.
Members of the international feminist movement were going to use the holiday as a tool in the fight for women's rights. Every year on the last Sunday of February they went out to rallies, advocating for improved working conditions, higher wages, social protection, and so on. Feminists also demanded that women be allowed to participate in elections, since at the beginning of the 20th century this was an exclusively male privilege. The holiday gained popularity in many countries, but did not have a single date until 1975.
March 8 used to be February 23
Immediately after the revolution in Russia, women's holiday was celebrated on February 23. On this day, workers from the outskirts of Petrograd went on mass strikes, which led to the signing of a decree on the right to vote for women. When in 2022 the Bolsheviks passed a decree replacing the Julian calendar with the Gregorian one, the countdown shifted, and February 23 automatically became March 8.
The world community has been celebrating March 8 since 1975
A single date for International Women's Day was established by a special UN decision. On this holiday, it is customary to discuss gender issues in society at the state level. However, in the 21st century, it is gradually losing its feminist “color”, since modern women, after a hundred years of emancipation, again want to be gentle, charming, fragile and surrounded by care.
In some countries, March 8 is also celebrated as Mother's Day. These are Uzbekistan, Serbia, Albania, Macedonia and others. In Italy, France and Germany, March 8 is not officially celebrated, and generally not very popular. Women are also celebrated here on Mother's Day, which is held on the last Sunday in November.
Japan has its own Women's Day
Although March 8 has been present in the Japanese holiday calendar since 1923, it has never become widespread. But on March 3, Girls' Day is celebrated - Hinamatsuri, which is very colorful, with rich traditions and multifaceted overtones. The rituals of the holiday, which originated at the beginning of the 17th century, became more complex with each imperial dynasty. However, the main focus: the formation of family values in girls, the development of cultural and practical skills, remain unchanged. You can call Hinamatsuri the only and true women's day dedicated to beauty, love and harmony.
Painted furniture
When choosing how to make paper furniture, do not underestimate the simplest ways. One of them is to simply draw furniture on paper or cardboard and place it in the dollhouse.
Of course, the painted home decoration cannot be compared with voluminous furniture made using one of the above methods, but as an option it is quite suitable for novice dollhouse designers.
By the way, in addition to paper, you can also draw on corrugated cardboard. It is noteworthy that some modern designers are beginning to use the method of partially hand-drawn furniture to decorate real houses.
Tips for making different types of structures
Any design can be made from pliable raw materials. There are enough video tutorials and master classes on special thematic resources, which present diagrams with detailed instructions. For those who are engaged in such construction for the first time, it is better to start with simple crafts made from plain or colored paper.
Benefits of leather furniture, tips for arranging and caring for it
Sofa
Paper sofas are one of the simplest designs. To work you will need a square sheet of paper. Then you just need to follow the scheme:
- Fold the workpiece in half, working along the fold line. Expand.
- Fold the sheet in half again, connecting the other two sides. A second fold line is formed, perpendicular to the first. Expand.
- Fold the bottom edge of the paper to the center horizontal fold line.
- Without straightening, fold the bottom edge in half again to the center line.
- Expand the bottom rectangle completely. It turned out to be three fold lines (not counting the central one) at an equal distance from each other.
- Fold the bottom of the sheet first along the first fold line, connecting the bottom edge with the second fold. Then, without unfolding, fold along the second fold line.
- Focusing on the central vertical fold, bend the upper corners of the folded part from the center to the base in the form of triangles.
- Bring the bottom to the center line along the third fold.
- Fold the top half of the sheet in half, connecting the top edge to the center line.
- Turn the back side up.
- Bring the lower corners to the upper base, smooth out the fold lines.
- Now connect the upper corners to the lower base, fixing the fold lines. Bend the corners.
- Bend the top part of the figure.
- A horizontal fold line is visible in the center. Fold the bottom of the sheet in half, connecting the bottom edge to the center fold. Form a new fold line with indents along the edges. Bend back.
- Connect the top half of the figure with the bottom along the central horizontal fold.
- The result was a figure in the shape of a boat. Now you need to turn the corners formed at the edges inward.
- Bring the free edge to the fold line in the center.
The sofa is ready. You just need to straighten the figure, giving it the correct shape.
Dresser
The chest of drawers is made of separate sections, absolutely identical in size. Its design can be considered using the example of assembling one module. You will need two square sheets of the same size 20 × 20 cm to make a compartment and a drawer. To assemble the drawer, you must perform the following procedure:
- Form two fold lines. To do this, fold the sheet diagonally, alternately connecting two opposite corners. Expand.
- Connect the corners of the square at the center point.
- Bend the top corner and bend it in the opposite direction towards the center.
- Turn the product over. Bend the corner, placing the figure so that it is at the bottom.
- Bring the free sides of the resulting triangle to the base (fold line). Fix.
- Turn the future piece of furniture over to the other side, where the other 3 corners remain folded.
- Lay 2 parallel fold lines. To do this, fold the left half of the sheet in half, connecting the edge with the central vertical line. Repeat the same steps on the right side.
- Do similar manipulations with the central horizontal fold. Return to square shape.
- Form folds at the bottom of the figure, 2 on each side, by folding the sheet diagonally.
- Next, fold the left and right sides of the figure, connecting them vertically at the center line.
- Fold the paper along the folds, forming a “box”. Secure the protruding corners into the side “pockets”, and roll the free edges inside the structure.
- A triangular flap is formed on the outside; it must be bent to form the handle of the drawer.
Types of artificial leather for furniture, differences from natural material
The next stage is making the department where the drawer will be inserted. The algorithm is approximately the same:
- fold the square so that 2 diagonals are formed;
- bend 4 corners to the center of the square;
- form fold lines by connecting the sides of the figure with the central lines - vertical and horizontal;
- form 2 diagonals at the bottom;
- connect the left and right halves again at the center;
- Form a “box” along the fold lines.
The drawer is inserted into the empty section - the chest of drawers is ready. You can make several such sections and glue them together.
Armchair
For the chair you will need paper measuring 206 × 160 mm. Manufacturing for the most part contains points from the algorithm for designing a sofa:
- place the rectangular sheet in front of you vertically;
- form a horizontal fold by folding the paper in half;
- Fold the bottom part 2 times to form 3 more fold lines;
- repeat steps 6 to 10 from the algorithm for making a sofa;
- form folds on the reverse side, turn over;
- unfold the top rectangle and fold it in half towards the center line;
- Assemble the shape of the chair using the finished lines, fixing the parts together.
You can use double-sided colored paper for the chair so that the finished model has a multi-colored design.
Closet
To make a cabinet using the same technique, you will need a square sheet. Further actions are performed according to the points:
- you need to make 2 vertical and 2 horizontal folds on the sheet so that you get 3 equal stripes, open the paper;
- fold the left rectangle in half along the first line;
- bend the top and bottom edges to the fold lines;
- open the pockets and bend the left side in half;
- connect the right edge to the left;
- bend the corners along the marked lines and open the pockets;
- Fold the parts along the fold lines and reveal the figure.
To make a cabinet, the chest of drawers can be used. It is necessary to glue the components together in the required order, combine empty shelves with drawers.
Table
Assembling the table is also not difficult if you carefully follow the instructions:
- Fold a square sheet of paper in half and unfold it. A vertical fold is formed.
- Fold the left and right edges in half, connecting them at the center line.
- Mark a horizontal fold in the center.
- Connect the top and bottom edges at the central horizontal line. Unfold the workpiece.
- Fold the bottom corners diagonally.
- Fold the bottom along the first horizontal fold.
- Repeat steps 5–6 for the top edge.
- Rotate the figure vertically.
- Bend the corners to the sides diagonally.
- Open them with your fingers and fold them so that you get a square from each corner.
- Transform each square into a diamond shape.
- Fold the diamonds in half, bringing the outer corners toward the center.
To correctly mark the folds and center points, it is convenient to use a pencil and a ruler.
Papier mache
Among the many ways to make furniture out of paper, the papier-mâché method (using paper mass and glue for modeling) stands out.
Most often, this method is used to make masks or some kind of figures, but it is also quite suitable for doll furniture. Like weaving from paper tubes, the papier-mâché technique is very economical, but at the same time it is simpler.
Furniture made in this way must have a frame and dry well before it is coated with paint or varnish. By the way, if you add a little gypsum to the paper mixture, the product will become much stronger.
Each of the above methods for making paper furniture is unique in its own way. Some are complex, others are simpler to implement. But no matter which one is chosen, the main thing is to put your soul into your work. Then the result will definitely please you, and your favorite children's doll will have the best home in the world.
Approximate Dimensions
Before you think about how to make a table for dolls yourself and from what material, you need to decide on the dimensions. You need to start from the height of the doll itself and the size of the house. The interior will look beautiful if all the furniture is approximately the same scale and style.
The easiest way to make all objects proportionally the same is to calculate the scale. You need to divide the average height of a person by the size of the doll. You will get a number by which you will subsequently need to divide all the real sizes of the furniture to get the doll sizes.
For example, the height of a doll is 20 cm. We divide the average height of a person 175 cm by 20 cm = 8.75. The actual dimensions of human furniture must be divided by this number to obtain the dimensions of doll furniture.
On average, dolls have a size from 7.5 to 15 cm. If the doll for which this or that piece of furniture is made fits these parameters, you can use the following sizes:
Double bed - 13−16 cm.
