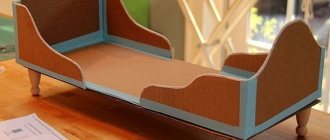
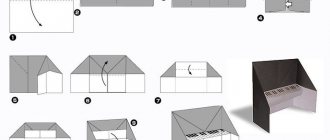
Furniture made from paper using the origami technique is convenient for furnishing ready-made doll houses or homemade roomboxes. It is difficult to find a more affordable and, at the same time, effective way to create toys. Paper models bring aesthetic pleasure to the child, while simultaneously developing his talents, intelligence and creative thinking. And the fact that the furniture turns out to be durable and functional is an additional bonus that fuels interest in it. Some furnishings will be useful for adults, for example, practical multi-tiered chests of drawers, in which you can put any small thing: from stationery to jewelry.
Required tools and materials
Origami furniture is an interesting trend that requires special attention. Making such figures does not take much time, and the resulting result pleases adults and children with its appearance. The main feature of the products is their maximum similarity to real furniture items: sofas, tables, cabinets, armchairs and chests of drawers.
It is unlikely that you will be able to use such furniture in real life, but the items will be a good option for creating a model of a future room or designing a dollhouse. To achieve similarity with real furniture, textured paper is used during construction to imitate various surfaces: stone, leather, fabric, wood and metal. When creating objects, it is better to use paint that does not completely saturate the material, but only gives it color.
The following materials are used for production:
- Material for the base – matchboxes, some corrugated cardboard, colored thick paper;
- Pieces of fabric, decorative film and textured paper for finishing finished items;
- Scissors;
- Black pencil or pen;
- PVA glue or any other for working with paper.
You can work with paper yourself, or you can involve loved ones in the process. Then the resulting products will be diverse, but together they will form a single ensemble.
Tips for making different types of structures
Any design can be made from pliable raw materials. There are enough video tutorials and master classes on special thematic resources, which present diagrams with detailed instructions. For those who are engaged in such construction for the first time, it is better to start with simple crafts made from plain or colored paper.
Benefits of leather furniture, tips for arranging and caring for it
Sofa
Paper sofas are one of the simplest designs. To work you will need a square sheet of paper. Then you just need to follow the scheme:
- Fold the workpiece in half, working along the fold line. Expand.
- Fold the sheet in half again, connecting the other two sides. A second fold line is formed, perpendicular to the first. Expand.
- Fold the bottom edge of the paper to the center horizontal fold line.
- Without straightening, fold the bottom edge in half again to the center line.
- Expand the bottom rectangle completely. It turned out to be three fold lines (not counting the central one) at an equal distance from each other.
- Fold the bottom of the sheet first along the first fold line, connecting the bottom edge with the second fold. Then, without unfolding, fold along the second fold line.
- Focusing on the central vertical fold, bend the upper corners of the folded part from the center to the base in the form of triangles.
- Bring the bottom to the center line along the third fold.
- Fold the top half of the sheet in half, connecting the top edge to the center line.
- Turn the back side up.
- Bring the lower corners to the upper base, smooth out the fold lines.
- Now connect the upper corners to the lower base, fixing the fold lines. Bend the corners.
- Bend the top part of the figure.
- A horizontal fold line is visible in the center. Fold the bottom of the sheet in half, connecting the bottom edge to the center fold. Form a new fold line with indents along the edges. Bend back.
- Connect the top half of the figure with the bottom along the central horizontal fold.
- The result was a figure in the shape of a boat. Now you need to turn the corners formed at the edges inward.
- Bring the free edge to the fold line in the center.
The sofa is ready. You just need to straighten the figure, giving it the correct shape.
Dresser
The chest of drawers is made of separate sections, absolutely identical in size. Its design can be considered using the example of assembling one module. You will need two square sheets of the same size 20 × 20 cm to make a compartment and a drawer. To assemble the drawer, you must perform the following procedure:
- Form two fold lines. To do this, fold the sheet diagonally, alternately connecting two opposite corners. Expand.
- Connect the corners of the square at the center point.
- Bend the top corner and bend it in the opposite direction towards the center.
- Turn the product over. Bend the corner, placing the figure so that it is at the bottom.
- Bring the free sides of the resulting triangle to the base (fold line). Fix.
- Turn the future piece of furniture over to the other side, where the other 3 corners remain folded.
- Lay 2 parallel fold lines. To do this, fold the left half of the sheet in half, connecting the edge with the central vertical line. Repeat the same steps on the right side.
- Do similar manipulations with the central horizontal fold. Return to square shape.
- Form folds at the bottom of the figure, 2 on each side, by folding the sheet diagonally.
- Next, fold the left and right sides of the figure, connecting them vertically at the center line.
- Fold the paper along the folds, forming a “box”. Secure the protruding corners into the side “pockets”, and roll the free edges inside the structure.
- A triangular flap is formed on the outside; it must be bent to form the handle of the drawer.
Types of artificial leather for furniture, differences from natural material
The next stage is making the department where the drawer will be inserted. The algorithm is approximately the same:
- fold the square so that 2 diagonals are formed;
- bend 4 corners to the center of the square;
- form fold lines by connecting the sides of the figure with the central lines - vertical and horizontal;
- form 2 diagonals at the bottom;
- connect the left and right halves again at the center;
- Form a “box” along the fold lines.
The drawer is inserted into the empty section - the chest of drawers is ready. You can make several such sections and glue them together.
Armchair
For the chair you will need paper measuring 206 × 160 mm. Manufacturing for the most part contains points from the algorithm for designing a sofa:
- place the rectangular sheet in front of you vertically;
- form a horizontal fold by folding the paper in half;
- Fold the bottom part 2 times to form 3 more fold lines;
- repeat steps 6 to 10 from the algorithm for making a sofa;
- form folds on the reverse side, turn over;
- unfold the top rectangle and fold it in half towards the center line;
- Assemble the shape of the chair using the finished lines, fixing the parts together.
You can use double-sided colored paper for the chair so that the finished model has a multi-colored design.
Closet
To make a cabinet using the same technique, you will need a square sheet. Further actions are performed according to the points:
- you need to make 2 vertical and 2 horizontal folds on the sheet so that you get 3 equal stripes, open the paper;
- fold the left rectangle in half along the first line;
- bend the top and bottom edges to the fold lines;
- open the pockets and bend the left side in half;
- connect the right edge to the left;
- bend the corners along the marked lines and open the pockets;
- Fold the parts along the fold lines and reveal the figure.
To make a cabinet, the chest of drawers can be used. It is necessary to glue the components together in the required order, combine empty shelves with drawers.
Table
Assembling the table is also not difficult if you carefully follow the instructions:
- Fold a square sheet of paper in half and unfold it. A vertical fold is formed.
- Fold the left and right edges in half, connecting them at the center line.
- Mark a horizontal fold in the center.
- Connect the top and bottom edges at the central horizontal line. Unfold the workpiece.
- Fold the bottom corners diagonally.
- Fold the bottom along the first horizontal fold.
- Repeat steps 5–6 for the top edge.
- Rotate the figure vertically.
- Bend the corners to the sides diagonally.
- Open them with your fingers and fold them so that you get a square from each corner.
- Transform each square into a diamond shape.
- Fold the diamonds in half, bringing the outer corners toward the center.
To correctly mark the folds and center points, it is convenient to use a pencil and a ruler.
Video
You can make anything from paper. You just need to show imagination and perseverance. Let's consider master classes on making popular types of furniture. Based on detailed instructions, you can make other types of interior items. The most popular are:
- Sofa;
- Dresser;
- Armchair;
- Closet;
- Table.
To find out how to properly construct paper furniture, you need to consider each option separately.
Sofa
A paper sofa will look great both in a dollhouse and in a miniature copy of a real interior. Before you start, pay attention to the paper sizes:
- For miniature options, you should choose colored paper 10x10 cm;
- For execution in medium sizes, you need to give preference to a workpiece of 20x20 cm;
- To create a large-sized sofa, the dimensions of the material increase proportionally.
The color of the paper can be chosen as desired, but it is better that it fits into the future interior or imitates real furniture. Having selected the materials, you can begin manufacturing:
- The square sheet is folded in half, after which it is opened and folded perpendicular to the first one;
- The next step will be an additional hem. The bottom edge is folded to the middle fold line, then folded again. The output is 3 fold lines, not counting the central one;
- The lower thin strip is folded onto the first fold, after which two identical triangles are laid by folding the side parts diagonally;
- The accordion is folded to the end, and the upper part of the workpiece is bent to the middle. The workpiece is turned over;
- The lower corners are folded up in turn, and the upper corners are bent down diagonally;
- The workpiece is turned over again, bending one corner inward. This is how the back is formed.
After turning the product over, you need to form the legs of the sofa and it will be ready. Such a beautiful and original item will become a real decoration for a toy living room or an original art object.
Fold the sheet in half
Half again
Make three folds at the bottom
Making corners from below
Raise the bottom part up
Making folds on the sides
Leveling the back
Making legs
Ready product
Dresser
The most optimal and profitable way to create a paper chest of drawers is to use matchboxes. They slide out conveniently, so making the item will not be difficult. If you want to make a chest of drawers out of paper, then you should use paper blanks. This chest of drawers is convenient for storing small, lightweight items. This will perfectly include beads, beads, clasps, clips and other little things for creativity and handicrafts. The top of the chest of drawers can be painted with colored markers, giving it an original look.
Construction of a paper chest of drawers consists of the following steps:
- Drawing a diagram for creating boxes: this stage is skipped if ready-made matchboxes or other blanks are used;
- Cutting out diagrams along the lines, as well as assembling boxes for future chest of drawers;
- The entire chest of drawers is covered with cardboard for strength, but there is no need to seal the front part where the drawers will be inserted;
- The fronts of the drawers are covered with any material - fabric, film, leather, and a bead or button is also attached as a handle;
- Legs for a chest of drawers can be made from push pins - for miniature furniture or toilet paper tubes - for large items.
This chest of drawers is also a good gift for a girl with a lot of jewelry: the drawers will fit all the jewelry.
Making boxes
Creating Box Elements
Connecting the elements
We decorate the coverings with rags
We glue the fronts of the drawers
Creating handles
Finished chest of drawers
Armchair
Making a stylish chair from colored paper is also not difficult. To create it you don’t even need glue or tape, you only need a sheet of paper of the required color. It is worth noting that cutting out blanks from beautiful textured paper will give better results than furniture made from ordinary plain material. In addition, if you find diagrams that show parts of furniture made in different styles, you can make a chair that is as similar as possible to real furniture. To work you will need one sheet of paper in the shape of a square. Its dimensions are selected depending on the dimensions of the future product:
- Bend the square sheet in half, then open it and press one of the halves to the center fold line;
- Also press the second part of the square to the center of the workpiece. Next, walk your hand along all the fold lines to clearly outline the resulting lines. Open the workpiece and turn it over with the front side facing you;
- One part of the 4 resulting lines must be cut: this is done using scissors or a metal ruler;
- Fold the workpiece across the resulting lines, visually marking the center, and bend the triangle to the right. Do the same with the left side, you should end up with two triangles superimposed on each other;
- The middle strip remaining at the bottom is folded over the triangles. Each fold line is additionally smoothed with your fingers;
- The strip that was previously bent up is bent back - it will serve as a seat. The side parts will become supports for the hands; they must be glued from the inside to the seat.
The result is an original and easy-to-make paper chair. To diversify its surface, decorative paper that imitates leather can be glued to the seat.
Stage 1-6
Stage 7-8
Closet
The construction of the cabinet is similar to the construction of the chest of drawers, which was described earlier. The difference will be that the frame must be higher, and in addition to drawers, shelves are needed. Some nuances of making a paper cabinet:
- For the workpiece, you must use a scanner made from a rectangular sheet of thick paper;
- The ideal size would be A4 format; if you need a larger product, the dimensions are increased proportionally;
- After you have drawn the diagram, you need to cut it out: first, cut out the main elements along the lines, and then start cutting out the overhead valves;
- The frame of the model is glued together without doors;
- The doors are cut out of the same paper. Later they can be decorated with film: the adhesive layer of such material will allow you to apply it to the base without any problems.
Finally, decorative handles are glued to the doors. Buttons or beads are suitable for this. The legs are made of thick cardboard.
Table
Assembling a table from paper is not difficult, especially if you already have experience working with this material. There are many options for creating tables, but beginners should choose a less complicated method. It consists of the following actions:
- For work, use a square sheet of paper;
- All sides of the square are folded inward, forming mini-squares;
- Each square is folded inward to form triangles;
- The triangles curve outward;
- The final stage is the formation of the legs.
To elevate the tabletop, stick beautiful decorative paper on it or paint it with colored felt-tip pens and acrylic.
Origami sofa
It's hard to imagine a living room without a sofa. For a guest, this is a great place to sit down, and for the owner, it’s a great place to lie down and relax after work. Let's make a sofa out of paper using the origami technique, as in the photo: Diagram:
Step-by-step instruction:
- Fold the sheet in half (twice) and unfold it. Get a cross-shaped fold.
- Fold 1/6 of the page along the dotted line (see photo).
- We wrap the sheet along the fold opposite this strip.
- We wrap the side parts of the resulting rectangle, 1/3 on each side.
- Bend the corners forward (in the places indicated by the white arrow). We do not touch the back side of the sheet.
- Fold the opened white rectangles in half.
- Raise the part of the craft marked with a dotted line.
- Bend half of the raised part down.
- Bend the sides forward.
- Pull the front part (back) forward.
- We get a paper sofa.
Furniture fasteners are the best connecting fittings. Main types and purpose of fasteners (95 photos)
Video: Lesson on how to form an origami sofa
Cabinet
Cabinet furniture made using the origami technique is no different from the real thing. The cabinets or chests of drawers are equipped with convenient drawers, and the closet is equipped with a real barbell. An ideal place to store your collection of origami clothes.
For an original cabinet based on the model of origamist Fumiyaka Shingu, you will need three squares measuring 21x21 cm.
Step-by-step instruction:
- Divide the first square into 3 parts vertically and horizontally.
- Bend the top part back. We fold the bottom one forward.
- We mark the fold lines with dotted lines. Open the sides, flatten and smooth.
- Fold the sides along the dotted lines.
- The first piece of furniture is ready.
For the second one you will also need a square of 21x21 cm.
- We divide the workpiece into three parts and roll it into a strip.
- We make vertical folds - 1/3 on each side.
- We connect both parts together.
All that remains is to put the boxes in place:
Instructions for assembling the box:
- We divide a square of 21x21 cm into 3 parts in both directions.
- Fold the top and bottom edges.
- We make folds along the dotted lines.
- Fold the top and bottom edges again.
- We outline the diagonal folds.
- We open the workpiece from the inside according to the arrows.
- We form a box by stretching the side walls. We glue the product for strength.
- Repeat steps 1 – 7 to make another box.
We make handles so that the cabinet can be easily opened.
Instructions for the pen:
You will need a strip of golden or dark brown paper 1x1.4 cm.
- Let's start from the inside out. We bend the strip in half along the long side.
- Fold the product along the dotted line.
- We repeat the action in the other direction.
- Glue the handles in place.
Cardboard box furniture
From one TV box you can make all the furniture in the house. To create it you will need:
- The box itself.
- Double sided tape.
- Scissors.
- Regular wide tape.
- Glue gun or PVA glue.
- Materials for decoration.
All furniture must be cut out, cut into the necessary parts and glued together.
Next begins the most interesting process - finishing. Cardboard can be painted, covered with wallpaper or paper. On the front of the cabinet
or dressing table, you should glue a piece of foil, imitating a mirror. You need to put a tablecloth on the table, and pillows on the sofa - this will add coziness.
Be sure to involve the child himself in the decorating process. This is a great opportunity to feel like an interior designer and show creative thinking. Anything can be used: small stones, shells, beads, rhinestones, stickers.
After finishing the design work, the arrangement of furniture in the house and filling it with details (vases, figurines) begins.
Of course, you need dishes in the kitchen. It can be cut out of cardboard, wood or molded from plasticine. How to make a bottle for dolls is a more complicated question. Here you can use bottles of drops for the eyes or nose, or ran out of perfume samples.
Weaving paper tubes as one of the ways to make doll furniture
Weaving is a fairly ancient and popular type of needlework. Today it is experiencing a new revival. However, modern craftsmen increasingly use paper tubes or ribbons for weaving rather than wicker. The finished product is painted and then varnished and in this form can serve for many years.
When choosing a way to make paper furniture for Barbie with your own hands, it would be nice to take advantage of this: today the tendency to use wicker paper furniture in your homes is becoming more and more fashionable.
Among the advantages of this technique are the elegance and strength of the finished furniture, as well as its realism. In addition, the materials will cost nothing, because these are unnecessary old newspaper or magazine sheets.
But among the disadvantages - to make doll furniture using this method, you must first master the weaving technique, and also have a certain pattern.
But, having learned how to create toy tables, cabinets or chairs for Barbie, it would be nice to try your hand at making human-sized furniture.
Furniture for dolls made of plywood
Plywood furniture is much stronger than cardboard furniture. Plywood is an environmentally friendly material, pleasant to the touch. Therefore, furniture for plywood dolls will be of high quality, beautiful and almost real.
You can make anything from plywood! Wardrobe and bed, living room set, rocking chair, buffet, stroller and sled.
The principle of making such furniture from plywood yourself is simple, but requires some skills:
- A drawing of the desired product can be found on the Internet, downloaded, and printed to a suitable size.
- Place the stencil on a sheet of plywood and trace it with a pencil.
- The parts are cut out using a jigsaw according to the template.
- Sand the edges of the parts with fine sandpaper (preferably fine sandpaper) to avoid splinters.
- The parts are painted, dried if necessary, the joints are glued and puttied.
- You can add additional decor to the elements, giving the product a certain style. Using the decoupage method, crafts are decorated with napkin elements or patterns are simply drawn using a stencil.
- Assembly of the structure.
You can make a wide variety of doll furniture from plywood; it will be an analogue of real cabinet furniture.
First of all, you need to prepare a drawing of furniture made of plywood. Drawing of a bed made of plywood. Drawing of a table made of plywood. Let's try to make a round coffee table with shelves.
- 2 identical circles are cut out of plywood.
- The circles will be connected by stands of 4 rectangles - this will create a shelf.
- Legs with a bend are cut out separately.
- All parts are connected and painted.
Drawing and assembly of a coffee table with plywood shelves
Operating procedure
Like any construction, a doll room begins with drawings. They must be very accurate, not “by eye,” since you will be working with very small parts, and there should be no inconsistencies or distortions anywhere.
If the roombox is cut out of thin plywood, you need (according to the drawings) to cut out three walls, internal partitions (if provided), and the floor
Openings for doors and windows are cut out especially carefully, first by drilling small holes in the corners of the future window or door
Many people like to use the pin-groove method rather than the adhesive method of connecting walls (there will definitely be a master class on this topic on the Internet). The parts are held securely and can be disassembled and reassembled. And during the work, for convenience, you can “bait” parts and joints with construction tape.
Kettle
A realistic snow-white teapot can be made using ordinary paper, glue and a toothpick. Cut several long strips, coat them with PVA glue on one side and wrap them around a toothpick. Once you have the desired diameter, the toothpick can be removed.
Next, you need to cut a circle out of paper that perfectly matches the diameter of the base. Glue them together to form the bottom. The handle should be cut out of paper and glued to the base.
Such a toy teapot can be decorated with paintings or painted in a bright, unusual color using gouache or acrylic paint.
Armchair
Among the pieces of paper origami furniture for children, the chair occupies a special place. It creates an atmosphere of comfort both in a real house and in a doll house. It’s hard to imagine a living room without an armchair; it would also be appropriate in a bedroom or office. For the most common model, you will need a square sheet of 15x15 cm.
Step-by-step instruction:
- We start from the underside of the sheet.
- We make a zigzag fold “mountain and valley” as shown in the diagram.
- In this case, the square is divided into 3 sections.
- We open the product.
- We make a similar zigzag fold, but now vertically.
- We open the sheet. We apply preparatory folds diagonally, following the diagram.
- Using the lines outlined in step 6, we assemble a three-dimensional figure.
- We bend the protruding triangular valves along the dotted line.
- Rotate the product 90° to the right. In front of us is the left side of the model.
- Open the right valve.
- Glue the area outlined by the ellipse.
- This is what should happen.
- We close the right side. Turn the model to the other side.
- Repeat steps 10 – 13.
The chair is ready. This is what it looks like from different sides. The model can be combined with a coffee table, sofa and other furniture, creating elegant ensembles.
Bed
A bedroom set is an integral part of a modern home. It usually includes a bed and two paired bedside tables. Let's start with the main piece of furniture. The most popular bed model consists of two parts: the body and the mattress.
Step-by-step instruction:
- For the body we use a 15x15 cm square. We outline the central axes.
- Fold the bottom and top edges 1/3.
- And bend it towards the central axis.
- We fully open all the folds, and then assemble the figure with a zigzag in the direction of the arrow.
- We outline the diagonal folds.
- We open the sides from the inside, as shown in the diagram.
- And flatten it.
- We bend the right edge of the workpiece.
- We place the triangular “legs” at right angles to the base of the bed.
- Raise the left side up. This is the headboard.
- We put the bed on legs.
Mattress:
- We outline the vertical axis of the square.
- We bend the right and left edges towards it.
- Let's turn it over again.
- We open all the folds.
- Fold the left side back along the dotted line.
- We fold the right edge in the same way, but forward.
- Bend the figure in half from top to bottom.
- We outline the horizontal axis.
- Fold the top and bottom 1/3.
- We lower the sides at a right angle.
- The mattress is ready. We place it on the base of the bed.
Origami bedside tables are assembled according to the principle of Japanese “masu” boxes. Place them vertically, with the open side inward.
Model No. 2
The second type of bed is made from one sheet. It comes with a blanket and pillow, which makes the model surprisingly realistic and elegant. For the bed you will need a sheet of paper 15x15 cm, as well as a ruler and pencil.
Detailed instructions are in the video tutorial:
For the blanket we use a square of 8x8 cm. It is advisable to take paper with a beautiful contrasting pattern. We will also make a pillow from it, loosely rolling a strip measuring 4x8cm.
Decoration
A separate stage is the decoration of finished products. Do-it-yourself furniture, diagrams of which can be found in this material, is decorated as follows.
| Material | Peculiarities | What is it suitable for? |
| Self-adhesive paper for furniture | This material can be used in the manufacture of any type of furniture. This film is ideal for beginning craftsmen, because it is easy to cut, and the adhesive layer allows you to decorate the surface without any problems. | For tabletops, seats of chairs, sofas and armchairs, for decorating cabinet doors and chest of drawers. |
| Using paints | Paints allow you to show creativity and move away from standards. Using paint you can paint any pattern and design. When choosing a product, make sure that it does not damage the paper base. Acrylic or water-based compositions are preferred. | For all types of crafts, especially for decorating the front parts of products. |
| Application of fabric | The fabric allows you to imitate the structure of furniture as much as possible. | Suitable for sofas, armchairs and chairs. |
If gouache is used for decoration, you need to mix it with PVA glue (1:1). After drying, the paint will not imprint on your hands, and the product will receive additional rigidity.
Do-it-yourself paper furniture will be an excellent option for a dollhouse or designing models of a future interior. Creating miniature objects is a fun activity that you can involve all family members in.
Film
Dye
Textile
What is needed to make a homemade sofa
DIY furniture for Barbie: simple master classes
Before work, you need to be patient, wooden pallets or blocks, as well as tools that simplify the work:
- universal tool;
- screwdriver;
- grinder;
- Screwdriver Set;
- wood glue;
- tape measure and pencil for marking;
- jigsaw (for sawing plywood) or hacksaw;
- construction stapler;
- large tailor's scissors;
- sewing machine (for covers or upholstery).
The choice of materials depends on the type of product.
The base of the backrest and armrests can even be made from scraps of plastic pipes, connected with couplings. Provide the finished back with regular pillows, and wrap the armrests with any porous material.
An easy way to make kitchen furniture
First, let's look at a simple option on how to make kitchen cabinets from matchboxes. The lower part is formed from 9 elements according to the principle of a chest of drawers. The function of handles can be performed by staples from a stapler. For wall cabinets 3, the box is fixed to a cardboard wall and cut in the middle to make doors. Of course, it is better to cover the boxes with paper or paint them in advance. Naturally, the surroundings play a big role:
- Complete the doll kitchen with mini lamps.
- Decorate the window with a lace curtain.
- You can make a sink out of foil.
Doll furniture will sparkle with new colors. You can complement your kitchen set with a table and chairs made of cardboard.
We will not describe complex options for making doll furniture for the kitchen out of plywood. Let’s just imagine the result of the master’s painstaking work:
We use matchboxes
How to make garden furniture with your own hands?
This method can be compared to children's blocks. A different number of matchboxes will allow you to make a stylish chest of drawers or a large three-leaf wardrobe.
Expert opinion Tatyana Leontyeva Professional housewife
Talk to your fashionista and find out what size doll storage to make. If it is a small bedside table, then 2-3 matchboxes should be placed one above the other. For a large chest of drawers with a lot of compartments, the boxes will be glued not only to each other, but also to the sides.
So let's get started:
- Glue the boxes together.
- Wrap the resulting chest of drawers with thick paper.
- Trim it and varnish the top.
- Decorate the retractable elements with paper, paint or fabric.
- Make handles from screws.
Then you can decorate and decorate the resulting chest of drawers at your own discretion.
Matchboxes - a convenient template for creativity
Folding furniture
Spacious sofa
Don't know how to make an origami sofa from paper or cardboard? This means our step-by-step instructions are exactly what you need.
Important! If you need to make durable furniture on which the doll can sit and lie without damaging the product, you should take cardboard for creativity, and not origami paper.
To complete the craft, you need to take an A4 sheet of cardboard and make a square out of it. To do this, simply bend one of the edges, align it with the longer side and cut off the excess edge.
We follow the diagram provided below. From it you can see that creating a sofa from cardboard is an extremely simple and very exciting activity.
Elegant table
An origami table is one of the simplest crafts. To complete this you will need extremely thin and fairly durable cardboard and a hot glue gun. Below are the detailed instructions:
- We cut cardboard 10x12 and 6x8.
- Place a small piece of cardboard in the center and trace it with a pencil, using a ruler. We complete the lines and cut off the corners.
- We connect the free edges so that a small sheet of cardboard remains inside, and fix everything with hot glue.
- Let's make the legs. To do this, by twisting a rectangular sheet of cardboard around a pencil, we form 4 identical tubes.
- Cut 4 narrow strips of thick, corrugated cardboard. Parameters – 1X5 and 1X7. Glue it to the tabletop. For tight fixation we also use a hot gun.
- With its help, we fix the legs, then, using small pieces of the same cardboard, we strengthen them.
The table can be placed on its legs only after the glue has completely dried. If you wish, you can make a larger table by following the instructions below.
Doll chair
We will make a chair from origami paper using the same technique as the table. The main principle is to wrap a base of thick thick cardboard with thinner one; you can also use paper.
First we cut out the lower base of the furniture, then the back. An origami chair will have legs made using the same technique as the elements for the table, only in smaller sizes. All elements are fixed with a glue gun.
Origami folding beds
An origami bed is perhaps the most important element of furniture in a dollhouse. We make it from paper or cardboard of your choice. We take into account the size and weight of the doll. Next, we follow the diagram below, which completely replaces the video master class on creating paper crafts:
In the photo of the finished product you can see that the origami bed for the doll is very similar to the real one.
You can use paper to make any furniture for small dolls and larger models of Barbie size.
Tags
from paper.from paper with yoursfrom paper.from paper with yoursfrom paper with yoursfrom paper with yoursfrom paper from paper with yoursfrom paper with yoursfrom paper papers. Origami paper bed. Origami bed Origami mouse Origami paper origami Origami bed Origami beds Origami bed Origami beds origami patterns How to make a bed How to make a bed made TRANSPARENT How to make a snowflake How to make a snowflake How to make a mouse How to make a snowflake How to make a snowflake How to make a snowflake How to make a snowflake furniture items and Paper furniture also Furniture Origami furniture for Origami furniture for Furniture from
bedspaperdollsofaviewedgesdetailedorigami-likecreationwilldiagramsbased
Drawings and diagrams
What is the difference between making a cabinet from cardboard boxes?
Simplicity is the main feature of a DIY box cabinet. How to make a cardboard cabinet with your own hands? An empty tea bag, a sheet of colored paper and a little imagination - the chest of drawers is ready. Matchboxes work well as drawers.
And beads or pieces of ribbon will make excellent decorative handles. The best part about all this is that the child is quite capable of completing the task on his own: parental help will only be needed at the stage of assembling everything necessary.
Decor
If a homemade bed is made into an existing dollhouse, then it is better to decorate it in accordance with the general style; the same principles apply here as in a real room. Bed decor includes both the design of the product itself and everything necessary for it - pillows, blankets, bed linen.
The finished bed is decorated with a wide variety of materials: glued or sewn beads, bows from unnecessary hairpins, ribbons, braid, beads, rhinestones, lace. Applications in the shape of flowers look good on products made of cardboard or paper, and for wooden products, burning, engraving, and sawing are suitable. Any of the models can be coated with regular varnish or nail polish, paints (gouache, acrylic).
Making bedding is not at all difficult - you will need a small amount of fabric (you can use scraps) and a little filling. Foam rubber is suitable for a mattress, and synthetic winterizer or cotton wool is suitable for pillows. Any thick rag can be used as a blanket.
All these elements can be knitted or crocheted - for those who love and know how to knit.
The model with a canopy and lace trim looks charming - this bed resembles the bed of a fairy-tale princess. Bedside tables made from matchboxes or soft ottomans can be a great addition.
Which decor option to choose depends only on the girl’s imagination and desires. The main thing is not to forget that children require realism - the manufactured model should be as similar as possible to a real bed.
