When the phrase “wooden box” is mentioned, many people immediately imagine a standard fruit box. Although in fact boxes can be very different and used for all sorts of purposes.
This is a very useful product that can be used in everyday life, not only somewhere in the country, but also just in the house. Let's figure out how to make a wooden box with your own hands, because only a homemade thing can be not only unique and as convenient as possible, but also completely safe.
DIY wooden box
general information
A box is a type of container or an interior item, which is a product that has a cubic or parallelepiped shape. It can be made of various materials, including plastic, cardboard, metal, but is mainly made according to tradition from wood or its derivatives. Depending on the design, the box can have solid walls and bottom or slatted surfaces, and it can also have a lid and be either simple or decorative.
On a note! The category of drawers also includes drawers that complement furniture and make it more functional and convenient to use. Such boxes usually do not have a top lid, but their bottom is equipped with special wheels that ride on small rails fixed inside the cabinet or cabinet in the place where the box itself should be located. This makes it easier to use.
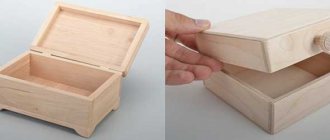
Wooden box
The history of the box itself is unknown. From time immemorial, people have used various containers for storing all kinds of household items, transporting and packaging goods, etc. Historians believe that, most likely, the first boxes appeared during the period when trade relations began to develop and were invented precisely with the aim of simplifying the transportation of goods and products , maintaining it in proper quality until it reaches the point of sale.
Wooden vegetable boxes
Nowadays, a wooden box is still used for transporting and storing goods, but at the same time it is also used in everyday life, and even in gardening. It is actively used for harvesting and growing seedlings. By the way, at one time standards even appeared for boxes for potatoes, storage of apples, etc.
At the same time, the boxes settled firmly in the house. They can be used not only as furniture elements, but also as individual products. For example, there are drawers for storing tools, small parts, sewing accessories, etc.
DIY wooden box
Serious competitors to a regular wooden box are products and containers made of veneer, plastic, and cardboard. But none of them can fully replace simple, but reliable and high-quality boxes, and therefore they continue to be actively produced and made with their own hands.
For seedlings
The size and shape of wooden planting boxes will depend on how you grow your flowers. Bulky items take up a lot of space and spoil the overall interior of the apartment. Therefore, if you plan to grow cucumbers and tomatoes on a windowsill, it is better to limit yourself to small wooden plywood boxes.
A garden plot offers more opportunities for the DIYer. So, a large and functional box for seedlings can be made from an old pallet. In fact, a pallet initially represents a finished product. The gardener can only make the bottom and walls from pieces of multi-layer plywood. To do this you will need decorative nails and a hammer. After this, the internal space is filled with earth, the seeds are sown between the top rows of boards.
Properties of a wooden box
Why, despite the emergence of cheaper and simpler competitors, does an ordinary wooden box not lose its popularity? It's simple - the answer to this question lies in the unique properties and features of such containers.
Table. Comparison of box characteristics.
| Drawer type | Advantages and disadvantages |
| Veneer | Such a box is made from planks that have virtually no processing. It is quite fragile compared to wood, but costs less. Suitable for storing and transporting fruits and vegetables, as well as other products. Afraid of moisture. |
| Made of plastic | A fairly convenient type of box that is not at all afraid of moisture. Depending on the quality of the plastic, it can be either very durable or quite fragile. But this type of box is still easier to damage than a regular wooden one. It doesn’t cost much, but it’s more expensive than a wooden product. Suitable for storing and transporting not only dry, but also wet products. |
| Made of metal | A species that is quite rare. Metal boxes have not become popular due to their tendency to rust, as well as their heaviness and high price. It is not easy to make a metal box at home without special equipment. |
| Made of wood | The most optimal type of box. It is quite durable, can have different designs, and is suitable for storing all kinds of products. Looks much better than a regular veneer box. When used as a decorative finish, it can be used at home; it is durable if the wood has been treated with protective compounds. |
Wooden box
On a note! Ordinary wooden boxes of simple design are actively used when decorating loft-style rooms. They are an excellent attribute of this design solution.
The production of wooden boxes in production occurs in accordance with GOST 20767-75 . And for them, a wooden board of a certain quality, 1 cm thick, is used. Such boxes are thin-walled, but durable. They are quite light and easy to use.
Tool cabinets, drawers, cabinets
Retractable design
Often in workshops you can see various cabinets and wall shelves. For a detailed layout of things, their surface is not enough.
Note!
- How to make a stand: make simple and beautiful phone stands with your own hands (105 photos + video)
How to make a mirror - a detailed master class on making a mirror with your own hands (125 photos + video)
How to make a table - choice of materials, design features and options for equipping the table (115 photos)
Then the question arises before a person: how to make a drawer? To do this, perform the following steps:
- the future design is calculated, a drawing is drawn taking into account the exact dimensions;
- a box is made according to the sketch;
- Guides are attached to the inner walls of the niche on both sides.
This way the box fits into the niche and does not take up extra space. If necessary, it can be removed from the niche. For ease of use, a handle and stops are attached to the drawer structure.
Boxes in the house
As a rule, boxes for transporting and storing products are not well processed - they are hardly sanded and, of course, are not varnished. But for use at home, it is recommended to treat them and cover them not only with protective compounds, but also with paints and varnishes. Then the box will look beautiful, and the person using it will not risk getting a splinter in his finger.
Simple tool box
Typically, the house rarely uses boxes made directly for transporting cargo or storing the same fruit. More often than not, those who need a simple but nice box have to contact carpentry workshops and order a specific product from them according to their size and wishes. So don’t confuse industrial and carpentry boxes.
Boxes in the house, as already mentioned, can be used for various purposes. This includes storing utensils in the kitchen, storing small items in the living room, storing toys, clothes, shoes, cosmetics, household chemicals, etc. The main thing is that this type of container fits organically into the interior and does not cause confusion.
Wooden box for storing various household items
The easiest way, of course, is to get hold of boxes in a store or warehouse, sand them and varnish them to use at home. But you can make such a container yourself, since this is not a difficult task at all, be it a box for decorating a room, storing things, or growing seedlings.
Possible mistakes
In fact, even a teenager can build a bed from boards. There is nothing complicated about a wooden structure. Of the common mistakes, one can only highlight laziness in treating wood with protective impregnations. They will not completely save the box from rotting, but will extend its service life.
For a warm bed, it is important to follow a layer-by-layer filling of organic matter.
Errors occur when arranging a warm bed. Here it is important to properly lay the organic matter in layers and start the process of overheating. First, you need to study the entire technology of growing crops on such ridges, otherwise they may burn from the heat.
Wood processing and care
The process is aimed at maximizing the life of the wooden structure. The fence needs to be protected from two important enemies: moisture and wood-boring insects.
Impregnations are used to protect wood
The tree is protected from insects by an antiseptic. The compositions are available for free sale. Impregnation "Senezh" has proven itself well. To protect against moisture, a wooden structure can simply be painted.
Other protective compositions include a solution of three parts sunflower oil and one part propolis. The tree is opened with melted beeswax, a solution of lime or copper sulfate.
Important! If over time the side of the bed becomes rotten, the area is replaced with new boards.
Why exactly a tree?
Wood is the very material that is most often used to create products for the home. The reasons why this happens are simple. First of all, it is important to say that wood is an environmentally friendly material that does not pose a danger to human health . It does not emit an unpleasant odor and does not release any toxic substances into the air, so you do not have to worry about allergies or health problems.
Wood is easy to work with
Wood is also one of those materials that you can easily work with at home. You don’t have to use complex specialized equipment; it’s enough to have a sawing tool, drill and screwdriver or screwdriver on hand. Also, grinding and other processing of the material may require a minimum of cost and effort.
The wood is durable and beautiful and, varnished, can maintain its appearance for many years. Only uncoated material can darken over time and lose its former natural beauty. Fresh wood looks very nice.
Why wood is the best material for making boxes
It is not surprising that wood has been and remains one of the most popular types of materials. Although now in almost any specialized store you can buy its derivatives - plywood, panels, furniture board, etc. But none of these options, in any case, will be better than ordinary natural fresh board.
Tool used
Depending on the selected material from which the box will be made, the appropriate tool is selected. This should include:
- jigsaw and jointer;
- grinder and welding machine;
- hand tool.
Naturally, when making any design you cannot do without a measuring tape and a pencil.
We looked at how to make a box yourself from various materials. This design is distinguished by its simplicity and does not require special knowledge or experience from a person.
To make it, it will be enough to show attention and have the necessary skills in handling hand tools.
Homemade boxes are distinguished by their durability and ease of use. Their production does not require significant financial investments, which adds to their popularity.
Making boxes: what do you need?
So, to make absolutely any wooden box (regardless of the purpose of its use), you will need a number of tools and materials. The list is small, but without these things the matter will not move forward. You will need:
- sawing tool for cutting wooden boards and blocks into strips of the required length. This could be a jigsaw or a wood saw;
- a device for sanding wooden surfaces - a grinding machine, sandpaper with a special block, etc.;
- hammer (in case nails will be used);
- screws, nails, possibly metal corners;
- screwdriver (if self-tapping screws will be used as fasteners);
- varnish and brush or paint - to cover the surface of the wood or give it a certain color;
Preparing the necessary tools
On a note! Before applying paint, it is best to pre-prime the wood. This will reduce the amount of paint used and also provide it with a more saturated color.
- pencil, square, ruler, tape measure - tools that will help make the necessary markings.
Important! Before you start creating a box, you must draw its diagram or download a ready-made one from the Internet. This will allow you to make a smooth and neat product that has the necessary parameters.
Wooden box drawing
What materials and tools will be needed for manufacturing?
To make a wooden flower box with your own hands, you need to prepare the following basic tools:
- jigsaw or saw;
- grinding machine;
- forceps;
- tape measure with a square;
- plane;
- screwdriver;
- hammer.
The design of the future box is selected in accordance with the equipment present: if all manipulations have to be performed manually, it is better to give preference to the simplest form. The presence of power tools allows, in turn, to realize any design ideas.
As base materials you can use:
- slats and boards with a thickness of at least 1 cm;
- OSB scraps;
- plywood sheets, including those that can be reused.
Subsequent surface treatment will be carried out using an antiseptic, a variety of paints and varnishes, and stains. Nails, waterproof glue, and self-tapping screws are suitable for connecting parts.
Thin holes are drilled along the edges of the workpieces
Making a plant box
Step 1. First of all, you need to decide on the dimensions of the box being constructed. It is important to choose the place where it will stand. Based on this, you should sketch out a drawing of the box indicating the dimensional parameters and calculate how much material is required.
First you need to decide on the sizes
Step 2. Next, you need to go to the store and purchase everything you need. First of all, you need to buy the required amount of boards.
Buy boards in the required quantity
Step 3. Now you need to apply the appropriate markings to the board - mark the sides and ends of the box on it. It is better to take measurements with a tape measure, but to get even marks it is better to use a square.
Marking
Step 4. Next you need to assemble the box frame and drill holes in its sides. It is better to make several holes on each side.
Assembling the drawer box
Step 5. The boards on the sides of the box need to be connected together using self-tapping screws. You can also use nails, but connections with self-tapping screws are much stronger and of better quality.
Self-tapping screws are used for connection
Step 6. Next, you need to determine the size of the bottom of the box and cut the bottom itself from the board. It needs to be secured by drilling wooden holes and screwing screws along the bottom border of the box around the entire perimeter.
Attaching the drawer bottom
Step 7: It is important to be sure to drill a few drainage holes in the bottom of the plant box. They will ensure the drainage of excess water that will enter the soil during irrigation or rain.
Drainage holes are drilled
Step 8. It is important to sand all surfaces of the drawer so that they are smooth, pleasant to the touch and safe.
Sanding the drawer
Step 9. Finally, the box can be painted, but it is better to coat it with varnish. This will make the box beautiful and additionally protect it from moisture.
Finished product painting
Video - Making a simple box
Gift bag with bow
What do you need
- Paper;
- glue;
- ribbon.
How to do
Fold the piece of paper in half crosswise so that a mark appears in the top center for clarity. Fold both sides of the sheet to this mark, slightly overlapping one another, and glue them together.
Fold and glue the bottom of the bag as shown in the video. Fold the long sides over so that the bottom touches the seam at the bottom of the bag. Open the bag and fold it again along the side lines so that it is straighter and more beautiful.
Place the gift inside and fold the top of the package into an accordion shape. Press it in the middle and straighten the edges of the resulting bow. Tie the bag with a ribbon.
If it is more convenient for you to make boxes using ready-made templates, use the website templatemaker.nl. There are many boxes of different shapes collected there. Moreover, their parameters can be calculated automatically. Promo You will find even more interesting ideas for New Year's gifts on the marketplace of the Multibonus loyalty program for VTB Bank clients. There are more than 240 thousand products for every taste: books, gadgets, household appliances, certificates from popular stores and much more. Connect the loyalty program to your bank card in VTB Online and select the appropriate option for accumulating rewards. Now “Multibonus” is holding a holiday sale with discounts of up to 50% on products of popular brands, and for purchases from program partners in the “Accumulate” section you can get cashback of up to 30%. If there are not enough bonus rewards, just pay extra for the order in rubles. Find gifts for loved ones
Slat box
Step 1. First of all, you need to cut the blanks to create a box. You will need bars of the selected length, slats 1 cm thick. The bars need to be cut to length so that their profile is triangular.
Blanks are cut
The process of creating blanks
The block has a triangular cross-section
Step 2. Next you need to take the bars, lay them on top of each other (2 bars on each side) and start making walls. You need to apply wood glue to the flat surface of the block and arrange the slats so that they rest on the flat side surface of the bars. The slats are placed at a certain distance from each other to create gaps.
Applying glue
The slats are parallel
Advice! If you plan to make several boxes of the same size, then it is convenient to use a wooden template to create the walls.
Step 3. Then the slats additionally need to be secured to the corner bars using nails or self-tapping screws. In this way, two side walls of the box are made.
Additional rail fastening
Finished side wall
Step 4. Next, the prepared walls need to be placed in a special template (or simply held correctly) and, using the same principle as in steps 2 and 3, attach the next slats to the sides of the free sides of the bars. Thus, it will be possible to create two other side walls.
The next slats are attached
All side walls are ready
Step 5. Then the bottom is made. You need to lay two slats (with a length equal to the length of the box) parallel to each other, and fix other slats on them, but without gaps, so that the bottom is solid.
Making the bottom of the box
The bottom turns out to be solid
Step 6. All that remains is to secure the bottom to the underside of the box, and it is ready. If necessary, all structural parts can be sanded before assembling the box. It is better to varnish or paint the product after assembly.
The bottom of the box is attached
This is what the finished box looks like
Video – Box on spikes
Folding box
An original and practical case that folds and unfolds as needed. This is a convenient option for needlewomen who find it difficult to organize a workplace during the creative process.
The photo shows bright folding storage cases measuring 15x15x20 cm.
What you will need:
- Cotton fabric size 50x45 cm.
- Adhesive interlining 50x45 cm.
- Chalk or water-soluble marker.
- Sewing machine, scissors or roller cutter.
Step-by-step instruction:
- Iron the fabric onto the adhesive interlining and carefully cut it:
- Draw 4 lines at a distance of 15 cm from each side and stitch them:
- We cut horizontal lines from two edges, as shown in the photo:
- We retreat 1.5 cm from the edges and mark the holes on four sides of the rectangle with a marker or chalk:
- We draw lines for the valve:
- And we cut them:
- The next step is to cut out the valves:
- We process the edges in any way:
- We assemble the box by threading the flaps through the side slits:
- After creating your first folding organizer with your own hands, the following products will be much easier to make:


