Tools and materials for restoration
- Various washes, paints and varnishes
- Sandpaper of different grits
- Spatulas
- Set of brushes and rollers
- Wood putty
- Furniture wax and sealant
- Furniture edge
- Electric tools – jigsaw, sander, screwdriver, hair dryer
If you do not have the necessary electrical tools, you can rent them from friends or a workshop, since buying everything you need will not be cheap.
Decorating an old buffet
Self-adhesive film will help you freshly transform an old kitchen sideboard. If you look at film with different patterns, but the same color scheme, then the buffet will definitely become the pride of the hostess and the subject of close attention of the guests. To remodel, you will need sandpaper, film, paint, and primer. The work process step by step:
- The old decorative layer is removed from the sideboard using sandpaper.
- The dust is wiped off with a damp cloth, and the cabinet is treated with a primer.
- After the surfaces have dried, the furniture is coated with paint two or three times.
- As soon as the paint dries, the furniture facades are covered with self-adhesive.
When decorating a buffet, you can use and combine various techniques: decoupage is glued to the furniture and the craquelure technique is used. Or the facades are artificially aged and contours of floral patterns are applied to them using a stencil.
Giving your furniture a different look is a great option to update your decor without replacing items. Thanks to the redesign of products, you can simply refresh the interior or radically change its style. In the case of the latter option, it would also be logical to think about changing the finishing of surfaces (wallpaper, tiles), textiles. Numerous methods of alteration allow you to show your imagination and give the products a unique look.
Restoration: methods
To update furniture, you need to get rid of various defects, cracks, abrasions, and so on.
Detailed photos of furniture restoration will help you see how this or that renovation work is carried out. Small cracks are covered with mastic, scratches on the surface are removed using iodine solution and polishing, deep cracks are covered with putty.
If you are working with wood, you need to use the same species to update the finish. The simplest method of restoration is to apply stickers; various applications are also used.
Minor repairs
If the item does not shine and its surface is clearly not polished, then it does not need to be refinished - just follow the recommendations for caring for wooden furniture.
New life for the hallway table
To do this, you need to bring the thing into the light and evaluate which of the following defects it has.
Loss of gloss
The first possibility is that the thing has lost its luster . This happens to a tree simply from time to time, from the fact that it stands and gathers dust, from the fact that it is touched with hands. If the surface seems worn and has lost its original color, you need to:
- buy a wood care product with orange oil at any hardware store;
- take a clean sponge, dip it in water and heat it in the microwave for thirty seconds - or treat it with steam, the main thing is that it is almost hot to the touch;
- Spray the product onto the surface using a spray bottle and wipe it with a hot sponge.
Classic is always in fashion
Your hands should be gloved when working, and the sponge, when it starts to cool, needs to be warmed up again.
If the thing is painted - for example, a wooden tabletop - you need to use a different recipe:
- Dilute a teaspoon of baking soda in a glass of water and thoroughly wipe the countertop;
- wait until it dries and wipe with a dry soft cloth to remove plaque;
- Pour two teaspoons of ammonia into a liter of warm water and wipe the countertop again with this composition.
Restored bedside floor lamp
If the wood is not simple and not painted, but varnished, a third approach is needed:
- pour a tablespoon of any dishwashing detergent per liter of warm water and carefully wipe the surface to degrease it;
- wipe a second time, but with a cloth soaked in plain water;
- wait until it dries and wipe with a small amount of vegetable oil.
Instead of vegetable oil, you can use a mixture of linseed oil, turpentine and vinegar. Or butter and beer in equal proportions. Or beer, which was previously boiled with a piece of wax of the desired color and cooled to a warm state.
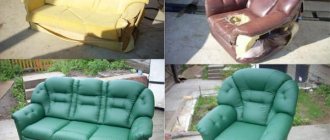
You can reupholster upholstered furniture yourself
As a result, the item will become bright, as if renewed. Often these simple recipes are enough to make the item look good and no further restoration is required.
Stains and dirt
The second is the presence of stains and dirt. You can approach the question in different ways:
- Minor abrasions and old faded stains can be wiped off with a banana peel.
- Simple stains for unknown reasons, which cannot be removed with a banana, need to be removed differently. First clean the surface with water and detergent, and then wipe with alcohol - not completely, but only the affected areas. If the color is not restored, you can paint them over with a furniture marker of a suitable color, or you can try to remember what they are from and bring them together in other ways.
Minor scuffs and faded stains can be wiped off with a banana peel.
- Grease and fumes on kitchen cabinets must first be rubbed with talcum powder so that they set, and then the resulting dirty powder must be wiped off with a rag. Then dilute two teaspoons of ammonia with a liter of water and wipe.
- Whitewash and emulsion paint are washed off with a cloth, which is dipped in a mixture of wine vinegar and olive oil - three drops of the second per glass of the first.
The main thing is that the cloth is barely damp and does not drip the mixture everywhere.
- White water stains that remain when you place a wet glass on wooden furniture or spill something are sprinkled with flour. Then moisten a cloth with oil - corn, olive, palm or regular sunflower - and wipe the surface. Then they wipe it again with velvet.
Grease and dirt on kitchen cabinets should be rubbed with talcum powder, then shaken off with a cloth
- White hot spots that remain if you place a hot frying pan or pan on wooden furniture are wiped with a heated mixture of paraffin and wax of the desired shade in a one-to-one ratio. Then cover with a paper napkin folded in several layers and iron it. The result is polished with felt or other rough cloth.
If the white spots are weak, not swollen, and do not reach deep, they are removed differently. Cover with regular table salt, add a couple of drops of oil and leave for three hours. Then the mixture is removed and rubbed with felt until the stain completely disappears.
Without stains, the furniture suddenly begins to look much better - beautiful and updated.
Beautiful, updated furniture
Mechanical damage
The third is the presence of cracks, chips and other mechanical damage. There are also numerous recipes here:
- If the furniture is varnished and small cracks have appeared on it over time, a mixture of ethyl alcohol and burdock oil in a one-to-one ratio will help. It must be applied with a white cloth, preferably flannel. Rub with felt.
- If lacquered furniture has a deep scratch from an unsuccessful mechanical impact, you can paint it over with a regular furniture marker or iodine - to achieve the desired shade, it can be diluted with water.
- If there is a scratch on lacquered furniture that has already turned white, you can use shoe polish of a suitable color or a mixture of mastic and wax in a ratio of four to three. The result must be polished.
Stylish leather sofa
- If there is a chip on the furniture, you will have to use putty, preferably a special furniture putty. It is better to buy a light tone and achieve the desired color with a color scheme. Then apply it to the chip, spread it so that it is completely covered, and the putty spreads evenly over the surface. Wait until it dries and sand with fine-grain sandpaper.
- If the furniture is swollen from moisture - not completely, but only in one place - it is covered with salt and a couple of drops of vegetable oil. Salt will absorb water, oil will restore flexibility to the tree. The result, again, should be wiped off with a cloth.
All these simple manipulations are often quite enough for the furniture to start looking good and no further restoration is needed.
But if you want the item to look not just updated, but completely new, you can process it additionally.
Modern style office
Step-by-step instruction
Before updating furniture, it is necessary to carefully examine it and determine the nature of the defects. To get rid of polish and coating wear, you need to do the following:
- The coating must be thoroughly cleaned of dirt.
- A camouflage mixture is applied to the cracks; after it dries, a transparent varnish must be applied.
- When the mastic has dried, the surface is treated with polish.
If the furniture has traces of severe abrasions, it is best to completely sand it, and only then putty and paint.
Removing old stains
Denatured alcohol will help get rid of old stains.
The technological process looks like this:
- the treatment area must be washed using household dishwashing detergent,
- After drying, rub the stain with a cotton swab soaked in alcohol.
After the stains disappear, you need to polish the surface using wax.
Chair restoration
One of the most common problems is a broken leg. The new leg should be the same type of wood as the chair.
- — The broken leg is removed;
- — A new leg is made according to measurements and blanks;
- — The new leg is sanded, then painted and polished;
- — When the paint dries, the new leg is attached to the chair.
The advantages of furniture after restoration with your own hands are obvious; these are not only money saved, but also the opportunity to learn how to give furniture a second life.
The benefits of upgrading your furniture yourself
Old furniture is an opportunity to create a unique piece of furniture. Knowing how to work with your hands saves a lot of money and helps develop creativity.
Advantages of restoration:
- You can use the remains of various materials: leather, fabric, wallpaper, etc.
- If done well, you will get a new model with a unique appearance.
- Learn interesting methods of restoration and broaden your horizons.
As a person masters the techniques, experience accumulates. Then you can proceed to more complex processes.
How to repaint furniture?
You need to choose the right paint. If the furniture is not expensive, you can use any paint, enamel, oil, acrylic, as well as aerosol cans.
Metal furniture must be painted with paint with an anti-corrosion composition, aluminum products - with special paint.
Spray guns, brushes, and rollers are used to paint furniture. Before painting, it is necessary to sand the surface and repair broken parts.
Before painting, you need to cover up chips and cracks with mastic, then saturate it with a primer composition. After this, it is treated with putty (cracks and chips), degreased with alcohol, and then primed and painted again.
Furniture should be painted in at least two layers. After this, it must dry for seven days.
We restore an old cabinet: repainting, aging, decoupage
Before you start working, you need to figure out (or better yet, sketch in color) what the finished product will look like. Having considered this point, you can begin purchasing the necessary materials. We will need:
- synthetic paint brushes of medium hardness (one for paint and one for varnish - at least two centimeters wide);
- wood paint;
- sandpaper (harder and finer);
- water-based varnish for wood (matte or glossy - at your discretion);
- acrylic primer for wood;
- masking tape;
- paraffin candle;
- napkins for decoupage or drawings printed on thin paper;
- PVA glue;
- spray bottle with water.
Step-by-step instruction
Step 1. First of all, you need to remove all the fittings, and you need to start work by cleaning the surface of the cabinet from old varnish. To make the work go faster, it is better to use a sander, but if you don’t have one, you can sand the cabinet manually.
To treat the surface of the wardrobe, a small round nozzle is enough
Step 2. The entire surface of the cabinet that is planned to be painted must be coated with a primer. You need to apply the composition with a brush in one layer, and then dry for the time recommended by the manufacturer (usually the primer dries for at least three hours).
The primer is usually colorless
Step 3. Cover with masking tape the parts that we do not plan to paint. We paint the remaining elements with a brush in one layer. Leave to dry, then, if necessary, cover the surface with a second layer of paint.
The first layer can be applied with white paint, the next layer is colored.
Step 4. Apply paraffin. We need to use a paraffin candle to treat those areas that we plan to make aged (for example, the side edges). This technique will allow you to remove part of the paint layer and expose the previous one. This achieves the “scuffed” effect that is relevant for old furniture.
Paraffin should be applied in a fairly dense layer.
Step 5 . Next, the cabinet needs to be covered with another layer of paint - this time it should be slightly lighter than in the previous layer (you can add white paint and stir). Doors and protruding elements can be painted in a different shade or color if desired, after sealing the joint lines with masking tape.
Strips of tape will allow you to draw even boundaries between shades
Step 6. We decorate individual elements (in our case, drawers and door ends) using the decoupage technique. To do this, apply a napkin with a pattern to the surface of the cabinet, moisten it with water from a spray bottle, then smooth it with a brush. Afterwards, cover the napkin with a layer of PVA glue and wait for it to dry.
PVA glue dries in about 20-25 minutes
Step 7. We varnish the finished cabinet in two layers (each layer must be dried according to the instructions).
Result of work
Video - Decoupage of furniture made of laminated chipboard
Furniture varnishing
The most important thing is that the process of varnishing furniture should be carried out in a room with good ventilation, away from open fire. After this, you need to prepare the furniture; to do this, you need to remove the old varnish coating without missing a single centimeter.
When the furniture is cleared of varnish, you need to fill the cracks and sand the surface of the wood. Proper restoration of wooden furniture involves performing consistent actions that lead to a significant result.
Before applying varnish, the surface must be primed. The varnish is applied in a thin layer, the second layer is applied after the first has completely dried.
It is necessary to spray the varnish at a distance of thirty centimeters, the movements should be wide and the direction horizontal. If drips appear, the distance between the can and the furniture needs to be increased. The first layer of dried varnish should be cleaned with fine sandpaper, then wipe the surface and apply a second layer.
Preparation as the basis of work
Any business requires careful preparation; this is necessary for a high-quality result. This also applies to furniture restoration. Before finishing, you always need to prepare the surface.
Since the body is often made of wood, the following steps are carried out during preparation:
- Carefully inspect the surface to identify various large and small defects.
- Warmly wash away contaminants using detergents. Dry the surface.
- They dismantle the furniture. This greatly facilitates the further process and preserves intact the elements that are not subject to alteration.
- If the part that needs to be corrected does not come off, then everything else is covered with film and sealed with tape. After this, the remaining part can be safely restored without fear of ruining the rest.
- Restoring upholstered furniture requires a more careful approach. The upholstery is removed very carefully. A pattern is then made from it using new material. The packing is also removed and replaced.
Restoration of veneer furniture
It is quite difficult to restore veneer furniture, but it is possible even at home. The easiest way to get rid of swollen veneer is to use a syringe with PVA glue, inject it into the bubble and smooth the surface. To do this, place a soft cloth and a heavy weight; you can iron this area with a warm iron.
To remove scratches and damage, special crayons are used that match the color of the furniture. After this, the veneer can be varnished if necessary. This method can be used to restore Soviet furniture, depending on the damage.
Veneering
The name of this technology comes from the main material – veneer. These are thin wood sheets from different species. From them, according to preliminary measurements, elements are cut out.
Using simple PVA office glue, they are glued to a surface that has been prepared and primed. A hot iron is used to smooth the surface.
Fast furniture restoration
These restoration options are suitable for those who do not want to spend a lot of time updating. Restoring chipboard furniture with your own hands, including wooden furniture, is quickly possible in the following ways:
- Quick painting (putty, primer and painting).
- Coating with white varnish creates the effect of bleached oak.
- Pasting using decoupage technique.
- Application of patterns and ornaments.
How to remove scratches
No one is immune from minor defects. To restore the furniture to its original appearance, there are several proven ways to disguise scratches:
- special pencils;
- wax;
- stain;
- mastic;
- rub with nut;
- tea and iodine.
You will need very little personal time and skill.
Note!
- Do-it-yourself wardrobe: a review of ways and methods on how to build a stylish and original wardrobe (video and 145 photos)
DIY ottoman: how to make it at home. The best ideas, master classes. Photo + video review of beautiful ottomans
DIY stool: master class on how to make it from wood. Instructions for preparation, assembly and beating (video + photo)
Furniture decoration
Decoration is the final stage after restoration. To make old furniture sparkle with new colors, the following methods are used:
- Dyeing a different color
- Application of drawings and ornaments
- Artificial aging
- Scorches
- Decoupage and appliqués
- Pasting with tinted film
The main weapon when updating old furniture is creative thinking and a set of necessary tools. Even an old, cracked cabinet can be turned into a stylish piece of furniture using one of the proposed methods.
Craquelure
Here there is a combination of two methods at once: decoupage and varnishing. Furniture is thus finished in an antique style. To do this, apply a varnish layer and leave it until completely dry, then apply craquelure varnish on top.
After drying, small cracks form, very similar to antique ones. At the last stage they can be gilded with gold paint.
Photos of DIY furniture restoration
Removing chips from wood
The process is a little more complicated, but also does not require special skill.
- Melt furniture wax, apply to the surface, level, sand and varnish.
- Disguise with decorative corners and protective profile.
- Glue the furniture edge.
All necessary materials are sold at a hardware or hardware store.
Decoupage
This method has recently become popular due to its simplicity. Children can be involved in the process.
The point is that ornaments cut from fabric or paper are glued onto a previously cleaned surface. Decoupage goes well with dyeing and painting.
Restore varnished surface
A master class with a description of furniture restoration is impossible without a description of work with damage to the paintwork.
- Determine the type of varnish applied. Apply an alkaline solution to an inconspicuous area. If the varnish has dissolved, then it is an alcohol-based composition. If not, then it is an alkyd substance.
- Buy a suitable solvent and remove the coating.
- Apply new varnish in 2-3 layers.
Alternatively, the old coating can be removed with sandpaper.


