Home stores offer a huge range of different textile items for the kitchen: towels, aprons, potholders, napkins, seat cushions. All these little things are practical, decorate the interior, and can add comfort and charm to even a faceless room.
This is not to say that finished products are very expensive, but why not save on something that you can do yourself and without any additional costs? It is best to start sewing experiments with basic things.
For example, first, study the question of how to sew oven mitts for the kitchen, and then begin to implement it. The simplest ones in shape - round or square - do not require any special sewing skills, or even a sewing machine!
Curtain decoration
After leafing through a lot of magazines with beautiful interiors, there is a desire to do something original and always with your own hands.
All you need to make your dream come true are the remains of beautiful fabric, they can remain after sewing curtains and tulles, openwork or satin ribbons, ribbons, threads and much more.
You can make a varied collection of potholders for the same curtains and curtains. In this case, you can safely use accessories, beads, seed beads and other small accessories.
DIY ideas for interesting potholders for March 8th, photo
Potholders are made not only for their own use. They can be given to mothers, girlfriends, sisters, colleagues, mothers-in-law, etc. There can also be an unlimited number of reasons: New Year, Easter or just a good mood. But such gifts will be most appropriate on March 8th.
Fabric potholder
Two strips (the craftswoman chooses the sizes herself) are sewn together; it is better to lay thick fabric or adhesive interlining between them. In this case, you can use different colors, decorative finishing of seams or decoration.
DIY potholder towel, photo
An oven mitt can perform more than one function, especially if it is combined with a towel. Agree that you should always have both at hand in the kitchen. We have prepared for you a selection of photographs demonstrating what this might look like.
In the kitchen you can have not one, but several potholders and towels at once.
The towel and potholder can be combined or contrast with each other in color.
An experienced needlewoman can make a set of kitchen accessories made in the same style, including a potholder and towel.
In order to diversify the atmosphere in the kitchen, you don’t need much - sew elegant and beautiful accessories. Take things you haven't worn for a long time, come up with a design and go for it! The reward for your efforts will be an updated look for the kitchen.
Kitchen mitts
First of all, when choosing a material for making potholders, you need to take into account the properties of the fabric and the thickness of the potholder. The future product will often come into contact with very hot surfaces.
DIY dog grip, photo
Another interesting type of potholders is made in the shape of a dog's face. In order to sew such a potholder, more time and skill is required. But how cute these kitchen accessories can turn out!
Variety of shapes
The mitten is the most popular and versatile option. The pattern is created by tracing the hand on paper.
Note!
Ideas for LD (a girl’s personal diary): step-by-step instructions for making it yourself, photo reviews of the best options
- Educational soft books made of felt: materials for making, detailed instructions + reviews of plots for books (100 photos)
Original do-it-yourself valentines - design options, necessary materials, master class for DIY work
The two outer and two inner cut-out parts are first sewn separately, and then joined, stitched, and quilted. Then a piping and a loop are sewn on. The mitten is very maneuverable, comfortable and practical.
DIY round pot holder, photo
Even the round potholders we are used to can be made stylish and original if desired. If you add a little imagination, a simple potholder will turn into a ladybug with wing-shaped finger pockets.
A pot holder can also become a sunflower mitten.
"Geometric" potholders
The only difference between them is the shape, size and design. Patterns for sewing potholders with your own hands are very simple. If we talk about a circle, then you can take an ordinary plate and circle it. The pattern is ready. As for the square, it is enough to make a square from a notebook sheet, make a pattern and transfer it to the material.
A geometric figure is cut out of fabric and filler. The edges are sewn together using a simple or overlock stitch. In this case, you can use fabric of different textures and colors for the sides. Place a colored edging ribbon or openwork ribbon around the circumference or perimeter to make the potholder look colorful and original. A loop must be sewn on for convenience. You can diversify any geometric potholder by sewing a pocket for your hand. The size of such a pocket is 1⁄2 of the side of the figure. The pocket should be made of thick fabric, folded in two.
Fabrics and fillings
To sew a functional oven mitt for the kitchen with your own hands, it is important to choose the right material and filler.
For such accessories, choose dense natural fabrics (linen, cotton, chintz, denim). Synthetic ones can be adversely affected by high temperatures. Also, before starting sewing, wash the fabric so that it does not shrink when washing the finished product. Check the material for staining - soak in warm water. If the water is even slightly colored, replace it.
Felt, drape, and batting are best suited for filler. You can also use a terry towel as a thermal layer.
If you choose padding polyester, you need to line it with interlining on each side: fabric (face up), interlining, padding polyester, interlining, fabric (face down).
Be attentive to the decor. Buttons, beads, rhinestones, dangling or “furry” elements on a potholder can play a cruel joke on you. Decorate the part that will not come into contact with high temperatures.
These recommendations will help you sew durable kitchen accessories.
Flower made from scraps
The patchwork technique is widely used when sewing potholders and other textiles to decorate the kitchen. It is necessary to cut out the pattern of the petals along the grain thread so that the product does not become deformed in the future. To create an interesting design you will need pieces of fabric with a pattern of berries, flowers and fruits.
The flaps are cut and stitched according to the intended shape. Then, padding polyester or other available filler is placed between the top and bottom layers and all parts are stitched around the perimeter.
Note!
Do-it-yourself bead brooch: photos of the best options, step-by-step master class on how to create it yourself, weaving patterns
Do-it-yourself felt toys - TOP-120 photos of toy ideas, do-it-yourself instructions for making them for beginners
- How to make a lapbook with your own hands: a detailed master class on how to make it yourself, reviews of lapbook elements
What can you make potholders out of if you don’t have any suitable fabric at hand?
DIY butterfly pot holder, photo
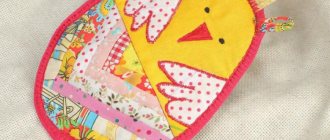
Butterflies are called potholders that are put on only the fingers, where for the thumb the indentation is made on one side, and for the rest - on the opposite side. If you bring your fingers to the center several times and then spread them apart, you get something like the flapping of a butterfly’s wings, which is how the potholder got its name and is often made in the shape of this insect.
Such oven mitts are very convenient in everyday life; it is impossible to burn your fingers or palms with them. Many housewives, having tried to use such an accessory once, do not want to use other types of potholders anymore.
But a butterfly potholder in this form is not the only option. It can be done in the shape of an apple:
Another interesting option in the form of laying hens, only the fingers are placed on top of the body from the side of the head. Such potholders will add coziness to the interior and can be an excellent gift.
Heart-shaped “butterflies” made from scraps of different colors look unusual and cute:
The simplest version of a butterfly potholder can be sewn in the shape of an egg. Unlike previous options, it is easy to perform, but this does not make it any less interesting.
Knitted potholders
Kitchen utensils are easy to knit or crochet - the process takes only a few hours. The product is not knitted from synthetic threads. The pattern of the pattern may be different; it is better to take the thread in two or three colors. A knitted potholder can be decorated with textile decor.
However, all options for openwork knitting are unacceptable - the potholder must fully perform its functions and protect your hands from burns. All knitted potholders are sewn with filling or knitted in two layers. The easiest way is to knit a mitten a couple of sizes larger than your own, sew in a seal and decorate it with a beautiful ribbon.
When conducting a master class on making potholders for your friends, do not forget to tell them that it is better not to use small-piece decorations in the form of rhinestones, beads and seed beads for kitchen products.
How to sew a pot mitten with your own hands, step by step with photos
As we wrote earlier, a mitten potholder is a very common type along with square and round ones. “Mittens” are convenient not only when cooking on the stove, but also in the oven, since the back of your hand often gets burned from the oven walls when you put in or take out the baking dish. They can be sewn on one or both hands. We will show you a master class for one glove. The second is done in a mirror way.
For work, prepare:
- textile;
- insulation;
- braid;
- pencil;
- tracing paper;
- scissors;
- threads;
- sewing machine
1. Make a pattern according to size. indicated in the photo.
2. Transfer the pattern to the fabric and cut out four parts from the main fabric and two from insulation.
3. Place the two main parts right sides together.
4. Apply a “filling” of insulation to them on each side, and on top of one more main part with the front side facing out.
5. Machine stitch the pot holder.
6. Trim the excess fabric around the thumb to make the line sharper.
7. Turn the potholder outward, trim the bottom with braid and sew on a loop.
Determining the shape and purpose of tacks
You don’t need a textbook to choose the shape and design of potholders; here you don’t have to limit your imagination to decorate your kitchen interior.
The simplest scheme will help you make exactly those accessories that will be actively used in the kitchen and will complement the set of towels, tablecloths and an apron.
Square potholder in patchwork style
Patchwork is ideal for creating square potholders. At the beginning of work, you need to decide what colors of fabric you will use. Ideally, they should not only fit well with each other, but also be in harmony with the overall image of the kitchen. As they say, the details make the whole look. If, for example, the predominant colors in the kitchen are beige, gray, white, caramel, you can make a potholder in pastel colors. But a brighter option is also acceptable, however, in the ensemble it should be accompanied by some other bright decorative item (painting, vase, curtains, flowerpots, etc.)
If you have already worked in the patchwork technique, you will probably use leftovers from already used fabrics. If this is your debut in patchwork, don’t be too lazy to do a revision in your closet. Often there is something lying there that you will no longer wear or use, but it will come in handy for such creative experiments. Pay attention to sales in fabric stores: small surpluses are often sold at a discount.
Materials for a pair of potholders:
- 2 pieces of linen fabric without a pattern - squares 24*24 cm each;
- 24 strips of linen fabric in several colors (24*2.5 cm);
- 2 pieces of wool blanket or cotton batting (also 24*24 cm);
- Border - 250 cm (the color should match the main fabric).
By the way, you can make the border yourself. To do this, cut strips of plain fabric 6 cm wide and then sew them together along the short side. Once you get the length we need, press the seams with a hot iron, then fold the border in half and iron again.
And now additional materials that will be useful when making patchwork potholders: iron, scissors, pins, sewing thread, sewing machine (ideally, you can sew by hand).
Sew on the stripes
Under the cotton batting you need to place a simple linen fabric, i.e. 2 squares with a side of 24 cm overlap each other. We put multi-colored stripes on top; they have to be sewn directly to the batting.
We take two strips and with their right sides facing each other, fold them in the center of the square batting. Sew on one side. We bend the top strip and iron the seam. In this case, the stripes should “look at you” with their faces.
Now we take another strip and place it right side down on the already sewn, just ironed, last strip. We sew the strips along the edge again, then bend the last strip and smooth the seam again. Using exactly the same principle, we sew the next strips until the piece of batting is completely covered. We do the same with the other potholder. If desired, each strip can be sewn with a finishing stitch. Upon completion, the square piece must be trimmed on all sides.
Sew on the border
We put the border on the wrong side of the potholder, which we just sewed from scraps. At the same time, make sure that the raw edge of the border is connected to the raw edge of the potholder.
Starting at one corner, sew the border to one side of the square first. Before each new corner, you need to bend the border at an angle of 45 degrees. In this way we sew the border around the entire perimeter of the potholder.
Final work
Returning to the corner from which we started sewing, we bend the border to the front side. This must be done before you sew the last piece of the border to the tack, i.e. slightly short of the corner. Cut off the excess border, leaving about 10 cm for the loop.
The border needs to be pressed onto the front side of the patchwork square. For convenience, pin the border with safety pins so that it does not move. Make a loop from the remaining tip of the border and carefully hide the cut inside the border.
Now all that remains is to sew the border to the front side of the potholder.
In practice, such patchwork pot holders are very easy to sew, you only need to try it once. And then you can quickly decorate any kitchen interior.
Original kitchen design
A tack of modest colors will not attract attention, but a bright model will become an object of admiration, a “highlight” of the design. Crafts in the form of watermelon or orange slices, pink-cheeked apples, bright strawberries or cherries will match the kitchen theme and whet the appetite of the household.
The design of the kitchen will look stylish and elegant if all interior items match in color. The fabric for the accessory can be chosen to match the dishes or curtains, you can sew an apron from the same material, or line boxes for various kitchen items.
From the same fabric as potholders, make hot mats and napkins.
Ideas for DIY sewing
The original design of kitchen oven mitts attracts attention, and if thought through correctly, such a product will also have a certain aesthetics.
You can choose a simple shape and sewing the product does not take much time, especially if you use a sewing machine.
If you use the hand stitching technique, you will have to pay attention to the thickness of the workpiece and choose the right sewing needle and thread to make the sewing process easier.
Mittens
The simplest design of oven mitts is the embodiment of the classic shape of mittens that reliably protect your hands during the cooking process.
The mitten with a separate cap for the thumb is easy to use and sewing is very simple; a simple diagram and sketch are used for this.
Butterfly
An original butterfly will decorate the kitchen interior; bright and colorful fabrics with original prints are used to sew it.
To sew such a product, you can use the traditional technique of basting and stitching parts, or use the patchwork technique, using symmetrically located scraps of fabric.
Double
Double potholders, which are two oval-shaped semicircles connected to each other, also look unusual.
A simple sketch is transferred from paper to fabric, the base remains solid, and two sidewalls are sewn onto it, not connected to each other, and a filler is placed between the layers of fabric.
Having chosen a good and correct sketch, you can simply reproduce it yourself and sew beautiful and comfortable potholders.
Often such products have a simple shape of a rectangle, square or circle, which allows them to be used as convenient hot coasters that are easily accessible.
Required materials and tools
In addition to the fabric on the front side, to make potholders, you need to choose the material of its “filling”. To ensure you don’t get a burn on your hands, you need a layer of filler, for which you can use padding polyester or batting.
To maintain the shape and strength of the product, the filler is secured on both sides with a non-woven pad. Using bias tape or a thin stretchy ribbon, make an edging to frame the outline of the craft and a loop for hanging.
You can sew a little thing by hand, or better yet, on a sewing machine. To work, you will need threads to match the material, scissors for creating a pattern, and pins.
