Have you noticed that the closet door has begun to close loosely, or is even lopsided?
Check the rollers for integrity. Due to constant dust and containing an increased amount of harmful substances, the rollers lose their elasticity, crack and break. CALL ME 8
OR WRITE
Service
Contacts
Replacing doors in a wardrobe
Sliding wardrobes are practical, versatile, spacious and functional.
Such a closet does not have large dimensions and allows you to store many different items, be it clothes or household appliances. Over time, wardrobe doors can damage their appearance. How to remove the door?
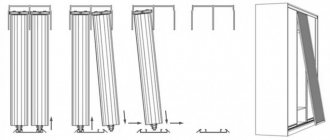
To dismantle the old door, you need to lift the door a little and use a screwdriver to spring the rollers from below. Afterwards, you need to carefully pull it towards yourself without any sudden movements, as a result the rollers should easily come out of the rails. Next, you should pull the sash out of the bottom guide and lower it to the floor at a slight angle. The doors should come out, after which you can install a new door.
As soon as you discover a fault in your closet, call Bob-Master immediately!
Our specialists have many years of experience in repairing cabinets of all models.
Replacing wardrobe rollers is as follows:
- Removing the door from the wardrobe
- Replacing broken rollers
- Cleaning the upper and lower guides
- Installing a door in a wardrobe
These works guarantee you further full use of the cabinet today. We repair cabinets from domestic and foreign manufacturers in the shortest possible time!
Our advantages:
- Check out in 50 minutes
- 24/7 acceptance of applications
- Work guarantee
Step-by-step instructions for assembling sliding doors
To make a sliding system for a closet with your own hands, you should strictly follow the step-by-step instructions and attach the panels according to a certain pattern.
Calculation
Before purchasing materials and components for assembly, you should accurately calculate the dimensions of the future product. Existing types of profiles, including rail and support, are available in standard configurations, which simplifies installation work. Cutting and processing of edges, as well as glass, should be ordered from a trusted company.
Drawings and detailing
To get a general idea of how to assemble a sliding door for a cabinet and secure it to the roller hanger guides, you need to prepare drawings for the placement of all the parts. The diagram shows the position of the main parts:
- Stand handle.
- Canvas.
- Guide rail on top.
- Bottom rail.
- Top crossbar.
- Bottom bar.
Point 13 indicates the upper rollers, and point 14-a indicates a self-tapping screw for fixing the support rollers.
Allowable error
When making and installing parts of the sliding system, an error of +- 5 mm is allowed. Moreover, even a slight deviation from the specified parameters can cause backlash in the valves. This is not critical, but a very unpleasant moment.
Installing the Top Rail
The profile in the upper part is fixed flush with the side walls. Any gap between the ends of the profile and the side wall is not allowed. The length must correspond to the internal width of the cabinet.
You can fasten the parts using countersunk screws or self-tapping screws with press washers.
Since the sash will be supported on the lower profile, and the upper ones will not be subject to loads, it is possible to choose a step between the fastening elements of 25-35 cm. The insertion is carried out in different channels (the first self-tapping screw is in the right, and the second in the left).
Installing the Bottom Rail
Before fixing the bottom guide, you need to perform a simple “fitting”. To do this, you will need to install the upper profile, place the lower profile on the bottom without screwing it with screws, and then install 1 sash. Such manipulations will help determine how many mm and in what direction the lower guide will need to be moved. This is done by level, assessing evenness along the entire length.
If the profile is to be placed in the desired location, it will need to be marked with a line along its entire length. After this, the sash should be removed and the guide should be fixed to the bottom of the cabinet using self-tapping screws.
Assembling the frame for filling
If the doors were shipped disassembled, or you are assembling the cabinet from scratch, the next step will be to assemble the frame. To do this you need to prepare:
- Two vertical profiles.
- Two horizontal frames corresponding to the width of 1 sash.
- Rollers.
- Fastening elements.
- Drill for drilling.
- Adjustment screws.
To assemble, you must first “try on” the parts to each other, lay out the profiles and make holes for assembling the rectangular frame. Then the roller elements and adjusting screws should be installed.
Fill setting
To fill the sashes, you can use the following materials:
- MDF (thickness 6-12 mm).
- Mirror (thickness 4 mm).
- Glass (thickness 4 mm).
- Rattan.
Filling materials are ordered after calculating the dimensions of the sash.
To fill the canvas, the frame fasteners should be loosened or unscrewed.
Buffer tape sticker
Buffer tape is used to protect the interior of the cabinet from external dust, as well as to minimize impacts of the doors on the side walls. The design is a thin strip of elastic material with a fleecy surface. It is fixed on the reverse side of the vertical guide profile.
Inserting the sash into the guides
The sash is fixed into the guides, starting from the far profile. To do this you need to follow these instructions:
- Move the door to the opening.
- Raise the sash to the working position and tilt the upper part towards the upper guide.
- Place the rollers into the grooves of the upper profile.
- Raise the sash.
- Check that the door moves smoothly and adjust if necessary.
- Install the second sash.
- Check the smooth movement of the second leaf.
By following the step-by-step instructions and drawings, you can assemble the wardrobe doors with your own hands and without any difficulties.
Prices for wardrobe repairs
| Replacing upper rollers in a wardrobe | from 2000 |
| Replacing bottom rollers in a wardrobe | from 1200 |
| Replacement/repair of sliding wardrobe guides | from 1800 |
| Replacing hinges | from 600 |
| Strengthening cabinet shelves | from 450 |
| Wardrobe remodeling | from 2500 |
| Repair/replacement of withdrawable mechanisms | from 600 |
| Repair/replacement/installation of gas lifts | from 650 |
| Partial disassembly of the cabinet | from 1000 |
| Furniture repair | from 1200 |
"Bob-Master" is a repair service for businesses and individuals, consisting of qualified craftsmen who are ready to fix any household and utility problems. Impeccable quality of workmanship, responsibility and accuracy allow the company to offer repair work of various scales and complexity in Moscow and the Moscow region.
Bob-Master specialists provide maintenance services for apartments, houses, club villages, townhouses and other residential real estate to individuals and corporate clients. Bob-Master provides a wide range of services for installation, connection, maintenance and repair of electrical equipment, heating systems, air conditioning and ventilation systems, surveillance and security devices.
Features and advantages of fittings
A roller mechanism is a special type of cabinet fittings that ensures smooth sliding of the door leaf along the runners when closing and opening the doors. Its presence guarantees:
- soft, silent movement of door leaves;
- opening or closing doors without effort;
- the impossibility of spontaneous displacement of facades to the side, even if drafts appear in the house;
- ensuring the vertical position of the canvases;
- space saving - the rollers move horizontally, they do not need free space under the cabinet;
- the possibility of using auxiliary devices, including remote control devices;
- attractive appearance of a piece of furniture.
The roller mechanism is convenient for people with disabilities - it is not an obstacle to movement in a wheelchair (in the absence of a threshold).
Among the disadvantages of such accessories are the high cost of the elements, difficulty in setting up and repairing.
Address:
m. Oktyabrskoye Pole, st. Raspletina, 19, office 2
m. Otradnoe, st. Dekabristov, 20/1
m. Bratislavskaya, st. Lyublinskaya, 96
m. Leninsky Prospekt, st. Leninsky Prospekt, 45
m. Vykhino, Ryazansky prospect, 72/1
Moscow region, Krasnogorsk, st. Komsomolskaya, 39
Unified dispatch service:
8
Email:
regarding cooperation [email protected]
Buffer tape for doors
This tape is required to protect the “inside” of things in the closet from dust. It is attached to the side of the facade itself and softens the impact of the doors on the side parts of the frame when closing. If you no longer need to adjust the mechanism, you can start gluing the buffer tape. With its help you will close all possible holes from the vertical end of the door itself.
Short and long pile tape is available for sale. The first type has a pile from 3 to 6 millimeters, the second - from 6 to 12 millimeters. Which tape to buy depends on your desire. Short pile is purchased more often due to its lower price, but its analogue copes with its task better. We select the shade of the device to match the color of the furniture itself. To glue, remove the protective part from the adhesive side and, starting from the top or bottom, smoothly press it towards the end.
How to find us:
SUBMIT YOUR APPLICATION
Roll-out mechanisms
Type: roller, hidden mounting, with closer Material: metal, plastic Suitable for: table drawers, kitchen drawers, chests of drawers, office tables, etc.
from 220 rub.
up to 530 rub.
Order
Furniture casters
Type: single, double Material: metal, plastic Suitable: for wardrobes, folding interior doors, etc.
from 190 rub.
up to 980 rub.
Order
Guides for sliding wardrobes
Type: top, bottom Material: metal Suitable: for sliding wardrobes, folding interior doors, etc.
from 210 rub.
up to 860 rub.
Order
Furniture hinges
Type: with closer, without closer Material: metal Suitable for doors: kitchen cabinets, bedside tables, wardrobes, etc.
from 150 rub.
up to 530 rub.
Order
Choosing reliable rollers
Before you go to the store to buy rollers, you should determine where they will be used. There are dozens of options for roller mechanisms designed only for moving furniture, and the same number for doors, cabinets, retractable systems and drawers. Let's look at the features of the choice.
Criteria for choosing furniture casters
Rollers for furniture fittings are the main mechanism of the sliding system. The main requirements for them are smooth and silent sliding when opening. Wheel rims can be made of rubber, Teflon, plastic, composites and steel. In addition, attention should be paid to the following criteria:
Furniture casters can have any design
- Planned load on supports. This is the main parameter that determines whether the mechanisms can support the weight of the furniture. The strength of the rollers will depend on the material from which the supports and main components are made, the method of fastening the roller and the diameter of the wheel.
The rim of a quality roller is at least a third of its thickness.
- Price. The products of proven companies are an order of magnitude higher than those that either have not yet managed to prove themselves or have not been able to. Metal-plastic rollers have the lowest cost, but if they break, they are very easy to replace.
- Quality of materials. The reliable rollers have steel supports, and the plastic used in the mechanism is hard and heavy.
- Quality of construction. This criterion is no less important. When assessing the reliability of the design, you should pay attention to the presence of backlashes and the strength of the connecting parts (roller axis, its fastenings).
- Housing design. It can be anything, the main thing is that it matches the furniture in height, color, and style.
- Mounting method. There are a lot of mounting options: threaded pins, platforms for self-tapping screws, bushings, etc. The required mounting method will depend on the design features of the furniture and the ability to install the mechanism you like on it.
- Extended capabilities. In this case, you should determine whether the rollers are rotating or fixed, whether they have a stopper and several wheels, and whether it is possible to remove the roller.
When choosing, do not forget about the rest of the furniture fittings, the quality and functionality of which largely determines the performance of the casters themselves.
Criteria for choosing rollers for sliding systems
Rollers for sliding doors have a fundamental difference depending on the opening system, which can be:
- Lower support. Suitable for any doors. A reinforced rail is installed at the bottom of the doors, which will take the main weight of the door. A roller moves along the rail, also experiencing a high load. The top rail is required solely to support the door.
Rollers in the bottom door system
- Suspension. Suitable for light doors. In this case, the door is suspended by rollers from the top guide, which takes the weight of the door. The door is fixed on supports on the bottom guide. In this case, you will need sliding door hardware with top rollers.
Rollers in the guide of the suspension system
When choosing rollers for a door, you should first of all focus on their supporting force, that is, how much weight they can withstand.
When choosing videos, you need to pay attention to the following points:
- The simplest rollers are made of plastic. Plastic is in many ways inferior to other materials: it breaks, scratches form on its surface, the shape of the wheel is deformed under the weight of the door, it slides off the rails and knocks when moving.
- A better option requires bearings. Such systems are much more reliable, but they are not silent, and it is not so easy to repair the bearings yourself.
- The most preferred and expensive option is steel or plastic rollers coated with Teflon or rollers with a rubber rim. The doors on them are silent when opening, slide smoothly and easily, and are easy to clean if necessary.
Framing the façade
To build the frame you will need:
- 8 self-tapping screws for tightening the profiles together;
- 4 wheels for support;
- 4 bolts to secure the wheels;
- 4 positioned supports on the top direction rail.
Place a handle on the vertical profile and make it equal to the height of the door (no need to remove the protective film). The result should be parts. We cut off the top and bottom horizontally so that the previously made size corresponds to the width, and subtract 2.5 centimeters from each side.
Mark the locations for the holes. We measure 7.5 millimeters from the edge of the vertical and horizontal parts and drill at the point of contact. We make calculations from all sides and make holes at these points with a diameter of 0.5 centimeters.


