It's no secret that kindergarten lockers are not luxurious in size and spaciousness. The jacket and boots fit - thank you. But a baby’s chest should contain so many necessary things. And here a wonderful thing comes to the rescue - hanging pockets for a locker in a kindergarten.
Varieties
In order for the child to have everything he needs, there should be room in the pockets on the locker, for example, for the following things :
- socks;
- T-shirt;
- tights;
- sweater;
- handkerchief.
You may need not only these, but also many other things that are convenient to store in special pockets (for example, a comb, hairpins for a girl). Of course, these things can be folded into a neat pile or placed in a bag, but using pockets is much more convenient.
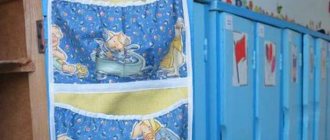
Usually they are sewn onto fabric and hung on the door of the cabinet in which clothes are stored.
Pockets with various methods of attachment to the door are used. The following options may apply:
- The most common is the use of eyelets or loops. They are hung on screws screwed into the cabinet door, or hooks attached to it.
- You can use an elastic band for fastening. In this case, there is no need to install hooks or hammer nails. Therefore, this method is convenient, but the elastic pockets will sag.
- Can be attached with adhesive tape. To secure it more securely, it is bent over the top edge of the door.
- You can use double-sided tape to hang the pockets. This method will be convenient in cases where it is not possible to screw screws into the door or attach hooks.
Each pocket can be made open or closed. The following options can be used:
- Using buttons or Velcro.
- Make sure that the elastic bands go through the top edge.
- Sometimes open pockets are suitable.
- It will be beautiful if they are decorated with embroidery or appliqués depicting your favorite cartoon characters.
- To attach to the door, it is convenient if the fabric with pockets is folded to the outside of the door. In this case, it will be possible to attach a recognizable picture on the outside for each child and write his name.
For your information! This will allow the kindergarten teacher to easily find the things of a particular child, and the child to find out at first glance where his things are stored.
The models used can be distinguished by pocket sizes:
- Large pockets can be used (for which old jeans are used, for example), occupying the entire door or most of it.
- Sometimes they are made of medium size, the size of half a door or a little larger.
- It is common to use models that use several small pockets.
Note! When choosing how to sew pockets for a kindergarten in a locker yourself, you need to take into account that a small number of pockets will not allow you to efficiently organize the storage of your baby’s things, and too small ones will not always allow you to find enough space for larger, replaceable things.
Features and purpose
Lockers in kindergartens are most often narrow, with a small number of shelves that do not fit all the necessary things.
It is still difficult for a child to find the right item without outside help. The best option is pockets for a children's locker in the kindergarten. The organizer is attached to the door, has several sections (large and small), can be easily removed, washed or washed. This is especially convenient for small items that can easily get lost on shelves. While in the garden, a child may need the following things: panties, socks, tights, T-shirts, replacement shoes. In addition to a change of clothes, the baby needs to have a sports uniform and Czech shoes. There are also personal hygiene items - a towel, handkerchiefs, combs, hairpins, elastic bands. To make it easy for your child to get what they need, you should use hanging pockets for the kindergarten locker. A mother who purchases a ready-made organizer or creates one herself should carefully consider the number of departments and their designations. It’s easier to get what you need if you divide the space into zones:
- for essential items;
- for small accessories;
- for small toys;
- for small personal items.
Pockets for a kindergarten locker, in addition to their main function, contribute to the development of motor activity of the baby’s fingers and memory.
What material are pockets made of?
The material for the cabinet organizer can be different:
- thin flexible plastic;
- fabric with water-repellent properties (Bologna, raincoat fabric);
- ordinary textiles (calico, cotton, linen, felt, etc.)
Plastic sachets are easy to care for, they are easy to clean, and can be easily treated with suitable disinfectants without prior dismantling. It will not be easy to make such an accessory at home, but you can buy it in almost any specialized store.
In some preschool institutions, hanging pockets are purchased centrally. But making it with your own hands will not be difficult even for a person who has only basic cutting and sewing skills.
Decor options
Each cabinet and its hanging pockets are individual. To make the organizer bright, you can use fabric with checkered, striped, polka dots, flowers or stars. If you decide to stick to a plain base for the product, then the finished pockets can be decorated:
- buttons, rhinestones (it is better not to use small parts for safety reasons);
- ribbons and bows, lace;
- applique, stripes, embroidery;
- images of cartoon characters and animals;
- the base can be the same color, the pockets are decorated with a pattern.
The right combination and reasonable selection of decor is important. You should not use many small decorative elements on fabrics with a ready-made pattern. If the base is monochromatic, it can be diversified with a combination of contrasting colors.
Branch processing
After the pockets are made, you need to decorate them. The easiest way to do this is to stick appliques with fairy-tale characters. It will look beautiful if beautiful embroidery is done on the pockets in advance. The appliqués are attached before the pocket is sewn on.
You might be interested in: Creating a pattern and sewing a beanbag chair with your own hands according to the instructions
Step-by-step instructions for processing pockets are as follows. The lower side edges are folded into a deep fold. This is necessary to give the pockets volume. To make flaps to close the pockets, they are cut in a trapezoid shape and sewn to the base at the wider part. For fastening, it is convenient to use a Velcro-type connection.
Decorated with appliqués
We sew pockets in a locker for a kindergarten with our own hands
To make pockets, you will need to take 2 types of fabric: elegant calico with a printed pattern for the visible sides, and white calico for the lining. Before starting work, it is advisable to wash, dry and iron all fabrics so that they immediately shrink as much as possible.
The finished size of the pockets is 65*25 cm. From the main and lining fabric, cut out 2 blanks measuring 68*27.5 cm. This will be the basis of the pockets for the wrong side and the lining for sewing on the pockets
- From the main fabric, cut out 3 pieces of pockets measuring 22.5 * 27.5 cm. Glue the upper sections of the blanks with adhesive dolikov, cut in the form of strips 1 cm wide. They will protect the upper edge of the pockets from being pulled out during use.
- Also, from the main fabric, cut out 3 parts for the facings of the upper sections of the pockets - rectangles with dimensions of 3.5 * 27.5 cm
- Then you can start sewing. First, iron the lower longitudinal section of each facing 5 mm towards the wrong side.
- Then place the facing on the pocket, face to face, align along the top edges, pin
- Sew the facing with a 7mm wide seam. Remove the pins
- Press the facing seam onto the facing. Fold the facing onto the wrong side of the pocket and iron it, fixing a transition edge 1-2 mm wide from the main part towards the facing, pin along the lower (ironed) edge to the pocket
- Place finishing stitches close to the top and bottom edges of the facing, remove pins and iron
- Prepare all the pockets in the same way.
- Then continue working with the lining of the pockets. First, place the first pocket on it, aligning it along the bottom and side edges and pinning it with pins. Then mark the place where the first pocket begins, add 5 mm upward and draw a line - this will be where the bottom cut of the second pocket will be applied. Attach it to it, pin it and sew it with a seam 7 mm wide
- Iron the second pocket up, stitch the seam of its stitching along the edge
- Check that the pockets are sewn on correctly. They must go one right after the other
- Process the last pocket in the same way.
- You should be left with a small uncovered area at the top of the lining. Measure its height, add 7mm to the seam and sew it in the same way as the pocket. So the entire front side of the pockets will turn out beautiful
- There can be several ways to attach pockets to a cabinet door. The simplest one is hanging loops of ribbons, through which the pockets are hung on small hooks. To make them, cut a grosgrain ribbon of a suitable color, 1 cm wide, into pieces 7 cm long. You will need 5 pieces in total. Scorch the cut of the loops with fire to prevent them from spilling out. Evenly distribute the prepared loops along the upper cut of the front side of the pockets
- Place the main (back) part on the front side of the pockets, align and pin along the edges
- Sew the pocket pieces around the perimeter using a 7mm wide seam, leaving a small unstitched area at the bottom for turning inside out. Remove the pins
- Turn it inside out, straighten the pockets right side out, iron them, stitch along the perimeter close to the edge, and at the same time sew up the opening for turning them inside out.
- Finish the buttons or overcast the loops and sew buttons to close the pockets.
New clothes for kindergarten are ready.
How to make your own diagram
If you want to make pockets in a kindergarten locker with your own hands, you should use the manufacturing tips. There are many advantages to this process:
- you can make an organizer, taking into account the dimensions of a specific pencil case;
- if there are enough leftover fabrics, they can be used, which will not require extra costs;
- the organizer can be made of any size;
- decorate the product with what the child likes best.
Tools and materials:
- thick fabric (1 m), braid, interlining for compaction, calico for lining, padding polyester;
- scissors, threads, elastic bands, Velcro, decor.
Having prepared the material and decided on the pocket option, you can get to work. To get a beautiful product, you need to think through everything to the smallest detail, choose the fabric, choose the base.
Pockets are created according to the following scheme:
- Cut a strip of fabric 25-30 by 140-150 cm. Fold it in half, this will be the base. If you need to compact the product, insert interlining between the layers.
- We select blanks for pockets (3-4 pieces of colored or plain fabric, decorated with appliqué), the sizes depend on the quantity and width. Additionally, you need to make a provision for free placement of items.
- If the compartments are on an elastic band, cut it into pieces.
- We stitch the top of the pocket, insert an elastic band and secure it to the edges.
- We make a mark on the base and sew the pocket on three sides. The edges at the bottom of the compartment can be gathered, leaving room for larger items.
- At the top, above the last section, you can place an applique with a name. We cut out letters from felt. If the pockets are plain, they can be decorated, for example, by sewing on images of socks or T-shirts. Then not only the child, but also the kindergarten staff will understand where everything is located.
- If the organizer will be attached with elastic bands, you need to sew 35 cm of tape on both sides of the base.
- To finalize the edges of the product, cut the fabric or braid 3-4 cm wide and sew along the edge.
- The pockets are ready, such a high-quality item will be useful to the baby not only in kindergarten, but also at home. Creating an organizer will not take much time. In addition, the child will probably be interested in helping his mother decorate the new thing.
Master class on making a pocket
To sew a wardrobe for children's clothes with the chosen pattern, you first need to make the base and then sew the pockets to it. How to make this is described below.
Various design methods
Pattern
If we consider a pattern for a pocket for a locker in a kindergarten, made by ourselves, measuring 80 by 30 cm, then you need to start by preparing the base. To do this you will need to make two pieces of fabric of this size. You will need two large pockets and several smaller ones.
Material for cutting
Assembling (sewing) yourself
When sewing a pocket, you need to fold three pieces of the same shape:
- main fabric;
- non-woven layer;
- lining
They are placed in the order indicated and sewn with a running stitch to the base. The top of each pocket is folded inward. Then it needs to be stitched. In this case, a pre-prepared gum is passed inside. It is slightly pulled together and secured along the edges of the pocket.
The bottom of the pocket is sewn using a hidden seam. Then the sides are attached.
How to form pockets
Let's do handicrafts together
Why do we need pockets for kindergarten? Mothers who have already raised more than one child know that such an accessory is very convenient to use. As practice shows, closets in preschool institutions are not very spacious. All clothes do not fit.
But we put spare panties, panties, socks, pajamas, and shoes there.
To put everything neatly and neatly on shelves, we came up with original fabric pockets. Of course, you can buy ready-made pockets and simply attach them to the cabinet door, but it’s much more pleasant to make such an item yourself.
You and your child can decorate the pockets with various figures, embroidery, appliqués and other designer little things.
The shape of the pockets should be narrow and long. To avoid getting into trouble, first measure the width and height of the door. Be responsible when choosing fabric. It should be elastic and moderately dense.
Where is the best location?
As mentioned above, pockets can be placed both on the side and at the foot of the crib. They are usually located on the outside of the cradle. Although, if the child is small enough and does not know how to sit independently, the sachet can serve as a protective side. In this case, I hang it inside the cradle. But even when the baby not only sits independently, but also moves around the crib, you don’t have to rush to rehang the sachet. It’s enough to place the little ones’ rattles and favorite toys in their pockets, and then mom’s lifesaver turns into a fidget playground.
