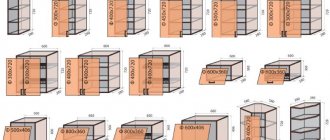
Modern kitchen sets consist of separate modules, wall cabinets, floor cabinets and pencil cases. The unifying elements give the furniture a holistic look: a single kitchen countertop, an apron, a cornice and a plinth. If you want to save money, “assemble” your kitchen in bulk from modules from series of well-known manufacturers. But be prepared for compromise solutions: it’s unlikely that you’ll be able to choose the ideal size and contents of a kitchen from standard modules. Another budget option is to make your own kitchen. Drawings of kitchen cabinets with dimensions for manufacturing will help you in drawing up a design project and subsequently calculating the costs of purchasing materials and components.
Advantages of a homemade drawing
The obvious advantages of a homemade kitchen drawing include the following aspects:
The ability to take into account all factors (dimensions of the room, location of window openings, material for making the furniture). High-quality drawings allow you to carry out optimal planning even in the smallest and most non-standard rooms, for example, a kitchen measuring 2 meters. In practical work, the master is helped by knowledge of the location of communication lines and expected changes in these lines.
The ability to independently model the future interior of the kitchen and dining area, plans for redevelopment, combination and zoning of premises.
In practice, when preparing a plan at home, the costs of specialist services are excluded. The freed up funds can be spent on materials for interior decoration or decorative design of the room.
In the process of creating a kitchen drawing with dimensions, the master himself controls the quality of the project, the schematic representation of the details and features in the drawing.
For each section of the drawing (room layout, manufacture and location of furniture, electrical wiring, socket outlet points), you can prepare a separate drawing, the quality of which depends on the skills of the owner.
Benefits of working independently
The most important advantage is the opportunity to model a sketch of the kitchen of your dreams, using your previous skills in drawing, measurements, calculations, creative ideas and the desire to draw a one and only kitchen project. This exciting work will bring a lot of pleasant emotions, because... In addition to self-expression, it provides for the wishes of household members in terms of comfort for everyone. Therefore, all family members will be able to draw a kitchen on paper, and in a general meeting, you can choose the most original sketches.
The second advantage is significant cost savings on calling a designer and fully developing the project. Having imagined this amount, it is recommended that you still try to draw a sketch of the kitchen on your own.
It is important to think through the plan of the future kitchen with maximum accuracy, calculating every centimeter and taking into account every small detail.
Drawing Options
The kitchen drawing includes not only a schematic representation of the room itself, but also a display of communication lines, the location of the set, its parts and an assembly diagram (for self-made furniture). The following technically important parameters must be displayed on paper:
- Dimensions and area of the room.
- Location of window openings and their sizes to scale.
- Direction of communication lines (electrical lines, water supply, sewerage, gas for the stove). Particular attention is paid to these criteria, because the entire layout of the future kitchen depends entirely on the location of communications.
- Model of the future furniture set and its shape, features of production and assembly. For example, a drawing of a corner kitchen can be displayed in several different variations, which have meaning in practice.
The next factor is not necessary for independent drawing, but it is better to pay special attention to it. It is important to display all the features of the interior decoration of the kitchen space on a pre-drawn diagram in order to carry out repair work strictly according to the specified points.
How to calculate the dimensions of facades for a straight kitchen with your own hands
Based on the known dimensions of kitchen tables, cabinets and wall cabinets, it is easy to calculate the dimensions of the facades. These calculations should be approached as carefully as possible, since this is perhaps the most expensive and visible part. There is no way to hide any flaws or “spans” in size; you will have to re-order the doors again.
The principle of calculating kitchen facades is simple: the kitchen boxes must be completely closed by the door, but at the same time, to allow movement, without the doors shuffling against each other when opening and closing, it is necessary to provide a technological gap. As a rule, it is 2mm on each side.
That is, if the height of the kitchen modules is 720mm, the height of the facades will be 716mm.
With a module width of 600 mm and closing with two doors, the width of the facades minus the side gaps is 600/2-2 = 298 mm. And minus the central gap between the two sashes, 1 mm on each side, it turns out 297 mm.
Thus, for a box 720x600, two doors measuring 716x297mm are needed.
The dimensions of the drawer fronts are calculated in a similar way. Don't forget to take away the gaps between them!
All that remains is to order cutting of chipboard parts to size with gluing the ends, fiberboard and facades, purchase fittings and fasteners for assembling kitchen modules.
Room layout on the drawing
The first and most important parameter that should be depicted on the plan diagram is the layout and shape of the room. The master has the opportunity to independently display on a sheet a drawing of a kitchen measuring 3*6 meters, 3*4 meters or any other size. It is important to write these parameters directly in the plan diagram itself, using a scale.
All building niches, alcoves, and auxiliary rooms available in the room must be shown in the image with dimensions indicated. Subsequently, you can make optimal use of the available free space for arranging furniture with a transformation function, built-in wardrobes, folding tables and other auxiliary accessories. Combined kitchens deserve special attention after the demolition of wall panels and partitions.
Download for free!
Renovate your kitchen with pleasure right now
Interface language: Russian
Distribution size:98 MB
How to create a kitchen layout in a 3D designer:
Step 1. Draw the room
First, create a prototype of your kitchen in the program. If you have a drawing, you can load it into the designer and trace it. But it won’t be difficult to draw a room from scratch - just select the dimensions and mark the walls with the mouse. When the room is completed, its area will be displayed.
You can monitor the process of creating a room in two windows at once
Step 2: Choose a finish
Think about the look you want to give your kitchen. Do you want to make it light and colorful or subdued and dark? In 3D Interior Design there are materials for every taste. Go to the “Properties” section of the room and switch between the “Floor”, “Walls”, “Ceiling” tabs, selecting design options. You can choose from wood and stone flooring, carpets, laminate, tiles, a variety of wallpapers and much more. You can also fine-tune the appearance of the room by adjusting the floor and ceiling skirting boards, for example.
Each finishing element can be customized independently - even the size of the pattern
Step 3. Add furniture and lighting
Now the most important part is the furniture arrangement. If you don’t know what type of headset to choose, look for options in specialized catalogs. The program has everything you need for visual modeling. There are many tables, bedside tables, armchairs, and hanging cabinets at your disposal. You can make a custom refrigerator, stove, sink - all of this can be customized in size, color, texture and other parameters. Also don't forget to choose a lamp.
Design is done clearly
Step 4. Save the project
When the kitchen layout is completely ready, you can take a virtual walk through it in 3D mode, then minor flaws in the layout will definitely not be hidden from your eyes. You can also calculate repair estimates directly in the program - it contains a convenient material cost calculator. All is ready? Save the project in DIP format or in one of the graphic formats (as a picture or PDF document). It is also possible to print the plan or switch to photorealism mode, where the visualization will be closer to reality.
Print the project to take with you to the store.
Image of communication lines
A mandatory element on the plan diagram is the direction of power lines, water supply, sewerage and gas (if there is a gas stove). Also on a separate sheet are the locations of outlet points, distribution boxes, electrical panels and switch keys.
Be sure to place all water supply taps and sewer pipes, heating pipes and appliances on the diagram. In the future, these parameters may be needed in the event of a malfunction or new repairs or redevelopment of the kitchen space.
Rules for arranging furniture in the kitchen
The kitchen is the most difficult place to arrange furniture due to the nature of the room. After all, there are many electrical appliances, water supply and ventilation systems.
It is not enough to be guided by your taste and aesthetics: ergonomics and compliance with safety rules are important, without which you can forget about the functionality of the room.
Minimum distances between objects:
- ✓ 50-70 cm between the table top and the top drawers. Higher - it will be difficult to reach; lower - you can hit your head.
- ✓ 65 cm from the electric stove to the hood and 75 cm from the gas stove for proper air circulation.
- ✓ 120 cm between drawers facing each other. This is relevant for those who are planning a U-shaped set.
- ✓ 90 cm from the table to the headset. This parameter is not strict, be guided by your convenience.
- ✓ 50 cm from sink to stove. Do not forget that water and electrical appliances should not be placed nearby.
An example of a successful arrangement of equipment and cabinets
There are also rules, they are based on logic and are designed to prevent alterations:
- ✓ Modules with drawers should be far from the stove, kettle and other appliances. If there are children in the house, they can use these “steps” and get burned.
- ✓ Sockets cannot be placed close to the sink.
- ✓ In the case of a corner set, the drawers will be difficult to open if you place them in the very corner.
- ✓ Leave free space between the outer drawers and the wall so that the doors swing open without difficulty.
Modern kitchens amaze with their designs
Location of the kitchen unit
The next stage for the master is to display on the drawing the location of the kitchen unit and the shape of its main elements. Depending on the type of arrangement and placement of furniture, there are several main types of layout:
- The linear arrangement option, which is the most popular and in demand among designers.
- Corner or L-shaped type of kitchen area layout.
- T-shaped kitchens are new in the world of practical design and interior design.
- Non-standard G-shaped layouts that are ideal for a combined kitchen.
Double-row and island types of furniture arrangement are also quite well known among designers and owners of apartments (private houses). For transformable furniture, indicate all built-in additional panels (folding tables, built-in sofas, sofa chair) folded and unfolded. This is necessary for the correct organization of the available space and the optimal arrangement of other interior items.
Kitchen of my dreams 5th grade technology presentation
When you have fully worked out the design, complete the kitchen project, you will need to defend it in class by making a presentation. We offer a presentation version created in the Power Point graphic editor:
Let your children's projects be unique and interesting! Don't be afraid to imagine and invent! Perhaps your child is the future interior designer who will create beauty in the homes of thousands of people!
Drawing for a homemade headset
Manufacturers of kitchen furniture today offer their customers and potential clients a huge selection of finished products or custom-made projects. In stores you can find a wide variety of models of all colors, shapes, sizes and materials.
However, many craftsmen with skill and proper construction experience make furniture with their own hands. This task also requires a correctly drawn up drawing. What criteria should be displayed on the diagram:
- Dimensions of the future headset.
- Type of design and folding mechanism if such a function is available.
- Materials and individual parts, types of fasteners.
- For upholstered furniture, the upholstery and type of filling must be indicated.
In the process of preparing a drawing, you should focus on the plan of the room as a whole in order to correctly correlate the dimensions, location of furniture and window openings.
Drawings for a kitchen made of wood and metal (stone or other finishing material) have a number of significant differences, which the master simply needs to know.
How to calculate a kitchen wall cabinet with your own hands
Difficulty in calculations is usually caused by corner elements. But, since in our version a direct kitchen is designed and calculated with your own hands, everything is extremely simple and clear.
The depth of kitchen wall cabinets is usually 300mm. There are two wall-mounted kitchen modules that are fundamentally different in design:
- Wardrobe with drying rack. A two-level wire rack for dishes is built into it. Therefore, its dimensions are strictly regulated by the dimensions of the drying itself - the width of the cabinet should be “round”, 500, 600, 700, 800 or 900 mm.
- Cabinet above the stove. According to kitchen standards, the distance between the hob and the cabinet should be 150-200mm greater than that above the rest of the work surface. That is, the cabinet should be shorter than the others in height. A hood can also be built into it. The details of installation and the required dimensions of cuts inside the cabinet can be found in the instructions included with the selected hood model.
The rest of the DIY direct kitchen cabinets have a completely standard design and are easy to calculate. Let's look at the example of a drawing of a kitchen wall cabinet with two shelves.
- Bottom 568x300 – 2 pcs.
- Sidewalls 800x300 – 2 pcs.
- Shelves – 568x280 – 2 pcs.
The back wall of the fiberboard can be inserted into a groove or overlapped. The second method is easier if you need to make a straight kitchen with your own hands - we recommend sticking with it. The rear wall in the groove is usually selected if you plan to install adjustable awnings. But for hanging a straight kitchen this is unnecessary; simple “ears” are sufficient for hanging upper kitchen cabinets and then tying them together into a single, monolithic structure.
Drawing for a wooden kitchen
Making a kitchen set from wood is an exclusively jewelry work, because every detail requires exact compliance with the given parameters. The same strict requirements are imposed on the quality of the drawing, so a master with the proper artistic skills can independently prepare a plan diagram.
Three types of drawings must be drawn on paper:
The first diagram should display the set as a whole, indicating all the furniture elements: dining table, worktops, wall and floor cabinets. All objects depicted must be presented to scale, but with actual dimensions included in the footnotes. The plans of the first type highlight the features of the external decor of the furniture set and the location of the set in the conditions of the available free space.
The second type of drawings contains information about built-in accessories: pull-out systems, open shelves, folding and sliding panels. Furniture is displayed on paper not only when folded, but also when unfolded. This is important for the optimal organization of free space and kitchen interior.
The third drawing shows the details: the dimensions of each workpiece, its shape and type of fastening. Also subject to accounting are fasteners: screws, self-tapping screws and metal corners, dowels and nails.
All prepared drawings must be as realistic as possible, and the quality of the plan diagram must allow the work to be carried out without gross errors.
The main rules regarding drawing up a plan for a future kitchen
Before you begin creating your kitchen layout, there are a few rules to learn that will help maximize the space's efficiency and usability. Let's look at them in more detail.
What rules must be followed to make the kitchen as comfortable and functional as possible?
#1 - Work triangle rule
This is the basic rule that needs to be taken into account when determining exactly how you will place your kitchen unit. So, according to the working triangle rule, you cannot arrange in a linear order:
- sink;
- stove;
- fridge.
On the contrary, these three points of the room should follow a triangular pattern, moreover, so that each of the points is located at a distance of no more than 180 centimeters in relation to each other.
What does a work triangle look like in the kitchen?
Think about this rule from a logical point of view, if you still haven’t been able to understand it, by considering the typical order of food preparation:
- food is removed from the refrigerator;
- they are then prepared for cooking by washing the mud, that is, in a sink;
- then, next to the stove, the ingredients of the future dish are mixed and chopped;
- Afterwards, the desired food products are sent to the stove.
Work triangle placement options
If you place the three main points of the kitchen further from each other, then you will spend several times more time and effort on:
- transportation of products;
- control of what is happening at any point;
- cleaning after cooking.
This rule is the main one, and with its help it is used and taken into account when planning all subsequent rules.
Work triangle in the interior
No. 2 – Rule for reasonable sink placement
So, first of all, the location of the sink is always determined. It should be built no further than 2.5 meters from the riser. Of course, you can set it beyond this indicator, however, in order to realize such an idea within the framework of a traditional urban dwelling, it is necessary:
- direct the water supply pipe at an angle;
- or install a pump.
Of course, this can only be done if the expected layout and thickness of the wallet allows it.
It is very important to place the sink correctly
In a private home, it would be wise to place the sink opposite the window, as this will have many positive effects:
- the ability to observe events happening outside the window while washing dishes, for example, thereby making this activity less boring;
- the opportunity to seriously save on electricity.
If you decide that you don’t want to wash dishes, but would rather spend money on a dishwasher, then this unit must be installed on one side of the sink:
- on the left if the owner of the apartment is right-handed;
- on the right if left-handed.
Placing a sink in a small kitchen
This way you will create the most comfortable and convenient space for yourself.
No. 3 – Rule for slab location
Next, you need to understand where you will place the stove or hob. According to the rules, it should be no further from the sink than a distance of 180 centimeters. The same applies to:
- ventilation;
- gas pipeline, if there is one.
It is better to place the stove one countertop after the sink, since this is where you will process washed food before cooking.
The length of said surface separating the stove and the sink should be about 90 centimeters - not too much, but also enough to do everything necessary.
It is convenient to place the stove in the area of a beveled corner
On the other side of the hob, according to safety regulations, it is also necessary to leave at least 40 centimeters of free space.
Please note: the stove should also not be placed near a window, at least at a distance less than 40 centimeters. This is contrary to safety regulations, and in addition, completely impractical.
No. 4 – Safe Distance Rule
So, it is necessary to correctly verify on the plan not only the location points of this or that item, but also the distances over which you will move while in the kitchen.
When planning a kitchen, be sure to take safety rules into account
So, the smallest width of passages in this room should be 120 centimeters. Thus, in this gap, 2 people can calmly, without interfering with each other:
- a person who is busy preparing food;
- a household member who came to the kitchen to pour himself some water or drink tea, for example.
In addition, this distance will be required so that you can comfortably and without incidents:
- load dishes into the dishwasher;
- remove food from the oven, refrigerator, cabinets, etc.
If the kitchen is a passage room, then you need to be even more attentive to the safety of distances
If the kitchen is a passage room, which is especially common in the layout of cottages and private houses, then this distance must be increased to one and a half meters.
If the kitchen is very small and is not a walk-through room, you can arrange meter-long passages in it.
No. 5 – Rule for proper placement of the refrigerator
So, the refrigerator must be placed as close as possible to the sink, and not from the stove, because:
- Most foods are washed before cooking;
- Then the refrigerator can be placed in the nearby built-in oven and microwave unit.
However, in small kitchens, the refrigerator can, in principle, be installed in another room located near the kitchen, for example:
- in the corridor;
- in the living room, etc.
The refrigerator must be within the working triangle
No. 6 – Competently bypassing the inconvenient nuances of the finished room
As a rule, the kitchen plan is drawn up already at the stage of the presence of erected walls in the apartment. And not always their architecture can be convenient for everyone.
So, let's see exactly how you can get around the inconvenient nuances in the table below.
Table 1. How to solve problems that arise when planning a kitchen arrangement
| Nuance | How to adapt a feature to your needs |
| Ledges | Sometimes kitchens are equipped with completely unnecessary projections at various points in the room. They can also be used to place cabinets, however, so that the furniture does not stick out, taking up the free space of the room, it must be made shallow, that is, the internal capacity must be reduced. |
| Niches | Niches that cannot accommodate any piece of furniture, such as a closet, can be filled with shelves, and things needed in the household can be stored on these shelves, for example:
|
| Excessively narrow or wide doorways | If possible, doorways can be:
|
| Kitchen space is too small | If you want your small kitchen to be equipped with all the necessary appliances, you need to choose mini electronics options. It’s even better to take the built-in one, as it allows you to seriously save space. Among other things, you can save space by reducing the following electronic parameters:
|
The disadvantages of any kitchen can be turned into advantages
No. 7 – Creating a kitchen plan simultaneously in professional computer programs and in reality
To ensure that no problems arise after installing furniture in the kitchen, you must use the following to create a plan for its location:
- real room;
- professional computer programs.
It is better to create a kitchen drawing in specialized programs
In other words, it is desirable that everything coincides in reality; the kitchen should be drawn at the beginning, for example, in one of the following free planners:
- program from IKEA;
- Planner5D;
- SketchUP Pro, etc.
Then, having sketched out a rough plan for furniture placement, go to your apartment or house and draw squares or other shapes directly on the floor and walls, replicating your furniture in full size. In this way you can:
- see the errors made in the calculations;
- confirm in the decisions made;
- come up with something new.
Kitchen project in SketchUp
No. 8 – Rules for arranging the dining area
Not every apartment is so large in area that you can fit a spacious kitchen and even a dining room into it. Usually, when eating, people sit at the table exactly where the cooking is done. That is why it is important to take into account some important nuances regarding the arrangement of the dining area.
1. So, first of all, it must be said that each seat has its own parameters, namely:
- 60 centimeters wide;
- 40 centimeters deep.
Please note: the above parameters are relevant for traditional furniture, but more comfortable chairs, for example, with armrests, will have a larger width and length, therefore, these parameters will have to be increased.
Dining area
2. From the edge of the tabletop to the wall, for comfortable movement of the chair and the person sitting on it, there should be a space of approximately 80 centimeters. If the space is smaller, the person will have to sit literally squeezing into the table, which will be harmful:
- for his digestive system;
- musculoskeletal system;
- psyche, since while eating the body should experience complete comfort.
Be sure to follow the recommendations regarding the distance that should be between the chairs and the table and the wall
Drawing for other types of kitchen
Modern interior styles involve the frequent use of not only wood for kitchen construction, but also other types of materials (natural or artificial stone, metal, plastic and glass).
For independent work, you need a slightly different type of drawing, which shows the features of the floor covering for the future set, the supply of electrical wiring and other communications, as well as the features of the masonry (stone or brick).
Using independent drawings, you can build any kitchen: 4 or 6 meters long, any shape and type of construction.
Calculate the size of the bottom base
To calculate the width of all components of the lower base, you need to take the total width of the tabletop and subtract from this value the length of the overlaps on both sides of the lower base.
We divide the resulting value into parts according to the number of modules included in the lower base - this will be the width of each of them.
As for the height of the lower base, to determine it you need to focus on built-in household appliances if you plan to use them. If you don’t plan, then you can easily rely on the standard size, which is about 85 cm.
Photos of kitchen drawings
Corner small kitchen, drawings of possible layouts
Still, it’s better to choose a corner layout for a small-sized kitchen - there really are a lot of interesting solutions for arranging a workspace. True, most of them involve moving the sink outside the “wet” area, or decorating a window sill into a dining table or bar counter. And other rather expensive proposals with the need for major repairs. But don't despair! Here are drawings of a small kitchen with a corner configuration that will not require significant investment from you. We will “work” with the space that the designer-architects handed over to us for operation.
Drawings of a small kitchen with the “correct” location of the stove
If we take into account that the ventilation shaft is located along the “short” partition with the bathroom, then it is logical to assume that the stove, with the hood connected, should be located there. Then the drawing of a small corner kitchen with a refrigerator will look like this.
The capacity of the lower cabinet tables is quite good; if you need more storage space, make upper cabinets for the ceiling. A standard side table under the sink is usually used as a corner module. But you can also make an L-shaped version, with a transformer door.
Design project for a small kitchen with built-in appliances
The main problem is that a small-sized kitchen is most often an inseparable “companion” of a separate bathroom. This means that the only possible place for a washing machine is also the kitchen. However, there are many projects where the washing machine can be built under the work surface without any problems and does not “disturb” other large household appliances by its proximity.
It is best to consider options where a narrow module is squeezed between the washing machine and the refrigerator or stove - a bottle holder, which you can make with your own hands.
But if you have a full-fledged washing machine with a standard depth of 600 mm, then you will have to be content with a minimal selection of design projects. Or move the refrigerator to another place.
With a narrowed tabletop
If you want more free space, you can narrow the tabletop on the side with a length of 1.6 meters. Be careful! Not all household appliances and not all retractable mechanisms can be built into them.
The optimal solution: place the built-in oven and sink on the side of the refrigerator, and the two-burner hob on a narrowed countertop. By the way, you can build a microwave or a narrow washing machine under it. In the drawing, a corner small kitchen will look like this.
It is better to avoid wall cabinets above a narrowed countertop. They will prevent you from using the work surface for its intended purpose.
With rounded tabletop
If you still plan to use a standard freestanding stove or place the “oven + hob” duo on top of each other, use beveled and rounded countertops to increase the free space.
Due to the beveled module, it will be more convenient for you to move around the kitchen, even if you install a fairly large dining table. At the same time, it will not be possible to narrow the countertop with a bevel - after all, the sink crashes into it. And most models of mortise sinks are designed for installation in a countertop of standard width.
