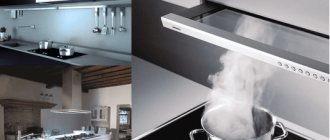
Let's talk about how to make a cabinet yourself and install a hood in it in the kitchen.
Hoods have different designs; below we will talk about only two models: a simple built-in one (it is attached to the bottom of the cabinet) and a telescopic one (it is mounted in a cabinet in a special way). For such hoods it is necessary to design special cabinets. These are exactly what we will consider in this article.
Typically, the width of these hoods is 50 - 60 cm. The cabinet for such a hood should be the same width, and the depth should be at least 28 cm. That is, for a standard hood you need a standard cabinet that is equal in width to it.
The height of the cabinet is designed according to the owner of the kitchen, because she should be the one who should be comfortable using the hood. However, the distance from the stove to the hood must be at least 65 cm and no more than 85 cm. (Permissible error is 5 cm).
The depth of the upper horizon of the cabinet will be less than that of the lower one. Let’s say the depth of the lower horizon is 30 cm, then the depth of the upper horizon will be 12 cm. A difference of 18 cm is enough for the corrugation to fit freely there.
The back wall moves forward, this allows you to mask most of the “insides”.
You can, of course, make a very ordinary cabinet without a back wall. But its internal appearance is, to put it mildly, unimpressive. When you open the doors, you will see an empty space, an opening in the middle of the lower horizon, and a corrugation coming out of it. The spectacle is not very aesthetic.
But if there is a back wall and an additional shelf, the interior appearance becomes much nicer. The shelf can be used around the house, and it also adds rigidity to the cabinet.
Types of hoods and their design features
A variety of kitchen air filter devices
Before purchasing equipment, you should decide on the location where the stove will be located, since the hood is installed above it. The design features of the model depend on the installation location of the slab. Depending on the type of location of the kitchen area, hoods are divided into several types.
- Flat. It is small in size and does not require installation of an air duct. It has built-in filters through which polluted air passes. The disadvantage is that they need to be changed periodically. The service life of the filter directly depends on the intensity of use of the stove and hood.
Flat hood - an inexpensive option with built-in filters that takes up little space
- Dome. The equipment of this group is connected to ventilation and has high performance. The more impressive size of the case makes it possible to install larger fans than in flat ones. Therefore, they are used in spacious rooms where there is a need to filter a large air flow from the kitchen. Remove odors from far corners of the room.
A dome or fireplace hood has good aerodynamics, operates almost silently, but is more expensive - Built-in. The most widely used type. The main advantage is that it hides in kitchen furniture or countertops and does not spoil the overall style of the interior. Another plus is that installing a built-in hood in a cabinet is easy to do independently and there is no need to call a paid technician.
A built-in hood is the most optimal solution for small spaces
Which type of hood to use depends on the size of your kitchen. If the kitchen is small, then the power of a flat hood will be quite enough. Built-in models are good in typical Khrushchev buildings. They save space, since the air duct and the frame itself fit neatly into the closet. In the kitchen, where space allows, there is a free-standing island; a fireplace or dome hood would fit perfectly there.
Scheme of operation of kitchen hoods
Which filters to use
You need to know that an incorrectly selected filter does not clean, but pollutes the air and can cause the spread of pathogenic microorganisms throughout all areas of the apartment.
Important. Regardless of the type of filter, they must be cleaned and replaced regularly. The maximum operating time cannot exceed 6 months.
Unfortunately, a very limited number of users follow this recommendation. If you consider yourself to be in this category, then it is recommended not to use filters or switch the hood only to flow mode.
- Aluminum filters for catching grease. Can be reusable or disposable. Collecting grease has a positive effect on the operation of electric fan motor parts and reduces the number of bacteria on pipeline surfaces.
Metal filters are reliable and durable
- Activated carbon filters. Absorb chemical compounds: unpleasant odors, smoke, etc. Additionally, they retain dust and grease. Disadvantage: they clog quickly, create additional resistance to air flow and significantly reduce the performance of the hood. Because of this, the load on the windings of the electric motor increases, they overheat, and the insulating varnish quickly loses its original dielectric parameters.
Such filters are more effective, but clog faster
At the first signs of deviations in the operation of the hood, it is necessary to inspect the condition of all elements of the device, detect the problem and eliminate it. This is the only way to guarantee its long-term and effective operation.
Video - Hood built into a 60 cm cabinet
An extractor hood built into the cabinet significantly increases the comfort of kitchens, eliminates unpleasant odors, and ensures a standardized rate of air exchange in the room. It is quite difficult to install such units in ready-made cabinets; the work often requires changing the design of the elements. It is much better to provide for the installation of a hood when designing kitchen furniture; this not only simplifies the installation process, but also increases the duration of use. You can read how drawings of kitchen furniture are made on the pages of our website.
Built-in hood dimensions
Diagram of a hood with a retractable unit with detailed dimensions
In order to correctly install a built-in hood, measurements are taken of the slab and the existing cabinet into which the equipment will be built. If you do not pay attention to this, it may turn out that the size of the device will exceed the dimensions of the cabinet.
Conclusion
A range hood is a very necessary device in any kitchen. In conditions of constant cooking - frying, steaming, boiling - the air becomes a haven for a huge number of dirty particles that cannot be seen by the eye. They are subsequently inhaled by family members and can lead to unpleasant consequences.
A hood is a useful device, but to harmoniously combine its appearance with the overall kitchen set, you will need to purchase a ventilation box. It can be easily ordered - such boxes for hoods are provided by the Leroy Merlin company, and they are of very high quality. But if you wish, you can do it yourself.
Installation of built-in hood. Required materials and tools
Correct installation of a kitchen hood
Let's consider the option when you decide that there is no need to make a new box, all that remains is to re-equip the existing wall cabinet. Before you begin installation, you need to decide on the material from which the ventilation duct will be made, and prepare the necessary tools so that everything is at hand.
Types of materials from which the air duct is most often formed.
Plastic air duct for connecting to the hood
Corrugated exhaust duct hidden behind the panel
Both types have a number of pros and cons. What to choose, you decide based on the parameters of the equipment, the capacity of the cabinet, and your preferences.
A structure made of flat rectangular pipes can be hidden in a suspended ceiling, almost without taking away the height of the room
The following tool will be useful for this work. For marking and measurements you need a tape measure, a square, a pencil. For cutting holes - a jigsaw, wood saws. A screwdriver, bolts, and screws will also come in handy. To glue joints, purchase adhesive sealant. To enhance the tightness, clamps are used; they need to be prepared.
90 degree bends for rectangular ducts
To rotate a rectangular ventilation duct at a right angle, a 90-degree bend is used. At ITAL it is produced from durable, wear-resistant polymer plastic - PP (polypropylene) or HDPE (low-density polyethylene).
These materials are chemically neutral and are designed to last for several decades without repair. Maintenance of working ventilation made of polymers does not require large expenses.
The minimum dimensions are 10x10 cm, the maximum is 1.5x1.5 m or more. The proportions can be any. Products are manufactured with two types of connections at the customer’s choice: for complete tightness with flanges, or with socket fastenings to simplify installation.
If you need to design a complex air duct system for an industrial enterprise or non-industrial building, contact our specialists. We carry out all turnkey work - production of ventilation sections, delivery to the site, installation, warranty and post-warranty service.
You can buy or order a plastic rotating section of the air duct 90 degrees in any size.
Bends 45 degrees rectangular ducts
The production of plastic bends at 45° at our enterprise is carried out in any size and proportions. The minimum dimensions are 100x100 mm, the maximum is not limited. The shape and size of the outlet is matched to an existing air duct or developed as part of a single project - in the case of a complex order of chemical-resistant ventilation in its entirety.
The connection of this shaped part with the remaining elements of the ventilation system (most often straight sections) occurs using flanges or a socket. For a 100% sealed air duct, a flange type of connection is used. The socket mounting method is characterized by ease of installation. Considering the light weight of the plastic parts, this is easy to do even alone without special tools.
You can order a 45-degree bend from chemical-resistant polymer plastic, such as low-density polyethylene (HDPE) or polypropylene (PP). The choice of material should take into account the characteristics of use - temperature conditions, air mass composition and other parameters.
We recommend ordering an accurate calculation from our engineers. This guarantees you the lowest cost and high quality products.
Working with the bottom shelf of the cabinet
Preparing a kitchen cabinet for installation of a built-in hood
When installing a built-in hood in a cabinet, you can go in several ways.
- Order a kitchen cabinet without a bottom. To bring out the air duct, you will need to make appropriate holes for it in the middle shelf and the top.
- Make a cabinet for the hood with your own hands, based on the dimensions.
- Remodel an existing piece of furniture, first remove the bottom or cut a hole according to the existing dimensions.
There is no need to disassemble the cabinet. You need to remove it from the wall and disconnect the doors. It will be more convenient to perform your actions on the floor. “Unstitch” the back wall, unscrew the side fastenings, then the bottom shelf will easily come off on its own.
When you cut out a place for a hood, you need to do it so that the body of the device fits tightly to the front wall, and not vice versa. Mark the place where you will cut with a marker, drill holes in the corners of the mark, and then cut.
What to consider when choosing
| Illustrations | Factors determining the choice of hood |
| Method of action . Hoods are either flow-through or circulation. The first remove air from the room into the ventilation shaft, and the second drive the air through a filter, clean it and re-direct it into the room. The choice of one modification or another is determined by the possibility or impossibility of laying an air duct. | |
| Material of manufacture . When choosing a particular air purifier model, pay attention to the coating of the bottom panel. It is preferable to choose modifications with a glossy surface, since glass or polished steel is easier to clean from soot. | |
| Lighting . The range of hoods includes models with lighting using halogen, fluorescent and LED lamps. I recommend choosing models that use LED lamps. This backlight heats up less, lasts longer and gives a brighter and more even glow. Due to its high brightness, a hood with LED lamps provides good illumination of the stove even when dirty. | |
| Productivity . Productivity is the volume of air that the device can pass through itself in 1 hour. To calculate productivity, we multiply the kitchen area by the ceiling height and get the volume of internal space. We multiply the resulting number by 12 - the air exchange rate according to sanitary standards, and then multiply by 1.6 - the minimum reserve correction factor. We compare the result with the device performance specified in the data sheet. |
Transforming the middle part of the cabinet
You will have to cut holes in the cabinet shelves to allow the air duct to pass through.
Most often, the hood is attached to the middle shelf. Therefore, you also need to make a cutout for the air duct. We mark the cut location with a pencil; if it is round, we drill a hole with a diameter of 10 mm for the saw to enter and cut along the mark.
Then you need to mark the places where the device is attached to the middle part. Attach the shelf to the body of the device, make a notch with a sharp object in the location of the future location of the screws.
Example of mounting a hood to a wall
To secure the shelf to the sides, use plastic corners. First, we attach the four corners to the shelf, adjust its position by placing the box on the floor.
Exiting the power cord above the hood, as well as organizing a hole for a corrugated pipe
Plastic ventilation duct: design details
For installation among various angles, turns and other features of the kitchen, manufacturers have provided, in addition to the main air duct (pipe), many additional parts that allow maneuvering when installing the duct.
An important part of them is the rotation (they are also called an elbow), they are made at 45 degrees, less commonly at 90. Moreover, they can be angular or rounded, thanks to them you can change the direction of the structure in the right place.
Adapters. they allow you to connect round and square profiles. It often happens that you need to connect a square air duct to a round outlet funnel on the hood, in which case an adapter is used. It also allows you to connect air ducts of different diameters and cross-sectional sizes of square and rectangular models.
The dimensions of the plastic box for the hood (rectangular) are as follows: the smallest are 50 mm by 100 mm. The largest are 200 mm by 400 mm.
Connectors. When the length of one air duct to the ventilation shaft is not enough, an additional one(s) is used to put them together; this is what connectors are used for. They come, like adapters for connecting pipes, of different diameters and different profiles..
Tee. Used less often at home, since it is usually used to connect two or more hoods to the main air duct.
Non-return valve - allows you to prevent air from being drawn into the apartment from the ventilation shaft. It allows air to flow in only one direction. When the hood is turned off and the reverse draft is activated, it tightly blocks the exit to the shaft.
The ventilation duct is plastic, rectangular, square or round - they all also need a grille connector. It is attached over the hole into the shaft, onto which the rest of the box structure is subsequently fixed.
In addition, you will need fastening elements, their number depends on how many connections there will be in the entire output system.
We build the hood into the cabinet and install the air duct
Ceiling version of ventilation installation
The penultimate stage of work will be the connection of all parts. The cabinet with the middle part and the hood attached to it is hung in place. We must not forget that the retractable part of the equipment must move freely back and forth. This part contains a filter that catches grease. It starts working when the moving part is located above the stove.
Installing Ductwork on the Top of the Cabinet
The last stage is the installation of the air duct. It is inserted through the top of the cabinet, into a hole cut in advance, and connected to the device. The joints must be coated with glue and secured with clamps. It is also important to maintain the ability to detach parts to clean the system from dirt.
Then the air duct is connected to the ventilation. Special grilles are used for fastening. A hood is an electrical appliance; there should be a grounded socket nearby.
Connecting the air duct to the ventilation duct
The work is not at all difficult if you take into account the points described above. A built-in hood is a good option for those who want to save space and maintain a beautiful interior.
An example of mounting a hood in a cabinet above the hob
Plasterboard models
This is a decorative, budget option. You can make it yourself. It will easily disguise an air duct made of corrugated material, which is clearly visible in the photo of the hood duct.
- Ventilation in the bathhouse - the best schemes and recommendations for their installation. Features of bath ventilation systems (90 photos)
- Exhaust pipe: the best models, characteristics, tips for selection and use (100 photos)
- Why windows sweat: main reasons, possible consequences and methods of elimination (80 photos)
The characteristics of the material limit the applicability of the model - it is used only as a decorative element. The benefits will be as follows:
- ability to adapt to a variety of interiors;
- variety of finishing solutions;
- budget.
Ventilation in the kitchen
The presence of a ventilation duct in the kitchen irritates many people, since it takes up a significant part of the usable space, as some believe. Its dismantling can free up an additional 0.5 sq. m of area, but you can’t do that.
Independent removal of such an element of the ventilation system as a ceiling duct can lead to the following:
- the ventilation shaft is formed according to the principle of a pyramid, when the ducts below serve as support for the upper ones, so dismantling any duct weakens the structure as a whole, since the upper elements of the system are deprived of support;
- Removing a ventilation duct in a separate apartment leads to the fact that for rooms located lower in the building's floor plan, access to the air exchange system is blocked.
In connection with the above reasons, the Housing Inspectorate always reacts sensitively to violations related to general building communications. Therefore, the minimum that you face in the event of dismantling a kitchen element such as a ventilation duct is a requirement for its restoration.
