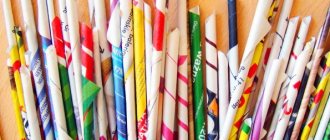
Our distant ancestors were engaged in weaving various household items. Willow twigs, grass and even plant roots were used for this. Today, the technique of this craft has remained virtually unchanged. New materials have just appeared, such as plastic. For those who like to create interesting designs from scrap materials, there is an opportunity to realize their imagination and skills in products woven from newspaper tubes.
Crafts from newspaper tubes for beginners step by step
History of weaving from newspaper tubes
It is believed that the ancestors of weaving from newspaper tubes are the Koreans and the Japanese. Eastern masters are famous for their virtuoso mastery of many paper techniques, including origami and papier-mâché. They came up with the idea of replacing expensive vines and straw with paper. Weaving from newspapers gained particular popularity when such material ceased to be in short supply, and magazines and other printed publications became available to all classes.
In the 21st century This art has become incredibly popular. This hobby is practiced by both adults and children. It is difficult and inconvenient for kids to work with vines or straw, but paper is a pliable material that is easy to use. It is easiest to practice with a ready-made base, but even in its absence you can create entire masterpieces of such art as weaving from newspaper tubes.
History of the craft
Weaving from plant stems was used already in Neolithic times. Archaeologists have found household items made in this way both in Africa and throughout Eurasia. It is assumed that people used thin tree roots and flexible vines for weaving.
Much later, the interlacing of long rods began to be used in construction. In the nineteenth century, many roofs were made using this technology. Ordinary people made fences near their houses, the rich could boast of wicker furniture.
Today, decorative wicker souvenirs can often be found at folk craft exhibitions. However, you don't have to stop at history alone. Using the weaving technique using newspaper tubes, real designer objects are created.
Crafts from waste materials: original ideas
DIY salt dough figurines: instructions, photo ideas
What's interesting about making crafts from newspapers?
It is important for any home craftsman that his works are used for their intended purpose, and that significant funds are not spent on their production.
Why is weaving crafts and interior items from newspaper tubes so popular?
- Newspapers are among the materials that are found in almost every home and after using them for their intended purpose, in other words, studying the information they contain, no one needs them. If only for lighting stoves.
Newspapers often go in the trash, but it’s better to make interesting souvenirs and vases out of paper - In addition to the newspapers themselves, you will need a few additional materials and devices - mainly: glue, scissors, a knitting needle and a piece of cardboard. Some may want to color their artwork. Finding paint for this is also not difficult. As you can see, this hobby does not involve any special expenses. Materials for weaving from newspapers
- From newspapers and magazines, it is possible to weave not only cute accessories for interior decoration, but also functional items, since the strength of such structures allows them to be used in the household.
It's hard to imagine that these products are made from old newspapers - The main advantage of such a pastime is the opportunity to make crafts together with the children. An exciting hobby helps not only keep them occupied, but also develop children’s imagination, teach them accuracy and perseverance. Weaving from newspaper tubes is a very exciting process.
Learning how to make decorative and utilitarian products from paper tubes is not at all difficult.
Openwork weaving and the use of unusual materials
Craftsmen involved in weaving have existed at all times, making useful household utensils and beautiful accessories for home decoration.
Newspapers and catalogues, magazines and even ordinary office paper are suitable for weaving and creating unusual products with original, simple or intricate designs.
Newspaper material is easy to process and you don’t have to make Herculean efforts for the creative process. This provides opportunities to involve children in the process, which guarantees the improvement of their practical skills and abilities, expansion of abilities and creative potential.
Newspaper vine: how to make blanks for weaving
The seemingly complex and incredibly difficult weaving process is quite simple, provided that all stages of the work are reproduced. After choosing an interesting and liked idea for making a craft, you need to prepare and prepare a lot of newspaper tubes necessary for weaving the product.
You can prepare newspaper tubes for handicrafts in your free time; the blanks will not lose their shape and configuration for a long time if you strictly adhere to the technology:
- the whole newspaper is cut into separate sheets, they are drawn into strips of 5-7 cm (thin strips are suitable for creating soft blanks, if the stripes are wider, the finished tubes will be too dense);
- A thin metal knitting needle is placed on the edge of the strip (a bamboo skewer is allowed) and a newspaper is wound onto it, the end of the newspaper strip is fixed with PVA glue.
By adjusting the angle of laying the knitting needle or skewer, you can achieve different heights of the tubes, but you should not chase the maximum length of the workpiece. The newspaper needs to be cut carefully; a stationery knife is best suited for this purpose, which will make the edges of the blanks even and smooth, and the finished products will turn out neat. Some craftsmen prefer not to use glue to fix the ends of the workpiece; in this case, the edges of the tubes are carefully folded to maintain the shape.
After preparing a large number of tubes, they can be pre-painted in different colors and shades in accordance with the sketch and your own wishes. One craft can combine different colors, the finished product can be painted, and to give it strength, the workpiece is varnished at the decorating stage.
What to make paper vine from
If you decide to turn mountains of waste paper into elegant baskets and flowerpots, we support your desire to make this world a better place and will help you choose the right material for making paper vines.
We recommend starting your acquaintance with the fashionable hobby with newspaper tubes. Firstly, this is the cheapest, or rather even free, consumable material. Secondly, they are soft and obedient. Newspaper pages are easy to roll into a neat tube; even an absolute beginner can handle this task.
If you have not found any deposits of unnecessary newspapers, visit the nearest stationery store and purchase a couple of packs of consumer paper. It can also be found under the names offset or newspaper.
We advise you to pay attention to the following manufacturers: Kondopoga, Syktyvkar and OfficeSpace. The paper of the latter is slightly thicker and crystal white.
This category of raw materials also includes fax paper. Its density will also allow you to prepare tubes without problems.
If you have accumulated a whole collection of glossy magazines that you can’t bear to throw away, then donate it to a good cause. Magazine pages, all kinds of flyers and even leaflets are also suitable for rolling tubes. But we want to warn you right away: products made from them turn out to be rough. In addition, dense, glossy wicker is more difficult to paint than paper.
Therefore, such rigid tubes are most often used to create frames for large products, frames, finishing mirrors and shelves. That is, everything that requires additional strength and rigidity of the structure.
This is the most unsuitable material due to its rather high density (A4/A3 office paper has a density of 80 g/m2). The tubes made from it are too dense and unyielding. Using office paper of any format, you will encounter difficulties already at the preparation stage: rolling it into a tube will take much longer than when using other types of raw materials. And the most important thing: the finished vine will turn out to be too rigid, it will be difficult to fit it into the weave, and twists and creases will be noticeable in the finished product.
Having analyzed all of the above, we can highlight our favorites. By a large margin, newspapers and newsprint (aka consumer) paper with a density of 45–48 g/m² are in the lead in terms of the number of advantages. It is this raw material that we recommend using for preparing paper vines.
Materials
Of course, you can’t do without paper here. It is best to make tubes from waste newspaper.
Newspaper paper is thin and easy to roll. It lends itself very well to painting. You can also use regular, low-weight paper.
Another option are magazines, used notebooks and cash register tape. It is recommended to cut paper along the grain.
Another important attribute is glue. To make paper tubes you need a glue suitable for paper. It is important that it is not very liquid, otherwise the tubes will get wet and fall apart.
If you need to paint paper straws in wood colors, use wood stain.
Construction primer is great for painting.
It doesn’t hurt to varnish the finished products. It is better to use acrylic varnish, it does not smell, dries quickly and forms a good protection.
Rope
- Two tubes must be placed crosswise at the first rack.
- The work is done by passing one tube behind the counter, and the second in front of it.
- The tubes are intertwined, going around the vertical stand, and swapped. The rear one is brought forward, and the one that was in front of the counter is brought back.
- Then weaving continues in the same order, intertwining the tubes and changing their places.
The weaving turns out beautiful and durable; for convenience, it is recommended to use an odd number of vertical posts. You can change the pattern slightly by weaving with two elements at once. Alternatively, you can weave by shifting the tubes in subsequent rows.
Tools.
To conveniently twist the tubes, you will need knitting needles or wooden skewers of various diameters.
You will probably have to use both thinner and thicker tubes for crafts. The thinner the tube, the denser it is. But thicker tubes are easy to flatten.
Naturally, when working with paper you need scissors. And for painting - brushes.
Stock up on clothespins to secure finished products.
Chess pattern
To obtain a different pattern, you need to use two pairs of tubes at once.
- The first pair is attached to a vertical stand, weaving is done through each stand with both tubes.
- Having gone in a row, the second pair of tubes is attached offset to one rack. Weaving is done the same way.
The result will be an original chess pattern, suitable for weaving a variety of quite durable products. Patterns are easy to combine when weaving one product in various combinations. For variety, you can use tubes of different colors when weaving.
How to make tubes from newspapers:
1. First you need to cut the newspaper strips to the desired size.
2. For this you will need a stationery knife. They are very convenient and quick to cut. First, cut the newspaper in the center to get two sheets of AZ size.
3. Then we fold these halves in half again and cut them again with a stationery knife.
4. You can do this not only one sheet at a time, but also in a stack at once.
5. Now take a knitting needle or wooden skewer and begin to wind the newspaper strip at an angle of 45 degrees.
Moreover, it is best to twist it so that the empty newspaper strip is on the right and when folded, it covers all the newspaper inscriptions. This way you will get white tubes, without unnecessary printed letters, and it will be easier to paint them in a uniform color, without letters showing through. But you can’t do without them completely, because the inside of the newspapers does not have a sufficient white stripe to cover the inscriptions. If you want to get white tubes, then you can use only the outermost strips of newspaper with a sufficient white margin around the edge. Or buy A3 newspaper writing paper.
6. Roll up the newspaper tube quite tightly.
7. Apply a little PVA glue to the tip of the newspaper
8. And screw it all the way. Remove the skewer or knitting needle. 9. You will get a tube like this.
10. It should be noted that when twisted correctly, one side of the tube is slightly thicker than the other. This is necessary so that they can easily be built up among themselves, inserting one into the other. 11. Initially, before weaving, the tubes can be extended. This will make it easier to weave. To do this, you need to drop a drop of PVA into a hole with a larger diameter and insert a tube with a smaller diameter into it. 12. After extensions, so that the tubes do not break, I crush them with a rolling pin, several pieces at a time
13. Or hands one at a time.
14. You will get such elongated tubes from which you can weave. Or you can first paint them with water-based acrylic paints or stain.
Initially painted tubes have some advantage: you can easily change colors immediately during weaving and the basket looks more neat, without white gaps. But first, it’s better to try a simpler method: first weave and then dye.
Features of paper curling
Only at first glance, “twisting” is performed quickly and easily. Practice shows that you can master the technique taking into account several features.
- We cut strips of the same size from the press spreads in an approximate ratio of 1X3. To increase productivity, fold the paper into a stack and use a utility knife;
- hold the tool at an angle of 45° and tightly wind the tapes onto it. If you wind the paper at an angle of 30°, you will get a thick stick (it will be useful for “knitting needles”). And at 90° the stick will turn out to be very thin (it is used for edging);
- We fix the tail-kerchief with glue, and then remove the workpiece.
During the twisting process, they are spliced together by inserting the thin end coated with glue from one tube into the wide hollow hole of the other.
For panels, decorative rugs and frames, flat blanks are required.
Place the finished “twigs” on a flat, hard surface and roll them with a rolling pin. Look at the master class in the photo.
Weaving a storage box
Cut out two rectangles of the required size from cardboard. We cover them with wallpaper or other beautiful paper.
After this we mark one rectangle. On each side we make marks every 2 centimeters. Glue the racks. Just glue them a little to the right of the marks. And we also glue a tube for the corner post to the corner.
Then glue the second rectangle on top. Place under a press for better adhesion and for the glue to dry. This also prevents the cardboard from warping.
When the bottom of the box is dry, put the mold on it and begin weaving the walls.
We bend each post into two and lift them along the side wall. These will be our racks. And due to the fact that we glued them a little to the right, our racks will fit exactly according to the marks.
Add three working tubes. We glue them under three posts to the bottom.
We weave one row into three tubes. The result is a pattern like a pigtail. And the cardboard that we have at the bottom is not visible at all.
To strengthen the corners, we glue two posts on them.
We weave the walls of the box with a chintz pattern using two tubes. During weaving, the tubes seem to catch up with each other. We glue two working tubes and weave first one, then the second.
To strengthen the corners, you can additionally wrap the corner posts with a working tube, but not every time, but every other time. If the tube runs out, extend it by gluing the next one to it. To do this, cut off the end of the tube a little, drip glue there and insert the beginning of the next tube into the hole. And you can continue to work.
We weave the walls of the box to the place where you want to make holes for the handles. We strengthen the seven racks by gluing additional tubes, and two to the outermost ones.
We continue weaving in the opposite direction until the second handle. We do the same thing here. And we weave to the same height on both sides.
Then we begin to weave in a circle again. And we weave to the desired height.
We hide the ends of the working tubes, pushing them towards the racks. And we move on to bending.
We add two short tubes to one rack and one more to the two adjacent ones. We will do the bending with a “rod” pattern. To do this, take one of the added tubes and place it behind the second stand from it. Then we also bend the first rack and lay it behind the same rack. We do this twice. Now we have two tubes coming from behind the counter. And 4 tubes remain free. We're not touching them yet.
And we begin to remove the extra tubes. To do this, we bend two working tubes behind the next stand, cut one (short) and glue it to the place where the stand comes out of the weave. We place the second one on it and put the first rack on top.
Do this until the end of the row. At the end of the row, we hide the remaining ends in the weave, pushing them inside the weave near the posts.
Prime the finished product with PVA glue and water. After the glue has dried, coat it with acrylic varnish.
You can add decorative trim to suit your taste. The storage box is ready.
It turns out strong, light and beautiful. And it will add order to your shelves.
Transition from the bottom to the walls. Raising the racks
Once the bottom is done, sound logic dictates that somehow you need to move from it to the walls to continue working. We'll look at several ways to raise racks to create beautiful pieces.
Smooth or imperceptible rise
The easiest way for a beginner is to simply lift the posts up about 30 degrees with your hands and continue to braid them with rope. After the first circle, the racks need to be raised another 30 degrees and continue to weave with a rope.
By the third, or maximum fourth, row you need to completely align them and continue braiding. This will create a smooth rise.
This method is used when it is necessary to achieve a smooth transition of the bottom into the walls of the product.
In the finished product, such a smooth rise of the racks will look like this: the transition is not sharp, the bottom gradually turns into walls:
Simple vertical lifting. Establishing a stand for the next
To master this technology, take an additional tube, preferably in a contrasting color, so as not to confuse it further, and place it on any rack; we will henceforth call it the first one. This manipulation will allow you to “reserve” a place for the last raised rack.
So, bend the first post, bend it through the additional tube and bring it up through the next one.
Bring the second rack up through the third in the same way.
Repeat these steps around the entire perimeter of the bottom. When you reach the extra tube, take it out and insert the last post in that place.
All the racks are already up. Before weaving the walls, pull each of them up a little.
A clear and sharp transition from the bottom to the walls will be visible in the finished product:
Using a string of three tubes
If you are new to newspaper crafting, this method may seem overwhelming to you. Therefore, we suggest you start your training by watching a clear video master class from Lada Ligai.
The transition made using this technique (a rope with three tubes) will be neat and smooth:
Preparing for work
Work begins with the preliminary preparation of tube blanks.
To make tubes you will need:
- old newspapers,
- PVA glue,
- knitting needle or wire.
Operating procedure.
- Newspapers must be cut into long strips. It is convenient to cut the newspaper lengthwise into quarters to create long strips. You will need a lot of strips; it is wise to cut them in advance.
- The tube is twisted using a knitting needle or a piece of wire. The smaller the diameter of the knitting needle, the neater the crafts made from newspaper tubes look. A corner of a newspaper strip is wound onto the tip of a knitting needle and, gradually twisting the strip at an angle of 45 degrees, a tube is formed. The edge is fixed with glue.
- The knitting needle is removed, the tubes are ready for use.
When forming the tubes, you will notice that one edge is slightly larger in diameter. There is a hole in it. This hole can be used to connect parts. After all, the tube is not that long; it needs to be extended during the weaving process. Fix the connection with glue.
What weaving techniques can be used for creativity?
To quickly and easily learn weaving from newspaper tubes for beginners, the needlework technology is reproduced step by step. Modern craftsmen using newspapers and magazines instead of wicker can master various weaving techniques that help create truly beautiful and unusual crafts.
Simple weaving
The simple weaving technique involves making a continuous ribbon, with one vertical part and gradual layering of rows. In such products, the number of vertical parts cannot be even, and the weaving itself is done clockwise, which is convenient for the creative process.
When creating shaped crafts with corner elements (baskets and caskets, trays and stands), you can use double and triple rods to weave into the corners.
Layer binding
The original weaving technique allows you to create durable and practical products obtained by weaving several tubes through one vertical. To create crafts using this technology, you will need to carefully select the blanks; they must be the same length and thickness.
The tubes are not pressed during the weaving process, this allows you to create the effect of volume of the material, which remains in a raised state until painting and opening with varnish.
Weaving in rows
Most often, this technique is used to create voluminous crafts or practical products that have a base. Horizontal rows are woven onto vertical guides extending from the base; for the creative process it is better to choose long and fairly dense strips.
This technique is best used to make baskets and baskets, themed hats and vases, boxes and boxes for small items, and decorative jewelry with three-dimensional shapes.
Rope weaving
A unique weaving technique that repeats the process of creating crafts from ropes and ropes using the macrame method. Interlocking newspaper tubes form one tube, intertwining with the base and with each other, which helps increase the strength and wear resistance of any product.
Using these skills, you can create the basis for a Christmas wreath or a Christmas tree (using a cardboard cone as a basis), animal figurines or containers for storing sweets or craft materials.
Processing of tubes
Depending on the purpose and final type of product, the tubes require additional preparation for further work with them.
Simple newspaper crafts can be made from unpainted tubes. Additionally, they can be designed in finished form. If you want to get a colored wicker product, it is wise to paint the tubes in advance. When painting a finished product, paint consumption and work time increase.
To paint blanks, it is recommended to take acrylic paint and mix it in the required ratio with the coloring pigment. It is more convenient to paint the tubes in a container by dipping them into the prepared paint.
Acrylic varnish is also suitable for painting tubes. You can dry the workpieces on a piece of plastic film.
If you want to simplify weaving, it is easy to give the blanks a flat shape by rolling them out with a rubber roller or rolling pin. It is easy to soften the workpieces before starting work by spraying them with water from a spray bottle.
What to paint with?
It is better to color the tubes in advance. To do this, you need to immerse them in a container of shallow depth, and then fill them with the selected dye, water-based wood stain will do, for 3-5 minutes. Dry the products on a wire rack or mesh. A brush will help distribute the paint evenly. It is easier to tint finished baskets using a spray bottle.
You can get a blue tint using regular blue dissolved in a water-alcohol base. The color can be varied individually. When using wood stain, the color match will be as follows:
- maple - red-orange;
- oak - brown-red;
- ebony gives a dark gray tone;
- larch – yellow;
- fern – green;
- mahogany – pink.
When using stain, the easiest way to paint the workpieces is to dip them directly into the container with the composition, from each end. This way the products will also be painted on the inside. The paper has time to become saturated with color, but does not get wet.
It is better not to pre-tint newspaper tubes. During initial painting, they still retain visible remnants of printing ink. When repeated, they become brittle. The problem can be solved by applying varnish tinted in the desired colors after weaving, in 2-3 layers.
How to paint newspaper tubes for weaving?
If you skip this step, the product will turn out to be variegated, but sometimes a uniform color is required. Not all paints can be used for this purpose. For example, watercolors are not suitable at all, because after drying they simply turn pale, that’s all. Those who are interested in how to paint newspaper tubes for weaving should answer that for this they use available materials - iodine, potassium permanganate, brilliant green, as well as special ones - gouache, food coloring, stain, color, car or interior sprayers. The latter are convenient to use on a finished product.
Well, it’s better to paint individual tubes like this:
- Prepare a solution and dip paper blanks into it. This method is used by those who often weave from newspaper tubes. In this case, it is better to cover the container with polyethylene and put on rubber gloves on your hands.
- Alternatively, you can make a device from a plastic plumbing pipe. Having installed the plugs on it, pour the color inside, place the tubes, shake and remove. Pour the remaining paint into a bottle.
- If there are not many tubes, then you can pour the color into a disposable cup and cover the products with a brush.
How to weave walls
Having weaved the bottom, you need to rise with a working tube to form the walls. You can weave them the same way as the bottom. This weaving method is called “rope”. Or master more complex patterns and openwork weaving.
How to learn to make weaving from tubes? Nowadays, videos with lessons and explanations are very helpful in this regard.
Ideas for wickerwork
It’s easy to weave a variety of products and crafts from newspaper or paper tubes. For a children's themed exhibition, it is easy to glue together a house from tubes and add a fence in the form of a fence. The craft will look very colorful.
You can weave round, oval or rectangular products from tubes. Before weaving any product, you need to decide on its shape and size. The easiest way is to take as a basis an object that is similar in shape and size and braid it.
To weave a plate or vase, you can use an ordinary plate, jar or vase of the shape you like. An object of suitable shape and size will also serve as the basis for a wicker basket.
A similar principle of operation applies to square or rectangular products. Having formed the bottom, a sample is placed on it and used as a base.
It’s easy to come up with new weaving ideas on your own by combining different patterns, or looking at photos on the Internet. Products woven from newspaper tubes look original and are quite functional, which allows them to be used in everyday life.
Openwork balls for decoration
If you need to quickly decorate a space for the New Year or create a festive photo zone, newspaper tubes will be very helpful.
Having several small balloons and brightly colored newspaper blanks, you can make openwork balloons.
The manufacturing process is very simple. You need to inflate the balloons to different sizes and tie them. Next, braid them with newspaper tubes, as if winding a ball. You shouldn’t wind too many rows, otherwise the airiness effect will disappear. For reliability, newspaper tubes are fastened in several places with glue. After the product has dried, all that remains is to burst the ball and take it out.
It is good to additionally paint decorative balls with acrylic paints from a spray can. Gold and silver options look especially solemn.
Technology of weaving from newspaper tubes
Newspaper tubes are the working material needed for making flowers. If you decide to master this craft, you need to prepare many newspapers in advance - some will be needed for training, others - directly for work.
Why newspapers? Their quality is much softer and more manageable than that of ordinary paper. The tubes must be long, which is what newsprint will help with. The ink used to print on paper makes your hands and work surface very dirty. We recommend that you cover your work area with something in advance. If you wish, you can weave products from any material: magazines, office or consumer paper, cash register tape and others.
First of all, you need to pay attention to the thickness of the paper. It needs to be thin because thick material will not roll up as desired and the tube will look very thick. If you take paper with a white edge and roll it using a certain technique, you will get white tubes. The advantages of working with newspapers include accessibility and low cost, and the disadvantages are hands stained with paint.
Advice. In some printing houses you can buy a roll of newsprint - enough for hundreds of tubes.
You can also use white paper, which is sold in packs. It is somewhat denser than newspaper, but you can still make tubes out of it. The disadvantages of white paper include its density - the tubes spin much more difficult and take longer, they do not fold well into a weave, and the twist is very noticeable.
Kraft paper can be used as a material for straws, but it is thicker than necessary and cannot be dyed.
The tape for cash registers is conveniently rolled and has the required thickness. However, it must be folded so that the slippery thermal layer is inside, otherwise the tubes will not be able to be painted.
Magazine paper can also be used as a material for weaving, but it is thicker than expected and is almost impossible to paint so that the inscriptions and drawings disappear.
So, for production you will need:
- clean whole newspapers;
- sharp knife or scissors;
- glue stick;
- wire;
- thin knitting needles, with a diameter of no more than 1 millimeter.
How to weave a house from newspaper tubes?
We chose the rectangular house model. It is worth rolling up the tubes in advance, but how many of these products will be needed depends only directly on the process and will become clear in the work, so it is better to make as much as possible.
To begin with, the bottom of the house is woven from double posts. One should be shorter than the other. Next, we raise the large vines and tie the short ones with a rope.
We weave rows and make an entrance hole through which tea bags will be served. Then the weaving will continue, but first, the tubes cut at the entrance are sealed using a braid of tubes.
Towards the top, the weaving should be gradually narrowed. It’s better to watch how to do this in the video master class. It is difficult to explain the process of creating walls for a roof. Then we finish the edges, process them, and make a roof.
Each craftswoman creates a roof in her own way, depending on her desires and capabilities. The wicker house made from newspaper tubes is ready.
Rectangular bottom
To do this, you need to intertwine the tubes in the same way as threads are intertwined in a simple (for example, linen) fabric. The sequence of actions is as follows:
- Place 10 tubes vertically.
- For convenience, you can place the press on their lower ends or secure them with masking tape.
- Take another tube and place it horizontally between the vertical ones so that they alternate. For example, the first will be on top, the second on the bottom, the third on top again, and so on.
- Place the next tube horizontally in the same way, but change the alternation. Now place the first from below, the second from above, the third from below and then in the same sequence.
- Place the third horizontal tube in the same way as the first.
- The fourth - similar to the second and further to the 10th.
When the number of vertical and horizontal tubes is the same, weaving the bottom is complete. Next, work continues in the vertical plane, lifting (and expanding if necessary) the base tubes.
Step-by-step instructions for weaving a bottom for a basket
For most crafts based on plywood weaving, the bottom is first formed; it can be round, semicircular, triangular, square or rectangular. There are two main options. The first is to make it out of cardboard, with racks around the edges. This is a fairly simple and accessible method, which is optimal for those who are just taking their first steps in weaving, since it is much easier to weave just the walls than to give the necessary shape to the bottom.
The second option is more complex; it suggests weaving the bottom from newspaper tubes. This will require long blanks made up of two or three blanks. There are many ways of weaving, but the principle is the same in all cases - the straws are woven together one at a time or in small groups, forming a single center. After this, separate “lozins” are braided around the resulting base, adding size and giving the desired shape.
If you are giving the bottom a round or oval shape, then it is best to cross several straws nested one inside the other. For example, take 5 pieces each and weave them together so that the bottom is not too voluminous - you can crush it a little (this is done with a rolling pin or an ordinary bottle, rolling 3-4 times). To facilitate further work, the intersections are coated with glue.
Then you need to take a paper straw and start tying the bottom; during the work, the straw is passed through 3 tubes - thus forming two rows. Then a few more rows are knitted, passing the straw through two tubes, and the last 2-3 rows are woven, passing it through only one straw.
Please note that while weaving the tubes, the bases should be spaced at an equal distance, initially this is how it works out, but it is important to constantly ensure that this proportion is maintained.
When moving to the walls, the tubes are crossed - this makes the products denser and more stable, and the transition, accordingly, more reliable. To weave the walls, working straws are most often used - the same ones that were used to form the bottom.
In order for the finished product to look aesthetically pleasing and neat, at the final stage of work it is necessary to remove all the working tubes and also form the edge. First, the working tubes are fixed; most often they are closed directly in the weaving - in the place of the closest binding. To perform this operation, you will need an elongated skewer or a regular knitting needle. Having retreated 2-3 downwards, the skewer is inserted so that it comes out not far from the working tube.
Next, the straw should be placed on a skewer and the entire structure should be bent, and then carefully removed in the place where the skewer was originally inserted. After this, the straw is cut as close as possible to the weaving and all manipulations with the remaining working elements are repeated.
This method is considered one of the most reliable and at the same time simple; it allows you to firmly fix the working tubes so that they are inserted into the weave and remain clamped.
At the last stage, they begin to design the edge. There are several ways, the easiest way would be to do the same as with the workers, but bend them inside the finished product.
Round bottom
This version of the bottom is used in various crafts from candy bowls to baskets. Let's look at different ways to weave it.
Option #1
We recommend that beginners get acquainted with paper wicker weaving by watching a useful video in which Olga Lagoda explains how to start weaving a round bottom. You will also learn how to calculate the number of racks for your first product.
Option No. 2
Weaving the bottom based on a cross made of 8 tubes. Take 4 tubes, stick 4 more in the middle at right angles. The result is a cross-shaped base for weaving. To work, you will need additional tubes - working ones. Lubricate the tip of one of them with glue and insert it into the second. Bend the resulting elongated tube in half.
Hug her 4 top bases. Its ends form two working tubes at once. This method of weaving is called “rope in two tubes.”
You can start braiding the base. Place the upper working pipe behind the 4 side bases, and run the lower one over them. To avoid confusion, look at the step-by-step photos.
In this way, braid the remaining warps, making a full circle.
Braid the second circle according to the same pattern, but insert working tubes for every 2 base tubes.
Make three full circles of the bottom.
Continue weaving with a rope, braiding each tube of the base. Weave the bottom until the distance between the base posts reaches 2 cm. Now the round bottom is ready.
If its size is not enough to realize your idea, you need to add additional racks
. If this is neglected, the weaving will become too loose, untidy and will not hold its shape well.
Additional stands are needed when the distance between the base tubes exceeds 2 cm
. Near each base, open a wider hole with an awl. Insert an additional tube into the hole with the sharp end, having previously lubricated it with glue.
For these purposes, it is better to take polymer glue, for example, Titan, Master or Dragon. Regular PVA will soak the paper and you will have to wait a long time for it to dry before continuing to work. Look at the photo to see what the process of adding additional racks looks like.
Having finished this work, braid a couple more rows of double racks with rope. And only after that they can be pulled apart one at a time and continued, braiding each separately. Thus weave the bottom to the desired size.
Finishing the weaving is very simple: hide the ends of the working tubes in the braid, cut off the protruding ends and glue them.
Option #3
This method also requires 8 tubes. Intertwine them to form a tight cross as shown in the photos.
Take the working tube, bend it in half and wrap it around the four base tubes.
Next, weave with a rope you already know, covering four tubes of the base.
In the second row you need to braid 2 tubes. Thus, you need to complete 2-3 rows.
When the distance between the pairs of posts reaches the cherished 2 cm, they need to be carefully moved apart and continued to be braided one at a time.
Carry out weaving until you obtain the bottom of the desired diameter, do not forget to introduce additional posts if necessary.
Secrets of weaving from newspaper tubes for beginners
Here are some tips for beginners from experienced professionals:
- To prevent the tubes from unwinding when painting, you must use a glue stick to hold them together.
- Weaving from newspaper tubes may seem difficult for beginners due to the fact that the product needs to be constantly turned. If you have a health disk on which it is customary to spin, you can use it to make your task easier.
- The tubes can be extended by making an acute angle at the workpiece and inserting it into another.
- The painted craft must be varnished. It is best to use an acrylic-based product.
- To avoid the formation of holes and gaps in the pattern, it is recommended to align the posts after each row and press the weave closer together.
Sources:
- https://womanadvice.ru/pletenie-iz-gazetnyh-trubochek-chto-eto-takoe-istoriya-idei-kak-sdelat-i-pokrasit-trubochki
- https://mebel-expert.info/podelki-iz-gazetnyh-trubochek-dlya-nachinajushhih-poshagovo/
- https://gidrukodeliya.ru/pletenie-iz-gazetnyh-trubochek
- https://mirpozitiva.ru/articles/2264-kak-krutit-gazetnye-trubochki.html
- https://kaksdelat.guru/kak-sdelat-trubochki/
- https://do-by-hands.ru/pletenie-iz-gazet/izgotovlenie-trubochek-iz-gazet/
- https://elenatrifonova.ru/kak-plesti-iz-bumazhnykh-trubochek
- https://vsepodelki.guru/pletenie-iz-gazetnyx-trubochek/
- https://piko-train.ru/podelki/cvety-iz-trubochek.html
- https://mirrukodelija.ru/domik-iz-gazetnyx-trubochek/
- https://vplate.ru/pletenie-iz-gazetnyh-trubochek/dno/
Start of weaving
They begin to weave the product from the bottom. You can make it from cardboard by gluing it. To prevent the ends of the tubes from being “conspicuous”, they are covered with a second sheet of cardboard.
Forming the bottom
To make work easier, craftsmen use cardboard as the bottom. If the product is woven entirely from newspaper, work begins from the bottom. The design consists of a bottom, guides and woven strips.
The height of the product depends on the length of the guide tubes. Several sticks can be used for weaving. Beginners are advised to start with one. The product will be more attractive if the bottom is made of wicker. In this case, a core is made, the ends of which are subsequently used as racks. Tubes are woven around them to create the bottom.
Round bottom
The round bottom is created from two cardboard blanks. The vertical posts of the craft are glued to the bottom circle, and on top they are fixed with a second blank using glue.
How to weave a round bottom: take 12 dowels, divide them into 3 and cross each other. Take a working vine and bend it around one tube to get 2 working ends. Weave 2 working vines around 2 sticks. By controlling the tightness of the rods.
The walls of the product are formed from such a bottom so that it looks solid. Parts made separately will not give such an effect. The walls are woven from the working tubes of the bottom.
The simplest option
There is an easier way to weave a round bottom. To do this, take eight long rods. Fold four at a time crosswise. Flatten slightly at the joint and glue.
Take the outermost vine from the bottom right side. They bend it around the stand, now from above, now from below. The second row is woven through one.
Continue working, gradually increasing the tube. When the bottom reaches the desired diameter, move to the sides. The bottom can be made more rigid using thick cardboard or thin plastic.
