chaise lounge for the cottage
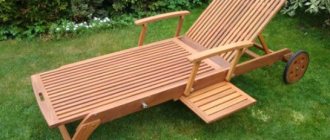
If you have a plot outside the city, you probably don’t mind relaxing in the sun on a summer day. For this you simply need a chaise longue for your dacha , because they were invented for this purpose, to enjoy sunbathing. And while some people prefer to buy such a thing, others can make their own and save money. A chaise longue can be made from available materials very simply - even a novice craftsman can handle the assembly process.
For example, this lounge chair in the photo. Looks like store bought, right? In fact, it is made by hand. Naturally, this is not the easiest option; you will have to tinker with metal tubes, but it is reliable. Basically, if you want to do everything yourself, it is better to make a wooden structure. The simplest thing is a fabric sun lounger, although many people prefer wooden sun loungers.
Requirements for homemade furniture
Any furniture intended for outdoor use must meet a number of requirements:
- Sufficient size. When developing a drawing, it is imperative to take into account the anatomical features of the future user. To calculate the angle of the backrest, it is better to use furniture construction standards. Correctly selected parameters will allow you to avoid pain in the back and neck, while ensuring normal blood circulation and comfort during rest.
- The height of the sun lounger should be optimal, especially for young children.
- Almost all models of sun loungers have a rigid frame (most often made of wooden boards). However, you should take care in advance about sewing a soft mattress or pillows.
- The safety of homemade furniture is one of the most important requirements for a craftsman. During the final assembly of the structure, it is necessary to carefully inspect all parts for defects, chips, cracks, and signs of surface damage by pests. All existing irregularities should be removed by grinding the parts.
- Particular attention is paid to pre-impregnation of all wooden surfaces with an antiseptic, antipyrine and moisture-resistant composition. As the main impregnation, you can use a production solution or a mixture of drying oil, turpentine, and melted paraffin.
When assembling folding models, sufficient attention is paid to the condition of the rotary fittings (reliability of fastening, absence of manufacturing defects, possibility of subsequent replacement).
During operation, preventive inspections of fittings and fasteners should be carried out at regular intervals.
Option #3 – Kentucky folding chair
The original chair is assembled entirely from blocks. If necessary, the chair can always be folded and stored.
The advantage of such a garden chair is that when disassembled it does not take up much space, and the design is designed in such a way that it allows you to completely relax your muscles.
To make a chair we will need:
- Wooden blocks measuring 45x30 mm;
- Galvanized wire D 4 mm;
- 16 pieces of galvanized staples for fixing the wire;
- Fine-grained sandpaper;
- Hammer and wire cutters.
For making a chair, bars measuring 50x33 mm are also quite suitable, which can be obtained by sawing a 50x100 mm board into three equal parts. The total length of the bars should be 13 meters.
Instead of galvanized wire and staples, you can use galvanized studs, the edges of which are secured with eight nuts and washers.
To determine the required quantity and length of wooden blocks, it is convenient to use a summary table. According to the drawing, we make through holes
The diameter of the holes should be 1.5-2 mm greater than the thickness of the wire used. Having prepared the required number of bars, you should carefully process all the edges, sanding the surface with fine-grained sandpaper.
Let's start assembling the structure.
For clarity, we use the assembly diagram of the seat with dividers, as well as the back of the chair. The dotted lines indicate the locations of through holes with wire threaded through them.
On a flat surface, according to the diagram, we lay out the bars for arranging the seat. Pass wire through through holes
Using the same principle, we assemble seats with dividers, connecting wooden blocks with pieces of galvanized wire
The main structural elements have been assembled. We take the ends of the wire, holding the sides of the structure, and carefully lift the chair.
All that remains is to cut off the excess wire with wire cutters, and then bend and secure the ends with galvanized staples
Preparation of the drawing
The first and most important step for the master is to prepare a drawing of the future chaise lounge.
The following parameters must be indicated on paper:
- General dimensions of the sun lounger.
- The height of the main shield above ground level.
- Backrest angle.
- Dimensions of armrests, headrest (if provided for by this model).
For a folding chaise lounge, be sure to note the location of the fittings and its main components. Actually, the sun lounger itself has several mandatory elements: a middle and four side support posts, a support post under the back, a backrest bed, and a lower bed of the sun lounger.
In the photo of the chaise lounge, built with your own hands, you can see that there are diagonal slats between the side supports. These elements also perform a supporting function.
Birch lounger
It’s easy to make an original chaise lounge from birch logs with your own hands.
To work you need to prepare:
- birch logs with a diameter of 75 to 120 mm,
- drill,
- saw,
- fasteners.
Operating procedure.
- Using a saw, make 45 cm long pieces of birch logs.
- Draw the outline of the product on the floor.
- Arrange the birch blanks according to the diagram, placing them in a vertical position.
- Connect the parts using self-tapping screws according to the diagram.
- The backrest is additionally secured with staples.
Selection of base material
To obtain a high-quality product, the master should decide in advance on the consumables. In practice, a home chaise lounge can be made from wooden boards, plywood, PVC pipes, and profile pipes.
Each of the presented materials has a number of features that must be taken into account when carrying out construction work:
- Wood (timber, board) is most often used in work. This base is durable, safe, and does not contain toxic impurities.
- Assembling a wooden sun lounger with your own hands, as a rule, does not present any particular difficulties.
- However, you need to be very careful in choosing the type of raw materials used.
- You should immediately abandon conifers, which, when heated, begin to exude caustic resins.
- Wooden pallets can be used as the main frame. A particular advantage of using pallets is their convenient shape and strength.
- The next most popular material is PVC pipe. In independent work, you can use pipe sections remaining, for example, after repairs.
- PVC is rightfully recognized as a very optimal option for assembling a country chaise lounge. To make a comfortable lounger, it is enough to have welding skills.
The most rarely used material for assembling a sun lounger is a profile pipe.
All metal surfaces must be pre-treated with an anti-corrosion compound to prevent rust. For assembly you will need a grinder and welding.
Lounger made of PVC pipes
When making a folding version of a chaise lounge, the wooden frame can be replaced with a frame made of PVC pipes.
To work you need to prepare:
- two-inch PVC pipe,
- 6 pieces T-connectors,
- 8 pieces L-shaped pipe connectors,
- canvas.
Operating procedure.
Pipe parts measuring 30 and 45 cm are fastened using ready-made connectors. In this case, one horizontal part remains without a T-shaped element. On the vertical sides of the structure, T-shaped parts are installed at an angle of 45 degrees.
For a rotating seat, an additional element is required. Cut a pipe 5 cm long and install it in a T-shaped element, securing it with another similar one. This element is necessary for a horizontal frame. The second part is made of pipes of 30 and 45 cm. The size of the transverse parts is 30 cm.
As a result of fastening all the parts, you should get a structure that is a pair of rectangles, one of which is built into the other. The seat is placed between the long part of the vertical side and the short part of the horizontal edge.
For ease of use, you need to install the seat in the desired position, measure the distance between the free T-shaped connectors. Cut the pipe to the required size and secure it.
After this, all that remains is to sew the seat from thick fabric.
Step-by-step assembly of a sun lounger
Having prepared all the necessary materials and tools, and prepared a drawing, you can proceed directly to work. The set of tools for making a wooden deck chair is standard and includes a jigsaw, tape measure, construction pencil, screwdriver, fasteners, and impregnation compounds.
Instructions on how to make a comfortable lounge chair with your own hands:
- Based on the existing drawing, parts are cut out for subsequent assembly.
- All wooden surfaces are inspected for defects.
- Irregularities and sharp gaps should be sanded.
- Next, impregnation is carried out with moisture-resistant and antiseptic compounds.
- The structure is assembled in the following sequence: a base of four supports, fastening the central or middle support post, fastening the diagonal jumpers. Self-tapping screws or dowels are used to connect adjacent parts.
- It is necessary to make several grooves on the upper contour of the side slats, which will subsequently hold the lifting backrest in several positions. If there is only one position, then the groove must be prepared in the singular.
- The lower part of the stock consists of successive rows of wooden planks. The slats must be fastened on the back side of the stock so that the protruding parts of the screws do not injure human skin or cause discomfort.
The upper part of the bed (lifting backrest) is assembled as a separate fragment, to which a holding post is attached. The bottom bar of the rack must correspond in size to the prepared grooves.
After assembly, you can cover all surfaces with 2-3 layers of acrylic varnish or paint the chaise lounge with acrylic paints.
How to make a folding sun lounger out of wood with your own hands
The blanks for making a folding beach chair must be dried in the shade for at least a week before starting work. In summer, wood often dries out, so to speak, “to the point of crackling,” so before you start cutting the pieces, you need to be sure that there will be no further shrinkage or warping.
First of all, we cut out the blanks and adjust them to length.
The next step is to remove the sharp edges and corners of the workpieces using an emery wheel. It is more pleasant to pick up and carry a folding chaise longue when there are no sharp or cutting edges on the frame.
We mark the drilling points and make holes for installing hinges using M8x50 screws.
We treat the parts of the folding frame with varnish and dry them.
The next step is to install the nuts in the holes and assemble the sides of the chaise lounge.
All that remains is to cut in the cross members and pull on the fabric cover.
To adjust the angle of inclination, we screw in several wooden plugs.
For those who like to relax by the water, the design can be supplemented with leg support, but in practice such rationalization has not proven itself to be the best. An additional pair of hinges complicates the folding frame of the chaise longue and makes it inconvenient to carry. Therefore, instead of leg support, ordinary wooden benches are often used, which simultaneously serve as a camping table.
Sewing a soft cover
Having a soft pillow or mattress on a wooden chaise lounge will be a definite advantage.
- For tailoring, you should choose textiles very carefully.
- For ease of subsequent care, it is better to sew two covers: an inner and an outer removable cover.
- When dirty or before the winter season, the outer part can be washed without damaging the filling.
- The size of the pillow or mattress can vary, but as a rule, it should completely cover the lower and upper bed.
Design examples
Furniture makers, both amateurs and professionals, rarely apply the canons meticulously and scrupulously. Any product made by human hands requires a creative approach, and in practical designs of sun loungers, the basic principles of their construction are applied with certain combinations and modifications.
For example, a chaise lounge, the drawings of which are given in Fig., can be classified as partially transformable. The profile of its drawer (on the right in the figure) is chosen in such a way that, depending on the inclination of the bed, this chaise lounge is suitable for both deep rest and mindless relaxation. The power scheme is combined: a small number of transverse beams (not support ones) work together with the flooring of the bed made of thin boards (preferably plywood slats). As a result, the design turns out to be technologically simple and low material-intensive.
Drawings of an adjustable anatomical chaise lounge
On the trail. rice. - an example of another approach to the same problem: a rocking chair (the side of the cell of the section drawing is 100 mm; the flooring is made of slats 30x40). Here the “transformation mechanism” is the vacationer himself: leaning back or leaning forward, he chooses (perhaps unconsciously) the most comfortable position. While swaying, you can combine both types of relaxation. If the lounge chair is under a tree, then the psychological relaxation from contemplating the fluttering leaves against the sky will enhance and complement the physiological one.
Drawings of a rocking chair
For elderly and/or people who are very tired from physical labor, a chaise longue is more suitable - a recumbent rocking chair with a canopy (see figure). If your body aches, your legs are filled with lead, and, especially, the romantic illusions of youth are behind you, the flickering before your eyes and the bright light in them only irritate, but when the fatigue subsides, the canopy canopy can be rolled up “to suit your mood.”
General view and dimensions of the sidewall of a rocking chair for elderly and/or very tired people
For those for whom romance is reality and the essence of life, a mobile couple's chaise longue with a folding canopy is suitable:
Drawings of a mobile couple's lounge chair with a folding canopy
A massive structure that can be rolled into a secluded corner, a durable elastic bed woven from a rope (preferably a propylene cross-lay); In such a chaise lounge, relaxation for two can be very, very active. And over time, its natural result will appeal to the children's anatomical chaise longue (side profile in the figure below; cage 10x10 cm, dimensions also in cm).
Side profile of a children's anatomical chaise lounge
Originality for originality's sake
In conclusion, let’s not forget about those for whom the meaning of life is not to be like everyone else (everyone else). One of the possibilities for implementing such a credo is a garden lounge chair made from... a plastic barrel, see video:
Video: homemade sun lounger from a barrel
Well, if the author(s) are comfortable in it, good for you. But, probably, one of the commentators on this story is right: a vessel that is quite expensive and necessary for the household is more worthy of being used for its intended purpose.
Display all materials with the tag:
- furniture
- recreation and sports
Go to section:
Photo of a homemade sun lounger
What you need for work
In order to independently make a country chaise longue from wood, you should have the following tools and materials available:
- A slab of laminated wood, its thickness should be two centimeters or more.
- Boards (zero point twenty-five hundredths of a centimeter long) and beams (zero point one forty-five hundredths of zero point forty-five hundredths of a centimeter) for finishing the product and making the frame.
- Electric tools (jig saw, drill, screw driver).
- Drills with a diameter of zero point four centimeters.
- There are four rollers, ten centimeters each.
- Corners for fastening.
- Sanding sheets.
- Paint and varnish to give the chaise lounge a beautiful appearance and protect it from damage.
For sun loungers made with your own hands, it is best to use sheets of spruce wood or other pine needles. This material is moisture resistant and is not subject to the negative influence of temperature changes. Such wood is sold in building materials sales centers or made to order from carpenters.
How to protect the array from moisture and sunlight
The surface must have good resistance to dampness, cold and summer heat. To prevent the material from swelling and drying out, it must be treated with protective compounds. If there are gray spots of mold on the surface, they should be cleaned off - otherwise the product will not last long. If the fungus penetrates deeply, it is better to take another workpiece.
Treatment with antiseptics
Antiseptic solutions are used to protect against microorganisms. First, the workpieces are dried. To prevent them from bending and splitting the crack, you should select a soft mode. It is best to dry them in the sun in warm, dry weather. In prefabricated elements, it will be necessary to process not only the surface, but also the holes for the fittings. If soil and moisture get into them, rotting will begin.
Processing is carried out before assembly. First, the parts are sanded with coarse sandpaper, removing the top rough layer and making the surface smooth. Then they pass it with fine sandpaper. The solution is applied with a brush or roller. The time is calculated so that it has time to dry.
Varnishing of prefabricated elements
During operation, the legs will often have to be in damp grass. Contact with a wet surface will destroy the fibers if they are not varnished. Antiseptics alone will not be enough for protection.
To reduce varnish consumption, the fibers are primed with liquid wax, factory primers, or a solution of PVA glue in water. After drying, the parts are sanded with fine-grained sandpaper.
Before you make a wooden chaise lounge with your own hands, you need to think about its appearance. To highlight the texture of ash or oak, it is better to use an alcohol-based clear varnish. For conifers that do not have high decorative characteristics, an oil composition is more suitable. It is also used on painted surfaces.
Alcohol varnish has different shades. Light and dark rocks are treated with varnish that matches them in color. It is applied in thin layers. The first two serve as a primer that impregnates the fibers and closes the pores. After they have dried, the coating is sanded with fine-grained sandpaper, and then the third layer is laid. A few days later - after it has completely dried - the final finishing layer is laid.
Treatment with an oil solution takes place in three stages. Each layer dries within 6-24 hours.
For work, use a brush or a cloth swab. To avoid drips, wipe off the excess on the fabric or brush on a smooth board. The strips are laid with a one-third overlap. Movements must be fast. You should not go over the same place many times - this will ruin the appearance of the coating.

