There are now more than enough tips on how to cut a baseboard at 45 degrees on the Internet, the only bad thing is that most of them are given by people who have never done this. Next, from a practical point of view, I will tell you how to cut skirting boards at the corners with your own hands in 3 options, and you will learn about both traditional methods and folk universal recipes.
The science of how to properly trim ceiling moldings in corners is not as complicated as it may seem.
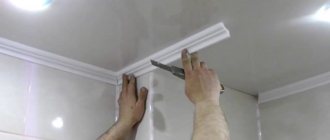
Ceiling plinth - fillet
To do this correctly, it is important to strictly follow existing recommendations and rules for finishing work. And then the result will please you.
There are no difficulties in attaching the fillet (this is the name of this element): virtually all types of products are attached with reliable glue.
Even inexperienced repairmen have no difficulty hanging the ceiling plinth. They are worried about something completely different: how to properly cut the ceiling plinth? In fact, almost every room, no matter how intricate its shape, is equipped with corners.
And in these inner corners, the individual elements of the plinth should be nicely and evenly joined. And in rooms with a particularly complex configuration, you will have to be smart about the external corners. Let's try to figure out what to do in each of these situations, and how to cut out the required part using the available tools.
Skirting materials and cutting methods
First of all, let's try to decide what the fillet can be made of, and what specific material is best for cutting.
On sale today you can find products made from polystyrene foam (polyvinyl chloride), wood, polystyrene foam and polyurethane.
Styrofoam
Perhaps one of the cheapest are skirting boards made of polystyrene foam, which is a fragile, soft and brittle material.
Even your fingers can leave dents on them; creases and defects easily form on them. It is quite difficult to cut a nice and even corner on a polyvinyl chloride baseboard.
For an inexperienced craftsman, a large amount of purchased material can go to waste precisely for this reason. This polymer also has high electrostatic properties, which explains its ability to collect dust.
It is most convenient to cut such a plinth with a hacksaw or a sharp construction knife.
Expanded polystyrene
Products made from polystyrene foam are also inexpensive, although this material is a more durable analogue of traditional polystyrene foam.
It can also be processed with a sharp tool.
Extruded polystyrene foam
Skirting boards made of extruded polystyrene foam are a little more expensive, they are somewhat denser and more difficult to cut. But they crumble and break much less.
Therefore, cutting them is more convenient and easier. For this purpose it is convenient to use a hacksaw or a sharp knife.
Polyurethane
Polyurethane ceiling skirting boards are currently perhaps one of the most expensive.
But they justify their cost: moisture-resistant, quite durable and dense, quite elastic.
The baseboard located above the kitchen stove may become deformed and even crack a little.
They cut perfectly with a special knife without forming crumbs. But these products are very sensitive to temperature changes.
Tree
Wooden skirting boards for ceilings are quite heavy and dense products, hard and durable.
They lend themselves well to processing with a special fine-toothed hacksaw. You can also use a reliable metal blade. So how to cut the ceiling plinth correctly?
Ready-made factory corners
Note that each master has the opportunity not to pore over precise cutting and fitting of corners.
At a hardware store you can purchase a factory-made corner element into which the prepared edges of the plinth can be easily inserted.
It is enough to measure the required length of the workpiece and cut it at a right angle.
All defects and flaws will be hidden by this special element. But it is not always possible to use this convenient method, since the standard dimensions of such factory corners can differ markedly from the size of the baseboard itself.
Such angles will stand out due to their disproportion, and it will not look very neat. But if the design of the room and the dimensions of the workpieces allow you to use this method, then you should not neglect it.
For those who have to use one of the methods for cutting ceiling plinths, the following tips will be useful.
Required materials and tools
To install a ceiling molding you need to buy:
- baseboard;
- glue (screws for wooden fillets);
- connecting corner, if you do not plan to cut the corners;
- putty (not needed for smooth walls);
- water-based paint for painting the baguette, if required by the interior design.
Tools and equipment you will need:
- stepladder or strong table (chair);
- miter box for cutting 45o corners at the baseboard;
- cutting tool (construction knife, hacksaw or wood saw);
- construction pencil;
- roulette;
- a hammer drill or electric drill when working with wooden baguettes;
- putty knife.
Trimming fillets
Trimming using a miter box
How to evenly trim the corner of a ceiling plinth using it?
A miter box is a simple tool used by carpenters. With its help, you can cut any workpiece at the desired angle.
It is usually a wooden, metal or plastic tray on which special vertical slots are made for cutting at an angle of 45° and 90°.
There are complicated designs, which, in addition to the mentioned angles, also have a hole for making a 60-degree cut.
A special miter box is produced for professional work. Its rotating mechanism allows you to fix the cutting blade in relation to the workpiece at any given angle.
Internal corner
The prepared plinth is applied to the ceiling, and the required length is set aside.
Then this same bar is inserted into the miter box exactly as it will be located on the ceiling. It must be pressed against the far wall of the device. In this position, the plinth is held with your left hand.
The hacksaw blade should be in such a position that its angle is 45 degrees, and the handle is as close to the hand as possible. Trying to avoid pressing on the saw, we carefully cut the workpiece.
Next, you need to cut off the counter strip at the baseboard. It is also placed at the far wall of the instrument, held and pressed, this time with the right hand.
The position of the hacksaw is similar to the previous procedure - its handle approaches the hand at an angle of 45 degrees. The baseboard is cut.
Then the finished, already cut planks are joined - the accuracy of the fit is checked. It is believed that for better orientation, when making an internal corner, it is better to start cutting from the front part of the product. The cut locations usually have to be adjusted with a file.
External corner
The most correct thing to do, in order to keep the dimensions more accurately, is to first start marking the inner corner, and only after that move on to the outer one.
Otherwise, it may happen that the entire length of the bar is not enough.
The plank is applied to the ceiling, and marks are made according to the size. Holding with your left hand, the ceiling plinth is pressed against the nearest wall, the handle of the hacksaw moves closer to your hand. The workpiece is cut.
The strike plate is pressed against the nearest wall, while it is held with the right hand. The hacksaw blade should be at an angle of 45°, the handle of the tool should be close to the hand of the master. A piece of the workpiece is cut off, the corner is neatly joined.
This type of edge processing of parts using wort is good in cases where the angle between the walls is even and straight (90°).
If its performance leaves much to be desired, then it is worth using a different method.
How to cut a ceiling plinth without a miter box?
Markings on the ceiling
The method with markings on the ceiling allows you to cut the corner accurately and evenly. It has one drawback - the plinth strip is quite inconvenient to hold in weight during the procedure.
In all other respects, using this method you will be able to mark the angle for cutting even more accurately than others.
When the plinth is applied to the intended installation location, all dimensional deviations and inaccuracies are noticeable and immediately taken into account.
Corner cutting
First you need to take a couple of blanks, then cut them at a right angle. Pressing the end of the plank against the perpendicular wall, we apply one plank. We draw a line on the ceiling along the contour of the plinth. We remove the first plank, then, in the same way, resting the end against the wall, we apply a counter plank. We mark a line along the contour in the same way.
The point where the two separate lines intersect is the mark at which the workpiece is cut. Each strip is applied to the surface again, and the point of the future cut is marked on both. From the found point to the other edge of the plinth strip, draw a line. We cut the skirting boards according to the previously made outlines, carefully join them, and place them in the place where they will be installed.
This method allows you to more accurately process internal corners.
How to make a miter box template with your own hands
If you don't have a miter box, you don't have to buy a tool for one-time use. You can make a template with similar functions yourself.
To do this, the required cut angles are applied to wood, paper or cardboard.
Then you need to draw a pair of parallel lines, find the center, and then use a protractor to measure angles of any given size.
This method is especially convenient because, using it, you can set an angle of any size, even larger than a straight line.
The method of processing a plinth blank using a homemade tool is practically no different from working with the original. The plank is pressed against one of the parallels, after which the hacksaw is set at the required angle and cut off.
Remember that before cutting the corners of the workpiece, be sure to check the size of the angle between the walls! To do this, use a protractor and a corner.
How to cut ceiling plinth correctly. Important little things
The measurements required to cut the plinth for the ceiling should be done in a special way . To determine and mark an internal corner, the length must be measured from the corner itself. To mark the outer corner, it is necessary to take into account that the plinth will protrude into the interior of the room at a distance equal to its width.
It is not advisable to fasten the skirting boards until their exact location has been measured and the counter plinth has been cut. Only after the perfect convergence of both strikers in the corner can you begin their installation and fastening. If you work with polyurethane or wooden skirting boards, defects and flaws can be corrected with a nail file or file. To fit a foam product, you should arm yourself with a sharp knife.
If even after finishing the baseboards there remains even a small gap, do not rush to get upset - it is easy to repair it with ordinary putty. Cutting ceiling plinth accurately and accurately is not that difficult. But in order to acquire at least a small skill, first try to practice on small workpieces.
What characteristics should you pay attention to when choosing
In construction markets or in specialized retail outlets you can find hundreds of options for ceiling plinths from various competing manufacturers. When choosing and purchasing this finishing element, you should pay attention to the following characteristics of the product:
- Ceiling plinth material:
- Polyurethane - PVC products, characterized by increased flexibility and strength.
Polyurethane ceiling plinth
- Expanded polystyrene - characterized by low weight and simplicity of design.
Expanded polystyrene ceiling plinth.
- Plastic - any pattern and bas-relief can be formed on the surface.
Plastic ceiling plinth
- Wooden ones are highly environmentally friendly and look ideal in country or loft style interiors.
Wooden ceiling plinth
- Gypsum - form an inextricable structure with the ceiling plaster.
Gypsum ceiling plinth
- Based on surface shape, there are 4 main types of products:
- With a convex profile.
Element with a convex surface
- With a concave surface.
Element with concave surface
- With curly cutting.
Element with curly cutting
- With a bas-relief image - suitable for interiors in antique or oriental styles.
Element with bas-relief
- In terms of dimensions - the standard length of ceiling plinths varies from 2 to 3 meters. When installed on the ceiling, the elements are joined together, followed by sanding the seam. The width of interior parts can be from 15 – 20 mm to 200 – 250 mm.
- Symmetrical or asymmetrical.
Symmetrical product
Asymmetrical product
- According to the finishing method, the surfaces of plinths for ceilings are produced in a rough version - intended for final finishing - putty and painting, as well as finished products covered with a layer of fine finishing, with a glossy or matte texture.
Depending on the material from which the products are made, there are several types of trimming for arranging elements along the length of the room and for joining them in the corners of the room.
