Garden path made of wooden saw cuts
Wooden saw cuts look very organic on the site. Here, this natural material is most often used to create paths. Garden paths made from wooden parts can be very diverse, but the manufacturing principle is the same for all.
Saw the tree into round timber 5-10 cm thick. Treat all parts with a special compound that will protect the material from cracking and rotting and thus increase its service life. Level the area. Place dried wooden cuts on it. Tamp them down thoroughly. The simplest - single-row - track is ready.
Fill all free space with any mulching material: bark, sawdust, pebbles, etc. Soil is also poured into the holes between the round timbers.
When creating a more complex path with several rows, always lay the largest round timber first. When they take their places, begin to fill the space between them with cuts of a smaller diameter. And at the end, fill the remaining gaps with mulch.
Some people frame a garden path made from wooden saw cuts with a border. You can use ready-made concrete fencing as a border, or you can make it yourself from boards or stones. Flower lovers plant low-growing flowers along the path - the result is a lively and bright border.
Watch
This craft is difficult, but with due diligence everything will work out. You need to take the mechanism from an old watch as a basis. We use a saw cut as a display with numbers.
Numbers can be burned onto the surface, pasted, or decorated with decorative elements. It all depends on your imagination.
You need to cut a small circle in the center to insert a clock mechanism with hands. The circle must fit perfectly.
If it is too large, you will have to use additional decor, such as artificial moss, leaves or flowers.
In the photo in the interior, such watches look original and are ideal for styles such as country, Provence and derivatives of them.
They can be used in minimalism, but provided that they match the color scheme, as well as at least one decorative wooden element in the room.
On the back of the clock it is necessary to provide the possibility of mounting it on the wall. To do this, a recess is knocked out in a certain place.
Fence made of wooden saw cuts
Another way to use wooden cuts in your dacha is to make fences out of them. There are a lot of options here. The parts can be stuffed or glued onto a dull picket fence.
You can combine wooden saw cuts of different diameters and artificial stone in one fence. The fence looks not only impressive, but also quite unusual.
Stones are most often used to fill gabions. However, other materials, such as wood cuts, are often placed in the space between the mesh. As with any wooden structures located outside the home, they must be treated with protective impregnation before use.
- How to make gabions with your own hands?
Gabions are being used more and more often in landscape design. What it is? Is it possible to make gabions with your own hands?
Saw all the logs into round timber of the same thickness. To create a gabion, you can use any saw cuts whose size exceeds the size of the cells. Fill the grid from bottom to top, immediately placing smaller ones in the spaces between large elements.
What products can be made
Beautiful products can be created using not only saw cuts, but also knots that may remain after construction work. You can also use dried branches.
They can be easily decorated and created different products. Knots and irregularities add a distinct style, and the cut of the wood will add extra character.
Table made of wooden saw cuts
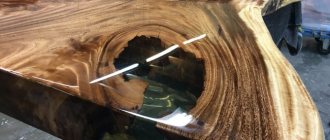
Wooden saw cuts are also used to create furniture, most often tables and chairs. A massive wooden table made from a huge old tree will, of course, not fit into every setting. However, in the right environment it will certainly dominate the interior.
Tempered glass is often used as a tabletop. It will add lightness, airiness, and the table, despite the base made of wooden cuts, will not seem so massive.
Small tea tables are the easiest way to use round timber. For such a table made from wooden saw cuts, you only need metal legs and wood impregnation.
These tables can also be used as bedside tables or as flower stands.
Material properties
For work, elements obtained as a result of end sawing of tree trunks are used. Tree stumps, trunks, branches and branches can be used as raw materials.
For blanks, you can take fresh wood. Drying parts at high temperatures promotes the formation of textured cracks on them.
The type of wood is selected depending on the type of product:
- Coniferous wood is excellent for making children's crafts, toys, trim, home interior parts,
- wooden elements of garden decor require hard wood species (birch, oak, beech) as raw materials.
Hot coasters
The process of creating square coasters for hot dishes from wooden saw cuts consists of the following steps:
- Take the trunk of any tree with a diameter of 1 to 3.5 cm. Saw it into round timber about 1.5 cm thick.
- On a sheet of plywood, starting from the edge, begin gluing the cuts with any wood glue. Use both large and small parts as you work.
- Fill the plywood to the width you need. After complete drying, cut it into strips of the desired size.
- Sand the workpieces thoroughly. They must be completely flat. After this, cut the strips into squares.
- Saturate the stands with wood oil.
- If desired, to protect the table, you can glue silicone legs to the bottom. Your coasters are ready.
The stands can also serve as a board for cutting food. To save space, they can be made two-tiered.
Preparation of material
To prepare high-quality parts, you will need to know how to use a hacksaw or circular saw to get a neat cut of wood.
Material procurement procedure:
- selection of wood (knots, branches, logs),
- removal of bark and sawing in the transverse direction,
- grinding the cut, drying, polishing,
- treatment with compounds to reveal the texture of the pattern,
- treatment with anti-rot compounds, varnishing.
Working on blanks will require time and skill. The result will be beautiful parts for making a wide variety of products. There are many options for products made from end-cut wood, ranging from crafts for children to home or garden interior items.
For further work you need a jigsaw and glue, and additional decorative elements if necessary.
Room decor with wooden cuts
Wooden cuts are often used to create decorative elements.
Watch
Take apart traditional and unremarkable watches. From there you will need a clock mechanism and hands. In the center of the wooden cut, make a hole equal to the size of the clock mechanism. Draw numbers on the outside of the clock using a stencil. Attach the arrows and insert the battery. Agree, wooden watches look much more interesting than plastic ones.
Mirror frame
You can also trim a mirror frame using wooden saw cuts. Cut a circle out of plywood. Attach a mirror to it and trace its contours with a simple pencil. Use white acrylic paint to paint the part of the plywood that will be covered by the wood cuts. When the paint is dry, glue the round timber onto the plywood without going beyond the line. Try to ensure that the cuts that go along the outside cover the edge of the plywood. Treat the frame with varnish and attach the mirror to the plywood.
Wreath on the door
You can also make an interior wreath with your own hands from wooden cuts. Saw the tree into thin, up to 1 cm, round pieces (photo 1). Find a round base, such as a bowl of suitable diameter, and place the pieces around it (photo 2). Carefully, trying not to move the circles, remove the base. Take a new circle and apply hot glue to both edges. Glue this cut so that one of its edges is on one round piece of wood, and the other on the other. So repeat until the end. The top row will connect all the elements of the bottom row. All you have to do is decorate the wreath.
We hope that after our selection, your interior will also include several items made from wooden sawn cuts.
Panel
One of the most common crafts made from natural wood is a decorative panel. It has many varieties, can consist of any number of blanks, it all depends on the imagination of the person laying out the panel.
However, there are several characteristic features by which the panels can be divided:
- Made from dark wood
- Made from light wood
- Based
- Without reason
An easy option is a panel on a base onto which blanks are glued. As a rule, this is thin chipboard, on which blanks in the form of circles of wood are then placed.
To fill the space between cuts, branches, leaves, small stones, moss and natural materials are used.
It is more difficult to lay out panels without a base. In this case, you need to be careful, the panel should be smooth and firmly glued. It is recommended to use special wood glue when gluing joints between materials.
The result will be a kind of board of circles. Its advantage is that you can make a three-dimensional craft from it by adding details.
Very often a design is laid out from wood circles. Looks original. This is one of the simple and quick options to create a unique decorative element.
Shelves
From wood cuts you can make original shelves of different sizes for small and large items. The saw blade is cut in half. Metal furniture brackets are attached to the bottom. Through the holes in them, the shelves are attached to the wall using dowels. The bark can be left on or removed. In the latter case, the sidewall is sanded and painted in the desired color, matching the overall style of the room.
Crafts for the playground
Figures assembled from saw cuts will delight any child if they represent cartoon characters or animals. You can make original bunnies. Each animal is assembled from 2 large (diameter at least 30 cm) disks and one medium-sized slice (15-20 cm). Large discs form the body and are installed parallel to each other. A head made from a saw cut of smaller diameter is fixed between them. Ears, paws and tail are made from large branches by cutting them at an angle.
Another craft option is owls. It is better to place the mother owl and the owlet on a stump. The body of the birds is made from a large oval cut. The eyes are formed from branch cuts. For the wings, the round disk is cut in half.
Laying end cuts
Laying slices is the main part of the work on installing decorative floors, similar to laying out a mosaic. There are several technologies for laying wooden slices on a prepared surface.
Filled with self-leveling mixtures
First, lay out the largest sections.
This option is best suited for creating noble floor coverings for apartments or country houses.
Sawed round pieces are laid out over the entire floor area. It is better to start the layout with the largest cuts, leaving space between them for smaller elements.
After this, we fill the gaps with small cuts, which allows us to diversify the overall picture and save on the consumption of such expensive material as self-leveling floors.
The rounds can be laid directly on the waterproofing without additional attachment: after pouring with epoxy mortar, all elements will be soldered into a single monolith.
After completing the layout of the end cuts, we begin to fill the floors with an epoxy self-leveling mixture.
For a greater decorative effect, you should choose not completely transparent, but slightly darkened epoxy self-leveling floors.
Distribute the mixture with a wide mop.
Dilute the mixture according to the instructions and pour it over the “stumps” so that they are slightly covered (0.3 - 0.5 cm).
Since self-leveling floors have increased fluidity, leveling them will not cause you any particular difficulties. To do this, just use a wide construction mop.
Laying on sand
If the thickness of the wooden “pancakes” you have is different, then for ease of leveling you can use coarse sand. The laying technology in this case is similar to laying paving stones. A 2-3 cm layer of sand is poured onto the subfloors, and cuttings are laid on top of it. To learn how to beautifully lay alloys, watch this video:
Leveling them in height is done using a building level and a rubber hammer, the blows of which deepen the protruding elements.
Filling joints with clay-lime paste
This option is the most budget-friendly, since it practically does not use expensive purchased mixtures.
In this case, the saw cuts are laid on a layer of plywood, to which they are glued using glue (PVA, “liquid nails”, etc.).
Then we prepare a solution consisting of 5 parts of sawdust, 2 of clay, 1 of lime and 1 of melted fat or vegetable oil. We fill all the gaps between the “pancakes” with this mixture. As a final touch, we cover the surface of the cuts with stain and varnish.
