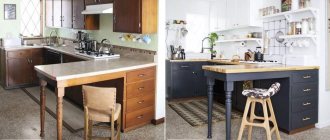
Restoration is a process through which old things, including furniture, take on a new look. You can easily refresh your kitchen design if you decoupage the kitchen table or the entire set. The tips and recommendations presented in the article will help you avoid problems when implementing this idea and qualitatively update your interior.
What is decoupage and when is it needed?
Decoupage is a special technique for decorating furniture and other interior items using a variety of materials, including improvised materials: napkins, wallpaper, wood, self-adhesive film, plastic, paper, newspaper and magazine clippings.
Attention! You will not be able to master the decoupage technique the first time, so you will need to stock up on time and patience.
After choosing the item to work with, you should choose a thematic pattern. Then take the material you like, cut it into small pieces and stick it on the surface of the part. If desired, you can add decorative elements and secure everything with several layers of varnish.
The following advantages of restoring kitchen furniture using the decoupage technique are highlighted:
- saving money on the purchase of individual (replacement of damaged) headset modules;
- the ability to make a unique design for a standard item;
- availability of materials in free access;
- ease of execution of complex designs;
- the opportunity to work on a project with the whole family.
As a rule, old products are subject to restoration. First, it’s worth determining whether decoupage of kitchen furniture is necessary in a particular case.
Recovery is required when:
- The headset has mechanical or other damage. In the kitchen, grease is often absorbed deep into the pores of wood, chipboard or MDF, the film peels off from the cabinet fronts, scratches and cracks appear;
- the interior has lost its relevance and original appearance. Over time, furniture becomes obsolete, and its appearance loses its attractiveness, despite the fact that all mechanisms may work properly;
- It is planned to rearrange the furniture. You can refresh the interior by changing places of cabinets, kitchen table and other furniture items. Moreover, if previously all the unsightly sides of the modules were hidden, then after rearrangement they may be visible and require restoration.
It is a mistake to believe that the decoupage technique is used to decorate rooms only in country, Provence or vintage styles. With the right approach, such decor will decorate a modern, high-tech interior. However, in this case, you will have to carefully consider which furniture parts are best to work with and determine the technology.
Styles
There are several types of decoupage, including:
- Simple City. Emphasized negligence is demonstrated with the help of torn newspapers, stickers and other things. This type of needlework does not require experience or high professionalism from the author.
- Shabby chic has become increasingly popular in recent years. Work is underway to give things signs of their “former splendor.” For this purpose, techniques are used to artificially age objects, causing the effect of antiques.
- Provence is characterized by lightness and grace. The technique of “faded” paints is often used.
- Victorian style should evoke a feeling of classicism and pretentiousness. This style combines themes from antiquity, subdued tones and gilding. It requires special qualifications from the authors, since it does not forgive mistakes in the structure of the decor.
Preparing for decoupage of a kitchen set
It is not difficult to decide on the selection of necessary materials. First of all, you need to inspect the kitchen set and determine how deep and thorough the restoration will be, that is, assess the degree of wear of the product.
Often, every home has the required tools and some materials (fabrics, napkins, newspapers and magazines), and the missing ones can be purchased in specialized stores.
Advice. Before working with any surface, it should be cleaned of dust and dirt and degreased.
Standard for decoupage furniture requires:
- Fine-grit sandpaper.
- Steam filling tool for deep cracks (optional).
- Decoupage glue or PVA.
- A brush of medium hardness (in the future it is better to store it in the original box or with a cap, so as not to buy a new one every time).
- Convenient scissors.
- Roller for smoothing wallpaper.
- Acrylic-based varnish (for processing plastic material or wooden boards at the final stage).
- Construction primer.
During restoration, special attention should be paid to the main material used for decoration. You can get ideas by looking at photographs of finished works on the Internet or by asking designers for help.
Execution technique
Decoupage has firmly established itself in the field of modern interior design. Handmade masters have developed a standard algorithm that will allow beginners to avoid serious mistakes.
The work is structured as follows:
- choose a product or surface to decorate;
- select the most suitable material for this;
- prepare a well-lit work space;
- check whether the chosen restoration style matches the interior;
- prepare decorative elements (cut out, print, try on products);
- decoupage of a kitchen box begins with sanding the surface with sandpaper;
- Next, you need to fill all existing cracks with a special product;
- if the wood has dried out, use putty;
- after cleaning, the module is carefully treated with a primer;
- glue is applied to the surface of the product in the place where the design will be located;
- the material is also thoroughly impregnated with glue;
- each cut out element is placed in its place according to the overall picture;
- if small bubbles have formed, they are punctured;
- Then the material is carefully smoothed with a roller or brush.
In this condition, it is important to allow time for the product to dry completely. Sometimes this takes from 3 to 12 hours. Finally, the surface is varnished (it is necessary to apply 3-4 layers at intervals of an hour). The kitchen is a place with aggressive conditions, and varnish can protect furniture from exposure to steam, grease, detergents and high temperatures.
Advice from the experts
If you decide to master the decoupage technique, it is better to implement creative ideas for your home and kitchen furniture, taking into account the advice of professionals. Restoration is a creative process that requires perseverance. You shouldn’t try to do all the work quickly, it’s important to do it well.
Arts and crafts experts advise the following:
- There is no need to glue the doors hanging. They must be removed from the hinges and placed on a horizontal surface.
- It is better to start mastering the decoupage technique with simple patterns or geometric compositions. Gradually, as they gain experience, they begin to develop sophisticated techniques.
- The overall dimensions of the pattern and the module being worked with must be harmonious. It is not recommended to glue several small elements over a large area.
- Before decorating glass products, degreasing is carried out first.
- Special glue should be used only when working with dense materials, and if they are thin, then PVA will do.
It would be practical to use vinyl wallpaper for a kitchen set. In stores, their range is quite wide, as well as the price range. This material is quite dense and can be washed easily, even if the varnish in some place fails to cope with its function.
Ready-made examples of do-it-yourself decoupage of old furniture
The technique of decoupage on furniture is so diverse that there are no limits to the author’s imagination. You can decorate not only furniture, but also other items in the interior:
- Caskets
- Interior doors
- Window frames
- Window sills
- Floor
Very often the decoupage technique is used for decoration.
When designing, you can combine several materials, not just paper images:
- Lace
- Rhinestones
- Tree leaves
- Decorative ribbons
All these options create interesting and unusual images, and also make the interior bright and original.
How to use self-adhesive film
If there is no desire or opportunity to restore the kitchen set by decoupage, then you can give it a new life by using self-adhesive film. This material can be found in different colors, with patterns, geometric shapes, matte or glossy surface.
Attention! Self-adhesive is resistant to moisture and temperature changes, so it does not need to be varnished.
The process of pasting requires no less care and scrupulousness than decoupage. If the film is applied incorrectly, air bubbles will appear, and it is almost impossible to tear it off the surface. Therefore, it is recommended to evaluate your strength before starting work.
Step-by-step instructions for beginners:
- Facades or other elements of the module are removed from the base.
- Part of the product is placed on the work area (table or floor).
- The cracks are filled with putty.
- The surface is leveled and degreased.
- Next, the element is cleaned again and allowed to dry.
- A small part of the film is peeled off (not completely), applied to the door, and then, gently pressing down, pulled by the white part until all the material is pasted.
- All bubbles and folds that appear are removed immediately, without waiting for the entire area to be treated with self-adhesive.
- If you still get wrinkles, you can try to stretch them by pre-heating them with a regular hairdryer.
Designers recommend combining two types of film (by color or texture) when working with kitchen furniture. Any interior style can be perfectly complemented by furniture elements covered with self-adhesive film.
Some more useful information
- Do you want to turn a minimalist kitchen with solid fronts into a classic one? This is possible by gluing moldings or carved parts onto them and then painting them following our instructions.
Also, before painting, the headset and wall cabinets can be supplemented with shaped brackets (they can be purchased ready-made or cut out yourself), and the base can be supplemented with baluster legs.
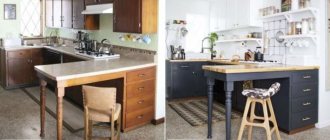
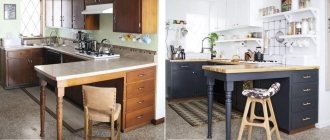
- For the best result, it is worth approaching the “update” of the kitchen in a comprehensive manner and, if necessary, changing not only the color of the facades, but also the countertop with an apron, curtains, dining table and chairs.
- Sometimes the thirst for change can only be satisfied by replacing/painting furniture handles.
- Of course, before painting the kitchen or covering it with vinyl, it needs to be repaired: tighten/change the fittings, glue and iron the peeling film a little, polish the scratches, and fill the chips, cracks and holes from furniture handles with furniture putty.
Support the project - share the material with your friends on social networks:
