Shower drapery is a decorative element that divides the room into target zones and protects the floor and walls from moisture. Before hanging a curtain in the bathroom, experts advise determining the type of curtain, choosing the best installation option and methods of fastening.
The designs differ in composition (metal, plastic), shape (straight, angular, round). There are different ways to attach curtains: using brackets, ceiling cornices, standard or telescopic rods. In the interior, the holders also carry a design load, so they are matched to the style of the bathroom.
Choice of material
Those who plan to choose a curtain for the bathroom need to take into account the specifics of fastening and materials. What is important is that the composition of the cornices matches the design of the room, the functionality and durability of the elements.
Plastic curtain rods are lightweight and economical. The material is resistant to corrosion, does not lose color, and is easy to maintain. The curtains move along the plastic curtain rod almost silently. Nylon elements are available in various shades.
There are models with imitation of natural textures: wood, stone, etc. When choosing a cornice, it is worth considering the disadvantages of the composition: fragility, wear.
Metal rods are durable, resistant to corrosion (after treatment with a special compound), temperature changes, and presentable. Manufacturers use various alloys to improve quality and functionality.
Elements made from such compositions are elastic and resistant to changes in temperature and humidity. When choosing a metal cornice, you need to take into account: the products are heavier than plastic and more expensive than their polymer counterparts. In bathrooms, metal holders look harmonious with chrome accessories.
Combined models are made of metal with a plastic or enamel coating. Bronze fasteners coated with enamel or plastic are possible. The products combine the reliability of steel elements and the practicality of plastic ones, and are not subject to deformation.
Curtain bars are made of wood impregnated with a moisture-resistant composition. The material is beautiful, but less durable than metal and gets dirty easily. Therefore, the installation of a wooden cornice is carried out mainly for original projects.
Methods for attaching shower curtains
There are many ways to attach shower and bath curtains. When choosing a model, experts advise being guided by the design and functionality of the curtains, which become part of the decor.
Classic bathtubs installed against the wall are decorated with straight brackets. Hanging structures are hung using dowels. Corner and irregularly shaped bathtubs require brackets. For spacious rooms with bathtubs installed in the center, arched or rectangular ceiling cornices are used.
When choosing a mounting method, the length of the curtain and the quality of the material are important. You will need to calculate the permitted load, since a plastic product will support nylon curtains, and a metal product fixed to the ceiling will support a heavy curtain made of thick fabric.
Telescopic rod
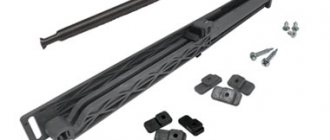
Telescopic rods are easy to install and easily transform to the desired size of the room. The models are unfolded and installed using special rubber attachments.
For standard baths, no special measurements are required. Telescopic models have standard sizes: from 75 to 120 cm, from 125 to 220 cm, etc. Before installation, you will need to carefully calculate the possible load. The design can only support light curtains.
Telescopic rod
Models are made of aluminum, steel, and durable plastic compounds. Products come in two-row and single-row. In the bathroom, the double-row design allows you to place a curtain and a towel. This telescopic cornice includes 2 tubes (small and large diameter), as well as a spring.
Boom installation technology
Installing a rod is a fairly simple process, but it also has certain subtleties. Below are options for installing cornices in spacers and on flanges, with ceiling hangers. The nuances of fastening to concrete walls, tiles, drywall and plastic sheathing will also be considered.
Installation of a straight rod in a spacer
To work you will need a tape measure, a level, a pencil and the bar itself.
Step 1. Based on the length of the curtain, select the optimal height for the rod. The bottom edge of the curtain should freely fall into the bathtub by at least 20 cm to avoid water splashing, and there should be a distance of at least 15 cm between the rod and the ceiling. Measure the required height with a tape measure and mark a point with a pencil. Place a mark on the opposite wall in the same way.
Step 2. Unpack the rod and be sure to read the manufacturer's instructions to avoid installation errors. Check how the mechanism works.
Telescopic cornice
Installation of a curtain rod with a telescopic mechanism
Step 3. Extend the tube to the required length, add another 1 cm, string the curtain rings if they are not removable.
Step 4. Lift the barbell and carefully place it in place, bringing one end in first and then the other. Place a level on top and make sure the cornice is positioned exactly horizontally. If it is not, correct it by applying pressure at the base. Then press lightly with your hand in the center - a properly secured rod should not move a millimeter. After that, all that remains is to hang the curtain.
How to install a bar in the bathroom
The optimal way to attach curtains is plastic half rings
Mounting the rod on flanges to a concrete surface
To work you will need:
- drill;
- screwdriver;
- tape measure and pencil;
- level;
- rod and dowels with self-tapping screws, which are included in the kit.
Step 1. Unpack the barbell, check the presence and integrity of all elements. Select a convenient mounting height, taking into account a 10-15 cm wide gap between the ceiling and the rod. Now attach the rod at the desired height to the wall surface and determine the attachment points. The structure should be positioned so that the curtains can completely cover the bathtub, but do not interfere with water procedures. Mark the fastening points with a pencil.
Cornice installation diagram
Marking
Important! Before starting work, you should make sure that there are no electrical wiring, water pipes or other communications in the areas where you intend to drill. You can check this using a special device - a household hidden wiring detector.
Step 2. Using a level, check the position of the marks relative to the horizontal, adjust them if necessary. If the distance between the marks is large, it is most convenient to use a water level.
Step 3. Next, take the first flange and attach it to the wall so that the mark is exactly in the center. Use a pencil to mark drilling points through the holes on the flange. Do the same on the other side.
Step 4. Now, using a drill with a hammer drill mode and a concrete drill, make holes the size of the dowels at the marked points. The diameter of the drill must match the diameter of the dowel. Typically, the rod comes with self-tapping screws and dowels measuring 6 mm. The depth of the hole should exceed the length of the fastener by approximately 5 mm. Typically, standard round flanges have three holes.
Drilling holes
Drilled holes
Step 5. The holes need to be cleaned of dust, insert dowels there, and hammer tightly. Next, attach the flange again and screw it with self-tapping screws. The flange is secured on the other side in the same way.
Installed dowels
Step 6. Next, you need to take the rod, put silicone liners on both ends, and pull decorative caps on them so that they are each turned in their own direction. If the rings for the curtain are non-removable, they need to be threaded before attaching the second cap.
Thread the rings onto the barbell
Step 7. Now loosen the clamping screws on the protruding part of the flanges, insert the ends of the rod one by one. Tighten the clamping screws until they stop on each side, and push the decorative caps close to the wall surface.
Flange for rod
Secure the flanges
Secure the barbell
Fixed rod
Rods are mounted on brackets in a similar way - first the brackets are attached to the wall, then the ends of the rod are inserted into them. The main condition is to accurately take measurements, because correcting errors will not be easy.
Rod holder
Installation of a corner rod
The main difference here is the presence of a ceiling suspension, otherwise the procedure for attaching the rod is almost the same as for the previous option. Hangers, mounting rings, and additional screws and dowels are usually included with the rod.
Corner cornice
Mark the height of the rod mounting
Step 1. Assemble the rod by inserting straight tubes into the corner elements. Try the product on the wall; if the rod is too long, cut off the ends.
Cut off the excess
Step 2. Put on both brackets and lightly secure them to the rod with screws. Place it on the wall at the required height, check the horizontal level, and mark drilling points through the holes in the brackets.
Mark the attachment points
Marking fixation points
Step 3. Remove the brackets from the cornice and put everything aside for now. Next, holes are drilled with a diameter of 6 mm and a depth of 40-45 mm, dowels are inserted and hammered in with a hammer.
Use a 6mm drill bit
Step 4. The brackets are individually screwed to the walls with self-tapping screws, a mounting ring for the ceiling suspension is put on the rod, the ends of the rod are inserted into the brackets and secured with screws.
Tighten the screws. Scheme
Tighten the screws to secure the flange
Step 5. A fastening attachment with holes for self-tapping screws is screwed onto a thin metal tube with a thread that acts as a suspension. Apply it to the rod so that the nozzle rests on the ceiling, and the tube itself adjoins the rod at a right angle in the bending area. It is the corner area that most needs additional support. Mark the cutting point on the tube with a pencil and saw off the excess.
Ceiling mount assembly
Attaching the ceiling suspension
Step 6. The free end of the tube is inserted into the fastening ring on the rod, clamped with a screw, after which the suspension is lifted vertically and pressed to the ceiling. Drilling points are marked through the holes of the nozzle, then holes are made, dowels are driven in, and the suspension is screwed to the ceiling.
Installation of a corner rod
Fixed cornice with fastening to walls and ceiling
If the rod is too long or has a more complex shape, you will need not one, but 2-3 hangers, located at an equal distance from each other. This method is suitable not only for concrete ceilings, but also for plasterboard surfaces, as well as those covered with plastic. The features of such installation will be discussed below. The only exception is suspended ceilings, in which case other fastening options must be used.
A U-shaped rod is also mounted according to the angular type. The only difference is that both ends are fixed on one wall. Typically, small models have only a wall mount that can easily withstand a load of 4-6 kg. But keep in mind that this requires a very strong, reliable base - you cannot hang the bar only on drywall or plastic panels.
Shower room in loft style with U-shaped ceiling cornice
Installation of flexible profile
At the request of the installer, the flexible curtain rod changes shape
Installing an aluminum flexible curtain rod is also not particularly difficult. To give the product the required shape, you must first draw a template. A large piece of thick cardboard is suitable for this. Place its edge against the side of the bathtub and trace the outline, making small allowances along the edges - 2-3 cm.
Step 1. Take the profile in your hands, press in the middle with your knee and bend it little by little. The material bends quite easily, so try not to press too hard. As you work, constantly try on the profile against the template so that you don’t have to straighten excessively bent corners later.
Flexible cornice allows you to fit it into any design
Step 2. The finished profile must be attached to the wall and the mounting locations must be determined. If the profile consists of several parts, they are fastened together using special plates that come with the cornice.
Step 3. Attach the brackets according to the marks and mark points on the wall through the holes with a pencil. Drill, insert dowels, screw the brackets to the wall.
Step 4. Now take the hangers, put the fastening attachments on them and attach them to the fixed brackets so that the attachments rest tightly against the ceiling, and the lower ends are located at the level of the profile fastening. Since the tubes are quite long, you will have to cut them, and to do this, mark the cut line with a pencil.
Advice. To increase the security of the attachment, drill a hole in the tube for the clamping screw located at the bottom of the nozzle. When tightened, the screw will enter the tube, and it will not be able to slip out even with increased load on the cornice.
Step 5. Thread the curtain hooks into the profile, lift the structure and insert its ends into the brackets. Secure them with self-tapping screws on the bottom side.
Step 6. Insert the hangers into the holes on the connecting plates, screw them lightly and mark the mounting points on the ceiling. Drill, secure the dowels, and then insert a long screw into the hole of the nozzle and use a screwdriver to fix it to the ceiling. Now you need to insert the tube all the way and tighten the screw. Secure the remaining hangers in the same way.
Step 7. The free end of the hanger should fit into the hole on the connecting plate. To do this, the profiles are moved apart a little, the end of the tube is threaded through the hole, and they are fixed with self-tapping screws on the bottom side of the profile.
Ceiling flexible cornice on the ceiling
After this, all that remains is to move the profiles back so that there are no gaps left, and screw them to the plate with screws through the corresponding holes along the upper edge.
Advantages and disadvantages
Each type of bathroom curtain mount has its own advantages and disadvantages. Valuable criteria are durability and strength. Aesthetics are also important: models must suit the bathroom interior. Before hanging a curtain in the bathroom, it is important to determine the texture and quality of the curtain material. The type of fastening depends on this.
The telescopic bracket will not support thick polyethylene and fabric curtains; nylon curtains are suitable for this model. Advantages of the model: the designs do not require much time for installation; you can vary and change products for any interior. The disadvantages of synthetic materials are that they are fragile and easily soiled.
Ceiling brackets are strong and durable, but require thoughtful design. Elements take up space and violate the integrity of the walls during installation. The disadvantage of cornices and brackets is that you need to drill holes in the wall and fasten the elements with self-tapping screws. When dismantling, additional repairs to the bathroom walls are required.
Shape selection
The functionality of the curtain mount depends on how well the design fits into the shape of the bathtub or shower. Brackets can be straight, angular, or non-standard. Non-standard (curvilinear) models are made according to the author's sketch to suit the design of the room.
Standard brackets can be straight, semicircular (arc), round, etc. Straight shapes are suitable for typical bathrooms. Arc cornices are used for rooms with round shapes. The spacious apartments with bathtubs in the center use original round rods. Flexible frames have also been developed that can be given the necessary shapes.
Straight
Straight brackets are the most common due to their simplicity of design and many types of fastenings. Cornices can be of fixed or variable length. Sliding brackets can be adjusted to the size needed in the room.
The advantages of straight models are versatility, elegant appearance. Used in standard bathrooms.
Straight cornice
Angular or arc
When choosing corner and arc structures, you need to take into account the parameters of the room - it must be spacious enough. Experts advise paying attention to the shape of the shower tray, the design of the room, and the material of the curtains. These criteria will allow you to determine whether a semicircular arch or an L-shaped crossbar is required.
Corner cornice
The corner structure is suitable for bathtubs in niches. The design allows the curtain to be folded to the side. Due to this, the room will be visually more spacious. Corner bars are advantageous for shower cabins and bathtub trays near the wall.
Structures consist of 1 or several corners. The degree and shape of the elements may vary depending on the purpose. If necessary, rounded cornices are used for L-shaped bathtubs. The arc crossbar has a rounding radius resembling a semicircle.
Varieties
You came to the store and saw a lot of different rods for bathroom curtains. First of all, you need to understand that in addition to its direct purpose, the cornice should decorate the bathroom and fit into the overall style of the room.
Types of rods:
- Standard. People are still familiar with them from Soviet times. They look like an ordinary crossbar (mostly plastic) and differ in thickness (diameter).
- For a corner bathroom. If your bathroom has the shape of a corner, or you placed a standard bathroom in the corner of the room, then the bar for the protective curtain should be angular accordingly. It can be in the form of a semicircle, arc, or the letter G.
- Special. They are designed for bathtubs with a non-standard shape. Asymmetrical bathrooms are made to order, so the curtain rods must be beautiful and support the design idea.
Rings for curtains in the bathroom
Curtains in the bathroom are hung using rings made of plastic, steel, alloys, etc. The mount for the curtain is selected in accordance with the design of the room, the material of the crossbar, and the design of the bathroom. Nylon models are the least practical because they are brittle.
Metal rings are strong and durable, but make noise when moving along the cornice. The best option for elements is combined compositions and polymer coatings. Such rings are strong, durable, not subject to corrosion, and silent.
Curtain rings
Other types
In addition to the above options, there are other interesting solutions.
These can be rigid glass curtains. Their opening mechanism can be hinged or sliding.
The most practical are sliding options. They are easy to use, practical and functional. The only negative is that splash marks remain on the surface of the curtains during swimming. After each water procedure, glass doors should be wiped with a dry cloth.
If you choose the option made of corrugated glass, this problem can be avoided.
Movable doors allow you to open them and ventilate the bath after bathing.
Hinged options are not very convenient in small bathtubs. When the doors are open, they occupy most of the space in the room.
Another option is plastic rigid curtains. They zone the room well, especially in combined bathrooms. Hinged plastic curtains are inferior in functionality to sliding plastic doors. But you won’t be able to install such a curtain for the bathroom yourself. You need to call a specialist.
Their material is light and plastic. You can create a curtain of any shape. Disadvantages of such a curtain: the plastic turns yellow over time.
You can use bathroom screens. It is better to use them in spacious baths, as they take up a lot of space
Installation Tips
Before you can properly hang curtains in the bathroom, you need to install a bracket. Installation depends on the design. The cornices must be adjusted to the size of the room: the pipes in the bathroom are aligned to the exact placement between the walls.
To attach telescopic models, it is necessary to remove the protective caps from the ends of the cornice. The rods are extended to the required distance so that the ends rest against the opposite walls of the bathroom.
Then the optimal height for the bracket is outlined. Caps are put on the pipe. The holder must be secured strictly horizontally. Symmetry must be checked with a building level. Then you need to install the curtain on the rings.
The semicircular structure is attached to the wall. To do this, you need to determine the height and mark the places for fastening. Then the holes are drilled into which the dowels are inserted. After installing the fasteners, the bracket is suspended.
Complex, heavy semicircular and corner elements are mounted using additional fastening to the ceiling - for reliability. The option of auxiliary fixation is possible if the bathroom does not have suspended ceiling structures.
When attaching long curved brackets to the ceiling, experts advise providing additional support - near the wall. The same method of strengthening the structure is recommended when the curtain is made of heavy fabric. The curved rod must be attached to an adjacent or opposite wall.
Felt stickers
To fix the curtain rod, you will need felt furniture stickers. They can be bought at any hardware store or ordered online. The price depends on the quantity and size, but is quite reasonable. For example, you can look at the cost of felt stickers on Yandex Market.
You will need two stickers, one for each side of the rod. Below is a step-by-step process for attaching and fixing the rod:
- Adjust the length of the rod so that it is 3-4 mm longer than the distance between the walls;
- Apply stickers to the ends of the rods;
- Put on the curtain rings;
- Place one end in the place where it should be, the second - a little higher;
- Lower the other end until the bar is in place.
After installation, the rod will stand in the spacer, under slight tension. The felt sticker will shrink and will be almost invisible (see photo). It may need to be replaced over time. But you will spend no more than 10 minutes on this, repeating the process again.
Felt furniture sticker installed between the rod and the tile.
