Tile is a fairly popular material for cladding floors and walls these days. Traditionally used in bathrooms and kitchens, but given the current variety of styles, sizes and colors, tiles can be used wherever desired. Accordingly, the supporting material on which the tiles are glued can also be very diverse, including chipboard.
For high-quality laying of tiles on chipboard, you need to use a special glue in the form of mastic or cement-based.
Features of particle boards
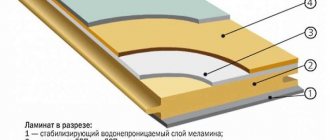
Chipboard and OSB boards are made from wood chips up to 15 cm long by pressing. Formaldehyde resins are used as a binder with the addition of up to 8-15% fillers, which increase the moisture resistance of wood.
In oriented strand board (OSB), the fibers are arranged in layers perpendicular to each other. This allows you to increase the bending strength of the product three times.
The slabs have the properties of wood; they increase in size at high humidity, swell, warp, and delaminate. Dampness causes mold and mildew to appear on the surface, causing it to rot. Therefore, they cannot be used in rooms with high humidity.
Slab properties:
- Low moisture resistance, humidity reaches 15%,
- Increase in size up to 30% upon swelling,
- High tensile strength,
- Afraid of mechanical damage
- Increased flexibility
- Low thermal conductivity,
- High soundproofing and noise-absorbing ability.
Wood panels are strong, rigid materials, but have increased flexibility. Therefore, it is advisable to lay them on a flat concrete surface or rigidly fix them to the wall frame.
What to consider when marking the floor
And now it’s time to figure out how to lay tiles on chipboard or OSB when the slabs are ready for installation (reinforcing mesh, “Betonokontakt”, dry screed and primer). First of all, the floor is marked, that is, you need to calculate the laying so that the cut pieces along the edges have the same width. But if any of the edges is covered by furniture or plumbing, then all the trimmings can be placed there - they still won’t be visible.
In addition, when making calculations, you should take into account the thickness of the seam - most often it is 3 mm, but you can use crosses of other sizes at your discretion. Also, we should not forget that not all corners in a room can have 90ᵒ, which means that the trim will be different in width. Therefore, the side that attracts more attention should be the smoothest.
Surface preparation technology for laying tiles
High flexibility under mechanical loads causes subsidence of the material, its deformation, which leads to peeling and cracking of the facing coating. To avoid delamination, the rigidity of the wood board is increased due to the peculiarities of its installation on the surface.
- When preparing the base for the installation of chipboard and OSB, carefully dismantle the previous old floors, all types of insulation, remnants of wallpaper, and adhesives.
- Installation of the slabs is carried out on a flat concrete base prepared with a screed.
- Eliminate surface differences of more than 2 mm per m2, unevenness, depressions, and bumps.
- A waterproofing layer of polyethylene film is laid over the entire surface of the completely dried screed.
If particle board is laid on wooden logs, the distance between them should not be more than 20 cm. This will ensure the rigidity of the coating and will avoid deformation when installing furniture and moving people.
- The recommended thickness of the slab for installation on walls is 1.2-2 cm, for floors from 1.5 cm to 3 cm.
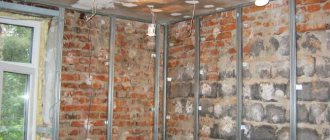
- When installing on walls, a frame is made of wooden blocks, slats or planks; differences are controlled using the mounting level.
- On the floor, the slabs are mounted on a concrete or wooden base; gaps can be left between the boards to save material.
- The joints between the slabs should be in the middle of the board and should not sag.
They fasten fiberboard and OSB with self-tapping screws, dowels, and screws, making sure that the fastener heads are completely recessed into the material and do not protrude on the surface.
Gaps up to 5 mm wide are left between the slabs and the wall to level out the thermal expansion that occurs when temperatures rise in the summer. Gaps and recesses from screwing in self-tapping screws are carefully sealed with putty.
Technical parameters to pay attention to
The technical and geometric features of the tile are of great importance when laying it on any base, especially on a vibrating one, which is chipboard. ISO 105-45-7 is an international standard by which the density of tiles is determined and there are 5 categories - the higher the number, the lower the abrasion:
- PEI-I - very high abrasion, therefore, use is only possible for walls and ceilings;
- PEI-II – suitable for floors with low traffic (bathtub, toilet);
- PEI-III - the load can be increased - such tiles can cover the floor in the kitchen, hallway or hallway;
- PEI-IV – used for shops, hospitals and public buildings of various types;
- PEI-V - can be laid in enterprises in workshops where light vehicles (trucks, loaders) are used.
Mechanical strength depends on the porosity of the ceramic; therefore, the looser the tile, the softer it is, and at the same time, water absorption and frost resistance increase. There are 3 classes in total, these are:
- B-III is the most porous tile, it cuts and breaks easily, but it is not advisable to lay it on the floor - only on the wall or ceiling;
- B-II – suitable for indoor flooring. Not frost-resistant;
- BI – used for both indoors and outdoors. Frost-resistant and very dense.
Preparing the slab surface for laying tiles
Chipboards have a smooth, even surface due to the adhesive composition with which the chips are impregnated. It has low adhesion and high moisture absorption capacity.
To eliminate these shortcomings, the surface of the slabs is coated with a primer, having previously been treated with sandpaper. The rough top layer will ensure deep penetration of the primer and increase the adhesion of the adhesive to the slab.
The deep penetration primer is applied in two layers. They use alkyd, polyurethane and silicone primers with quartz filler, which make the surface rough, increase moisture resistance, and antiseptics prevent the development of mold.
- To increase rigidity and improve the adhesion of the tiles to the surface of the slabs, the wood material is reinforced with a polymer or metal mesh.
- It is mounted using metal staples with a construction stapler with an overlap of up to 5 cm.
The mesh is carefully covered with a layer of putty or liquid glue, making sure that it is evenly distributed over the surface, leaving no gaps, covering the caps of the screws and the protruding edges of the cells.
If the floor has rotted and only logs remain
In this case, all floorboards are dismantled and the joists are assessed. Some of them must also be rotten. Bad lags are replaced with new ones.
All beams are treated with an antiseptic and aligned using a level.
A new wooden flooring treated with an antiseptic is nailed on top.
Nailing new wood flooring
The further procedure is as described above.
There is another option. Install additional logs. Next, sheets of plywood are attached to them. The latter will be the basis for laying the tiles. This option will be discussed below.
Features of choosing tiles
When choosing a tile, take into account its linear dimensions, moisture absorption capacity and bending strength. The reliability and durability of the facing coating depends on these indicators.
- The moisture absorption of the tiles should not exceed 3%. With increased humidity, the dimensions of the facing material do not change, but the weight increases, and this leads to an increase in the load on the adhesive joint. When facing chipboard and OSB, preference is given to glazed tiles, porcelain stoneware, clinker ceramic tiles with a compacted structure and small pores, and white clay monocottura.
- The linear dimensions of tiles for walls and floors should not exceed 30 cm, the ideal option for facing particle boards is mosaic with parameters from 2x2 cm to 10x10 cm, glazed ceramic tiles 15x15 cm, 20x15 cm, 20x20 cm, 30x30 cm, polymer tiles, Glass tiles are suitable for decorating the walls of the kitchen, bathroom, and corridor.
- Flexural strength characterizes the ability of a coating to withstand mechanical loads. All types of tiles do not have a bending moment; under heavy load they crack, and if voids have formed in the adhesive composition, it can burst when pressed with a heel, pressed with a table leg, or hit with kitchen utensils. Therefore, for tiles with water absorption of no more than 3%, the strength is 39 N/mm2.
If you take into account the nuances of choice and requirements for tiles, you can safely veneer them with chipboard and OSB.
Plywood
Since it is almost impossible to reliably glue tiles onto finished plywood, care must be taken to improve the adhesive properties of this material. First you need to treat it with an antiseptic and a waterproofing mixture, even if moisture-resistant sheets were used. After this, to improve adhesion to the coating, it is recommended to lay and secure a serpyanka mesh on it. Prime the plywood in several layers. This will not only improve adhesion, but will also provide additional protection against moisture, especially if the material will be used in the bathroom.
Plywood and similar materials must be laid correctly - this is the basis for a high-quality tile covering
Next, laying ceramic tiles on the plywood floor is carried out according to the standard scheme. Before laying the covering on the wall, you need to secure the support rail so that the coating, which has not yet adhered to the base, does not creep down.
An important point that should be taken into account not only when laying the tiled flooring, but also when installing the plywood itself: the material changes in size depending on environmental conditions, so small gaps should remain between the slabs and around the perimeter of the room to compensate for the movement of the sheets. To prevent them from forming voids, you can fill the joints with polyurethane foam.
Features of choosing glue
The adhesion strength of two dissimilar surfaces depends on the type of glue. Conventional Portland cement-based adhesive is not suitable for tiling chipboard and OSB boards.
Types of adhesive compositions for cladding slabs:
- Based on epoxy resins, an adhesive with high viscosity, low shrinkage, high elasticity of the mixture is produced, which forms a thin durable film after drying and high moisture-repellent properties.
- Polyurethane synthetic elastomer will provide a strong, reliable connection of the tile to any surface, including chipboard and OSB boards.
- Acrylate based adhesive.
- Polyvinyl acetate adhesive composition with the addition of plasticizers, stabilizers and hardeners.
The main condition for an adhesive composition is to ensure a reliable connection of dissimilar materials, create a moisture-repellent barrier, and have high adhesion.
By taking into account the three features of the technology of tiling chipboard and OSB sheets and following the installation recommendations, you will receive a strong, durable coating that will delight home owners for many years.
Base primer
Waterproofing Sopro DSF 423 allows you to level the surface and does not require subsequent reinforcement.
The next stage is treating the base with a special primer to increase the strength of the connection. As such a primer, a solution that has stood the test of time, the adhesive primer “Betonkontakt,” can be used.
This solution has fairly high adhesion rates for materials, as it is reinforced with special additives, for example, marble particles. The surface treated with “Betonkontakt” (which has a special tinting that allows the treated areas not to be missed) becomes rough, which ensures high-quality adhesion to the tiles.
You may be interested in: Proper wallpapering of the kitchen
The Betonkontakt primer is applied in one layer only to a dry and clean surface. Contamination, getting wet and detachment of chipboard areas for treatment with “Betonkontakt” are unacceptable, since these areas will be destroyed under the tiles.
The Betonkontakt primer has a drying time of 24 hours.
Photo of laying tiles on chipboard and OSB
Installation of ceramic coating
As a rule, the adhesive is applied to the base with a notched trowel with a comb height of 10 mm, but if you are using BI class ceramics, the composition is also applied to the tile itself. To do this, coat the working side with glue, and then peel it off with an ordinary steel spatula or small spoon - a layer of no more than 1 mm remains.
Lay the tiles starting from the far corner of the room, gradually moving towards the exit to finish the installation at the doors. Despite the fact that the base must be level, the cladding elements may lie on a slope, so they should be constantly checked by level and/or building regulations. Grouting of joints is done no earlier than after 3-4 days.
You learned how to lay tiles on chipboard and that it is quite possible. It also shows what else you should pay attention to during preparation and installation. Follow the directions given above and you should be able to avoid adhesion problems.
Source
