Drilling is one of the important stages of furniture manufacturing, requiring accuracy and utmost care. In production, to facilitate the marking process, they use additive machines and special furniture templates (gearboxes). At home, you will have to be content with a tape measure, a square and a marker to mark the locations of future holes for a certain type of fastener. Each type of fastener requires specific drills for furniture making . In some cases, you can limit yourself to the minimum set. For example, if your goal is to make a simple shelving rack with your own hands, then you can get by with a set of two ordinary drills with a diameter of 5 mm and 8 mm, which any “home” craftsman will probably have - in combination they completely replace a specific drill for confirmations. But if the goal is to implement a larger-scale project, you will need other drills for making furniture.
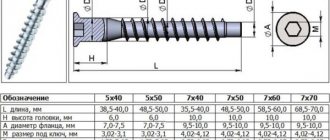
Drills for confirmation (euroscrew)
The specific shape of the confirmat drill, with a characteristic expansion from a diameter of 5 mm to a diameter of 8 mm, allows you to make two holes at once in one go, for the narrow and wide part of the Euroscrew with a countersink for the head. “work” with this type of drill with both frontal and horizontal parts, drilling the end of furniture panels and front parts. It is important not to confuse the “face” with the “wrong side” during the process - otherwise, it will be difficult to hide untidy chips instead of a neat countersink into which the confirmation cap will “sink.”
Installing an eccentric coupler
Let's look at how an eccentric screed is used using the example of a countertop and a cabinet. An example of the use of an eccentric coupler is a desk, or any case where it is necessary to connect two parts in a hidden way.
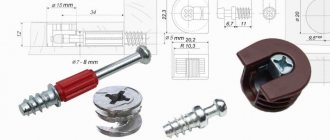
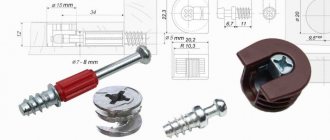
An eccentric coupler consists of two parts: a rod and an eccentric. The rod is installed in one part, and the eccentric in another.
Fig.2.
To install the eccentric coupler, you need to drill several holes. In one part, a blind hole is made for an eccentric with a diameter of 15 mm and a depth of 12.5 mm (the distance between the center of the hole and the end of the part is equal to the length of the rod), as well as a hole for a rod with a diameter of 8 mm (the distance between the center of the hole and the surface of the part is 8 mm). In another part, a blind hole with a diameter of 5 mm and a depth of 12 mm is made for installing the rod.
The installation of the eccentric coupler begins with markings. Before marking the parts, you need to know the installation size. In the example below, the installation dimension is 26 mm. You can find out the size either on the packaging, or upon purchase, or by measuring the stem. From the head to the beginning of the thread.
Marking the holes for the eccentric coupler
It is convenient to do the marking as follows. It is necessary to place the parts to be connected on top of each other, and mark the location line of the eccentric coupler.
Fig.3.
It is convenient to make markings on both parts being connected at once. The position of the rod relative to the front or rear end of the part is marked on the parts (usually 5-7 cm). On the part in which the eccentric will be installed, mark the center of the hole along the eccentric.
In the photo, two parts are connected at once, so I did the markings at the same time.
Next, on the part where the eccentric will be installed, the center of the hole for it is determined. In the photo above, this is a horizontal serif. The length of the segment is the installation dimension equal to 26 mm.
Hole drilling tool
After the markings are made, it is necessary to drill all the holes. The holes on the tabletop are made with a regular drill with a diameter of 5 mm. It is convenient to use special wood drills. Using a similar drill only with a diameter of 8 mm, a hole is drilled in the end of the mating part.
In order to make a sample for the eccentric, a special Forstner drill is needed. These special drills come in different diameters, so for high-quality installation of the eccentric, you should purchase a drill with a diameter equal to the diameter of the eccentric.
Fig.4.
The hole for the eccentric is made with a Forstner drill with a diameter of 15 mm. Here it is important to accurately observe the depth of the hole. Traditional hole depth is 12.5 mm. You can maintain the depth of the hole using a drilling depth limiter.
Using this drill, we make a hole with a depth equal to the thickness of the eccentric, which is about 12.5 mm.
Fig.5.
After the hole for the eccentric is ready, drill a hole with a diameter of 8 mm for the rod. The order of drilling the holes is important, so drilling a hole too deep for the rod will not allow the hole for the eccentric.
Examples of using an eccentric coupler.
Fig.6.
Fig.7.
Fig.8.
Installation of minifixes (ties) during the manufacture of furniture from OSB and plywood
Installation of minifixes (ties) during the manufacture of furniture from OSB and plywood
During the manufacture of furniture from OSB and plywood, various hardware is used; the specific choice of hardware depends on the installation location and the qualifications of the craftsman. How are individual furniture parts secured?
All of the above connection methods, except for minifixes, have several more significant disadvantages. First, these connections are disposable; if you had to unscrew a screw or pull out a nail, you cannot reinstall it in the same place; the pressing force is critically reduced. Secondly, furniture made with such hardware is difficult for an ordinary buyer to assemble at home; not every one of them knows how to independently drill holes, take measurements, etc. Minifixes (ties) are completely free of these disadvantages. Assembling/disassembling furniture is simple, you can perform these actions many times, and in terms of reliability of connection, minifixes confidently take first place. All furniture produced by industrial enterprises is assembled only on minifixes. Let's take a closer look at how they are installed; we hope that you will use our advice when making furniture.
Instructions for installing minifixes
There are quite a few types of minifixes, but most of them consist of three parts: a metal eccentric for tightening parts, a plastic coupling for fixing the threaded part and the rod (rod) in the hole. For installation you need a wood drill Ø 7÷10 mm and a cutter Ø 15÷16 mm. As an example, we will take the most common minifixes used to connect 16 mm thick boards or plywood.
Minifix cutter
Hole for plastic coupling
[/td]
Installed plastic coupling
Marking the hole for the eccentric
Hole for rod
View of the rod in the attracted part
Minifix installation diagram
After correctly installing the eccentrics, you only need an ordinary screwdriver to assemble the furniture; all operations are performed quickly; most models can be assembled independently without helpers.
What types of minifixes are there?
Angular. Used to connect individual furniture elements at an angle. The rod has a hinge that can change the angle of inclination of the rod head in relation to the threaded part. They are used quite rarely for a simple reason - most of the corners in furniture are straight, therefore, there is nowhere to use it.
How to make markings for an eccentric
There's nothing complicated. Measure the total length of the rod without the threaded part and subtract from it the thickness of the head and the minimum thickness of the eccentric (in the place where it has a slot). This will be the distance at which you need to drill a hole for the eccentric.
We recommend watching:
A short overview of the minifix and its installation - Let's make furniture ourselves
Today we will talk about interesting fasteners, for which you do not need to make through holes (as in the case of confirmat).
Minifix (also called an eccentric coupler) is a fastening system designed to connect two parts together.
With its help, two parts can be pulled together both at right angles and at other angles (for example, there are eccentric ties of different types that allow parts to be pulled together at different angles, but since they are used quite rarely, we will not consider them).
We will look at the most common type of eccentric tie - tie between two perpendicularly located parts.
The eccentric coupler consists of three elements:
Connecting using minifixes has both its advantages and disadvantages.
The advantages include the following:
The disadvantages of this type of fastening of parts include:
Minifix is installed in different ways.
The simplest is manual installation.
For installation you need:
At the very beginning, you need to make a visual mark (limiter) on the drill
Next, you need to make all the necessary holes (instructions for eccentric couplers are usually included, so it will indicate where and what holes to drill).
After everything, we screw in the ties and connect the parts (by the way, the parts can be connected with an eccentric tie, together with dowels, which will act as guides, and the strength of the connection will increase).
But, in such an installation (as shown above), there is one drawback.
Even with minor errors, the connection will not be perfect, that is, the edges of the parts will be offset from each other. This, by the way, is a very significant drawback of this type of connection.
But it is quite easy to eliminate it by using it to mark and drill holes in the parts of the jig (template).
As a rule, such conductors are made at home, but even in this case, the quality of the connection itself (or, to be more precise, accuracy) will be higher, and the time spent on this whole thing will be much less.
Of course, after reading this article, you will think about the advisability of using rather expensive fasteners with such a difficult installation (although, in some cases, you simply cannot do without an eccentric coupler).
Personally, I have never used such ties, and in cases where the visible side of the part cannot be drilled for confirmations, I use ordinary corners.
I'll end here, see you later.
How to install an eccentric coupler - video
We looked at the method of connecting parts with an eccentric coupler, and the technology for making holes. The main difficulty in using an eccentric coupler, and, as a consequence, its low popularity, is the difficulty of drilling holes and the need to use special drills. It is quite difficult to make an accurate additive at home. However, the secrecy of connecting parts and the possibility of repeated assembly and disassembly of furniture without damaging it makes the eccentric coupler indispensable in many cases.
