Home pageArticlesWorkshop /IndoorFurniture eccentric screed (minifix - Minifix) - what types are there, mark and install fastening fittings with your own hands
How to connect laminated chipboard furniture parts using eccentric ties. Let's figure out how to mark, find out the size of the holes and what tool is needed for this...
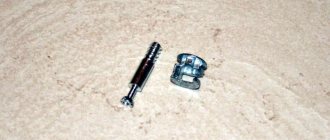
The furniture eccentric tie, or as it is also called “minifix”, is definitely a hit in the furniture industry. Minifixes are an indispensable fastener where it is necessary to make a hidden connection of slabs, and at the same time through holes for confirmatory ties are excluded.
In this video, we will look at the two most popular and most used options for furniture eccentric ties, and also learn how to mark and connect furniture parts using simple ties with a 15mm eccentric. and couplers - shelf holders, with an eccentric in a housing with a diameter of 20 mm.
Simple eccentric couplers
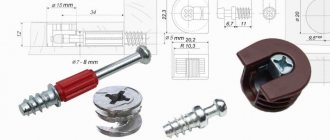
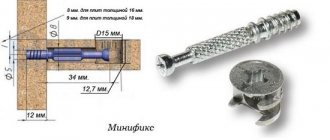
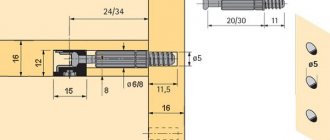
They may differ in the diameter and long threaded part, the type of threaded part of the pin, as well as the diameter and height of the eccentric itself. For different slab thicknesses, there are different ties. The most common couplers are for 16 mm slabs, with an eccentric diameter of 15 mm. and height 12 mm.
The height of the eccentric for different types of couplers can vary from 10 to 16 mm.
The tie pin may have different threads. Self-tapping, or Euro-thread - intended for screwing into drilled holes with a diameter of 5 mm and a depth of 8 mm to 11 mm.
If the pin has a metric thread, it is screwed into a special plastic sleeve, which is pressed into the plate in advance.
An option with a plastic sleeve, it is good to use in not very dense slabs, where the Euro-thread of the pin can break out.
Also, the lining is good as a repair option when a pin with a self-tapping thread no longer holds in the slab, instead of which you can always install a tie with a lining.
What do you need to know before purchasing?
They differ:
- eccentric diameter and height;
- stand length;
- type of rack fastening (screw or self-tapping screw);
- type of nut (futorka).
Connector operating principle
When assembling the product, a rod with a T-shaped head passes through a hole in the end of the main part. Its head is in the middle of the transverse hole. An eccentric is installed there, which grips the rod head with its inner side.
During the next turn, the eccentric rotates in the hole and acts on the head of the rod - first it brings the parts to be connected together, and then creates the necessary force in the connection.
The coupler consists of a cast metal eccentric, a nozzle and a rod. There are many designs in which the rod is wrapped in the material of the attached part without a nozzle.
IMPORTANT! Eccentrics with a diameter of 25 mm, and sometimes 15 mm, must be closed with a plastic plug.
Screeds are distinguished by the diameter of the eccentric. The larger it is, the greater the stroke of the tie and the greater the possible force. Eccentrics with a diameter of 25, 15 and 12 mm are used.
Flaws
During operation, the fasteners may become loose. To solve this problem, manufacturers make the working surface of the eccentric concave, and the spherical working surface of the rod head is in contact with it. In other designs, the internal working surface of the eccentric is stepped, and the adjacent working surface of the rod head is flat.
In this case, the outer surface of the eccentric is equipped with oblique smoothed teeth, inclined in the opposite direction from the direction of its rotation during assembly. This increases adhesion to the material of the part, additionally preventing its spontaneous rotation and loosening of the connection during operation.
The notches inside the eccentric increase its grip on the rod three times compared to a smooth flat surface.
Such fasteners require the exact relative position of all mating holes. Drilling these holes in the knee will cause the cam to break.
Screed-shelf support
This coupler has a short pin with a self-tapping Euro thread, and the eccentric is located inside the body which is pressed into the plate. The eccentric body can be made of either plastic or metal.
This option is good because of its ease of installation; you need to drill not three holes as with the option with a simple screed, but only two.
Also, with such ties, we get the opportunity to assemble furniture in a limited space, since to install a shelf you do not need to move the walls to the sides; you can simply lower the shelf from top to bottom.
Some manufacturers offer ties with the ability to tighten the eccentric on both sides. Thanks to this option, you can install, for example, the bottom of a cabinet, and the fasteners will not be visible.
Euro-threads are most often used on the pins of such couplers, and the diameter of the hole for the eccentric part with the body is 20 mm.
Now let's move on to the practical part - marking and installing eccentric couplers.
Eccentric coupler: types, application features and mounting options
The requirements for furniture fasteners are as follows: 1. The fasteners must provide the necessary strength and, no less important, the accuracy of the connection.
2. Be inconspicuous or at least aesthetically attractive. 3. Additive (drilling holes for installing fasteners) should be simple and take as little time as possible. The fewer holes, the better. 4. Assembly of furniture should be simple and convenient. 5. The connection should be cheap (you need to consider not only the cost of the fittings, but also the man-hours and machine-hours spent on both the additive and the assembly of the furniture). Often, the use of more expensive fittings can significantly reduce the cost of furniture as a whole + increase its consumer properties (quality) Notes on the topic: Unfortunately, neither “confirmat” nor eccentric ties such as “Minifix” or “Rafix” are self-sufficient, since they do not provide centering of furniture blanks and require the installation of centering dowels nearby. It seems to me that the manufacturers of these eccentric couplers deliberately make them this way, without relying on the accuracy of the additive. Therefore, if we count the holes required for the additive, then 4 holes require (two each in the face and end) require confirmations, 4 holes require Rafix type ties (3 in the face and 1 in the end) and 5 holes require “Minifixes” (3 in end and 2 in face). This is bad. In addition, you can count how many parts a connection consists of using a “minifix”: dowel, liner, rod, eccentric, plug. Even if you do without the futurka, you still get three elements. Therefore, all of the above options for fittings should be considered as something not exactly cheap, but labor-intensive and complex for garage workers. Is there anything without the listed disadvantages? The answer is yes. Eat. Some are presented in Russia. Such accessories are not produced in Russia, but are imported. There are different options. They require drilling not 4 or 5 holes, but only 2 (only in the face or in the face and in the end) or 3 (2 in the face, one in the end), and consist of only 1 or 2 elements (maximum). The time for assembling furniture is reduced by 2-5 times. Production time is reduced in proportion to the reduction in quantity, as well as movement from one production site to another. There are options for fittings that have never been imported to Russia. Including, for example, completely hidden ones. The disadvantages of such fittings are the following: it requires a more precise additive and is more expensive. And further. Few people know about such accessories. I have no connection with companies that supply such accessories and therefore there is no reason to advertise sellers and manufacturers of such accessories. Reply
Marking for screed with 15 mm eccentric.
I would like to immediately note that the connection using simple ties with a 15 mm eccentric is more correct to make in combination with the additional installation of dowels.
Such a connection, thanks to the precise fixation of the part using a dowel, will not allow the parts to move. Because the tie pin gives a certain backlash, due to which the furniture structure will not have the correct geometry and rigidity.\
Taking as a rule, one tie, one dowel, I mark holes for drilling in the mating parts, markings are always made from the front edge of each part.
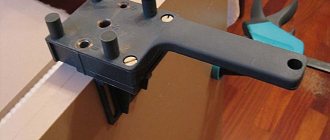
For convenience and accuracy of adding parts at home, I use the simplest jig for 16mm laminated chipboard.
Such a jig allows you to accurately mark and make end drilling of holes at an angle of 90 degrees. We mark a hole for the pin at the end of the plate, and on the side of the same plate the middle of the blind hole for the eccentric. The end hole is located exactly in the center of the plate, at a distance of 34 mm from the edge, I mark the middle of the hole for the eccentric.
Using a 15 mm Forstner drill to a depth equal to the height of the eccentric, a blind hole is drilled for the eccentric; when using a Forstner drill, you need to be careful not to drill through the slab.
To do this, I installed a depth limiter for drills and a wide washer on a Forstner drill. For those who use such a drill for the first time, before drilling, you can drill a preliminary hole with a thin drill of 1.5 - 2 mm.
In order for the hole entrance to be smooth and without chips, until the hard front laminated layer has been passed, I begin to drill at low speeds, trying to hold the drill exactly at 90 degrees and carefully press it to the workpiece, having passed the laminated layer, I increase the speed and reach with the drill all the way to the limit washer.
Next, a hole is drilled from the end part with an 8 mm drill to the depth of the hole for the eccentric. Since I am using a jig in which the hole is designed for a 5 mm drill, I first drill through the jig with a 5 mm drill, and then with an 8 mm drill without a jig.
I check that the inserted eccentric is completely recessed into the slab and will not protrude.
Next, on the second part of the mating part, at a distance of 8 mm from the edge, a 5 mm hole is drilled with a depth equal to the height of the pin thread. For this, I still use the same conductor.
Next, I install the dowels in the pre-prepared holes.
I screw the pins into place; on many pins, for convenience, plastic bushings are installed; you can use them to hold the pin while screwing.
Now, you can connect the mating parts.
I install the eccentrics in their places, connect the two parts, and turn the eccentrics.
The connection is ready, and thanks to the presence of furniture dowels, the parts are held rigidly and do not play among themselves, as could be the case without installed dowels.
Furniture screed RAFIX 20 white for parts with a thickness of 16 mm or more, flush mounting
Draw your attention to!
Before paying for your order, please check whether the selected products and accessories fit the size of your furniture or the features of your interior!
Just call us or write using the contacts from the site header - this is the easiest way to place an order or get a consultation! We are always ready to help with advice before purchasing!
It’s very easy to purchase the product you need in the online store Hafeleshop.ru
: 1. First you need to go through a simple registration. Depending on whether you are a retail or wholesale buyer, an individual or a legal entity, you will be offered fields to fill out. 2. Then add the selected products to your cart using the search, catalog or Hafele article numbers known to you. 3. Once you have completed selecting the items you need, go to your cart and then click on “Place an order” in the lower right corner.
Next, you will receive a written confirmation of your order to your email address that you provided during registration. And soon after that, expect a call from our manager who will answer all your questions about the order.
Registration upon first purchase
Go to the Login/Registration page (the link to it is in the upper right corner on all pages of the site) and fill out the form provided (form options are available for retail and wholesale types of purchases, as well as for legal entities and individuals). Required fields are marked with an asterisk.
Complete the form and an email with your registration details will be sent to the email address you provided.
How to place an order
Having selected the product you like in the catalog, click on the “Add to cart” button to place this product in your order basket. You can always see information about the number of items in the cart and the current amount of orders in the upper right corner on all pages of the site. More detailed information about the status of the order basket is available by clicking on the “My order” link. From there you can go directly to placing your order.
In the order, as well as in the product card, you can once again look at the photographs of the product, study the characteristics, instructions for installation, installation and operation, and also watch a video about the product.
How to place an order
In your order basket, you can select a payment method, delivery operator and review the list of products again, changing the number of units if necessary. On the first page of checkout, you will be asked to review the list of products again, where you can delete individual items, as well as change the quantity for each item in your order. You can also print your order or download a PDF file. If you have a promotional code for a discount, you can enter it in the appropriate field at the bottom of the page. After completing all the necessary operations, click on the “Place an order” button in the lower left corner.
In the next window, select the payment method and delivery type that suits you and click on “Continue checkout”.
In the window that appears after, continue registration. To do this, fill in your contact information and the address where the order will be delivered. Then click on “Proceed to payment”.
Payment
Our store offers most payment options for goods.
1 — When you pick up your order from the store yourself, you can pay in cash or by card.
2 — When delivering by courier, it is also possible to pay in cash and by card. We use the services of the SPSR courier service whose couriers are equipped with mobile cash registers and terminals for accepting bank card payments.
3 - We also work with the platron payment aggregator, during the order you can select this option, go to the platron website and pay for the purchase in the following ways: The following payment methods are available in the system:
- bank cards (VISA, MasterCard, American Express) - payment terminals (all major terminal networks are connected to us, including QIWI, Eleksnet - Euroset communication stores (instructions for paying for Europlats), Svyaznoy - electronic money (QIWI wallet, Yandex.Money, WebMoney, PayPal) - payment from the balance of a mobile phone Beeline, MTS, Megafon, TELE2. - payment through Internet banking Alfa-Click, Promsvyazbank, HandyBank, VTB24
After completing the payment, wait for a call from our manager.
Don't forget to follow the official Hafele Russia accounts on social networks! In addition to news about exciting new products, we regularly have competitions for valuable prizes from Hafele!
We mark and connect the parts using shelf support ties with short pins
So, we mark a hole for a short pin with a self-tapping thread.
Then, on the mating part, at a distance of 9.5 mm from the edge, mark the center of the hole for the eccentric.
Next, I use a 5 mm drill to drill a blind hole for the pin, and on the mating part, using a 20 mm Forstner drill, I drill a blind hole for the eccentric.
I screw in the pin and install the eccentric in the housing into the mating part.
I connect the parts, after which I turn the eccentric to fix it.
Once again I would like to repeat, for better marking and drilling of parts, it is advisable to use jigs, thanks to which the accuracy, quality and speed of work increases, and the money spent on a jig will come back to you in the form of no defects, saved effort and time.
How to use a tie: fixation
Eccentric fasteners are used to connect two parts of a product. Let's look at the principle of its operation using the example of fastening a table leg.
How to install a screed in a desk part?
In the upper part of the table leg, you need to drill two holes for the metal retainer.
Two similar holes are drilled on the end of the table (above the newly made holes). As a result, we get an end-to-end channel.
Two more holes are drilled on the tabletop (this time blind) with the same location relative to each other.
A rod with a T-shaped head is screwed into the resulting holes.
The table leg is applied to the table top so that the rod can pass through the prepared through channel, ending up in the center of the hole for the latch, and enters the latch itself.
After this, the eccentric is turned clockwise until it stops. This is how the tie secures the rod.
An eccentric tie is the best fastening for furniture. However, you need to make precise holes for the eccentric and fastener rod, otherwise both the lock and the parts of the product will break.
