Home pageArticlesWorkshop /IndoorFurniture eccentric screed (minifix - Minifix) - what types are there, mark and install fastening fittings with your own hands
How to connect laminated chipboard furniture parts using eccentric ties. Let's figure out how to mark, find out the size of the holes and what tool is needed for this...
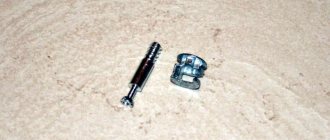
The furniture eccentric tie, or as it is also called “minifix”, is definitely a hit in the furniture industry. Minifixes are an indispensable fastener where it is necessary to make a hidden connection of slabs, and at the same time through holes for confirmatory ties are excluded.
In this video, we will look at the two most popular and most used options for furniture eccentric ties, and also learn how to mark and connect furniture parts using simple ties with a 15mm eccentric. and couplers - shelf holders, with an eccentric in a housing with a diameter of 20 mm.
Simple eccentric couplers
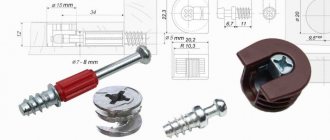
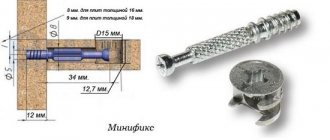
They may differ in the diameter and long threaded part, the type of threaded part of the pin, as well as the diameter and height of the eccentric itself. For different slab thicknesses, there are different ties. The most common couplers are for 16 mm slabs, with an eccentric diameter of 15 mm. and height 12 mm.
The height of the eccentric for different types of couplers can vary from 10 to 16 mm.
The tie pin may have different threads. Self-tapping, or Euro-thread - intended for screwing into drilled holes with a diameter of 5 mm and a depth of 8 mm to 11 mm.
If the pin has a metric thread, it is screwed into a special plastic sleeve, which is pressed into the plate in advance.
An option with a plastic sleeve, it is good to use in not very dense slabs, where the Euro-thread of the pin can break out.
Also, the lining is good as a repair option when a pin with a self-tapping thread no longer holds in the slab, instead of which you can always install a tie with a lining.
Screed-shelf support
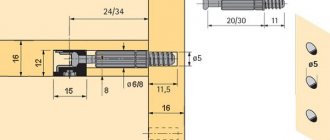
This coupler has a short pin with a self-tapping Euro thread, and the eccentric is located inside the body which is pressed into the plate. The eccentric body can be made of either plastic or metal.
This option is good because of its ease of installation; you need to drill not three holes as with the option with a simple screed, but only two.
Also, with such ties, we get the opportunity to assemble furniture in a limited space, since to install a shelf you do not need to move the walls to the sides; you can simply lower the shelf from top to bottom.
Some manufacturers offer ties with the ability to tighten the eccentric on both sides. Thanks to this option, you can install, for example, the bottom of a cabinet, and the fasteners will not be visible.
Euro-threads are most often used on the pins of such couplers, and the diameter of the hole for the eccentric part with the body is 20 mm.
Now let's move on to the practical part - marking and installing eccentric couplers.
Marking for screed with 15 mm eccentric.
I would like to immediately note that the connection using simple ties with a 15 mm eccentric is more correct to make in combination with the additional installation of dowels.
Such a connection, thanks to the precise fixation of the part using a dowel, will not allow the parts to move. Because the tie pin gives a certain backlash, due to which the furniture structure will not have the correct geometry and rigidity.\
Taking as a rule, one tie, one dowel, I mark holes for drilling in the mating parts, markings are always made from the front edge of each part.
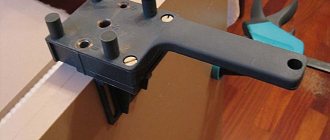
For convenience and accuracy of adding parts at home, I use the simplest jig for 16mm laminated chipboard.
Such a jig allows you to accurately mark and make end drilling of holes at an angle of 90 degrees. We mark a hole for the pin at the end of the plate, and on the side of the same plate the middle of the blind hole for the eccentric. The end hole is located exactly in the center of the plate, at a distance of 34 mm from the edge, I mark the middle of the hole for the eccentric.
Using a 15 mm Forstner drill to a depth equal to the height of the eccentric, a blind hole is drilled for the eccentric; when using a Forstner drill, you need to be careful not to drill through the slab.
To do this, I installed a depth limiter for drills and a wide washer on a Forstner drill. For those who use such a drill for the first time, before drilling, you can drill a preliminary hole with a thin drill of 1.5 - 2 mm.
In order for the hole entrance to be smooth and without chips, until the hard front laminated layer has been passed, I begin to drill at low speeds, trying to hold the drill exactly at 90 degrees and carefully press it to the workpiece, having passed the laminated layer, I increase the speed and reach with the drill all the way to the limit washer.
Next, a hole is drilled from the end part with an 8 mm drill to the depth of the hole for the eccentric. Since I am using a jig in which the hole is designed for a 5 mm drill, I first drill through the jig with a 5 mm drill, and then with an 8 mm drill without a jig.
I check that the inserted eccentric is completely recessed into the slab and will not protrude.
Next, on the second part of the mating part, at a distance of 8 mm from the edge, a 5 mm hole is drilled with a depth equal to the height of the pin thread. For this, I still use the same conductor.
Next, I install the dowels in the pre-prepared holes.
I screw the pins into place; on many pins, for convenience, plastic bushings are installed; you can use them to hold the pin while screwing.
Now, you can connect the mating parts.
I install the eccentrics in their places, connect the two parts, and turn the eccentrics.
The connection is ready, and thanks to the presence of furniture dowels, the parts are held rigidly and do not play among themselves, as could be the case without installed dowels.
Furniture items
PVA glue for furniture, carpentry, for wood.
Several examples of furnishing a kitchen combined with a living room:
- 1. Sofa. It becomes an object that zones space. The sofa is placed with its back facing the place where food is prepared. In small rooms (less than 20 sq m) a corner is placed, which is placed against a wall installed perpendicular or parallel to the kitchen.
- 2. Set. According to designers, minimalist models without elaborate details look modern. The service, vases or glasses are placed on an open shelf. You can buy a fashionable display case for them. Furniture is placed near the wall. If the space is large (20 sq. m, 25 sq. m or 30 sq. m), then in the central part you can install an island, which also has sections for kitchen appliances.
- 3. Furniture set. The style should be combined with the design of both rooms. In small rooms, a compact table and chairs made of transparent material or painted in light colors look good. You can add a table with a round top to your living room interior. In spacious rooms, the kit is installed near the wall or in the central part. An elongated rectangular dining table would look good here.
We mark and connect the parts using shelf support ties with short pins
So, we mark a hole for a short pin with a self-tapping thread.
Then, on the mating part, at a distance of 9.5 mm from the edge, mark the center of the hole for the eccentric.
Next, I use a 5 mm drill to drill a blind hole for the pin, and on the mating part, using a 20 mm Forstner drill, I drill a blind hole for the eccentric.
I screw in the pin and install the eccentric in the housing into the mating part.
I connect the parts, after which I turn the eccentric to fix it.
Once again I would like to repeat, for better marking and drilling of parts, it is advisable to use jigs, thanks to which the accuracy, quality and speed of work increases, and the money spent on a jig will come back to you in the form of no defects, saved effort and time.
Pros and cons of minifixes
We figured out how it works, where to use it and how to install it. What other advantages or disadvantages of such fasteners?
- Easy assembly/disassembly after first installation;
- Wear resistance (can be frequently disassembled and reassembled);
- All fasteners are hidden, there are no unnecessary elements on the outside, and the eccentric inside can be closed with a special plug;
- Saving material - for other types of fastening, an additional part made of chipboard may sometimes be needed;
- The quality of the connection - unlike, for example, simple dowels, the minifix does not just “hold” the part, it tightens it. And this gives rigidity to the entire product.
You can continue further, moving from the general to the specific. In each specific furniture product, minifixes can play their role and, accordingly, perform some, sometimes special, tasks.
Everything is simpler with the minuses, there are almost none:
- The cost is higher than that of Europrops. Logically, this is a 2-3 component product, and it is more complex.
- Difficult to install. Yes, the first installation is more difficult, you need more holes, it takes longer to mark everything.
