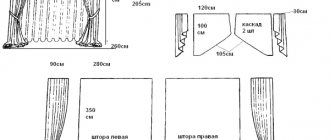
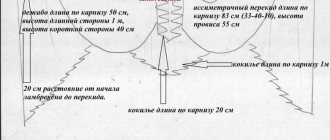
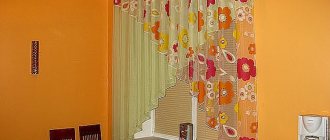
Today you won’t surprise anyone with ordinary curtains framing a window opening. But an openwork lambrequin, made with your own hands, will help not only visually enlarge the window opening and cover up the imperfections of the cornice, but will also add lightness, complement the interior with originality and give it completeness. An interesting and sophisticated openwork pattern is the embodiment of elegance and a sense of style, which is advantageously used to decorate a room.
Do you use lambrequins to decorate curtains?
Yes
45.92%
No, I plan to make it
54.08%
Votes: 98
From this article you will learn about the intricacies and secrets of creating an additional curtain decor with your own hands - an openwork lambrequin. Selecting the type of product and suitable fabric, a list of necessary tools and a detailed sequence of the process - this is discussed in detail in the article.
What are lambrequins?
The word "lambrequin" has French roots and means "carved decoration." The item itself looks like a heavy drapery placed across the window, at the top of the frame.
Since ancient times, complex and openwork ornaments and lace patterns have been used in interior design to give it a special charm and sophistication.
Supplements usually include:
- fringe;
- brushes;
- ribbon;
- ruffles;
- eyelets;
- waves;
- braid.
Wide range of options for choosing configurations, colors and shapes makes it possible to create hundreds of different design options.
The main use of this element in the interior is aesthetic. The lambrequin covers the cornices and the empty space between the two panels, which completes the design of the window.
Depending on the style and design of the room, you can choose a suitable pattern, or create an original project yourself.
Additional information: Using a lambrequin you can also visually reduce or increase the window opening. It all depends on how high or low it is hung, what shape it has.
Depending on the style and design of the room, you can choose a suitable pattern, or create an original project yourself.
Windows decorated with carved lambrequins look sophisticated. The patterns look especially bright in combination with a simple light-colored fabric. There are many easy options for making your own decorations.
Window decor with openwork elements will add zest to your interior.
Photo
Help the site, share with friends

Let's discuss this article together:
Click to cancel reply.
How to sew an openwork lambrequin with your own hands?
If you have the time and energy, you don’t have to go to a special store - you can decorate the house yourself. The main advantage of this type of product is its ease of manufacture and maintenance. Even a beginner can sew openwork lambrequins. The first step is to choose a base - the ideal solution would be a self-adhesive bandeau base.
First, take a bandeau - a rigid base, which is sealed on the front side with curtain fabric.
Attention! The material must be handled very carefully. The smallest inaccuracy can spoil the final result.
For sewing you will need:
- main material;
- lining;
- thermal bandeau;
- cords and fringe;
Decorating ordinary items with fringe completely changes their appearance, turning things into unusually beautiful and stylish accessories.
- thread of the desired color;
- whatman;
- scissors.
Tools and materials.
Next, you need to use step-by-step instructions to complete the job correctly. An important decision is the choice of a sketch for the future decorative element.
On the Internet there are a large number of interesting offers for openwork lambrequins with photos.
The quick manufacturing guide includes several steps.
- We are preparing the pattern. We transfer the selected pattern to whatman paper and cut it out.
- We attach the resulting stencil to a heat-resistant fabric - a bandeau.
- We decorate the resulting product with the main fabric, laying it on top.
- We attach the lining to the wrong side using glue webs.
- We sew a zigzag stitch along the edge, adding cord or fringe.
Step-by-step instruction.
Note! You cannot choose natural fabrics - only synthetics. You might think about felt lambrequins. Also, the material should not be friable, since the edges can “fan” over time.
Machine stitching is an inexpensive and accessible processing option.
Processing the edge of the lambrequin with a zigzag
It is also possible to process it with a laser, if such a possibility exists. The only drawback will be the edges of the thermal bandeau, visible from some viewing angles.
Laser cutting is a non-contact method of processing fabrics, allowing you to achieve high cutting accuracy and an absolutely even cut of the material.
A quick method with high-quality results is burning onto fabric. The question of how to cut a figured lambrequin from an unnecessary curtain is solved in exactly this way.
Product patterns can be of varying degrees of complexity - from simple and laconic lines to ornate carved weaves that create a single fantasy pattern.
Materials
The components of the openwork lambrequin are distinguished by the originality of the product and are exemplary high quality materials! It is produced on the basis of fabric bands for curtains “soft” - a matte finish with a light pile, and “shanzelize” - gloss, satin. They are pleasant to touch and easy to clean from dirt and dust. After a long time, they retain the brightness of the colors.
Soft is a curtain fabric with a fleecy coating. It feels like velvet or velor, high density and softness. The surface has a subtle pattern and may appear matte.
Chanzelize is a satin curtain fabric that has two sides, resembles silk when touched, and is smooth. In production, fabric is used only on the glossy side. If you look closely, the structure of the fabric has small stripes that match the tone of the base. Incredibly soft and pleasant fabric with a dense texture, perfectly retains light rays, and is easy and practical to care for.
How to correctly make flowers for lambrequins?
Floral motifs always remain popular, and flowers can add a special charm to the interior of a room. Even a novice needlewoman can make voluminous fabric flowers with a garland of petals. It doesn’t require a lot of costs or materials.
Possibility of masking poorly chosen cornice and architectural flaws of the window opening.
To make it you need to have:
- interlining;
- thin cardboard;
- base fabric;
- glue stick;
- bias tape;
- decorative tape;
- shiny beads;
- a thread;
- scissors;
- iron.
Necessary materials and tools.
First you need a pattern of petals and leaves - at the initial stage we cut out the parts from cardboard. It is best to outline the resulting parts on non-woven fabric with chalk. In total, you will need 3 large petals (calculating the proportions of the lambrequin) and 5 smaller leaves. After this, we begin the main work.
- Apply glue to the non-woven fabric and apply it to the underside of the fabric.
- Carefully cut out fabric blanks for both sides - a total of 6 and 10.
- First, we run a heated iron along one side. When the product holds tightly, use a glue stick and apply the second part of the fabric.
- Next, you will need to decorate the edges with trim to remove imperfections.
- When each piece is glued and processed, we move on to assembly.
Decorates the curtain composition, acting as an exclusive addition that gives the window design a bright personality.
When collecting a flower, we will try to use our imagination. We connect the three petals with a thread, covering the junction with a bunch of decorative tape. We fasten the leaves with a double-stitched ribbon and add beads on threads. You should get an elegant leafy garland. For splendor, you can omit several ribbons without foliage.
A variety of shapes, designs and colors allows you to choose a bandeau model for any interior.
Important! You should pay attention to the color scheme. The edging of the flower should match the color of the ribbons.
Non-standard window shapes
Private houses differ from city apartments in their original layout and non-standard window openings. Instead of curtain rods, brackets, suction cups, and Velcro are sometimes used. They can ruin the entire aesthetics of the window. They have to be covered with patterned lambrequins.
Bay window
The most difficult thing is to choose a design for alternating bay windows. An example in the photo is the author's design of the hall curtains with patterned felt overlays under the cornice.
Arch
Many architects claim that arched windows are the most beautiful, but they are the most difficult to decorate with tulle. A simple way is to fix the curtain with small brackets along the arch line, hiding the fastening with a lambrequin or openwork felt module.
A rigid gang for a non-standard window is attached to the ceiling cornice; there may be suction cups or Velcro underneath it, which is better to hide.
For two windows
The ornate decor for two openings should be mirror-symmetrical or identical in design. The duo looks good, where curtains with identically shaped tiebacks on different sides are complemented by vertical patterned elements.
It is important to be selective when choosing an original design, having good taste. A selection of illustrations in the interior gives a general idea of the use of this type of decor; there may be other options.
What are the features of a double openwork lambrequin?
Figured lambrequins can be fixed on top of ordinary ones, which gives the overall picture a special flavor. Regarding the shade, it is better to create a sharp contrast between the background and the patterned decor. If you have a regular fabric decoration, you just need to secure the openwork part on top. You will need to ensure that the pattern for the second layer fits well with the rest of the interior solutions for the windows.
The designs of the products can be simple, with laconic, clear lines, or complex, with ornate carved interweavings of a single fantasy pattern.
You can find a lot of monograms, ornaments and stencils for lambrequins to create your own style. The types of window decorations, often consisting of several parts, are striking in their diversity.
The value of handmade products is undeniable: they are true works of art.
The whole picture usually consists of details such as:
- swag (a sagging piece of fabric with gathers);
- jabot (fabric cascade falling along the edge);
- tie (lancet horizontal folds);
- puffs (lush and puffy patterns);
- mold (central element having an acute angle).
The presented products can be made from a set of the following elements.
Note! You should always combine elements in such a way that bright, eye-catching colors do not outweigh calm tones.
Stylistic options
The elegance of openwork lambrequins can update a thoughtful style solution. They look great in laconic minimalism, extravagant art deco, luxurious baroque.
Classic
Multi-layer curtains add their own flavor to an elite interior with precise proportions. In this case, openwork inserts made of dense fabric can become the basic component of window decor.
Modern
General urbanization and new technologies are the main idea of hi-tech, loft or urban minimalism. There is a tendency to simplify textile compositions. They do not always have room for openwork additions, with the exception of rolled lambrequins. They complement the curtains with scallops, as in the photo.
Modern
There is a distinction between modern style and modernism, which reigned in art at the beginning of the twentieth century. Modern in translation means “modern”. The era of decadence (decadence) gave birth to the Art Nouveau style - with asymmetry and grace of lines. The characteristic “modern” design looks good on a wire lambrequin or a wooden insert with handmade carvings.
How to make a lambrequin from cord and wire?
Sleight of hand and numerous tips on the Internet will help you create an unusual window design. You don’t need to spend a lot of time fiddling around making a lambrequin from a cord. Thanks to its minimalistic appearance, it can become part of a double lambrequin without being excessive. A similar product is created using only 3 basic items: furniture cord, thick paper and wire.
Making accessories using this technique began relatively recently.
- You will need to find the desired sketch and put it on paper.
- Then tightly wrap the wire base with a cord of the desired shade.
- Secure the tips with a glue gun and mask them with strong thread.
Just three years ago, one of the curtain factories proposed and began to implement this idea. - Carefully bend the future product, focusing on the contour of the drawing.
- At the points of contact, sew with small pieces of wrapped wire.
Each specialist began to add something of his own to the idea, inventing new versions of the product.
Important! If the wire is stiff and bending is difficult, you will need pliers. In some places it is difficult to do without this tool.
Basic tools for creating window decorations
- The fabric chosen for the given room, lining material - if necessary.
- Threads (it is more convenient to baste with bright ones, matching the color of the fabric - for sewing).
- Needle, scissors, pins, etc.
- Sewing machine.
- Ruler and chalk, tape measure.
- Most likely you will need bias tape and a border with fastenings for the cornice, but here it all depends on the chosen shape of the lambrequin.
- Experience. If you have no sewing skills at all, then they will be difficult for a novice needlewoman. It’s worth choosing the simplest option, without decorative elements, to begin with.
- Availability of space. Since the work is quite voluminous, the floor will be an ideal option if there is no large table.
How are windows decorated with openwork lambrequin?
Lambrequins are not new to the interior. The opening is designed along the entire length or in separate parts. Intricate corner decor or a standout patterned dome in the center are popular.
Carved decorations on windows often act as a bright accent in window decoration.
As you can see, decorations vary in shape, location and material. Sometimes their appearance seems catchy and unexpected, because imagination decides everything here. However, the constant in the figured lambrequin remains refined elegance.
Thus, making an openwork lambrequin yourself will not be difficult, provided that the cut is precise and neat.
Important criteria for selecting finished products
Not so long ago, multi-layer curtains returned to fashion, so the production of openwork lambrequins was launched.
- the length and width of the decorative element depends on the format of the window opening, the purpose of the room and its area (for a small kitchen, a carved triangle or an elegant strip is suitable);
- to visually expand the space of a bedroom or nursery, you need a cornice that occupies the entire wall;
- for the hall or living room the most expensive decor is selected, for other rooms something more modest is suitable;
- the color may differ from the main palette; a contrasting shade or a slightly darker shade of curtains and accessories for them will do;
- the format of the decoration and the complexity of the ornament should emphasize the style;
- You shouldn’t overload the windows with decor; it’s unreasonable for the patterns to dazzle your eyes.
When choosing carved decor, you should think about the practicality of what cleaning method the curtains need with the addition of a new module. The easiest way to clean a hard plank is with a sponge and household products. Soft lambrequins can only be vacuumed.
Jute filament technology
To get started, you need to apply a pattern to paper or take a ready-made stencil. Place the sheet with the stencil in a transparent file bag. The jute pattern is laid out on the surface of the oilcloth and fixed with glue.
When making jute filigree, the stencil is covered with a film, on top of which glue with jute is applied
The steps of performing filigree can be described sequentially as follows:
- Glue is applied to the element of the finished pattern, covered with film, and distributed using a toothpick or knitting needle. There should not be too much glue, otherwise the element will be difficult to fix and it will take a long time to dry. Another technique involves applying glue directly to the cord.
- Using tweezers, lay out the jute cord on the drawing. There is no need to cut the thread in advance; it is better to complete the element and cut the thread diagonally at the end with small scissors. The oblique cut will be invisible and will blend harmoniously with the element.
- The finished pattern (product) is treated with an aqueous solution of PVA glue, allowed to dry, separated from the film, varnished or, if desired, painted with acrylic paint.
Preparing a napkin
So, you have prepared: a good piece of synthetic translucent fabric, a table with lighting and a tool for the guilloche technique, drawing diagrams.
Now place your sketch, which is best done on cardboard, on the glass surface of the table, and place a section folded in half on top.
Turn on the burner, wait until it heats up, and then start working. Make a test cut in some inconspicuous area and see how the tool behaves. Start working from the middle so that the drawing does not move.
The longer you work, the more pieces of material will remain on the needle. This is why you need sandpaper to clean the tool.
When you train yourself to make the simplest cuts and get used to your hand, you will be able to burn out even the smallest holes, cut through fabric without lifting your hand, make even round holes of any size, create more complex patterns by soldering several layers of fabric. Guilloche napkins are a very exciting process, but as with everything, the technique requires perseverance and attentiveness.
After several attempts, you can learn how to create such luxurious products.
The guilloché technique also involves creating products using additional materials. We offer a more complex master class - guilloche napkins with several materials.
We will need:
- synthetic fiber material;
- a small piece of shiny fabric;
- work table;
- scissors;
- burning apparatus.
We start guillochéing a napkin with an ornament. Place the stencil on a backlit table and place the shiny fabric face down on the stencil.
Now, using a soldering iron, we burn out the design and remove the excess.
The finish should adhere well to the paper. After this, we place the main piece of napkin on the paper with the pattern. Place the cut so that the pattern is in the corner. Now, using a soldering iron, secure the pattern and the main fabric in several places, pressing down the fastening points with your hand. Work carefully so as not to harm yourself.
Now, using a knife, you can carefully separate the napkin from the paper.
After the product is separated from the stencil, go over the entire pattern, as if once again fastening the two layers. If desired, you can make holes to make the napkin more openwork. And the edges of the napkin need to be trimmed to create a relief.
Guilloche napkins, the diagrams of which you will find in our article, involve creating such beautiful products, with different patterns and using multi-colored materials. The principle of creation is similar to that described.
Guilloche pattern for napkins:
Guilloche pattern for processing napkins and tablecloths
Guilloche napkin: core and edges
Now about fabrics
We will only work with 100% synthetic fabrics. Why is that? Natural and mixed fabrics burn when fired, but do not melt and are not sticky.
When guilloche they use nylon, nylon, raincoat fabric, fabrics with lurex, artificial silk and satin, brocade, velvet, panvelvet, organza, taffeta, crepe and many others - all those where 100% polyester is written in the composition.
Fabrics can be used either plain or multi-colored, it all depends on the creative concept. Of particular value are fabrics with a blurred pattern, that is, with a gradual transition, play of tones. Imagine the petals of a flower gradually changing color from the tips to the core.
Nylon can become the basis of the product. The base of the product and finishing parts-additives to it must have good adhesiveness, which is what nylon provides. Sometimes nylon tapes are specially placed under the main fabric, especially if the main fabric is acetate or viscose, which are easily burned out, but do not provide synthetic glue, and this is the basis for attaching burned-out fabrics and parts to them. Also, a base made of nylon tape will help keep the shape of a petal made of soft fabric.
Butterfly
To create this simple but interesting craft, you will need a standard set of tools, strips of paper in black, yellow and pink.
First, let's make the preparations:
- Glue two yellow strips together and roll them into a loose roll. Then we make a second similar part (we align the diameter of both elements using a template).
- We twist pink paper into a loose spiral. Then we squeeze the resulting workpiece from opposite sides and form a “drop”. We bend the tip of the “drop” slightly to the side.
- From two black tapes glued together, we make a free spiral and form an “eye” from it. Separately roll up a loose roll from 1 black strip.
- The last element is the mustache. To create them, bend a black strip in half and twist only the ends of each half with a tool.
Having prepared the base (a sheet of cardboard or thick paper), we assemble the butterfly.
Tips for Newbies
For beginners, the art of guilloche may seem very difficult and even impossible. In reality it's not like that. Having carefully studied the specifics of this technique, you will not have any difficulties.
The most important thing is to choose the right fabric. Artificial silk is considered the ideal option, but, in principle, any synthetic material is suitable. To accurately display the selected ornament, it is necessary that the material does not burn, but melts
In addition, the fabric must have good light transmittance.
To accurately display the selected ornament, it is necessary that the material does not burn, but melts. In addition, the fabric must have good light transmittance.
Stencils are definitely used in the work. They allow you to convey the image most accurately.
During operation, melted fibers of matter accumulate at the tip of the device, as a result of which the width of each subsequent fragment of the ornament will be greater. Therefore, it is necessary to constantly monitor the needle of the device in order to have time to clean it with the blade.
Even a schoolchild can master guilloche. On the Internet you can find a lot of different training courses that will help you decide on the direction in this interesting art. Such a difficult hobby can even develop into a personal business, of course, if you approach it professionally.
Useful tips
Let's look at some useful tips regarding the guilloche technique.
If you plan to work with leather, you should first moisten it a little with water using a sponge.
For needlework, it is advisable to use transparent glue. With its help you can perfectly decorate your finished work. It is most convenient to work with materials that have a dense texture.
Before you start working with fabrics, you should first iron them thoroughly. Then they are securely fixed on the work surface. During work, you must remember to comply with safety regulations. Do not touch the needle of the device to avoid getting burned.
To ensure high quality and accurate work, it is important to carefully monitor the position of the needle. It must be strictly perpendicular to the working surface. In the process of making any craft by guilloche, you must proceed gradually, you should not rush
Excessive haste will lead to the fact that the finished product may not be very neat, and the master will have to correct many mistakes. When printing a drawing for a future craft, make sure that it has fairly thick outlines.
Make sure that the dimensions of the glass sheet of the base and the future craft correspond. There must be special chamfers on the edges of the glass. Only with them the likelihood of cutting yourself on the material will be minimized.
Crafts made using this technique can be additionally decorated with decorative stones, rhinestones and other attractive materials.
Creating a still life
It will be much easier for beginning pyrographers, as well as young children, to learn how to paint with fire in the still life style. To do this, you need to find a more suitable design with contours for burning on Internet sites and begin the procedure. If the basis is a vase of flowers, then you need to try to choose those sketches that have as little shadow as possible. Such images can be started only after obtaining certain skills and preparation.
Girls will like still life more. Boys cannot always appreciate the creation of such compositions. An attractive design with flowers, fruits, a room or other harmoniously composed objects is immediately classified as a woman’s hobby. When burning out drawings, it is best for boys to take on cars or favorite cartoon characters.
Master classes for Getting Started
It will be difficult for beginners to get used to working with a burner carefully; even professionals don’t always do this here. The main thing is persistence and long hours, then work with work can be decorated with whatever your heart desires.
Silver napkin will be needed
inserts:
- printed pattern;
- synthetic fabric - silver;
- base fabric for pattern;
- light or tracing table.
It is much easier to work with a light table, but if there is no such thing, then the pattern on the tracing paper is not transferred and imprinted onto the fabric by pressing with reverse pressure. The sides of this pattern from tracing paper are applied with the front side on the fabric and the pencil or pattern is passed over with a pen, imprinting it on the fabric.
Fruit painting
To work with this, you can take any napkin to make or make it yourself. The still life will consist of cherries and apples. Pictures from Printed are suitable as a stencil. Internet them, apply the fabric of the required color and go over it along the contour with a burning machine. all After cutting out the details of the fruit, glue them onto a napkin, creating a still life.
Using this method, you can make absolutely any design, be it a vase with cute flowers or a kitten. Brightly colored scraps of fabric will give children twice as much joy. The opportunity to assemble a picture from them and hang it in your room is the best gift.
Classification of devices
There is a large selection of tools for needlework. The main thing is to determine for what purpose it is required: to work professionally or to try a new technique.
| Soldering iron | Suitable for burning, but you will need to sharpen the tip to make it look like a needle and make it easier to work with. The tip is not suitable for working with fabric, as it will constantly stick to it, which will complicate the process. |
| Burner with temperature controller | The best option, suitable for most needlewomen. The range of work increases significantly, allowing you to work with different materials. |
| Fabric burner | A device designed for working with fabric and covered with a protective material that protects your hands from overheating. Unfortunately, it only comes with one needle, which cannot be replaced. The lack of a temperature change function is another drawback. |
| Burner with replaceable nozzles | A set of attachments allows you to create different patterns and lines of different thicknesses. A failed attachment can be ordered online so as not to buy the entire set again. |
Making a butterfly
You will need a stencil or base for a butterfly with two wings. Decorations will be attached to the top of it. The work is quite within the capabilities of a child. After cutting out the shape of a butterfly from the fabric, think over a pattern for it. It is enough to choose 2-3 colors of synthetic fabric that will harmonize with each other. Cut out a pattern of each color in layers and apply it to the wings of the butterfly.
A child can learn guilloche, and then the butterfly will serve as a gift for the teacher. And if you wish, you can tell all your classmates about the lesson, because it is suitable even for beginners. Having chosen an openwork pattern, you can begin work. Organza butterflies look very light and beautiful.
By placing a printed butterfly pattern under the organza, you just need to follow the contour with a burner. Next, you should carefully separate the butterfly from the diagram. They look great as interior decorations or as an addition to a postcard or gift. Such butterflies can be planted on curtains.
Tools
First of all, for work you will need to stock up on the necessary tools.
The master’s main “working tool” is a special tool with a forked tip and a comfortable handle. It is used to roll paper strips.
If it is not possible to buy a ready-made tool, you can replace it:
- awl;
- ballpoint pen refill;
- gypsy needle;
- toothpick.
So, in order to turn a toothpick into a device for forming quilling rolls, it is enough to cut off the sharp part from it and bifurcate the resulting tip using a stationery knife.
A “fork” for holding paper can also be made using a gypsy needle. To do this, just break it from the ear side.
When using other available means, place the tip of the paper strip on the tool and hold it with two fingers while twisting. The paper strip must be held with your left hand, and the tool with your right. Rotate the tool clockwise.
You will also need scissors, tweezers, a simple pencil and glue. The adhesive composition should be quick-drying, fairly thick and dense, and have a dispenser with a small nozzle (1-2 mm). The best options for working with paper are PVA and Moment transparent glue.
A ruler with holes of different diameters will help make quilling easier for beginners. With its help, it will be possible to maintain uniform dimensions when manufacturing individual parts. Thanks to this, the finished product will look more neat and beautiful.
Also, when creating crafts from paper strips, you may need a cork or foam mat, a wide-tooth comb, and safety pins.
Diagram and manufacturing of the dial
Almost all famous brands have a decorated dial. This pattern looks original and emphasizes the individuality of the owner. The carving can be reproduced manually or using a special machine. A very thin needle is used for this work.
To create such a pattern you will need a very high level of skill and a clear eye. The work area is small, and the lines should be as thin as possible. Schemes that can be used to engrave any pattern can be found in the public domain
It is important to take a responsible approach to the execution of the drawing; this process is intricate and complex.
Learn guilloche step by step for beginners with a master class
than, Before getting down to the practical and technical aspects of guilloche technique, it is worth learning a little about the history of the development and emergence of this branch of creativity.
The technique designated guilloche itself as a type of creative activity only in the mid-twentieth century. This industry is quite young compared to many other creative areas. Guilloche is an original technique developed by Zinaida Kotenkova in the 1980s, which means burning a method onto fabric.
This method consists in the special use of a soldering tool or a burning tool for cutting out patterns on or fabric for gluing parts of material, forming an applique. Using this author's technique of decorating fabrics, you can get unique panels, napkins, tablecloths, covers for notepads and books.
with the help of the tools of which guilloche is performed.
The fabric guilloché technique involves the use of hot heaters - objects or cutters. For beginning needlewomen, it will be enough to have a soldering iron with a pointed tip. tip, if you want to create complex curled patterns, get a professional special burning set for wood. Buy a variety of attachments with thin, rounded and wide working ends. Such a variety of tools will allow you to change and complicate your Give.
For applications, preference is given to cutters with an adjustable function so that the tension can be worked with both dense and thin fabrics. With reduced voltage, you can melt the material to glue the elements of each appliqué together.
Do not forget to carefully care for your cutter: sharpen the needle with sandpaper before each use.
In addition to unique tools such as a burner and a cutter, you will need quite standard tools. These are sharp scissors and tweezers, which will be very convenient for moving small parts, stencils and diagrams, working on the glue surface.
The secret of this type of applied creativity is that it is only performed on synthetic fabrics. They do not burn, unlike natural materials, but begin to melt.
Most often, guilloché masters use the following materials:
- excellent - Nylon is suitable both for the base and for the manufacture of finishing parts.
- Nylon tapes help dilute the design with bright accents.
start Before working, check the properties of the fabric. small Take a piece of scrap and set it on fire to see if the material melts or burns, whether the working needle leaves fumes and soot on it.
To make a napkin using the guilloche technique you will need:
- A piece of synthetic fabric fiber measuring 20 by 20 centimeters;
- a piece of silver fabric to create an ornament;
- guilloche device for;
- a sheet of paper with a coin pattern drawn on it;
- ornament for decorating the edges of the napkin;
- lamp;
- piece of glass
To begin, prepare a working For. Place glass in this area and place a lamp under it.
Place a sheet of paper on the glass with a pattern of the future napkin ornament drawn from the paper, and place the silver fabric on top of the pattern with the front side facing the paper. Using a burner or a soldering iron, trace all the contours of the ornament.
The pattern with the fabric together should remain on the paper, and carefully remove the excess fabric that was cut along the contour. Using a knife, remove all small, pre-cut sections of fabric from the pattern. Using a knife, remove all small, pre-cut areas of fabric on the pattern
Using a knife, remove all small, pre-cut areas of fabric on the pattern.
The pattern will be paper with a sheet attached. On top of the pattern attached to the paper, place the pattern of the main fabric 20x20 centimeters with the front side facing the sheet of paper. Using a soldering iron burner or you need to pinpoint the pattern in several places. After tackling the fabric area, press down the applied soldering iron with your fingers so that the pattern and the fabric adhere firmly to each other.
Using a knife, carefully lifting the entire napkin together with the pattern, separate it from the sheet as follows.
paper, you need to use a soldering iron to go over the entire pattern applied, not forgetting to press the fabric against the pattern with your fingers. In the desired areas of the future napkin, several through holes can be made in the pattern as a decoration. This way you will get an openwork finish.
Along the contour of the outer trim, trim off all excess main fabric of the fabric. Use coins to decorate the entire outline of the napkin. Here is a photo of the napkin below showing how you can make it.
You can even decorate your curtains using this technique.
Secrets of successful drapery
Curtains and drapes decorated with drapery look especially attractive. For draperies, it is better to choose fabric of solid colors. Soft delicate folds can be created from materials that drape well - cambric, silk, organza, velor.
Curtain tape is a great way to create an even fold across the entire width of the curtain, since the pleat is already built into its structure.
Using draperies made using the swag and jabot method, you can create additional decorative elements.
All these methods will help create an expressive window design and transform even the simplest curtain materials.
