Vadim
7534 0 0
Vadim May 5, 2018
Kitchen sets contain a lot of dishes, household appliances and other kitchen utensils. All this stuff has serious weight, there are no problems with floor blocks, but fastening wall cabinets requires a responsible approach. At the moment, the suspension bar is considered the most reliable device, and further, we will step by step analyze the intricacies of such a suspension, plus I will show you a few more useful tricks.
Wall cabinets in kitchen units only seem light in appearance; in reality, they require the installation of a reinforced, durable suspension.
How the canopy strip works
The entire structure consists of a specially prepared metal strip on which there is a hook, which is attached from the inside to the side wall of the cabinet. From the outside, such strips for attaching wall cabinets in the kitchen are invisible.
Thanks to such furniture you will save space, at the same time it is spacious.
Gas lift and adjustable awnings for kitchen cabinets - installation of furniture according to all the rules
Adjustable canopy - appearance, colors
Design of adjustable hangers ↑
Internal structure of an adjustable eyeAdjustable canopy and rail for mounting on a wallApproximate diagram of fixing the suspension to a metal rail
How to attach the gimbal yourself: brief instructions ↑
- Adjustable canopies are recessed 5 mm relative to the rear wall. Therefore, before you begin installing the lugs to the cabinet, you should make small holes in the fiberboard to match the size of the “ear” of the suspension.
- Attach adjustable hangers to the sides of wall kitchen cabinets.
- Cut the mounting strip exactly to the size of the wall. When purchasing ready-made furniture, the tire is supplied in a specific size for each drawer.
- Attach the guide to the wall, having previously measured the required distance from the tabletop. Approximate calculation: the height of the work apron plus the height of the wall cabinet minus the thickness of the roof (usually 16 mm).
- Hang the furniture on the rail and begin adjusting the hangers.
Detailed video instructions ↑
Installing an adjustable hanger on a kitchen cabinet: How to attach a hanger to a strip: Adjusting a kitchen hanger: Universal gas lifts and adjustable hangers for kitchen cabinets make furniture installation easy.
Moreover, thanks to properly selected lifts, the usable area of the internal space of the cabinets increases and the ease of use of the kitchen set is optimized to the maximum. And technically competently installed adjustable lugs guarantee the durability of the use of upper wall cabinets. Those readers who have taken on the interesting but difficult task of independently designing their own kitchen ask, among other questions: what are the...
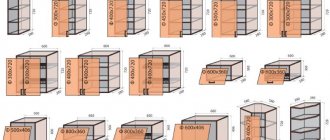
How to determine the standard sizes of kitchen cabinets and the overall dimensions of a kitchen set
For decades now, linoleum for the kitchen has remained the most popular type of flooring. Despite all its accessibility, this one is unique.
We choose linoleum for the kitchen according to all the rules
A clearly developed kitchen drawing is a guarantee of quick and trouble-free furniture assembly. A detailed design of a kitchen set with dimensions will help you avoid.
Advantages and disadvantages of the plank
This simple design has a number of advantages, which is why it has gained its popularity:
- Even non-professionals - people with basic construction skills - can cope with the installation.
- When installing adjustable awnings, there is no need to measure and drill holes for each wall hanging cabinet separately. The general level is reflected.
- Using anchor bolts you can adjust the position of the cabinets. They can be placed on the same level, regardless of the flaws of the wall.
- Unlike fastenings for wall-mounted kitchen cabinets with dowels, a design with a strip is considered more “durable” and reliable. Even if a couple of screws loosen over time, the rest will hold well even when the cabinets are as full as possible.
The system has no global shortcomings. The only thing you should keep an eye on when purchasing a bar is the quality of the material. Low grade metal will bend a lot and may even break during furniture installation.
The locking mechanisms of kitchen cabinets have to endure heavy loads.
Hanging on a mounting plate (rail)
Before you start hanging your kitchen cabinets, you must keep in mind that there will be a gap between the furniture and the wall. It is necessary that the gap be the same both above and below. It is necessary to install an additional rail at the bottom of the cabinet.
You can attach it at a height where the lower part of the furniture “enters” the kitchen apron.
This type of canopy has a number of positive aspects if you hang it on loops and hooks. Firstly, it is very easy to make markings for the mounting rail; the installation of cabinets can be done with high precision. Secondly, the hangers can be adjusted, and dismantling and installation will be quick and easy. Thirdly, the cabinets form an even row, without any gaps. Fourthly, the ability to withstand any loads, here they are distributed evenly.
You can handle this job yourself.
But there are several disadvantages of this type of canopy:
- Such a kit - attachments and rail - is not cheap. But this is, rather, not such a serious obstacle, because the time savings are significant;
- Gaps form between the wall and the furniture.
Despite this, this method is considered the most acceptable, within the capabilities of any master.
Installation method
To properly secure kitchen wall cabinets, you need to select a tool in advance and strictly follow the installation technology. It’s easier to do the work with 4 hands, but 1 person can do it. Of course, this will take a little more time and will require extreme concentration, accuracy and caution.
An important factor is the reliability and quality of fastening of each part of the headset to the wall.
Preparatory stage
Before starting the process of drilling surfaces and direct installation, you need to perform the following steps:
- Cleaning and leveling walls. The easiest way to do this is with drywall. First, you need to secure a frame of profiles to the wall, on which the structure of the cabinets will be supported.
In order to begin the process of installing kitchen cabinets, you need to level the walls. - For corner kitchens, the angle between the two planes should be maintained at 90 degrees. If the curvature of the walls is insignificant, you can simply plaster them.
Please note that for a corner kitchen, the angle of the walls is provided at 90 degrees. - Applying basic markings. Using a perpendicular, a construction pencil and a level, you need to schematically arrange the attachment points and select the height of the structure.
This stage must be performed using a plumb line, pencil and level. - If the situation requires it, you must first install all sockets and lighting fixtures and attach all related elements.
Installation and connection of all sockets and lamps must be completed in advance. - Before starting work on the installation of kitchen cabinets, the walls must be painted or wallpapered - no repair work should be carried out after installation.
You can do all the work yourself, without any help.
Hanging height indicators
It should be convenient to use the set, so the height of the cabinets directly depends on the height of the owners and the anatomical features of their figure, and the features of the room.
Before you start assembling the set into a single “wall”, you need to decide on the height at which the furniture will be hung.
Main criteria and numbers:
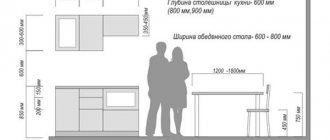
- The drawers should be tactile and located at eye level. On average, the distance from the plane of the table top to the top cabinet is 55-65 cm. In this case, a person must reach the very top shelf without the risk of dropping the desired item and without the use of auxiliary objects (chairs, benches, etc.).
- If you do not plan to mount a table top or the lower part of the set, then the ratio of human height and fastener height should look like this:
- up to 165 cm – 175-180 cm;
- 165-157 cm – 185 cm;
- 175-190 cm – 200 cm.
To correctly carry out these manipulations, preliminary calculations must be made.
Required tools and materials
To carry out the work quickly and efficiently you will need:
- Drill or hammer drill with drills or augers. For brick and concrete, the impact mode should be used; for other surfaces, regular drilling will be sufficient. When working with tiles, you need to stock up on drill bits with pobedit tips.
- A screwdriver, which will be used to tighten the screws for attaching the holders to the cabinets.
- Construction pencil and tape measure.
- Level for marking the location of cabinets and adjusting awnings.
- Stable ladder.
Don't forget to prepare the walls!
Before hanging the cabinets, you need to prepare the walls by doing some work:
Use plaster or plasterboard sheets.
These points will be the basis for the work ahead.
After hanging the cabinets, painting the walls will be very problematic.
Step-by-step instructions for installing the strip
Work must be performed in the following sequence:
- Initially, the size of the bar is measured and a corresponding mark is made on it. The plank can be cut with a hacksaw, a grinder, or simply broken off.
- Marks for drilling are made on the wall, taking into account the distance from the top edge of the cabinet. You can mark them with dots or draw a solid line for the entire headset.
The main thing is that all measurements are made using a building level. - After the holes in the wall are drilled, you need to check the location of the anchors: they should be carefully driven into the wall and make sure that the depth of all elements is the same. With just one incorrectly installed anchor, the cabinet may not fit against the wall and the entire structure will become warped.
- The bar for hanging kitchen cabinets is applied to the wall (it is advisable for two people to work here: one holds the hanger, the other fixes it), the anchor bolts are inserted into the required holes and driven in until they stop. Using a screwdriver or screwdriver, the fasteners are carefully tightened.
Holes are made on the pre-marked wall for fixing the tire.
It is important! It is better to use a hand tool with which you can adjust the force. Otherwise, there is a high probability that the anchors will be tightened with different intensity.
The body of the hanging furniture must be mounted on a tire. The reference point is the plane of the wall.
How to hang on drywall
The most “painless” method is to screw anchor bolts through the drywall into the base of the wall. The method has one significant drawback - it is easy to overtighten the bolt, which will lead to cracks on the drywall sheet.
The load per bolt should not exceed 15 kg.
A more reliable and material-safe method is the use of mortgages, which are installed on the wall at the design stage. Their role can be played by timber, metal profiles, etc.
If the set needs to be fixed on a plasterboard surface, then a wooden beam or a thick board, which is fixed to the wall thanks to anchor bolts, will come in handy.
The wall is covered with plasterboard, and marks are placed at the location of the mortgages. It is at these points that the kitchen cabinet will then be attached to the wall. The principle is the same as in the previous method - using anchor bolts, but the load can be set to 1.5 times greater.
It is extremely important to make high-quality and durable fastening of kitchen cabinets to the plank, since they create a large load on the wall and fasteners.
Useful drilling tools
You can never have too many tools, but in a city apartment, a home craftsman has nowhere to put a full-fledged machine, but he needs to work, and here the problem will be solved by special attachments for an electric drill.
| Illustrations | Recommendations |
| A circular saw . A convenient device that allows you to unravel relatively small bars with a cross-section of up to 50 mm at home. | |
| Fraser . Attachment for milling small blind holes. With it you can easily cut out a bed for a door lock, handle or hidden canopy. | |
| Stand for corner and straight drilling . This stand makes it easy to create precise holes at the desired angle. Working depth is up to 150 mm. | |
| Lathe . The power of such a machine depends on the engine power and the maximum speed of the drill, but most models are suitable for working with soft wood. | |
| 90º collar . An indispensable thing for working with furniture, especially for repairing it, when it is not possible to drill a straight hole in some narrow compartment. | |
| Pump . Summer residents will appreciate a unique nozzle that replaces a garden pump. Its productivity is 2500 l/hour, which is quite enough for a country house of six acres. | |
| Engraver . For small engraving work there is a flexible “sleeve” with the ability to connect a set of special attachments. | |
| Grinding and sharpening machine . This is perhaps the simplest and most accessible device. The drill is attached to the table with a clamp with a special holder, after which the attachment with the desired circle is inserted into the chuck. | |
| Metal scissors . A whole series of such attachments is produced. The configuration of these devices is different, but the task is the same everywhere - to quickly and effortlessly unravel the sheet of metal. | |
| Cord brush . Such nozzles are available in 2 versions - with metal and synthetic bristles. | |
| Drilling machine . Here the drill is already used for its intended purpose, but the rigid frame with a feeding mechanism allows you to make precise holes with a fixed depth |
Types of cabinets
Furniture for storing things, consisting of a frame, shelves, and doors, can be made of wood, metal, or plastic. According to the installation method, cabinets are divided into types:
Fastenings for each type are different, but can be interchangeable if certain conditions are met, such as surface evenness and type of masonry.
Mounted
Individual structures installed on fasteners above floor level are called suspended. To fix the position, mounting rails, “ears”, corners and other fittings are used. These types of cabinets are used to store kitchen utensils, food, and other household items. Depending on the type of door, they can be open, closed or combined.
Bolts, anchors or tires?
To ensure that the fastenings are reliable and the filled cabinet does not fall at the most unfortunate moment, you should take into account the material used to make the walls and furniture. Carefully consider the type of fastening.
How to fasten and what fittings are most optimal for a brick, concrete, wooden wall?
For a wooden wall of a country house, fastening with countersunk screws made of hardened alloy would be optimal. The most effective installation is with self-tapping screws with a large pitch and double-start thread.
It is better to attach shelves to a concrete and brick base using dowels, plugs, metal bolts, and plastic fasteners. You can strengthen the fittings in the holes after the drill with gypsum mortar.
Molly or butterfly screws will securely secure hanging furniture to a plasterboard wall.
For open shelves with light loads, decor, and lighting, you can use plastic butterfly dowels and drill dowels.
Hanging storage systems for dishes, food, and equipment should be mounted on classic metal fittings. For example, you can buy regular dowels made of durable alloy or molly (butterfly dowel in a metal version).
If it is impossible to reach the wall through the sheathing, you can use wooden bookmarks. The thickness of the embedded beam should be equal to the thickness of the transverse frame. If these numbers do not match, the structure may become deformed. The thickness of the timber is adjusted according to the profile sample. A metal butterfly screw is optimal for fastening hardware.
Features of the suspension design - how it works
As a rule, this furniture fittings has a decorative plastic case, inside of which the adjustment mechanism is hidden. Only the heads of the adjusting screws can be seen from the outside; in addition, the case has through holes, reinforced inside with metal plates included in the suspension mechanism block. However, some models are made entirely of metal, which distinguishes them with higher strength and, accordingly, price. And regardless of any external differences, the design always includes the main part with which the cabinets are hung - a strip with hooks at the end, connected inside the body with adjusting screws.
The suspension is usually a plastic case with an adjustment mechanism inside.
The movable mechanism gives the suspension some freedom to move the clamp bar back and forth and up and down, with the main amplitude along the second vector occurring at the end with the hooks. Thus, by rotating the screws, you can extend the suspension from the body by 2 centimeters, and vertically adjust the height of the cabinet box within 22 millimeters. This is more than enough to ignore some unevenness in the wall and still get an ideal line of position to hang each cabinet evenly on the kitchen wall relative to its neighbors.
Mounting options
There are 2 methods by which fastenings for kitchen cabinets are made. Installation is carried out:
- One line, that is, the location of the fastener is equidistant from the ceiling;
It is considered the most common type of accommodation. This way you can easily secure the cabinets yourself. - Different levels are used for hanging, that is, objects are at different heights.
This method is used much less frequently, since its implementation is much more complicated than a linear fastening scheme.
The first method is popular because you can use only your own strength to attach kitchen cabinets, without turning to outside help.
The choice of option is determined by the number, size and depth of wall cabinets.
The second option for attaching fixation items is less common among ordinary people. This is because the roof of this furniture is used as an additional surface.
Any of the proposed variations is perfect for both a room with a small area and a large one.
