There are quite a few options for making countertops for the kitchen, mainly plastic or acrylic products. But what can you say if the countertop for the kitchen unit is made of tiles? It is quite possible to do this yourself; to do this, you just need to follow all the recommendations indicated in this article.
Obviously, this countertop option wins in many respects: appearance, practicality and durability.
Advantages and disadvantages of tile countertops
The advantages of a tiled countertop are undeniable!
- Ceramic tiles are resistant to heavy impacts, hot pots and other inconveniences.
- It is inexpensive and easy to clean.
- Ceramic tiles are resistant to heat, water and dirt.
- According to technical characteristics, tiles are much stronger than wood and are not so susceptible to external influences.
- A huge selection of textures, colors and formats, which allows you to bring any fantasy to life.
- You can make a work surface yourself and replace broken tiles.
The disadvantages of ceramic tile work surfaces mainly include joints, which require special cleaning and care.
- The problem can also arise when cooking, since the work surface is not perfectly smooth. Therefore, it is not entirely suitable for rolling out dough.
- Instead of ceramic tiles, we can choose porcelain tiles. This material should be used with caution, as it is porous and requires special care.
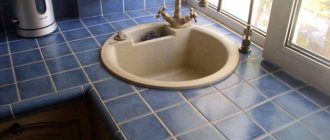
The tiled countertop will look great together with the wall decoration. In addition to kitchen surfaces, window sills can be made using the technology described below. Let's look at how you can do this simple job without errors.
Design finishing ideas
When tiling the table top yourself, you can give free rein to your own imagination. To ensure that the tabletop does not stand out from the general style of the room, you need to choose the right pattern and color of the material.
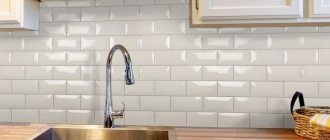
For strict styles that do not welcome excessive diversity (high-tech, minimalism, modern), a plain table surface is best suited. The color of the tile should be combined with the rest of the interior details. When using shiny metal (in high-tech style) for decoration, it is advisable not to choose a contrasting shade of the countertop in relation to the apron or walls.
In the design of a minimalist kitchen, you can also use contrasting combinations, and the style of the room in the Art Nouveau style will be successful with contrasting accents on the surface or end of the tile countertop, island, and chair seats. You can support them with decorative inserts if you lay out tiles on plain walls or furniture facades.
For less strict rustic styles (country, rustic, Provence), you need to choose not only the color, but also the texture of the tile. The rough details of a rustic interior are successfully emphasized by floor tiles with natural stone finishes. For lighter country and Provence, you can use tiles with floral patterns or create mosaic panels from small monochromatic details.
Tile mosaic
A type of decorative ceramic finishing is mosaic. To decorate the tabletop, you can use a variety of options:
- lay out a plain central field and complement it with a multi-colored or contrasting border;
- randomly arrange colored elements over the entire surface;
- make thematic inserts from colored tiles on a plain surface (you can buy ready-made small factory panels);
- use fragments of colored ceramics (tiles, plates, vases) for mosaics and create complex compositions.
Tile mosaics are made according to principles similar to installing tiles on a countertop, and only require the selection of decorative elements in accordance with the sketch. You can use leftover tiles in a mosaic tabletop: the size of the tiles does not play a decisive role. It is acceptable to cover part of the countertop with small parts or waste from wall repairs in the bathroom and kitchen. When creating a mosaic, you only need to make sure that the surface of the table is smooth.
Tile composition
Tiles are made from durable material such as ceramic, stone, fired clay or even glass. Regular tiles include ceramic and porcelain, while stone-cut tiles include slate, granite, travertine and marble. The size and shape of the tiles vary depending on the material.
- Ceramic tiles and porcelain tiles come in different shapes and sizes.
- Natural stone is usually limited to squares and rectangles.
- Most kitchen countertops are tiled with ceramic and porcelain tiles.
Ceramic tiles are made from natural clay that is baked at high temperatures to remove moisture, causing the material to become hard.
Such tiles gained the greatest popularity in the 70s of the last century; today they are still used due to their availability and ease of installation.
Some care tips
An artificial stone countertop does not require special care, but some recommendations should still be followed. It is enough to treat the surface of a countertop made of natural or artificial stone once a year with a special impregnation. This impregnation prevents the penetration of moisture, extending its service life. Tile joints must be periodically coated with sealant.
Stone countertops must be sealed once a year. Use special coasters for cold and hot dishes. You should not cut food on the countertop; for this you need to use cutting boards. Natural stone surfaces need to be polished occasionally. The tiled countertop does not require special care; simply wash with warm water and soap.
Tools and materials
The countertop can be made from tiles left over after the renovation of the room or you can buy new material.
To work you will need:
- Tile;
- Level;
- Putty knife;
- Tile adhesive;
- Carpenter's glue;
- Silicone or sealant;
- Primer for tiles;
- Tile cutting tool;
- Screwdriver, self-tapping screws.
Preparatory work
You must disassemble the old table before you begin. If this is not possible, its surface must be processed and leveled as accurately as possible.
- The most important thing is to choose the finishing material. For a beautiful design, buy the same tiles as on the kitchen wall. The range of sizes is wide: from small mosaics or classics 10x10 to tiles of impressive sizes 60x120. If you have a certain skill, working with large tiles is much faster and easier.
- We take two sheets of FB or FSF plywood, 20 mm thick, which is impregnated with a waterproofing compound. We make protrusions along the cross-section to a width of 3-5 cm.
- We secure the first sheet on each side with several self-tapping screws for fixation. We use metal corners for stable fastening. Apply wood glue to this sheet using a zigzag motion. Choose moisture-resistant glue.
- Glue the second sheet of plywood on top and screw in the screws for secure fixation. We make small notches on the front surface of the second sheet. Press the painting mesh tightly onto the surface from above. Seal the joints of the countertop and the wall with sealant. We also treat the edge with sealant.
- As a result, we glued two sheets of plywood together and securely attached them to the kitchen sections. Treat the sides of the plywood with waterproofing compound. The painting mesh attached to the plywood surfaces should also be treated with a moisture-resistant compound.
- If you need to insert a sink into the countertop, you must cut the hole before placing the ceramic countertop on the base. The cut portion should not be thrown away as it will be needed.
The part cut off before pouring should be secured with resin and screws in the place from which it was cut, so that after the solution has hardened, this part can be easily removed.
How to install correctly: features
To install correctly, you need to listen to the advice of experts:
- When adjusting plywood to the format of tiles or porcelain tiles, you need to leave a couple of cm “in reserve” on 4 sides (the tiles should slightly overhang the plywood).
- Cuts and corners of the tabletop must be processed at least 2 times. This should be done especially with the sink cutout to avoid rotting.
- In the cooking area, you need to go over the protective layer several times (to resist heat).
- To obtain a moisture-proof cement layer, when diluting it, add a little tile adhesive mixture.
Before laying the tiles, it is important to ensure that the base is level.
Laying tiles on a kitchen countertop
We glue the tiles from the outer corner, laying the initial row along the length. For work, you can use broken tiles instead of whole ones; they will help you lay small work surfaces.
At this stage of the work, the tiles will be cut and carefully glued to the countertop. The result is a beautiful, smooth and comfortable surface. Patterned materials can be used for end tiles.
Step-by-step instruction
- A layer of tile adhesive is placed on a base approximately 0.5 cm wide, then processed with a spiked spatula. Each of the tiles is leveled along the edges and height using a level. To ensure equal spaces between the tiles, dividing crosses are often used.
- After the glue has dried, seal the seams with grout. The color of the grout mixture is chosen to match the color of the tile or similar colors. To do this, apply a finishing solution to the surface of the tile, which is lightly pressed into the cracks with a rubber spatula. The remainder of the solution is removed with the same spatula for subsequent introduction into the remaining seams.
During such work, the tiles are wiped with a damp cloth so that the mixture does not dry out and remain on the tiles.
By following the step-by-step steps, you will give your kitchen countertop an aesthetic appearance. The laid tiles will fit perfectly into the interior of the room. All actions are simple and easy to perform independently.
Which one is used where?
For the end, shaped tiles are used, which have an L-shape in appearance. With its help, they simultaneously cover the first row and cover the end. The top tile can hang over the end dies, protruding by 2–4 mm.
The ends give the countertop a finished look and increase its aesthetic appeal. You can decorate the top surface of the table in different ways. For example, on a horizontal surface, a die can be laid out in such a way that the edge of the glued fragment hangs over the thickness of the porcelain stoneware. Then the remaining dies are cut into strips and glued at the end edge.
As for laying at an angle of 45 degrees, professionals can do this. The downside of this type of tabletop design is the large amount of trimming, which increases the number of glued fragments. In addition, a professional master can handle this work. Therefore, this design may require labor costs for the tiler.
For the countertop itself, you can use large elements, which will simplify maintenance and also speed up the cladding process, reducing the number of joints. However, if the kitchen is small, then it is preferable to use small tiles. This eliminates the possibility of introducing an imbalance, which can visually reduce the already insufficient square meters of the room.
If possible, the sizes can be increased. By the way, the size can determine the thickness of the dies used, which should not be forgotten before purchasing durable and high-quality material.
As for the use of mosaic for the tabletop, professional tilers can choose it. Even if you want to, working with it requires care and experience, and a beginner will not be able to make all the joints perfectly identical.
