After purchasing a plot to build a house, people constantly equip it. First they build housing, then they decorate flower beds and begin arranging recreation areas.
For comfortable spending time in the fresh air, the main thing is to build a gazebo, table and benches. It is impossible to imagine any outdoor picnic without a table. Therefore, in this article we will look at how to make a table for a summer house with your own hands, what tools and materials you will need for this, and what are the advantages of making country furniture yourself.
Table dimensions and construction features
To make the garden table as convenient to use as possible, you need to accurately determine its dimensions:
- length 120 cm;
- width – 80 cm;
- height – 70-80 cm.
This table can accommodate from 8 to 10 people freely and without constraining each other. If the tabletop is smaller, the product will not be functional. A large tabletop will be too bulky.
It is best to make country furniture from wood. The main thing is that these are breeds that are resistant to negative factors. If boards are chosen as a consumable material, the product will be inexpensive, but at the same time practical, aesthetic and durable (with proper care of the wood).
Also among the advantages of building a table from boards is the fact that the materials for constructing country furniture can easily fit into a car. Since the length of the tabletop will be only 1.2 m.
Materials for making a country table
You can make your own garden table from various lumber. This could be: boards, construction pallets, logs, plywood, LSDP. Each individual option has its own advantages and disadvantages. When choosing building materials, you should take into account their technical characteristics, cost, and aesthetics.
Which wood is best for outdoors?
Wood of different species is suitable for outdoor furniture. These can be either soft species (pine, fir, spruce, cedar) or hard (oak, birch, ash, maple, acacia).
Attention : too soft tree species, such as poplar, alder, willow, are not recommended for use in the construction of garden furniture.
When choosing wood for the manufacture of outdoor furniture, it is worth considering its resistance to rotting, high moisture and sudden temperature changes.
Important : for beginners in carpentry, it will be easiest to start working with pine and birch. Since this wood is quite easy to process in various ways, and at the same time has high technical qualities.
In the manufacture of individual elements of furniture (table tops, legs, frames), it is allowed to use different types of wood. All individual elements of a piece of furniture are assembled using dowels made of acacia or boxwood.
Outdoor table for a summer residence drawings
To make a table for the yard with your own hands, you need to acquire an exact drawing of it, which indicates not only the dimensions of the product, but also the materials for its manufacture. You can make such a drawing yourself by drawing it by hand or choose the most suitable option on the Internet.
Attention: having a well-drawn drawing of the future piece of furniture will prevent errors in the process of manufacturing its parts and their assembly.
The following parameters must be indicated on the diagram of future furniture:
- height;
- depth;
- width;
- length.
Attention: when choosing the size of country furniture, you should take into account not only standards, but also personal wishes and the size of your garden plot.
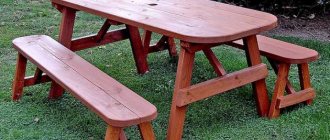
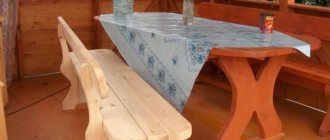
If the dimensions of the yard allow it, then the ideal option would be to build a bench with a table with your own hands. It will fit harmoniously on the veranda, terrace, gazebo or simply in the middle of the garden. This design has many advantages:
- spaciousness;
- aesthetics;
- functionality;
- practicality;
- ease of use;
- good stability.
Brief description of different types of benches with photos
Classic. An ordinary wooden bench. The design is simple. Its appearance can be changed by making the backrests, for example, cross-shaped, or changing the shape of the handrails.
Metal. She's always beautiful. The metal frame is prepared and then joined together. The product can be decorated with various metal figures. There is a small drawback to this product: sitting on metal is uncomfortable.
Therefore, boards must be secured to the seat. The combination of metal and wood creates a special impression. In addition, it is very comfortable to relax on such a bench.
Stone structures. It is always not only beautiful, but also very original. The view is fabulous. Such a structure is built to last forever. He can't be moved.
Here you need to be very careful in choosing a place so that the bench looks great against the backdrop of the garden, the entire area, and decorates it. There is one drawback of such a bench: the stone is very cold, you need to think about how to insulate the seat.
Required Tools
To make a table with benches for your garden with your own hands, you need to prepare the following tools:
- wood hacksaw;
- electric jigsaw or circular saw;
- drill with various drill bits;
- screwdriver;
- hammer (if it was decided to use nails instead of screws).
This is a minimal list of tools that are simply impossible to do without when assembling wooden furniture. To make the work go faster and at the same time make the furniture look more aesthetically pleasing, you will also need:
- milling cutter;
- sander;
- rotating miter box (allows you to make precise cuts at the desired angle).
Decoration nuances
DIY transformable benches can be decorated in a variety of ways. The decor on the seats and backs of the benches looks quite interesting. To apply a picture or pattern, you can use acrylic paints. Images made using the decoupage technique look nice. Patterns made with an electric burner are very effective. Drawings and ornaments carved on wooden beams will seem very interesting. In homes where small children live, it is important to decorate benches with figurines of animals and fairy-tale characters.
In fact, under any conditions it is necessary to pay attention to the external beauty of the benches. They don’t necessarily have to have a pattern on the back or seat
Metal benches can be decorated with a forged pattern of thin iron rods. Such decoration will add a little weight to the structure, but it will still look elegant. It’s not bad when the decor of the bench matches the general appearance of the yard and outbuildings. First of all, this is expressed in the color palette of the bench and the edging of the beams used.
To learn how to make a transforming bench with your own hands, see the following video.
How to make an outdoor table with your own hands
A bench with a table with your own hands is considered an ideal option when arranging a recreation area in or near a gazebo. For this you will need:
- boards of standard sizes;
- metal studs with washers and nuts for connecting individual parts of the table;
- timber
The process of making a table and benches for a summer house with your own hands is as follows in detail:
- Seats are made according to the existing drawing. The boards are cut into the required lengths (necessarily in double quantities, since there should be two benches). The wood is then sanded, paying special attention to the ends. Short sections (used to hold the seat boards together) are cut at a 45 degree angle.
- Next, the structure is assembled and attached to the bottom of the seat.
- Then we add legs to the obtained result, which are fixed with nails or self-tapping screws, and all parts are tightened with studs and bolts.
- Next we attach the seating boards. They should not be nailed close to each other, but gaps of at least 5 mm should be left. This will prevent rotting and damage to the wood under the influence of heavy rainfall. The seating boards are nailed to the supports.
- The finished seats are secured with four boards.
- Next, the legs are attached using pins.
- Now you can start assembling the table. To do this, the transverse boards for making the tabletop are cut at an angle of 52 degrees. They are attached at such a distance that the table legs fit.
- Then we move on to assembling the legs - crosses. To do this, take two boards and cross them. The intersection of the boards is marked with a simple pencil. At this point you will then need to remove the wood to half the thickness of the board.
- We do the same with the second board. To check how correctly the work was carried out, you need to fold the legs together and they should be in the same plane. Now you only need to connect them with nails, and you can begin installation on the previously prepared structure.
- The final step is installing the countertop. It is attached to the product using metal pins.
Choice of modification
Among the variety of models of multifunctional furniture, tables are in particular demand. They are presented in various modifications and forms. According to their purpose they are divided into:
- For magazine work. With the help of a special tabletop and a smooth transformation mechanism, an ordinary table can easily be turned into a work desk, reminiscent of a school desk. The fastening system is designed for several different positions, allowing you to take the desired height. The furniture is equipped with convenient drawers for storing books and stationery.
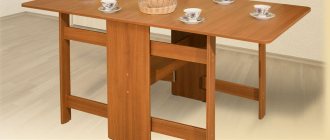
- Dinner-magazine. This is the most common option, indispensable for small spaces that do not have a separate dining room. It stays folded most of the time and takes up little space. But when guests come, it can be easily expanded to create a full-fledged dining table that can accommodate up to ten people.
- Storage table. Compact design that hides storage space for household items from prying eyes. Consists of a table top and several drawers underneath. Once assembled, access to them is blocked. It opens if you rotate the tabletop around its axis.
- Picnic table. Has many modifications. This is the most common item that is most often made by hand. The tabletop can be rotary, round or rectangular. It is attached to frames that make it easy to move the structure into the desired position.
Making transformable tables with your own hands is not at all difficult. Without any skills, you can start with a picnic product. It has the simplest assembly scheme; any material will do. And after practicing, you can proceed to more complex furnishings. At the same time, choose a design that you really like, and not the one presented in the store.
Examples of DIY table decors, an overview of the best techniques
Journal-worker
Lunch-magazine
Storage table
For a picnic
How to treat a wooden table outdoors
A wooden bench table with your own hands needs to be properly treated with various antiseptics and impregnations so that it can serve its owners for as long as possible without losing its original technical qualities and appearance.
After making a wooden table and bench with your own hands, the furniture will need to be treated with an antiseptic to prevent it from rotting. It is also advisable to additionally protect the wood from pests (insects and rodents), and it would not be a bad idea to treat it with fire-prevention impregnations. And only after all these measures, the table with benches can be covered with stain to emphasize the impeccable texture of the wood, and covered with waterproof varnish in several layers.
As can be seen from all of the above, it is quite possible to make a table for a summer house yourself if you have a little skill in carpentry. With a little effort, you will have functional, practical and durable furniture in the recreation area so that you and your family can barbecue and simply relax in nature on warm summer evenings.
