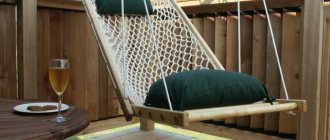
Making such a piece of furniture is easy and simple with your own hands. To do this, just choose the most suitable type of design, stock up on consumables and free time.
Peculiarities
The features of the hammock chair include:
safety and environmental friendliness (due to the use of natural and non-toxic materials);- original design;
- simplicity and ease of use;
- Possibility of use at any time of the year;
- ease of care;
- long service life.
A hammock chair is a soft version of a hanging structure . On soft pillows that sway from side to side, it is pleasant to spend summer evenings in the fresh air.
Advantages
The advantages of a hammock chair include::
- Wide selection of models. Such products differ in shapes, designs, colors, and materials of manufacture. Some chairs are something like a cocoon, others are a product with a soft fabric seat.
- Possibility of self-production. To do this, you will need to use minimal sewing skills and prepare supplies.
- A hammock chair can be framed or frameless. Both models do not have sharp corners or parts, which makes them popular among small users.
- The textile can be easily detached from the product and washed in an automatic machine.
Device
A hammock chair, as a rule, has a fairly simple design . It consists of:
Fabric seat. For these purposes, a tight cut is most often used.- Crossbars, which serve as a strapping element and distribute the load. The seat is tied to the crossbar.
- Sling. To do this, use a strong rope or braided cord.
- Suspension. For these purposes, chains for ceiling mounting or rings with a spring are used.
Hanging hammock chair using macrame technique – master class
I'll show you a very simple model. In fact, it is no different from a full-fledged hammock in which you can lie. But there is also a difference - this is how the strips are attached. They are not placed horizontally, but one is fixed above, the second below. Between them there are wooden slats that connect the upper and lower base and allow the structure to be stable.
A few words about the quality of the threads. The fact is that the main emphasis will be on the lower part. Therefore, the threads should not stretch too much; ideally, if it is a thin cable or dense synthetic rope, then the hammock will not stretch quickly.
What else do we need:
- Planks (1.6-2cm) – 2 pcs.;
- Reiki (0.6-1cm) – 2 pcs.;
- Rope for weaving – 125-130m;
- Clothesline for fastening – 4m;
- Screws and drill.
Making crafts.
We make 2 holes on each edge of both planks. One is at a distance of 2, the second is 3.5 cm.
We insert thin slats into those holes that are closer to the edge. And this is how all 4 wooden bases are connected.
We hang a wooden base to make it easier to weave. We cut the rope into 8m lengths (into 16 pieces).
Fold the rope in half. We leave the loop in front of the bar and fold the edges over the bar. We thread the edges into the loop.
This is how we fasten all 16 ropes.
Distribute all loops evenly over the base.
We take the first 4 ropes (from 2 loops) in our hands. We bend the rope on the far right at a right angle, place it on the 2 closest ropes and thread it under the one on the far left.
We pass the left rope behind the two that are nearby and thread it into the loop on the right, which we formed when we bent the right rope.
Lightly tighten the knot. We do this with all the ropes.
To make the second row, step back about 7cm. We skip the last 2 ropes. We take the next 4 ropes in our hands and do the same with them as we did in the previous row: we throw the rightmost one over the leftmost one; We pass the left one into the right loop.
And so the whole series. We weave until we have ends of ropes of about 20 cm.
We tie the edges tightly on the bottom bar.
The chair is ready! All that's left is to hang it up.
We cut the clothesline into 2 halves of 2m each.
We thread the ends of the clothesline into the holes at a distance of 3.5 cm from the edge.
We make strong sea knots at the ends of the ropes.
All! Let's hang up our chair! Simple, fast, and we are guaranteed a wonderful holiday!
Materials
A hammock chair can be made from different materials:
- rattan or wicker;
- with a base made of plastic or acrylic;
- made of thick textile without frame;
- non-standard models in the form of a drop.
Attention : when using the product outdoors, durable and wear-resistant materials are selected. They must cope with negative environmental factors and be resistant to rain, direct sunlight and ultraviolet rays and temperature changes.
As for the materials used to make the hammock chair, the type of construction and model are taken into account . The most common are:
Macrame. In this way, the products are decorated on a hoop, which is braided with a silk cord that is soft to the touch. Using this method, original products with fringe and various decorative elements are created.- Tarpaulin.
It is a fairly durable material and is perfect for outdoor use. The tarpaulin can withstand heavy loads up to 300 kg. It is not afraid of sudden changes in temperature, increased moisture, or direct sunlight. Its only drawback is the small selection of color palettes . This model will look harmonious on the veranda, in the garden or gazebo. - Textile. For these purposes, dense fabric is selected that can withstand weight up to 150 kg. Also, the selected material should not stretch or deform during operation. To increase the strength of the material, it is recommended to fold it in two layers. You should avoid light and easily soiled colors . Especially when using the product outdoors.
How to make a hammock with your own hands
General rules
Mexican hammock
Despite the fact that the Mexican hammock in the countryside easily turns over, falling out of it is not so easy. After all, it embraces a person from all sides. A Mexican hammock is more comfortable than a Brazilian one and allows all muscles to relax better.
To make it, take 2 pieces of durable fabric 1.5x3.2 m. The fabric is sewn according to the instructions below.
When tying, you can use such knots.
Mounting options for home
The type of fastening of a self-made product can be:
Ceiling. To do this, use a hook attached to the ceiling. A chain is attached to it, which will hold the product. With such a model it will be pleasant and comfortable to swing from side to side.- Axial.
This option is also attached to the ceiling. But additional slings are installed on the sides of the seat, attached to the walls or ceiling. It will not be possible to swing on such a product like on a swing; the seat will only rotate around its own axis . - Shtangov. For this purpose, a special curved stand with a ring stop at the bottom is used. A suspension consisting of a ring and a spring with a chain is mounted at the top of the rod. This option is durable, reliable and stable.
- In the form of a platform with a double suspension. It is a strong and stable base equipped with sidewalls. This type of fastening is suitable for installing a spacious double chair.
- With a crossbar, at the ends of which rings with cords and a suspension are put on.
Step-by-step instructions on how to make it at home
You can make a hammock chair in different ways. Each individual option is unique in its own way. It could be:
Tools
To make a hammock chair you will need the following tools:
How to weave hanging macrame step by step?
To make it you will need the following materials:
As for the choice of cord for braiding, it is better to use a cord with a thickness of 4 mm .
The manufacturing process is as follows: Next, a hook is mounted to the ceiling, onto which a chain for the hammock is attached.
Hoop swing
If you don’t know how to work with the macrame technique, you can make a hammock chair from fabric. This is a simpler and more convenient option. To do this you will need to use:
The manufacturing process will look like this:
To make the product easily adjustable in height and tilt, we thread metal buckles into the free ends of the tape . The slings are assembled into a special iron ring and attached with a carabiner to the crossbar or ceiling.
Master class on fabric cocoon
Beginners are advised to start making a hammock chair with a simple and frameless design. The manufacturing process is as follows:
The product can be hung on two durable carabiners or on a wooden plank in the garden or in the house.
If you try hard, the result will definitely please you:
Scheme and drawing
Before you start making your own hammock chair, you will need to make a drawing of it. To do this you can:
- Use options found on the Internet. Among their variety, each person will choose the option that suits them, which can be modified according to their own preferences.
- Draw a diagram of the future product with a pencil on paper. For this option, you must be able to independently determine the dimensions and calculate every detail .
Weaving a hammock from linen thread (rope)
The clothesline has special strength and is not afraid of moisture and the scorching sun. That is, a hammock is great for a summer house; hung it and let it hang all season! This is a huge advantage of the material, namely, clothesline. But the thickness of such a rope is greater than that of a cord, and therefore it is not so convenient to weave. But it's economical! You will need less thick rope than thin yarn.
The simplest and most convenient way to weave clothesline is a net.
It's very easy to do.
- We tie a rope to the bar.
- Then we connect the ropes that are nearby. We tie them in a knot.
- We go lower and tie a knot in the ropes that are nearby, but were previously tied to neighboring ropes.
And so on to the very bottom. At the bottom we thread the rope through the holes of the plank and secure it with knots.
This hammock is made very quickly! But for complete comfort it should be equipped with pillows and bedspreads.
What do we need
The necessary consumables can be purchased at the nearest hardware supermarket, as well as tools. If you already have the necessary tools at home, expenses will be minimal .
Here's what you'll need in terms of supplies:
- Three wooden cuttings with a diameter of 3 cm and a length of 1 m;
- Two wooden cuttings with a diameter of 1.6 cm and a length of 1 m;
- Four wood screws 2.5 cm long;
- A skein of polyester rope with a diameter of 0.5-0.6 cm, a length of 180 m;
- A coil of rope is 1-1.5 cm in diameter, 6 m long.
You will also need the following tool:
- A centimeter, or better yet, a tape measure;
- Ruler;
- Pencil;
- Tailor's scissors;
- Three clamps;
- Bulgarian;
- Flat and round file;
- Drill + wood drill bits 16 and 4 mm;
- Crosshead screwdriver.
However, if you have a utility room at your dacha, it’s probably already full of such tools, and finding everything you need won’t be difficult. It is better to do all the work on a large table with dimensions of about 1.5x2 m.
Attention! Don’t forget about safety equipment – safety glasses and gloves.
Video description
To properly hang a hammock, you should definitely watch the following video:
Hanging a hammock is a very important procedure on which your safety directly depends.
On verandas and in rooms where it is possible to easily reach the concrete floor, a hole is drilled in the ceiling into which a high-strength steel bolt is inserted. The chair itself is already installed on it, using a ring or hook. Even a wooden hammock can be secured in this way.
It is very important to reliably strengthen the structure on the ceiling Source pinterest.com

