The front of any wardrobe is sliding doors. They are the ones who shape the appearance of the furniture. Finished products are produced in certain sizes and do not always meet the needs of homeowners. For someone who has already dealt with making furniture at home, it is much more profitable to make a sliding wardrobe yourself according to your own dimensions. After the cabinet body is ready, the most important phase of the work begins - assembling and installing the doors for the sliding wardrobe with your own hands.
Components of sliding wardrobe doors
Materials and sizes
The dimensions of the door leaves depend on the length and width of the cabinet opening, the size of the sliding system components and the number of doors. Typically, 2 or 3 sliding doors are placed in the opening. You can make their exact calculation according to our instructions.
The length and height of the opening is the basis for calculating doors
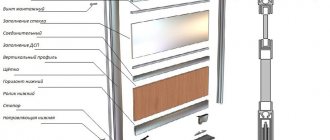
An extensive range of products for furniture manufacturing will make it possible to select everything necessary for the production of doors according to individual drawings and detailing. Aluminum profiles are used for the canvas frame and guide rails. The materials for filling door frames are usually mirrors, chipboard and MDF sheets. In some cases, craftsmen use decorative plywood, sometimes they create canvases from laminated parquet.
Expert opinion
Alexander Didenko
Furniture assembler at Mabaks
Often one of the doors is made completely mirrored, and the other panel is made blank. In combined frame fillings, mirrors are combined with other materials. The advantage of assembling doors with your own hands is that the master can beautifully arrange the fragments of the frame filling in one order or another.
Types of sliding systems
To decide on the design of the door block, you need to know the main differences between sliding systems. There are four groups of them:
- Coupe. The simplest type of mechanism. Easy to do yourself without complicated tools.
- Radius. It is impossible to assemble such a structure without experience and specialized tools.
- Cascade. The complexity of the system is not inferior to the radius.
- Harmonic. The simplest hinged door, sliding on top rollers. The disadvantage is poor vapor and sound insulation.
All sliding systems are based on rollers and a guide profile, but differ in the way the sash moves :
- Along the wall. The best option is to make compartment doors yourself. Disadvantage: free space is required on the wall adjacent to the opening.
- Driving inside the partition. It is more difficult to make such a design. The advantage is saving space along the wall.
- Retractable. The principle of operation is similar to a system where the sash moves along the wall, but special fittings allow it to change its position. Disadvantage: it’s difficult to make and expensive.
Any sliding system consists of a set of rollers, guides, and rails. The mechanism differs in the material of manufacture :
- Steel. For an interior door, a system made of this durable material is chosen. The mechanism is designed for heavy loads. Disadvantage: loud noise.
- Aluminum. Guides from this material are chosen if you need to make a lightweight sliding partition from polycarbonate, plastic, or glass. Advantage: quiet operation.
- There is even a plastic mechanism . It is usually used on accordion folding doors. The frameless device is attached to the frame of the doorway. The sash moves on the upper rollers.
An aluminum guide and steel rollers are often used. This mechanism is inexpensive, but long-lasting.
Preparing door assembly
How well the doors for the sliding wardrobe will be made depends on how the preparation of furniture assembly is organized. It is necessary to purchase materials and prepare tools.
Materials
- Draw up a specification of parts, moving parts and hardware (screws), focusing on calculations with drawings.
- Do this for one door.
- The quantity of all components should be doubled or tripled depending on the number of sliding wardrobe doors. Theoretically, there could be more doors, but in practice this is impractical.
Based on the specifications, purchase all parts. There are times when, when planning to install one type of sliding system, they find a slightly different design on sale.
To prevent this from happening, you should do it in reverse order. First, study the range of component parts and assemblies, and include their parameters in the basic data for calculating cabinet door rails. After that, according to the finished specification, purchase everything you need.
It should be noted that large shopping centers equip their departments with cutting equipment. In order not to suffer at home with marking and processing materials, you can do it all in the store. Door leaves will be cut from sheets of mirrors, chipboard and MDF, and an aluminum profile of the required length will be prepared. Cutting silicone sealant and schlegel yourself is not difficult.
Tool
If you still decide to make the doors completely yourself, then you need to prepare the following tools:
- tape measure, metal ruler and square,
- drill-driver,
- jigsaw,
- metal hacksaw,
- screw driver,
- level and plumb,
- scissors and cutter (construction knife).
Steel
Durable and reliable material. Costs less than aluminum. What's the catch? The difficulty of installing steel structures. It is problematic to cut steel guides to fit the required size, and the rollers, moving along the steel guide, emit a characteristic noise.
The best option would be to install aluminum guides in combination with steel rollers. This way, a balance will be maintained between the lightness of the structure, its strength and low noise level when opening and closing the door.
Steel guide
Step-by-step instructions for assembling sliding doors
- The cabinet opening guards are checked for correct horizontal and vertical position using a level and plumb line. Deviations are eliminated. (link: DIY wardrobe)
- Aluminum profiles are marked with a tape measure and a marker into the required sections.
- Cut the profiles with an ordinary hacksaw for metal. Make very carefully so that the cuts are strictly perpendicular to the longitudinal axes of the aluminum parts.
- Mounting holes are drilled in the frame racks from the outside. Two holes are made at the bottom - one for fastening to the lower frame bar, the other for fastening the rolling mechanism (roller). One hole is made on top for installing a self-tapping screw.
- Install the upper and lower guide strips. Using a narrow drill, drill holes through the profiles in the cabinet slabs. Then the rails are secured with self-tapping screws and a screwdriver.
- Spring stoppers are inserted into the groove of the bottom bar on both sides.
- Mirrors of the required size are cut out with a glass cutter or entrusted with this work to a master.
- Sheets of laminated chipboard or MDF are marked with a marker.
- The canvas is cut out with a jigsaw. If possible, it is better to do this with a band saw or circular saw.
- A silicone tape is placed with a groove around the perimeter of the finished filling. At corner joints, excess silicone is cut off with scissors.
- One rack is fastened with a self-tapping screw to the top bar of the frame.
- A canvas or mirror is inserted into the corner of the frame.
- Attach the bottom bar to the side handle so that the blade fits tightly into the groove.
- After this, the frame is closed by installing a second rack.
- Before final tightening of the screws, the brackets of the upper horizontal rollers are inserted under their caps. The fasteners are tightened with a wrench.
- Set screws secure the two lower support rollers into the groove of the lower frame rail.
- The buffer tape (schlegel) is pulled into the side grooves of the racks, after first removing the protective strip from the self-adhesive base.
- Schlegel closes the mounting holes. The top and bottom of the schlegel can be secured with special clamps.
- In the case of assembling a combined filling, the upper, middle and lower strips are attached to one rack.
- Fragments of filling are inserted into the grooves of the frame from the side.
- Then the second stand is attached to the transverse bars.
Rear mount
This stage can be considered the final one. The rear wall of the cabinet is usually made of HDF, the thickness of which is from 3 to 4 millimeters. It is fastened with the help of furniture nails, already supplied with the purchase of the cabinet, or special screws of small sizes 4*16 and lining corners. Of course, a more reliable and stronger option is screws with backing corners; they will securely fix the back wall and will not allow it to fail, unlike furniture nails. Therefore, when purchasing a cabinet, you will immediately be sure which components are included in the furniture assembly.
We attach HDF along the entire back of the cabinet body, to its internal partitions and tightly fixed shelves, this will give the back wall greater protection.
You can assemble the back part in the early stages, when the cabinet is still lying down, but it is best to leave it at this stage so as not to spoil the thin wall.
Door installation
First place the door on the internal rails. The second door is installed on the outer path. If there are three sliding fences, then two of them are placed on rollers on the internal tracks, and the third door is placed on the external rails. You can do the opposite, but in the first version the facade of the sliding wardrobe will look more beautiful.
Installation is carried out in the following order:
- the door is rolled with horizontal rollers into the opening of the upper guide rail
- press the support rollers with your hands, bending the springs,
- the rollers are installed on the lower guide bar,
- If there are violations of the correct movement of the sliding system, the mechanisms are adjusted.
Making a canvas
For example, we will consider the size of the canvas with a width of 180 cm. If 2 sashes are planned, the length is divided in half. When each half is installed on different rails, the width of the leaf is increased by 10 cm (5 cm for each sash). This is necessary to overlap one half of the door with the other.
To make compartment doors stronger and stiffer, a metal profile is installed at the ends of the door leaf. The roller is mounted next. At a distance of 10 cm from the bottom edge of the canvas, a recess is made using chisels or a milling machine. A roller system is installed into the finished landing groove and secured with self-tapping screws. The mechanism is adjusted after the door is installed in the opening.
To make handles, cut out a recess in the canvas. The groove is made at a distance of 3-5 cm from the edge of the door, drawing a vertical line with a pencil using a construction corner. The wood is selected using a chisel or milling cutter, and the edges are rounded with a crown drill. Everything should be done carefully so as not to damage the canvas. A hole of the required diameter is drilled under the fastening pin. After the preparatory work, the handles are installed and connected with a bolt on both sides.
Types of door fastenings
In addition to the rail type of fastening of door panels, there are suspended structures and accordion doors.
Hanging mount
The hanging system is that the cabinet doors are suspended from the upper guide profile. The rollers of the canvas move in a horizontal groove of a duralumin strip fixed to the top plate of the built-in wardrobe. The bottom of the sliding fence can be free or have plastic tabs that slide along the track of the bottom guide bar.
The suspension is used for small cabinets in utility rooms. The leaves are made from cheap materials for lightweight doors. The design of this type of fastening does not imply intensive use. The advantage of the suspension system is ease of installation and low cost of the materials used.
Top roller sliding door system
Harmonic
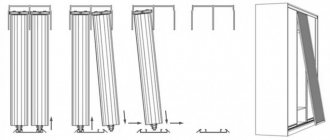
The system resembles the operating principle of window shutters. Narrow canvases are connected to each other by piano hinges. The bottom and top of the doors are equipped with horizontal rollers that move in the grooves of the guide strips. Accordions are convenient to install in built-in wardrobes.
The advantage of this type of fastening of canvases is that by sliding the “shutters” apart you immediately gain access to the entire contents of the cabinet volume. Sheets of any durable material are used to fill door frames. Canvases made from laminate flooring panels can add a unique twist to the interior of any room.
If you have the desire and a little experience working with tools, manufacturing and assembling sliding doors for a sliding wardrobe will not seem out of reach. Carrying out such work independently will make a significant contribution to the accumulation of experience in the manufacture of furniture of decent quality.
Preparatory stage
When making a wardrobe, you can accomplish two tasks at once: filling an empty niche in a living space and creating a functional place for storing clothes, linen and other things.
For example, you can install a wardrobe in the attic of the second floor. This technique will solve the problem of storing household utensils and will allow you to close one of the inclined walls that the roof forms.
If there is an empty niche in the room, then you have probably already chosen the place where the built-in wardrobe will be located, i.e. you already have an idea of what size the wardrobe will be, you know its length, height and depth.
If the space for a furniture structure is not limited, then in order for the cabinet to look beautiful, it is necessary to be guided by the rule of the “golden ratio”; the ratio of height to width, according to this rule, should be 1.62 or close to this ratio. Then the cabinet will look beautiful.
Drawings with dimensions and calculation of the number of parts
Here we will consider the process of manufacturing a cabinet with a depth of 520 mm, a height of 2,480 mm and a width of 1,572 mm (calculated according to the “golden ratio” rule, taking into account the height of 2,480/1.62 = 1,531).
You need to design a wardrobe according to the “golden ratio” rule
Considering that sliding doors are not recommended to be made wider than 1,000 mm and the overall dimensions of the structure, in this case two doors with a rough size of 2,480x785 mm are provided. If you plan to make the closet wider, then the number of doors may be larger.
It is not recommended to make the depth more than 600 mm, since with a greater depth it will be very inconvenient to use the shelves, especially the top ones - it will be difficult to reach things.
Choosing internal filling
Once you have decided on the overall dimensions, depth and number of doors, you need to figure out the internal contents of the cabinet, i.e. partitions, shelves and their location.
Here you need to take into account your preferences and the location of the structure.
For example, in the hallway closet you need to provide a large compartment for outerwear, which can be hung on hangers at the entrance to the apartment.
If the closet is planned to be placed in a living room, it would be more logical to provide a large number of shelves for bed linen and towels. Also, for ease of use, it would be advisable to think about drawers. For beauty, you can finish the end with attached rounded shelves.
To simplify the design process and save time, use special programs.
If you have a drawing that you have thought through to the smallest detail, it will be much easier to make a cabinet
It will be convenient to use this same drawing later when marking the location of shelves and partitions on the wall, assembling the cabinet at the installation site.
To carry out this operation, it will be more convenient to put the dimensions in a “chain” as in the screenshot below. This will eliminate the possibility of making mistakes when determining the dimensions of parts. It is assumed that the cabinet is made of particle board (chipboard) 16 mm thick.
The drawing should always be at hand
Moreover, if you are making a cabinet with a height from floor to ceiling, then it is advisable to add 5-8 mm to the dimensions of the parts of the vertical group (here these are parts No. 5 and 6). This must be done in order to compensate for uneven floors and ceilings. When installing these parts and assembling the cabinet, it is better to slightly adjust their length on site than to end up with an unsightly 10 mm gap.
Of course, if you have a high-quality renovation, with a strict horizon line of the floor and ceiling, you should not do this.
Then a table of parts is compiled with the quantity, dimensions and indication of the sides that will be edged. The table will be useful when ordering cutting of all chipboard components.
Table: parts for making a cabinet
A table containing information about the parts will be needed for sawing
Parts 12 and 13, not shown in the dimensional drawings, are pads for the upper and lower guide strips of sliding doors. Their width (100 mm) is selected based on the width of the guide profiles, and their length is the internal width of the sliding wardrobe (1,572 -16 = 1,556 mm)
Columns 5, 6, 7, 8 indicate the side of the part that will be processed with edge tape, i.e. all front sides are indicated.
Sawing parts
After compiling such a table, everything is ready to place an order for cutting parts and processing edges. Firms providing this service have software that allows you to place parts on the sawn chipboard sheet with minimal waste (this service is included in the cost of cutting). At the same time, they sell chipboards of various thicknesses, colors and textures, and do edge processing.
Before ordering sawing, be sure to double check the quantity, size and location of the edges of the parts. Correcting errors in some cases, of course, is simple, but it also happens that, due to one small inaccuracy, an additional sheet of chipboard may be required to make a part, and this is expensive.
Features and installation procedure
You can install sliding doors yourself even without much experience. It is quite possible to do without installers. It will take a little time, and also installation instructions. We will try to give a detailed description of the process with photos and video materials.
Self-installation of sliding interior sliding doors
The systems may differ slightly, but the general rules remain the same. There are several requirements that must be met before installation:
- The opening must be level, otherwise you will have to take a canvas that covers all deviations with a margin.
- The load-bearing capacity of the sides of the doorway should be high, as should the wall above it.
- The opening must already be finished: plastered and painted, covered with wallpaper or decorated with decorative panels.
Next we proceed to assembly. First you can attach the rollers. Different manufacturers have their own recommendations. Some recommend retreating 1/6 of the width of the door leaf from the edge; in other systems, they are attached immediately from the edge, and the mounting plates provide the indentation. This is the system we install: in it, roller platforms are installed immediately from the corner.
Marking the installation location of the rollers
We center them, measuring so that the distances are the same. Having positioned the plate, use a pencil or marker to mark the locations for the fasteners. Drill holes in the marked places. The diameter of the drill is 1 mm less than the diameter of the screw.
Securing the Roller Shoes
We set the plates and screw in the screws. The length of the fastener depends on the weight of the canvas, but not less than 70 mm. We twist them exactly perpendicularly, otherwise unnecessary stress will arise.
Installation of rollers
Supports for the rollers are inserted into the installed plates. They are fixed with a lid on the side surface. Next, roller platforms are screwed onto the threaded pins.
Roller platforms are screwed onto the pins
It is also convenient to install handles and locks before hanging. They need special, mortise ones. If you bought a ready-made kit, the required holes are available. If you have used a regular canvas, you will have to trace the outline with a pencil and remove the excess with a chisel. After the handle or lock fits into the recess, the attachment points are marked, holes are drilled for them and the fittings are installed.
Handle installation
Next, you can begin installing the guide. With mounted rollers, this will be easier: you know exactly at what height the bottom edge of the rail should be.
The most convenient way is to hang sliding doors on a dry wooden beam. Its cross-section is less than 50*70 mm, its length is twice the width of the door leaf + 5 cm. We cut the guide to the same length.
We measure the length of the carrier and mounting bar
Having aligned the guide along the beam, it is attached to the beam with self-tapping screws no less than 8 cm long. The number of fasteners is at least three, departing 10 cm from the edges and in the middle (more often is possible, less often - not).
Attaching the guide to the beam
Now you can measure at what height to mount the timber. A guide with a beam is “rolled” onto doors with installed rollers. This way you can accurately note how tall the doors are. We drill at least four holes in the side edge of the beam for mounting to the wall.
The guide with the beam “rolls” onto the rollers on the door
Add 7-10 mm to the resulting mark - the doors should hang and not shuffle along the floor. 7 mm is the minimum gap, which is sufficient if there is no floor covering in the opening. If they are planned (later to lay laminate, carpet, linoleum, etc.), then the thickness of these coverings must also be taken into account.
Trying it on to the doorway
To prevent the canvas from “walking” during installation, it is wedged with small wooden wedges. At least two stops are required - near both rollers.
We wedge the canvas
Having placed the beam against the wall and adjusted its position using a level, we mark its position with a pencil. If the wall allows, you can fasten it to the wall through and through, but for this you need to use self-tapping screws at least 120 mm long, or better yet, place it on anchor bolts.
If the wall, for example, is concrete, the installation of dowels is required. To do this, you need to transfer the marks for the fasteners to the wall. This can be done using a thin and long drill, the diameter of which is smaller than the drilled hole.
Transfer the marks to the wall using a thin drill
An even simpler option: a long thin nail. It is inserted into the hole and a mark is made on the wall with a couple of blows. The following procedure is known: drill holes for the dowel plugs, insert the plugs, hammering them in if necessary. Then we install the doors.
Attaching sliding doors to the wall
Stoppers must be secured along the edges of the guide. They are inserted from the sides, the required location is established experimentally (so that the canvas covers the opening completely when closed, and rolls back sufficiently when opening. They are fixed using clamping screws.
Installing stoppers on sliding doors
Having opened the doors, we install the flag roller on the floor. It fits into a groove cut into the bottom of the blade. It is necessary to ensure that the doors do not deviate vertically.
Installing Flag Roller
First, we insert it into the groove, mark holes for fasteners, drill, then secure with short self-tapping screws (length about 15-20 mm).
This is what the installed flag roller looks like with the doors open
At this point we can assume that the sliding doors have been installed. They are already fully functional. Finishing work remains. The mounting beam with the guide is covered with a decorative overlay, matched to the tone of the door leaf. It can be nailed directly to the timber with finishing nails.
The decorative overlay can be nailed directly to the beam
Only when you put it out, make sure that the wheels are closed. It’s much more beautiful this way)) Now that’s it, you’ve installed the sliding doors with your own hands.
A video tutorial on how to install such a door is shown below. There are several installation options.
We install cassette-type sliding doors (in a pencil case)
The process of installing the guide and hanging the door leaf is almost identical to those described above. There is no need only for finishing, but all other stages are necessary. Instead of installing a decorative strip, a false wall is mounted at a distance of at least 10 cm from the wall. It is usually made from plasterboard profiles, which are covered with wall plasterboard. But this is not important - you can use gypsum fiber board or plywood, or any other suitable material.
Where does the distance of 10 cm come from? The thickness of the door leaf and the gaps on both sides are 5 cm. At least another 5 cm is added to this for installation of the profile. So it turns out to be 10 cm.
Since the main load will fall on the wall, the frame made of profiles need not be reinforced. If such a wall does not seem very reliable to you, you can insert wooden blocks inside, which are screwed with self-tapping screws. This will make the structure very rigid.
The basic principles for calculating a pencil case for a sliding door, as well as marking features and principles for preparing a doorway for installation, see the video.
Wardrobe design
Due to its massiveness, the wardrobe often appears as an awkward dark or light spot in the context of the room. This effect is only enhanced if the area of the room is small and the closet takes up the lion’s share of the area. In order to somehow hide the bulkiness of this object, designers are coming up with more and more new ways to decorate it, allowing the emphasis to shift away from its impressive size.
Single-color facades are suitable for apartments in a minimalist style
At the moment, several decoration techniques are considered the most popular:
- installation of mirrors and stained glass;
- use of sandblasting pattern;
- placement of photo facades;
- finishing with leather, bamboo and other non-trivial materials.
The combination of different types of textures is a characteristic feature of sliding wardrobes
We will talk about each of the above methods of working with the external appearance of a wardrobe in this chapter.
Mirrors
Installing mirrors is the most laconic and effective solution to the problem of massive cabinetry. This is why mirrored wardrobes are so often used when furnishing one-room apartments. Mirrored doors not only allow you to visually enlarge the space, but can also serve utilitarian purposes, since they allow a person to try on clothes without leaving the room.
Mirrored wardrobes work to visually expand the space
If you want to add personality to your wardrobe, then instead of ordinary mirrors, you can order stained glass with a specific pattern that will diversify the monotonous finish. However, such delights are usually made to order and are quite expensive, since they require manual work.
Sliding wardrobe with stained glass
Sandblasting drawing
This technique involves applying a design to glass using a jet of air and sand released under very high pressure. The sandblasting pattern leaves a residue on the glass, a bit like frozen frost on windows. Thanks to the use of this processing method, the resulting pattern looks very sophisticated and minimalistic.
Facade made using sandblasting technique
This option is perfect for those people who want to bring something unusual into the interior, and at the same time do not want to experiment with bright colors and large shapes. The cost of this type of work is high, but it can last for many years, so if you like this delicate and unobtrusive ornament, then this option is for you.
Photo facade
Using a photograph on the front of a wardrobe is a very bold and bright solution that instantly attracts attention. The colorful nature of such a product, however, leads to frequent errors in its use.
For example, a person takes the photo wallpaper he likes and places it on the closet, while in the context of the interior it looks like a completely inappropriate foreign spot.
Not only photographs, but also paintings can serve as a model for photo facades
Therefore, when selecting photographs, it is important to be guided not by their entertainment value, but by the color features that will allow them to fit into your room. It is also not recommended to select photographs with a lot of bright and small details - they will quickly begin to tire your eyes
To expand the space in small rooms, panoramic landscapes are usually used.
The photo façade motif can complement the overall style of the room
Natural materials
The use of bamboo, rattan and leather to cover the facade of sliding wardrobes is an innovation, and therefore quite rare. One of the main features of this technique is its high cost - sometimes ordering such textures can cost more than the cabinet itself. However, if desired, all these materials can be replaced with artificial analogues.
Combination of leather and mirror surface on the front of the wardrobe
As a rule, bamboo is used in most cases for “upholstery”, since it is most softly integrated into almost any interior and complements it with its woody motifs. If you want to settle on such an exotic option as leather, then you should make sure that it correlates with other leather products (for example, a sofa).
Sliding wardrobe with rattan and bamboo trim
How to independently calculate the dimensions of a sliding door
It is important to correctly take measurements from the doorway:
- Height. Measure the space between the threshold and the top crossbar of the opening. It is advisable to take several measurements, retreating 50-70 cm. Minor differences in heights of up to 15 mm are allowed - when ordering a door, rely on the smaller value. Make sure that the floor in the installation area is level - even with a slight slope, the sliding door will open/close spontaneously.
- Width. The width of the passage is also measured in several places, taking steps of 50-70 cm. An unevenness of a maximum of 20 mm is allowed.
When ordering, doors here, on the contrary, are based on the largest of the values.
Opening depth. The thickness of the wall in the passage is measured. Minimum - 82 mm. But to ensure the possibility of adjustment, a depth within 100 mm is still desirable.
Now it remains to calculate the main parameters of the future design:
- Door height = passage height - 4 cm (250 cm - 4 cm = 246 cm).
- Double door width = passage width + 26 mm / 2 ((1400 mm + 26 mm) / 2 = 713 mm). If there are three lines, then the amount is divided by 3, if there are four - by 4, etc.
In the case when you are installing a single-leaf structure, the calculations are even simpler: add 5 cm to both the width and height. This is enough for the structure to completely cover the passage. To find the required length of the guide, just multiply the found width of the blade by 2.


