Icer
13063 0 0
Icer March 27, 2018Specialization: master in the construction of plasterboard structures, finishing work and laying floor coverings. Installation of door and window units, finishing of facades, installation of electrical, plumbing and heating - I can give detailed advice on all types of work.
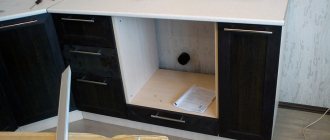
Today we will figure out how to assemble a reliable cabinet for an oven and hob. Almost anyone can do the job, the main thing is to have the necessary materials and tools at hand.
Assembling a simple nightstand for a hob and oven is not difficult
Kitchen set design
And so, the design of a kitchen set should begin with the creation of a fundamental design of kitchen furniture, i.e.
from determining the location of the sink, its size and plate. The location of the hood, cupboard, drawer for spoons and forks, etc. will depend on these two elements. As an example, we can cite the following aspects of organizing the kitchen workspace.
It is convenient to install a narrow pull-out basket (15-20 cm wide) on the left or right side of the stove at the bottom of the kitchen unit for oil, salt, etc.
At the top of the kitchen unit it is convenient to place a similar cabinet for spices.
It is convenient to place the dish drainer directly above the sink.
It is convenient to make a drawer for spoons and forks in the lower part of the kitchen to the left or right of the sink.
In general, before starting the actual design, it is important to sketch out a rough design of the kitchen set. If this is quite difficult to do, then you can apply for a project to some organization that produces custom-made furniture
As a rule, a design project is not expensive.
Once the rough plan is ready, you can begin designing the kitchen. To do this, it is advisable to use standard elements to determine the location of cabinets, both the bottom row and the top. The space that a standard cabinet does not fit into is filled with a non-standard one. In this case, a distance of 1-2 cm from the wall should be provided in case of compensation for unevenness of the walls.
Once the general plan is ready and the overall dimensions of all cabinets have been determined, you can begin to calculate the dimensions for ordering the parts of the kitchen set. At this stage, you should pay a little attention to the design of the cabinets.
conclusions
Ovens are a real miracle of technology. After built-in appliances without a cooktop appeared in the world, people now have the freedom to choose the location of this appliance. They are compact, they have more useful and interesting functions that will help you create culinary masterpieces.
Although such ovens require the purchase of special kitchen units, with a competent understanding of this issue, we can not only purchase comfortable and high-quality cabinets, but also create them with our own hands, having basic skills and the necessary materials.
In modern kitchens you can increasingly see built-in appliances. And this is not surprising. Integrated stoves and refrigerators, washing machines, dishwashers, microwave and UHF ovens into the kitchen unit allow you to save the work surface and manage the interior space of the cabinets more functionally. And, of course, they give a more holistic and harmonious look to the overall kitchen design. How to build an oven with your own hands? You should start with the correct layout of the kitchen unit.
Calculation of box dimensions for installation
The modular box will act as a kind of structural shell for the oven. Specific dimensions will depend on the characteristics of the equipment model, but there are recommended standards that correspond to most modifications offered on the market. In particular, the total height of the box, as a rule, is about 80-90 cm. It should be taken into account that part of this value will be allocated to the retractable bottom drawer and the legs of the structure. As a result, there should be approximately 60 cm left specifically for placing the equipment body. In terms of width and depth, the size is also in the range of 60-70 cm. At the same time, there are also compact models. To build in an oven of this type, at first glance, it is quite possible to get by with a small box. But even in this case, experts recommend adhering to the standard. Even if the appliance does not require the creation of a niche with parameters of 60x60 cm, the use of such a box will eliminate the need for further modification of the structure to fit other standardized kitchen appliances. And the free space in the niche itself can be used for other purposes.
Blueprints
In the accompanying documentation, manufacturers usually indicate the dimensions of the built-in oven and hob. If one is not available, take a tape measure and a ruler and measure the equipment yourself. Write down the data on a separate sheet.
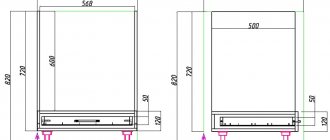
Find a drawing of the cabinet on the Internet. Print it on a printer. Compare the dimensions on the plan with your measurements. Usually the standard dimensions are the same. Otherwise, adjust the cabinet dimensions to fit your equipment.
Expert opinion
Alexander Didenko
Furniture assembler at Mabaks
You must understand that if the height, width and depth of the cabinet opening in the drawing are larger or smaller than your oven, then you need to add or reduce accordingly
cabinet parts dimensions
. After adjusting the dimensions, draw your drawing. When calculating the dimensions of the planes, take into account the thickness of the adjacent parts.
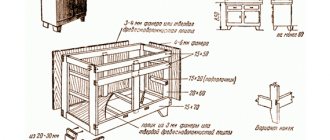
Diagram of the structure of a standard oven cabinet
Tool
To assemble the oven cabinet you will need the following tools:
- jigsaw for smooth cutting of chipboard without burrs;
- clamp for fixing parts;
- tape measure and square for marking holes for fasteners;
- screwdriver;
- screwdrivers;
- confirmat drill (countersink) and driver for installing euroscrews (confirmat).
Countersink, Euroscrew, plug and knob
Ergonomics
A cabinet for a built-in oven can be either a low floor-mounted module or a high cabinet-column, in which the equipment can be placed at any convenient height. This arrangement provides convenience, ergonomics and guaranteed protection from children (more precisely, children from technology). Many today choose the second option, but it should be remembered that it is not suitable for small rooms.
If the size of the space allows, tall furniture can significantly enhance the functionality of the kitchen. The closed lower and upper tiers serve as a spacious storage system and visually unload the facades without attracting attention. Blind doors are usually used for these modules. In combination with other cabinets they form a monolithic wall. The oven compartment must first be reinforced.
Installation recommendations
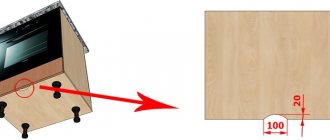
The physical installation does not require any special operations, but some nuances are still worth considering. The lower part should have a solid backing 2-3 centimeters in height. It must have anti-slip, fire-resistant and damping properties. Such materials are usually produced by the manufacturers of household kitchen appliances themselves. Direct fastening is carried out with screws, but not in all cases. If you build the oven into a cabinet on the second tier of the unit, then it is necessary to perform a rigid fixation, and to the wall itself. Floor installation usually does not require such actions.
Ventilation
Good ventilation is very important for ovens to function properly. It is important to take care of this before making the stove cabinet. For good ventilation, install the oven 60 mm from the wall of the unit, and the gaps on the sides and bottom should be approximately 5 centimeters.
Some cabinets are designed with a special gap between the back wall and the bottom for more efficient ventilation. It is important to take care of this to avoid damage to furniture, as well as damage to the oven itself. Carefully read the oven instructions before constructing the cabinet.
Connection Safety Tips
Not only its performance, but also the safety of the house as a whole depends on how correctly the equipment was connected. First of all, experts warn against any twisted connections. Although this is a simple, but unsafe way to connect wires. It is also not recommended to make direct connections between cores made of different materials, such as copper and aluminum. The oven can be properly installed and connected correctly only using screw terminal blocks. In addition, the wiring must be connected to the electrical panel through an automatic machine operating in a separate manner.
Connection from one cable of the hob and oven
What to do if there is neither the opportunity nor the desire to connect the oven with a separate cable from the panel board, but you still have wiring from an old electric stove in your kitchen or there is already a previously laid wire to connect the hob.
Is it possible to power the oven from it? It is possible, but here again certain rules must be followed:
The electric oven must have a separate circuit breaker
The power cable from the panel must be designed for the load of simultaneous connection of both the oven and the hob
Roughly speaking, the circuit breaker in the switchboard should be selected not according to the load of the devices, but according to the actual cross-section of the existing cable!
Here is the cable and differential circuit breaker you should have in your control room to simultaneously connect the oven and hob (the table shows their total power):
Remember that you cannot connect both kitchen appliances directly or through a terminal block at the same time if they are protected by one single circuit breaker in the panel.
Also, the option of installing a separate outlet on the oven, by unsoldering it from the terminals in the distribution box or directly from a powerful outlet through which the hob is already connected, does not help.
Installing a double socket, even in the factory version, will also not help in an emergency.
Why can't you do this, you ask? Because if the oven plug and cable are initially designed for a current of up to 16A, then it is not known what will happen if there is an overload with them or with the insides of the oven when you put them on a 25A machine, or even more so on 32A-40A.
The best and optimal option in this case is to place a small box behind the kitchen in which a 16A machine and an outlet are mounted.
Thus, the plug of the connecting wire of the oven can be safely connected to the socket, since it, in turn, is protected by a separate circuit breaker, with a rating lower than the machine in the panel. Here is a diagram of such a connection:
The power cable of the box is connected either by crimping or soldering directly to a powerful cable coming out of the wall. This can also be done through a separate terminal block.
The socket must be modular; it initially fits into such boxes.
This entire assembly (socket + automatic) can be easily connected to a common cable going to the hob. How to assemble and power such a box, watch the video:
Preliminary points
Hobs and ovens are available in gas and electric. Connecting equipment to the gas supply network requires the permission of a professional gas technician. Therefore, we will only touch upon do-it-yourself installation of electrical equipment.
Installation of the electrical connection point
First of all, the outlet should be located in close proximity to the cabinet. The open rear opening of the cabinet allows you to easily install the electrical connector on the wall at the back of the furniture. Since two pieces of kitchen equipment are quite powerful, install a socket with two sockets and grounding.
Hobs and ovens are not equipped with plugs. Therefore, decide for yourself whether to make an outlet for them. At home, I connected the panel cable in parallel with the oven to the power supply from the entrance through the terminal blocks. There is a separate 32 A circuit breaker in the entrance panel for this line.
Preparing the wires
If the three-wire cables of the oven and hob are not equipped with connectors, then you need to connect plugs with grounding terminals to them. The length of the wires must be such that it is possible to connect the equipment before installation and check its functioning.
Oven and stove connection diagram
Subtleties of installing household appliances in the kitchen
To create an ergonomic, functional and comfortable room, a built-in oven must comply with:
- operational safety;
- energy saving;
- easy cleaning after work;
- easy to use.
By the way, the equipment should take into account not only the parameters of the kitchen. The color scheme of the room deserves special attention. The main part of the household appliances of this plan is made of stainless steel. This allows technical devices to blend seamlessly with furniture, since the fittings are mostly chrome-plated. That is why such a universal option is ideal for a countertop.
How to choose an oven cabinet - what requirements should you make?
Built-in ovens can be:
- gas;
- electric.
Gas ovens are more expensive, but pay for themselves faster - gas is cheaper than electricity. However, the heat is not distributed so evenly in them and some products are not baked.
In any case, the furniture must be equipped with a ventilation system - a grille or special openings. Some models are made without a back wall.
Electric models are not economical and require high-quality wiring, but dishes in them are cooked evenly, for which they have received recognition from most housewives.
It is important to choose the right size of furniture. If this is an oven cabinet, then its height is usually from 65 to 80 cm
Depending on the design, this parameter includes:
- height of the oven box – 59.5 or 60 cm (standard);
- height of legs/base – 10-12 cm;
- tabletop thickness – 2-4 cm;
- drawer height – 10-20 cm.
The depth of the cabinet is from 50 to 65 cm, depending on the model of the built-in equipment. Of this, about 10-13 cm is the overlap of the countertop on the body, which is necessary for stable placement of the oven. Width varies from 50 to 120 cm.
Material
It is important to determine what you are going to assemble the cabinet from. For the manufacture of kitchen furniture, laminated chipboard sheets (LDSP) are usually used. But I recommend taking MDF. This is somewhat more expensive than laminated chipboard, but the modified boards are covered with a more durable and heat-resistant film.
For side racks and drawers, a sheet thickness of 10–12 mm is quite suitable. For shelves, due to the high load, it is better to take 16 mm sheets. Having different thicknesses of material in your workshop will save money. Otherwise, it is better to purchase sheets with a cross section of 16 mm.
Assembly
Using a hex wrench, we assemble the table using furniture screws, just like regular store-bought furniture or a children's construction set.
The middle shelf must be secured with screws.
It should not be placed on holders. This shelf is a structural element. Without it, the product will be shaky.
I didn't have enough furniture screws in my supply, so I used mounting angles to attach the top slats.
The last step is to screw the legs.
The table is ready. Now you can install the hob. Let's compare the result with the project.
Such a table for temporary purposes can be made from any material: non-laminated chipboard, plywood with a thickness of at least 12 mm, and even boards are also suitable.
Don't like to read? Then look:
If the article was useful to you, like and subscribe to the Xev Workshop . There is still a lot of interesting things ahead.
What to do
You can kill a flock of birds with one stone: save on electricity (after all, it is more expensive with gas), cook nutritious food and not spend money on buying additional stoves, immediately buy the one that will be installed in the future.
But how to use a hob without a kitchen set? This is what I want to tell you about and even show you.
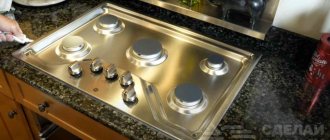
Gas hob
I purchased a two-burner hob AVEX HM 3022 RY in retro style for a cramped kitchen. Very beautiful. The surface is tempered glass in a soft beige shade, bronze switches. There is only one drawback - it doesn’t have legs to put on the table yet.
So I decided to make a temporary table for the hob from what I had. I am sharing the instructions. Working on your knees – everything is possible.
How to install an induction hob yourself: step-by-step guide
It is recommended to entrust the installation of an induction hob to a specialist. Sometimes it is done independently. First, they do the preparatory work: determine the size of the panel and the surface where the equipment will be built in (it should be wider and longer than a household appliance), markings are applied to it.
Markings are applied in two ways: apply the panel and trace it with a marker, or calculate and mark the mounting location. The second method is more reliable:
Then the landing hole is cut out. To do this, use a milling machine or jigsaw. The first one makes a better cut. To get a smooth and non-crumbling edge using an electric jigsaw, take a fine-toothed file. The procedure is as follows:
After cutting, the panel is inserted into the hole. If it went in without effort and covered the surface, then everything was done correctly.
Then the mounting hole is sealed to protect the tabletop from moisture: apply a thin layer of acrylic sealant to the ends of the hole. A sealing tape, which comes with the equipment, is attached to the top surface. It is glued around the perimeter of the hole in one piece. At the corners, the sealant is glued with a turn. The end and beginning are connected end-to-end, without gaps or overlaps.
Install the electrical outlet below surface level. It must be grounded.
After the preparatory work, proceed to install the device:
If the panel does not have a power cord, and only terminals for connecting an external cable are installed, do the following:
Installing an induction hob over an oven
The classic location of the induction hob is above the oven. To ensure that its operation does not affect the quality of the panel’s functioning, certain conditions must be observed.
When choosing an oven, pay attention to the fact that it has a forced cooling and ventilation system. It is built into the cabinet, like the hob
A gap of at least 1 cm is left between them to prevent overheating of the equipment.
The magnetic field is affected by objects made of ferromagnets. If the oven contains such material, it is placed at a distance of 3 cm from the panel - there is no longer a field there.
Further installation of cooking equipment is practically no different from installing a panel above the countertop:
To install the equipment correctly, study the operating instructions, which detail the sequence of actions for a specific model.
How to install an oven: steps
In order not to rack your brains over how to accurately install a built-in oven with your own hands, act according to a pre-developed plan.
Preparation of tools and auxiliary materials
In general, to quickly install an oven in a suitable kitchen niche, you will most likely need:
- drill with a set of drills and cutters;
- screwdriver or screwdriver;
- insulating tape;
- standard connecting terminals for wires;
- knife;
- a plug with a piece of cable of the required length, if the oven was purchased without them.
If it turns out that there is no electrical network connected to the installation site, ending with a suitable socket, you will have to take care of the method of laying it and masking the laid route.
Make sure there is an outlet for connecting the oven
Preparation of the workplace
When considering options for how to build in a new oven, you should take care in advance of having a niche that is somewhat larger than the size of the oven. There can be several ways to create it:
- provide an appropriate compartment when ordering a kitchen set;
- purchase a separate module manufactured specifically for built-in ovens;
- select a suitable compartment in existing furniture;
- make changes to the design of the existing cabinet by independently equipping the necessary niche.
The size of the gaps left was discussed earlier.
Important! Deviations of clearances in a larger direction are not as critical as in a smaller direction
Installation
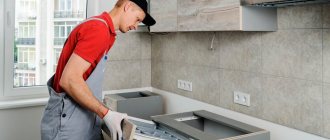
Before installation, you need to make sure that the cable with a plug can be connected from the oven to the outlet intended for it. If there is no corresponding hole in the back or side wall, you must carefully make it yourself using a drill or jigsaw.
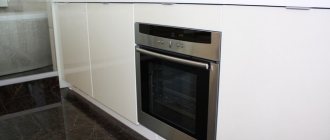
The oven is installed in a niche in accordance with the requirements of the instructions supplied with the product. It can stand on adjustable legs or be attached with special screws to the side walls of the compartment allocated for it. In this case, its front panel with the door becomes an integral part of the interior
During the installation process, it is important to ensure a horizontal position of the device and reliable fixation
Connection
The stage of connecting the oven is usually combined with its installation, since after final installation, access to the rear wall of the device is most often impossible. There are two ways to connect electrical equipment to the electrical network:
- directly;
- through a plug-socket connection.
Marking electric oven cables
In the first case, it is recommended to use standard terminals designed for suitable power. The second option is more preferable. Ovens are usually sold with an existing power cable ending in a standard plug. Otherwise, you will have to make it yourself by connecting to the corresponding sockets inside the oven body.
During the connection process, it is important to correctly secure the grounding wire to the terminals intended for this purpose on the oven body, in the plug, socket and on the input panel. To eliminate the possibility of error, it is painted yellow or green in three-core cables
Carefully! Electrical connections of powerful household appliances using twists are not allowed. Direct contact between aluminum and copper should be avoided
Professionals use soldering or screw clamps.
Functionality check
Any installation must end with startup tests. Before turning it on for the first time, it is recommended to carefully remove any remaining grease from the internal surfaces of the oven chamber using a clean and slightly damp cloth. The test run takes place for 30 minutes at a temperature of 250 °C without placing food in the oven. The appearance of a faint burning smell and a little smoke is not evidence of a malfunction. Most likely, it is the factory oil burning out.
After installation, you must start the oven
It is advisable to check the equipment in all modes provided for in the instructions. At the same time, the operation of indicators and useful functions is checked. If no deviations are noticed, you can begin operation.
Types of structures
There are several types of cabinets for installing ovens:
- Cabinets. In this type of design, ovens are built in at eye level, and spacious cabinets are installed below for storing various kitchen utensils.
- Under the hob. Such devices are more like the classic version of ovens combined with stoves. They are less convenient than pencil cases, because when cooking you need to constantly bend over, which brings some discomfort. There may also be problems with cleaning the oven. But they have advantages in some situations. For example, in small kitchens it will be difficult to install a large cabinet for the oven. Also, this design is suitable for those who concentrate all the cooking items in one place.
Hood
10. All types of hoods work the same
There is an opinion that a dome hood is a priori more powerful and cooler than a built-in hood. In fact, what’s cool is when the hood is matched to your room, as well as the expected intensity of cooking. In all other respects, the operating principle of all hoods is absolutely the same. And the choice is based only on your personal preferences. If you want to hide it out of sight, take the built-in one. If you plan to make it a cool design accent, look at domed or hanging ones.
11. Recirculation hood does not remove odors
If you do not have a connection to the main ventilation and think that a hood with carbon filters will save you, do not be fooled. It can solve the issue of grease and carbon deposits on surfaces, and also cleanse the air of impurities. But the smell won't go away. And if you decide to cook something very fragrant (or not so), it will smell the same.
